

User manual, English (US)
Page 3
... by one or more of cable entry as possible. All rights reserved. Features • A-B Repeat Play • Automatic Channel Setup • Automatic Head Cleaner • Automatic Tracking Adjustment • Blue Background • Closed Caption • Daylight-Savings Time • English or Spanish displays • High Quality (HQ) System • One-Touch Recording • Real-Time Counter • Remote Control or Front Panel menu access • Repeat Play • ShowGuardTM - This equipment...
... by one or more of cable entry as possible. All rights reserved. Features • A-B Repeat Play • Automatic Channel Setup • Automatic Head Cleaner • Automatic Tracking Adjustment • Blue Background • Closed Caption • Daylight-Savings Time • English or Spanish displays • High Quality (HQ) System • One-Touch Recording • Real-Time Counter • Remote Control or Front Panel menu access • Repeat Play • ShowGuardTM - This equipment...
User manual, English (US)
Page 4
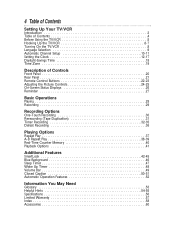
... Using the TV/VCR 5 Hooking Up the TV/VCR 6-7 Turning On the TV/VCR 8 Language Selection 9 Automatic Channel Setup 10-11 Setting the Clock 12-17 Daylight-Savings Time 18 Time Zone 19 Description of Controls Front Panel 20 Rear Panel 21 Remote Control Buttons 22-23 Adjusting the Picture Controls 24-25 On-Screen Status Displays 26 Reminder 27 Basic Operations Playing 28 Recording 29 Recording Options One-Touch Recording 30 Rerecording (Tape Duplication 31 Timer Recording 32-35 Defeat Recording 36 Playing Options Repeat Play...
... Using the TV/VCR 5 Hooking Up the TV/VCR 6-7 Turning On the TV/VCR 8 Language Selection 9 Automatic Channel Setup 10-11 Setting the Clock 12-17 Daylight-Savings Time 18 Time Zone 19 Description of Controls Front Panel 20 Rear Panel 21 Remote Control Buttons 22-23 Adjusting the Picture Controls 24-25 On-Screen Status Displays 26 Reminder 27 Basic Operations Playing 28 Recording 29 Recording Options One-Touch Recording 30 Rerecording (Tape Duplication 31 Timer Recording 32-35 Defeat Recording 36 Playing Options Repeat Play...
User manual, English (US)
Page 5
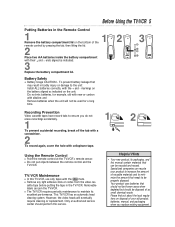
... remote control and the TV/VCR. Using the Remote Control q Point the remote control at the TV/VCR's remote sensor. Before Using the TV/VCR 5 Putting Batteries in the Remote Control 1 1 Remove the battery compartment lid on disposal of your product to increase the amount of reusable materials and to minimize the amount that needs to be properly disposed. Recording Prevention Video cassette tapes have record tabs to the unit: Install ALL batteries correctly, with alkaline; This TV/VCR has an automatic head cleaning...
... remote control and the TV/VCR. Using the Remote Control q Point the remote control at the TV/VCR's remote sensor. Before Using the TV/VCR 5 Putting Batteries in the Remote Control 1 1 Remove the battery compartment lid on disposal of your product to increase the amount of reusable materials and to minimize the amount that needs to be properly disposed. Recording Prevention Video cassette tapes have record tabs to the unit: Install ALL batteries correctly, with alkaline; This TV/VCR has an automatic head cleaning...

User manual, English (US)
Page 6
... antenna and adjust its length, direction, and angle for the clearest picture. ANT. Hooking Up Your TV/VCR With a Cable Signal or Outdoor Antenna Connect a Cable signal or an antenna to the ANT(enna) Jack on the top of the TV/VCR. Hooking Up Your TV/VCR With a Cable Box To view any channel, set the TV/VCR to the Cable Box output channel (channel 03 or 04). Then, select channels at the Cable Box. ANT. Hooking Up Your TV/VCR With...
... antenna and adjust its length, direction, and angle for the clearest picture. ANT. Hooking Up Your TV/VCR With a Cable Signal or Outdoor Antenna Connect a Cable signal or an antenna to the ANT(enna) Jack on the top of the TV/VCR. Hooking Up Your TV/VCR With a Cable Box To view any channel, set the TV/VCR to the Cable Box output channel (channel 03 or 04). Then, select channels at the Cable Box. ANT. Hooking Up Your TV/VCR With...

User manual, English (US)
Page 7
... part number is available from Philips Service Solutions Group. Select channel 00 (A/V IN) at the TV/VCR when viewing tapes that you turn on the VCR or camcorder. Hooking Up the TV/VCR (cont'd) 7 D. Crooked Pin Bent pin Straight Pin Cable Plug Details are playing on the TV/VCR, go to the VIDEO In Jack on page 31. OUT Connect an Audio cable to the AUDIO OUT Jack on the VCR and to copy tapes...
... part number is available from Philips Service Solutions Group. Select channel 00 (A/V IN) at the TV/VCR when viewing tapes that you turn on the VCR or camcorder. Hooking Up the TV/VCR (cont'd) 7 D. Crooked Pin Bent pin Straight Pin Cable Plug Details are playing on the TV/VCR, go to the VIDEO In Jack on page 31. OUT Connect an Audio cable to the AUDIO OUT Jack on the VCR and to copy tapes...
User manual, English (US)
Page 8
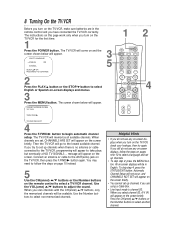
... remote control and you have connected the TV/VCR correctly. If you still do not see any on-screen displays when you turn on the TV/VCR for the first time. 1 Press the POWER button. When you are using a Cable Box. • Line Input mode is no antenna or cable connected to the TV/VCR, programming will appear to set up channels. • To skip step 2, press the MENU button. 8 Turning On the TV/VCR Before you turn on the TV/VCR, make sure batteries are set, CHANNELS...
... remote control and you have connected the TV/VCR correctly. If you still do not see any on-screen displays when you turn on the TV/VCR for the first time. 1 Press the POWER button. When you are using a Cable Box. • Line Input mode is no antenna or cable connected to the TV/VCR, programming will appear to set up channels. • To skip step 2, press the MENU button. 8 Turning On the TV/VCR Before you turn on the TV/VCR, make sure batteries are set, CHANNELS...

User manual, English (US)
Page 10
... available channels. 2-3 EJECT MENU POWER STATUS/EXIT CLEAR 1 2 3 4 5 6 7 8 9 SLEEP/ WAKE UP ALT.CH 0 REC PAUSE /OTR /STILL PLAY REW F.FWD STOP CH. Helpful Hints • Line Input mode will scan only through channels you receive. PRIMARY SETUP > SELECT LANGUAGE AUTO PROGRAMMING CH MEMORY REVIEW VOLUME BAR [ON] SET CLOCK SELECT KL CHOOSE B TO END PRESS EXIT 3 Press the PLAY/v button or the STOP/w button to select AUTO PROGRAMMING, then press the F.FWD/B button. The TV/VCR...
... available channels. 2-3 EJECT MENU POWER STATUS/EXIT CLEAR 1 2 3 4 5 6 7 8 9 SLEEP/ WAKE UP ALT.CH 0 REC PAUSE /OTR /STILL PLAY REW F.FWD STOP CH. Helpful Hints • Line Input mode will scan only through channels you receive. PRIMARY SETUP > SELECT LANGUAGE AUTO PROGRAMMING CH MEMORY REVIEW VOLUME BAR [ON] SET CLOCK SELECT KL CHOOSE B TO END PRESS EXIT 3 Press the PLAY/v button or the STOP/w button to select AUTO PROGRAMMING, then press the F.FWD/B button. The TV/VCR...

User manual, English (US)
Page 12
... are set the clock using Automatic PBS Channel Selection, follow the steps on page 19 to have connected and turned on pages 14-15. MUTE SPEED TRACKING MEMORY > PRIM. To set . q Channels are setting the clock, press the CLEAR button until the space for the number you tell the TV/VCR the current time. Manual Clock Setting 1 Press the MENU button. 2-3 EJECT MENU POWER STATUS/EXIT CLEAR 1 2 3 4 5 6 7 8 9 SLEEP/ WAKE UP ALT.CH 0 REC PAUSE /OTR /STILL PLAY REW...
... are set the clock using Automatic PBS Channel Selection, follow the steps on page 19 to have connected and turned on pages 14-15. MUTE SPEED TRACKING MEMORY > PRIM. To set . q Channels are setting the clock, press the CLEAR button until the space for the number you tell the TV/VCR the current time. Manual Clock Setting 1 Press the MENU button. 2-3 EJECT MENU POWER STATUS/EXIT CLEAR 1 2 3 4 5 6 7 8 9 SLEEP/ WAKE UP ALT.CH 0 REC PAUSE /OTR /STILL PLAY REW...

User manual, English (US)
Page 19
... MENU 5 Press the PLAY/v button or the STOP/w button to your time zone. 1 1 Press the MENU button. 2-5 > PRIM. The TV/VCR will set the clock using AUTO CLOCK, specify your time zone. 6 Press the MENU button, then press the STATUS/EXIT button. Then, press the F.FWD/B button. 6 EJECT MENU POWER STATUS/EXIT CLEAR 1 2 3 4 5 6 7 8 9 SLEEP/ WAKE UP ALT.CH 0 REC PAUSE /OTR /STILL PLAY REW F.FWD STOP CH. Time Zone 19 When you select AUTO at step 4 if AUTO CLOCK...
... MENU 5 Press the PLAY/v button or the STOP/w button to your time zone. 1 1 Press the MENU button. 2-5 > PRIM. The TV/VCR will set the clock using AUTO CLOCK, specify your time zone. 6 Press the MENU button, then press the STATUS/EXIT button. Then, press the F.FWD/B button. 6 EJECT MENU POWER STATUS/EXIT CLEAR 1 2 3 4 5 6 7 8 9 SLEEP/ WAKE UP ALT.CH 0 REC PAUSE /OTR /STILL PLAY REW F.FWD STOP CH. Time Zone 19 When you select AUTO at step 4 if AUTO CLOCK...
User manual, English (US)
Page 20
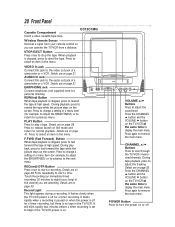
... the TV/VCR power is set POWER Button Press to play a tape. to eight hours long) of a menu item (for a timer recording, but there is no tape in the menu. When playback is stopped, press to eject the tape. REW(ind) Button When tape playback is stopped, press to rewind the tape at the same time to normal playback. During playback, press to the next menu. Press to change a setting of the channel you can operate the TV/VCR from your remote control...
... the TV/VCR power is set POWER Button Press to play a tape. to eight hours long) of a menu item (for a timer recording, but there is no tape in the menu. When playback is stopped, press to eject the tape. REW(ind) Button When tape playback is stopped, press to rewind the tape at the same time to normal playback. During playback, press to the next menu. Press to change a setting of the channel you can operate the TV/VCR from your remote control...
User manual, English (US)
Page 22
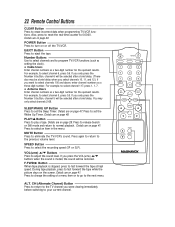
... SPEED TRACKING MEMORY Press to release Search or Still mode and return to play a tape. Press to adjust the sound level. VOL(ume) o/p Buttons Press to select an item in the menu. EJECT MENU POWER STATUS/EXIT CLEAR 1 2 3 4 5 6 7 8 9 SLEEP/ WAKE UP ALT.CH 0 REC PAUSE /OTR /STILL PLAY REW F.FWD STOP CH. VOL. If you want to select channels 100 and above, enter channel numbers as a two-digit number...
... SPEED TRACKING MEMORY Press to release Search or Still mode and return to play a tape. Press to adjust the sound level. VOL(ume) o/p Buttons Press to select an item in the menu. EJECT MENU POWER STATUS/EXIT CLEAR 1 2 3 4 5 6 7 8 9 SLEEP/ WAKE UP ALT.CH 0 REC PAUSE /OTR /STILL PLAY REW F.FWD STOP CH. VOL. If you want to select channels 100 and above, enter channel numbers as a two-digit number...

User manual, English (US)
Page 23
.... TRACKING o/p Buttons Press during tape playback to start a One-Touch Recording (an immediate timed recording, 30 minutes to eight hours long) of the channel you press the PAUSE/STILL button, the noise lines will change a setting of the TV/VCR to select an item in the menu. REC(ord)/OTR Button Press once to adjust the tracking. Details are on pages 38-39. During tape playback, press to access or remove the status display...
.... TRACKING o/p Buttons Press during tape playback to start a One-Touch Recording (an immediate timed recording, 30 minutes to eight hours long) of the channel you press the PAUSE/STILL button, the noise lines will change a setting of the TV/VCR to select an item in the menu. REC(ord)/OTR Button Press once to adjust the tracking. Details are on pages 38-39. During tape playback, press to access or remove the status display...

User manual, English (US)
Page 29
... the TV/VCR, NO CASSETTE flashes on the tape. VOL. Recording 29 Read and follow the steps below . 3 Use the CH(annel) o/p buttons or the Number buttons to select the channel you can change the tape speed using the SPEED button. q If the tape does not have a record tab, PROTECTED CASSETTE CANNOT RECORD flashes on . SLP is ON. (REC DEFEATED will come on the screen briefly. SLP(Super Long Play) 8 hrs. 6 hrs. 3 hrs. 1 3 EJECT MENU POWER...
... the TV/VCR, NO CASSETTE flashes on the tape. VOL. Recording 29 Read and follow the steps below . 3 Use the CH(annel) o/p buttons or the Number buttons to select the channel you can change the tape speed using the SPEED button. q If the tape does not have a record tab, PROTECTED CASSETTE CANNOT RECORD flashes on . SLP is ON. (REC DEFEATED will come on the screen briefly. SLP(Super Long Play) 8 hrs. 6 hrs. 3 hrs. 1 3 EJECT MENU POWER...
User manual, English (US)
Page 31
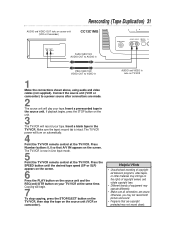
...; Unauthorized recording of copyrighted television programs, video tapes, or other materials may infringe on the rights of copyright owners and violate copyright laws. • Different brands of equipment may operate differently. • Make sure all connections are copyright protected may not record both picture and sound. • Programs that A/V IN appears on the screen. If playback begins, press the STOP button on the source unit (VCR or camcorder). The TV/VCR is...
...; Unauthorized recording of copyrighted television programs, video tapes, or other materials may infringe on the rights of copyright owners and violate copyright laws. • Different brands of equipment may operate differently. • Make sure all connections are copyright protected may not record both picture and sound. • Programs that A/V IN appears on the screen. If playback begins, press the STOP button on the source unit (VCR or camcorder). The TV/VCR is...

User manual, English (US)
Page 32
... SET CLOCK menu. q A tape is ON. Make sure the tape's record tab is intact and the tape is reset. (The clock will not occur only if it was scheduled to take place during the power failure. • You cannot set a timer recording if DEFEAT RECORDING is in the TV/VCR. q DAILY: The TV/VCR will be restored when the clock is long enough to record the program. SELECT PROGRAM NUMBER TO END PRESS EXIT 2-3 1 EJECT MENU POWER...
... SET CLOCK menu. q A tape is ON. Make sure the tape's record tab is intact and the tape is reset. (The clock will not occur only if it was scheduled to take place during the power failure. • You cannot set a timer recording if DEFEAT RECORDING is in the TV/VCR. q DAILY: The TV/VCR will be restored when the clock is long enough to record the program. SELECT PROGRAM NUMBER TO END PRESS EXIT 2-3 1 EJECT MENU POWER...

User manual, English (US)
Page 34
... the timer recording you finish setting a timer recording. The Record light will appear on the TV/VCR once. Helpful Hints • PROGRAM NOT COMPLETED / CLASH may appear on the TV/VCR screen two minutes before a timer recording should begin. 1011 8 EJECT MENU POWER STATUS/EXIT CLEAR 1 2 3 4 5 6 7 8 9 SLEEP/ WAKE UP ALT.CH 0 REC PAUSE /OTR /STILL PLAY REW F.FWD STOP CH. You cannot use the SPEED button at step 1. 11 Press the POWER button to turn off the TV/VCR...
... the timer recording you finish setting a timer recording. The Record light will appear on the TV/VCR once. Helpful Hints • PROGRAM NOT COMPLETED / CLASH may appear on the TV/VCR screen two minutes before a timer recording should begin. 1011 8 EJECT MENU POWER STATUS/EXIT CLEAR 1 2 3 4 5 6 7 8 9 SLEEP/ WAKE UP ALT.CH 0 REC PAUSE /OTR /STILL PLAY REW F.FWD STOP CH. You cannot use the SPEED button at step 1. 11 Press the POWER button to turn off the TV/VCR...

User manual, English (US)
Page 53
...; Cable - The line input channel is approximately six hours). Picture: adjusting increases or decreases the contrast of the picture on the TV/VCR from purple to green. Tape Speeds: how fast the tape travels during dubbing. Tint: adjusting changes the tints of the picture on the screen. Mode: a TV/VCR operation. Sharpness: adjusting softens or clarifies the picture on the screen. VHF (very high frequency; HQ: high quality; a timed recording that allow you set your TV/VCR during playback or recording...
...; Cable - The line input channel is approximately six hours). Picture: adjusting increases or decreases the contrast of the picture on the TV/VCR from purple to green. Tape Speeds: how fast the tape travels during dubbing. Tint: adjusting changes the tints of the picture on the screen. Mode: a TV/VCR operation. Sharpness: adjusting softens or clarifies the picture on the screen. VHF (very high frequency; HQ: high quality; a timed recording that allow you set your TV/VCR during playback or recording...

User manual, English (US)
Page 54
... during the power failure. • Make sure DEFEAT RECORDING is reset. (The clock will be happy to dry. Location For safe operation and satisfactory performance of your TV/VCR. If you suspect moisture inside the unit when you . TV/VCR will not record. • Make sure the tape has a record tab. If you are not using AUTO CLOCK. TV/VCR will not perform a timer recording. • Set the recording start and stop times correctly. Details...
... during the power failure. • Make sure DEFEAT RECORDING is reset. (The clock will be happy to dry. Location For safe operation and satisfactory performance of your TV/VCR. If you suspect moisture inside the unit when you . TV/VCR will not record. • Make sure the tape has a record tab. If you are not using AUTO CLOCK. TV/VCR will not perform a timer recording. • Set the recording start and stop times correctly. Details...
User manual, English (US)
Page 55
.... Helpful Hints (cont'd) 55 The remote control is not available, or the remote control will not access the menu. • Use the buttons on page five. Details are on pages 24-25. • Select an active channel. Details are on page 54. TV/VCR ejects the tape when you have a picture. • Adjust the antenna. TV/VCR does not have set a timer recording and the TV/VCR power is destroyed. • Adjust the tracking. TV/VCR does not display...
.... Helpful Hints (cont'd) 55 The remote control is not available, or the remote control will not access the menu. • Use the buttons on page five. Details are on pages 24-25. • Select an active channel. Details are on page 54. TV/VCR ejects the tape when you have a picture. • Adjust the antenna. TV/VCR does not have set a timer recording and the TV/VCR power is destroyed. • Adjust the tracking. TV/VCR does not display...

User manual, English (US)
Page 58
... color, adjusting 24-25 connections 6-7, 31 contents, table of 4 controls remote 22-23 tv/vcr 20 counter only mode 26 daylight-savings time 18 defeat recording 36 duplication 31 earphone jack 20 eject button 22 fast forward search 41 f.fwd/B button 22, 41 f.fwd button 20 front panel 20 glossary 53 helpful hints 54-55 hookups 6-7, 31 language selection 9 line input mode . . . .7, 10, 31, 53 long play 29, 53...
... color, adjusting 24-25 connections 6-7, 31 contents, table of 4 controls remote 22-23 tv/vcr 20 counter only mode 26 daylight-savings time 18 defeat recording 36 duplication 31 earphone jack 20 eject button 22 fast forward search 41 f.fwd/B button 22, 41 f.fwd button 20 front panel 20 glossary 53 helpful hints 54-55 hookups 6-7, 31 language selection 9 line input mode . . . .7, 10, 31, 53 long play 29, 53...


