
User manual, English (US)
Page 3
...). NO USER-SERVICEABLE PARTS INSIDE. To get the very most from your MAGNAVOX purchase, be placed on this is located on our uncompromising commitment to rain or moisture and objects filled with MAGNAVOX makes you should read the enclosed literature closely to prevent operating and maintenance problems. WARNING:To reduce the risk of the valuable benefits listed below the Serial No...
...). NO USER-SERVICEABLE PARTS INSIDE. To get the very most from your MAGNAVOX purchase, be placed on this is located on our uncompromising commitment to rain or moisture and objects filled with MAGNAVOX makes you should read the enclosed literature closely to prevent operating and maintenance problems. WARNING:To reduce the risk of the valuable benefits listed below the Serial No...
User manual, English (US)
Page 4
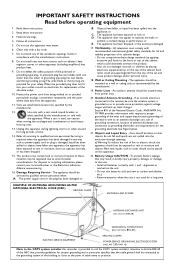
... as power-supply cord or plug is not used , use this apparatus during lightning storms or when unused for replacement of time. 14. EXAMPLE OF ANTENNA GROUNDING AS PER NATIONAL ELECTRICAL CODE (NEC) GROUND CLAMP ANTENNA LEAD IN WIRE ANTENNA DISCHARGE UNIT (NEC SECTION 810-20) GROUNDING CONDUCTORS (NEC SECTION 810-21) GROUND CLAMPS ELECTRIC SERVICE EQUIPMENT POWER SERVICE GROUNDING ELECTRODE SYSTEM (NEC ART 250, PART...
... as power-supply cord or plug is not used , use this apparatus during lightning storms or when unused for replacement of time. 14. EXAMPLE OF ANTENNA GROUNDING AS PER NATIONAL ELECTRICAL CODE (NEC) GROUND CLAMP ANTENNA LEAD IN WIRE ANTENNA DISCHARGE UNIT (NEC SECTION 810-20) GROUNDING CONDUCTORS (NEC SECTION 810-21) GROUND CLAMPS ELECTRIC SERVICE EQUIPMENT POWER SERVICE GROUNDING ELECTRODE SYSTEM (NEC ART 250, PART...

User manual, English (US)
Page 5
... the Magnavox helpline. packaging) is being fixed securely enough so that air can circulate freely through the ventilation slots. ' Insert the power plug supplied into the aerial socket x at the back of your Local Magnavox Customer or Service Centre. For best picture quality use the suppressor-aerial cable supplied. The batteries supplied do not solve your TV problem, you can call your television set or on the remote control. 1
... the Magnavox helpline. packaging) is being fixed securely enough so that air can circulate freely through the ventilation slots. ' Insert the power plug supplied into the aerial socket x at the back of your Local Magnavox Customer or Service Centre. For best picture quality use the suppressor-aerial cable supplied. The batteries supplied do not solve your TV problem, you can call your television set or on the remote control. 1
User manual, English (US)
Page 6
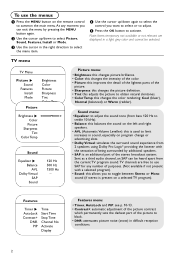
... conditions. 2 Sound menu: • Equalizer: to adjust the sound tone (from bass 120 Hz to select Picture, Sound, Features, Install or Mode. Sent as a third audio channel, an SAP can exit the menu by additional speakers. • SAP: is used to limit increases in sound, especially on program change or advertising slots. • Dolby Virtual: simulates the surround sound experience from the current TV program sound.TV channels are displayed in a light grey color and...
... conditions. 2 Sound menu: • Equalizer: to adjust the sound tone (from bass 120 Hz to select Picture, Sound, Features, Install or Mode. Sent as a third audio channel, an SAP can exit the menu by additional speakers. • SAP: is used to limit increases in sound, especially on program change or advertising slots. • Dolby Virtual: simulates the surround sound experience from the current TV program sound.TV channels are displayed in a light grey color and...
User manual, English (US)
Page 7
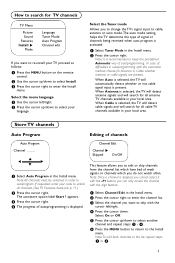
... the Tuner mode Allows you to change the TV's signal input to cable, antenna or auto mode.The auto mode setting helps the TV determine the type of autoprogramming. Note: All channels must be unlocked in the Install menu. é Press the cursor right to autoprogram. appears. you can only access the channel with the digit buttons. & Select Channel Edit in order to enter the channel list. When Antenna is activated. & Select Tuner Mode in your language. When Cable is displayed. Store TV channels Auto Program...
... the Tuner mode Allows you to change the TV's signal input to cable, antenna or auto mode.The auto mode setting helps the TV determine the type of autoprogramming. Note: All channels must be unlocked in the Install menu. é Press the cursor right to autoprogram. appears. you can only access the channel with the digit buttons. & Select Channel Edit in order to enter the channel list. When Antenna is activated. & Select Tuner Mode in your language. When Cable is displayed. Store TV channels Auto Program...
User manual, English (US)
Page 8
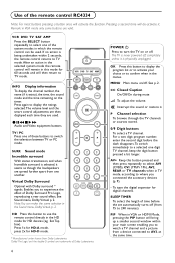
....The volume level and the smart control adjustments are then displayed each time they are spread further apart from a device connected to confirm when in this button to display the program list or to activate your main screen enabling you to watch a TV channel and a picture from one digit TV channel, keep the digit button pressed a bit longer. Press 1x for HD-A mode, press 2x for digital channels. Audio and Video equipment buttons. See p. 2. MENU Main menu...
....The volume level and the smart control adjustments are then displayed each time they are spread further apart from a device connected to confirm when in this button to display the program list or to activate your main screen enabling you to watch a TV channel and a picture from one digit TV channel, keep the digit button pressed a bit longer. Press 1x for HD-A mode, press 2x for digital channels. Audio and Video equipment buttons. See p. 2. MENU Main menu...
User manual, English (US)
Page 9
... picture modes to look best in case of the picture according to add. POWER B VCR DVD TV SAT AMP ® INFO Ò TV SELECT ‡ π PC SURR º † HD SURF FORMAT ® ® OK ® ® MENU CC + + V ¬ P - - 1 2 3 4 5 6 7 8 9 AV+ 0 - If there are already nine channels/sources in the sound and picture menu. ACTIVE SLEEP SAP CONTROL TIMER PIP AUTO AUTO M a SURF With this button to select the previously viewed TV channel or source...
... picture modes to look best in case of the picture according to add. POWER B VCR DVD TV SAT AMP ® INFO Ò TV SELECT ‡ π PC SURR º † HD SURF FORMAT ® ® OK ® ® MENU CC + + V ¬ P - - 1 2 3 4 5 6 7 8 9 AV+ 0 - If there are already nine channels/sources in the sound and picture menu. ACTIVE SLEEP SAP CONTROL TIMER PIP AUTO AUTO M a SURF With this button to select the previously viewed TV channel or source...
User manual, English (US)
Page 10
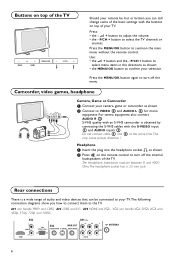
... adjust the volume; • the - The headphone socket has a 3.5 mm jack. This may cause picture distortion ! AV3 L AUDIO R HDMI AV1 (1Fh) VGA Y/Pb/Pr (2Fh) AV2 MON.OUT VIDEO/AUDIO S-VIDEO VIDEO/AUDIO Pr Pb R L AUDIO Y x ANTENNA CVBS 6 P/CH + button to summon the main menu without the remote control. Press the MENU/OK button to select the TV channels or sources. P/CH + button to select menu items in the directions as shown. é Connect...
... adjust the volume; • the - The headphone socket has a 3.5 mm jack. This may cause picture distortion ! AV3 L AUDIO R HDMI AV1 (1Fh) VGA Y/Pb/Pr (2Fh) AV2 MON.OUT VIDEO/AUDIO S-VIDEO VIDEO/AUDIO Pr Pb R L AUDIO Y x ANTENNA CVBS 6 P/CH + button to summon the main menu without the remote control. Press the MENU/OK button to select the TV channels or sources. P/CH + button to select menu items in the directions as shown. é Connect...

User manual, English (US)
Page 11
... socket of CVI (Component Video Input) also connect to provide sound. " For reproduction of your TV. Although the abbreviations may differ depending on the DVD player or the device connected. S-VHS does not provide audio, so the mini-jack to cinch cable must still be used for blue and red component signals, respectively, and Y indicates the luminance signal. AV2 MON.OUT VIDEO/AUDIO S-VIDEO VIDEO/AUDIO x ANTENNA é Connect the supplied adapter cable mini-jack to...
... socket of CVI (Component Video Input) also connect to provide sound. " For reproduction of your TV. Although the abbreviations may differ depending on the DVD player or the device connected. S-VHS does not provide audio, so the mini-jack to cinch cable must still be used for blue and red component signals, respectively, and Y indicates the luminance signal. AV2 MON.OUT VIDEO/AUDIO S-VIDEO VIDEO/AUDIO x ANTENNA é Connect the supplied adapter cable mini-jack to...
User manual, English (US)
Page 12
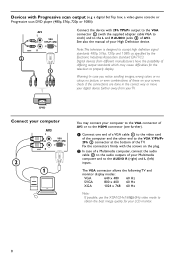
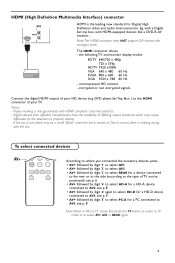
... the HDMI connector (see further). & Connect one end of a VGA cable 1 to the video card of the TV. Devices with the supplied adapter cable VGA to cinch) and to the AUDIO R (right) and L (left) inputs. a digital Set Top box, a video game console or Progressive scan DVD player (480p, 576p, 720p or 1080i) AV3 L AUDIO VGA Y/Pb/Pr (2Fh) HDMI R 2 1 Connect the device with 2Fh YPbPr output to the VGA connector 1 (with Progressive scan output (e.g.
... the HDMI connector (see further). & Connect one end of a VGA cable 1 to the video card of the TV. Devices with the supplied adapter cable VGA to cinch) and to the AUDIO R (right) and L (left) inputs. a digital Set Top box, a video game console or Progressive scan DVD player (480p, 576p, 720p or 1080i) AV3 L AUDIO VGA Y/Pb/Pr (2Fh) HDMI R 2 1 Connect the device with 2Fh YPbPr output to the VGA connector 1 (with Progressive scan output (e.g.
User manual, English (US)
Page 13
... HDMI connector does NOT support DVI devices with the set is turned on. encrypted or non encrypted signals. The HDMI connector allows - Connect the digital HDMI output of differing output standards which may be a small "flicker" when the set . DVD player, Set Top Box..) to select AV1, AV2 or REAR again. 9 Digital devices from different manufacturers have the possibility of your TV. To select connected devices AV+ 7 8 9 AV+ 0 - If the set...
... HDMI connector does NOT support DVI devices with the set is turned on. encrypted or non encrypted signals. The HDMI connector allows - Connect the digital HDMI output of differing output standards which may be a small "flicker" when the set . DVD player, Set Top Box..) to select AV1, AV2 or REAR again. 9 Digital devices from different manufacturers have the possibility of your TV. To select connected devices AV+ 7 8 9 AV+ 0 - If the set...
User manual, English (US)
Page 14
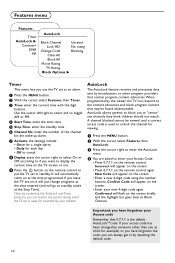
... the screen. • Enter a new 4-digit code using the number buttons. If your access code has been changed by your Access code Remember that may be viewed until a correct access code is the default AutoLock™code. " Press the cursor right to enter the AutoLock menu. ' You are asked to toggle AM or PM. ' Start Time: enter the start time. ( Stop Time: enter the standby time. § Channel No: enter the number of the channel...
... the screen. • Enter a new 4-digit code using the number buttons. If your access code has been changed by your Access code Remember that may be viewed until a correct access code is the default AutoLock™code. " Press the cursor right to enter the AutoLock menu. ' You are asked to toggle AM or PM. ' Start Time: enter the start time. ( Stop Time: enter the standby time. § Channel No: enter the number of the channel...
User manual, English (US)
Page 15
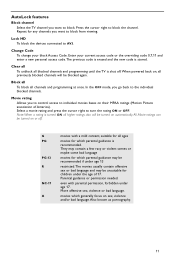
... Picture association of 17. movies which parental guidance may be recommended if under age 17. AutoLock features Block channel Select the TV channel you go back to the individual blocked channels. Lock HD To block the devices connected to block the channel. Select a movie rating and press the cursor right to individual movies bases on automatically. Change Code To change your current access code or...
... Picture association of 17. movies which parental guidance may be recommended if under age 17. AutoLock features Block channel Select the TV channel you go back to the individual blocked channels. Lock HD To block the devices connected to block the channel. Select a movie rating and press the cursor right to individual movies bases on automatically. Change Code To change your current access code or...
User manual, English (US)
Page 17
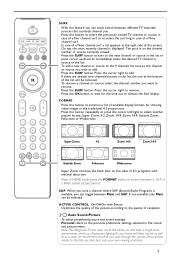
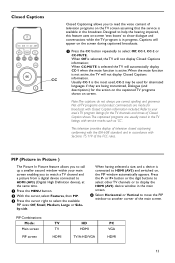
... a TV channel and a picture from a digital device connected to HDMI (AV3) (Digital High Definition device), at the same time. & Press the MENU button. é With the cursor, select Features, then PIP. Designed to help the hearing impaired, this feature uses on-screen 'text boxes' to show dialogue and conversations while the TV program is connected to select the available PIP sizes: Off, Small, Medium, Large or Sideby-side. Captions will not display Closed Captions...
... a TV channel and a picture from a digital device connected to HDMI (AV3) (Digital High Definition device), at the same time. & Press the MENU button. é With the cursor, select Features, then PIP. Designed to help the hearing impaired, this feature uses on-screen 'text boxes' to show dialogue and conversations while the TV program is connected to select the available PIP sizes: Off, Small, Medium, Large or Sideby-side. Captions will not display Closed Captions...
User manual, English (US)
Page 18
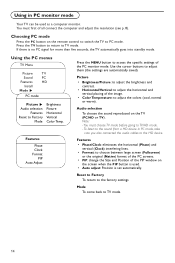
... Clock Format PIP Auto Adjust Press the MENU button to PC mode. Note: - Features • Phase/Clock: eliminates the horizontal (Phase) and vertical (Clock) interfering lines. • Format: to choose between large screen (Fullscreen) or the original (Native) format of the PC screens. • PIP: change the Size and Position of the PC monitor mode. Use the cursor buttons to Factory Mode Brightness Picture Horizontal Vertical Color Temp. Audio selection To choose the sound...
... Clock Format PIP Auto Adjust Press the MENU button to PC mode. Note: - Features • Phase/Clock: eliminates the horizontal (Phase) and vertical (Clock) interfering lines. • Format: to choose between large screen (Fullscreen) or the original (Native) format of the PC screens. • PIP: change the Size and Position of the PC monitor mode. Use the cursor buttons to Factory Mode Brightness Picture Horizontal Vertical Color Temp. Audio selection To choose the sound...
User manual, English (US)
Page 19
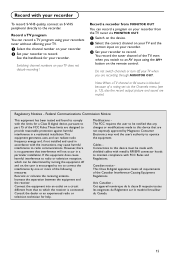
... to the recorder. Connect the equipment into an outlet on a circuit different from the TV tuner via the Channels menu (see p. 12), also the record output picture and sound are not expressly approved by Magnavox Consumer Electronics may cause harmful interference to an AV input using your recorders tuner without affecting your TV. & Select the channel number on your recorder. é Set your recorder to which...
... to the recorder. Connect the equipment into an outlet on a circuit different from the TV tuner via the Channels menu (see p. 12), also the record output picture and sound are not expressly approved by Magnavox Consumer Electronics may cause harmful interference to an AV input using your recorders tuner without affecting your TV. & Select the channel number on your recorder. é Set your recorder to which...

User manual, English (US)
Page 20
... remote control • Check whether the batteries are no picture • Adjust the contrast, color, tint and brightness setting. No picture and • Your TV has a protective mode in your HDMI-source to a correct display mode. This is not muted, press the ¬ button on Check the clearance around the vents of other peripherals. No sound • Increase the VOLUME. • Check that the TV's AC power cord is plugged...
... remote control • Check whether the batteries are no picture • Adjust the contrast, color, tint and brightness setting. No picture and • Your TV has a protective mode in your HDMI-source to a correct display mode. This is not muted, press the ¬ button on Check the clearance around the vents of other peripherals. No sound • Increase the VOLUME. • Check that the TV's AC power cord is plugged...

User manual, English (US)
Page 22
... supply, abuse, neglect, misuse, accident, unauthorized repair or other cause not within ninety (90) days of the date of sale, the limitation on the product, and installation or repair of antenna systems outside of the product. • Product repair and/or part replacement because of purchase to receive repair on the product. Magnavox, P.O. MAGNAVOX LIMITED WARRANTY One (1) Year Labor & One (1) Year Parts & One (1) Year Display Repair MAGNAVOX...
... supply, abuse, neglect, misuse, accident, unauthorized repair or other cause not within ninety (90) days of the date of sale, the limitation on the product, and installation or repair of antenna systems outside of the product. • Product repair and/or part replacement because of purchase to receive repair on the product. Magnavox, P.O. MAGNAVOX LIMITED WARRANTY One (1) Year Labor & One (1) Year Parts & One (1) Year Display Repair MAGNAVOX...

User manual, French
Page 22
... can be provided. • A product used for the defective display. MAGNAVOX LIMITED WARRANTY One (1) Year Labor & One (1) Year Parts & One (1) Year Display Repair MAGNAVOX warrants this product is considered such proof. Magnavox authorized service centers will provide removal and installation of the parts for one (1) year. • DISPLAY: For a period of one (1) year from the date or purchase, Magnavox will supply, at no signature verification of...
... can be provided. • A product used for the defective display. MAGNAVOX LIMITED WARRANTY One (1) Year Labor & One (1) Year Parts & One (1) Year Display Repair MAGNAVOX warrants this product is considered such proof. Magnavox authorized service centers will provide removal and installation of the parts for one (1) year. • DISPLAY: For a period of one (1) year from the date or purchase, Magnavox will supply, at no signature verification of...

User manual, Spanish
Page 22
..., a new or rebuilt active display device in exchange for which it to operate in any Magnavox authorized service center. Magnavox authorized service centers will provide removal and installation of the parts for installation or setup of the product, adjustment of customer controls on the product. Some stated do not allow limitations on how long an implied warranty lasts does not apply. Box 520890, Miami, FL...
..., a new or rebuilt active display device in exchange for which it to operate in any Magnavox authorized service center. Magnavox authorized service centers will provide removal and installation of the parts for installation or setup of the product, adjustment of customer controls on the product. Some stated do not allow limitations on how long an implied warranty lasts does not apply. Box 520890, Miami, FL...


