
User manual, English (US)
Page 4
... Videotapes 6 First-Time Setup and Use Before Using the TV/VCR/DVD 7 Hooking Up the TV/VCR/DVD 8-9 Optional Connections 10 First-Time Setup, Watching TV 11 Playing a Videotape 12 Playing a Disc 13 Description of Controls Remote Control Buttons 14-15 Front Panel 16 Rear Panel 17 TV Settings Menu Language, Resetting TV Channels 18 Adding/Deleting Channels 19 Setting the Clock...
... Videotapes 6 First-Time Setup and Use Before Using the TV/VCR/DVD 7 Hooking Up the TV/VCR/DVD 8-9 Optional Connections 10 First-Time Setup, Watching TV 11 Playing a Videotape 12 Playing a Disc 13 Description of Controls Remote Control Buttons 14-15 Front Panel 16 Rear Panel 17 TV Settings Menu Language, Resetting TV Channels 18 Adding/Deleting Channels 19 Setting the Clock...
User manual, English (US)
Page 5
... Zoom Playback * If available on the remote control. If the DVD has a menu, access it will appear in the top right corner of the TV/VCR/DVD. If the feature is not currently available. TV/VCR • Automatic Channel Setup • ...remote control. Access the setup menus by pressing the DISC MENU button on the Disc DVD Disc Menus... In DVD mode, you try to make it available. All DVDs do not have menus. Introduction 5 Welcome to use all its features. Available Disc Features... Setup Menus... This manual describes the 27MDTR10S and explains how to your TV/VCR/DVD...
... Zoom Playback * If available on the remote control. If the DVD has a menu, access it will appear in the top right corner of the TV/VCR/DVD. If the feature is not currently available. TV/VCR • Automatic Channel Setup • ...remote control. Access the setup menus by pressing the DISC MENU button on the Disc DVD Disc Menus... In DVD mode, you try to make it available. All DVDs do not have menus. Introduction 5 Welcome to use all its features. Available Disc Features... Setup Menus... This manual describes the 27MDTR10S and explains how to your TV/VCR/DVD...

User manual, English (US)
Page 7
...the unit will eventually require cleaning or replacement. Using the Remote Control q Point the remote control at the TV/VCR/DVD's remote sensor. This TV/VCR/DVD has an automatic head cleaning system. q Do not mix batteries, for a long time. TV/VCR/DVD Maintenance q Remove any light adhesive stick-on the bottom of...with new or carbon with alkaline; However, the video heads will not be recycled and reused. Before Using the TV/VCR/DVD 7 Remote Control Battery Installation 1 Remove the battery compartment lid on notes from the video cassette before putting the cassette in bodily...
...the unit will eventually require cleaning or replacement. Using the Remote Control q Point the remote control at the TV/VCR/DVD's remote sensor. This TV/VCR/DVD has an automatic head cleaning system. q Do not mix batteries, for a long time. TV/VCR/DVD Maintenance q Remove any light adhesive stick-on the bottom of...with new or carbon with alkaline; However, the video heads will not be recycled and reused. Before Using the TV/VCR/DVD 7 Remote Control Battery Installation 1 Remove the battery compartment lid on notes from the video cassette before putting the cassette in bodily...
User manual, English (US)
Page 14
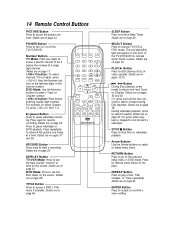
... Button Press to search forward. The corresponding light will appear on the screen. DVD Mode: Use the Number buttons to see the tape counter, channel, or time on or off the TV/VCR/DVD. Press to access the picture controls. Details are on page 25. Details are on page 11. +100/+10... then the Number buttons of the last two digits of a single digit channel. DVD Mode: Press to enter a Track or Chapter number. +100/+10 button: Press before the number of the channel number. 14 Remote Control Buttons PICTURE Button Press to remove some menus or displays. Details are on page...
... Button Press to search forward. The corresponding light will appear on the screen. DVD Mode: Use the Number buttons to see the tape counter, channel, or time on or off the TV/VCR/DVD. Press to access the picture controls. Details are on page 25. Details are on page 11. +100/+10... then the Number buttons of the last two digits of a single digit channel. DVD Mode: Press to enter a Track or Chapter number. +100/+10 button: Press before the number of the channel number. 14 Remote Control Buttons PICTURE Button Press to remove some menus or displays. Details are on page...

User manual, English (US)
Page 15
... SEARCH MODE REPEAT REPEAT A-B MODE AUDIO SUBTITLE ANGLE VOL. (volume) v/w Buttons Press to select memorized TV channels. REPEAT A-B Button Press to set up Markers. MODE Button Press to play repeatedly. SPEED Button Press... section of the current Track/Chapter. Details are on page 57. Press repeatedly to skip to access DVD Disc menus. Details are on page 49. Details are on page 61. Details are on page 60....Track, or Title on page 34. Details are on a Disc. Remote Control Buttons (cont'd) 15 ZOOM Button Press to enlarge the picture during Disc playback.
... SEARCH MODE REPEAT REPEAT A-B MODE AUDIO SUBTITLE ANGLE VOL. (volume) v/w Buttons Press to select memorized TV channels. REPEAT A-B Button Press to set up Markers. MODE Button Press to play repeatedly. SPEED Button Press... section of the current Track/Chapter. Details are on page 57. Press repeatedly to skip to access DVD Disc menus. Details are on page 49. Details are on page 61. Details are on page 60....Track, or Title on page 34. Details are on a Disc. Remote Control Buttons (cont'd) 15 ZOOM Button Press to enlarge the picture during Disc playback.

User manual, English (US)
Page 16
...or Track. It lights when the TV/VCR/DVD is in TV/VCR mode. Press while play is in Standby mode (power off the TV/VCR/DVD for a timer recording. This lets you watch materials playing on page nine and 27. OPEN/CLOSE A Button (DVD) Press to select TV channels. Details are on page 37... L/R (left/right) In jacks Use audio and video cables to connect these jacks to adjust the volume. Remote Sensor Receives a signal from your remote control so you can operate the TV/VCR/DVD from a distance. Details are on page 12. Turn off ) for personal listening. REC/OTR light (red...
...or Track. It lights when the TV/VCR/DVD is in TV/VCR mode. Press while play is in Standby mode (power off the TV/VCR/DVD for a timer recording. This lets you watch materials playing on page nine and 27. OPEN/CLOSE A Button (DVD) Press to select TV channels. Details are on page 37... L/R (left/right) In jacks Use audio and video cables to connect these jacks to adjust the volume. Remote Sensor Receives a signal from your remote control so you can operate the TV/VCR/DVD from a distance. Details are on page 12. Turn off ) for personal listening. REC/OTR light (red...

User manual, English (US)
Page 22
...SLEEP SELECT 123 CH. 456 789 +100 0 +10 SPEED C.RESET ZOOM VOL. SETTING CLOCK - Helpful Hints • You must use the TV/VCR/DVD remote control to set . Press B. - TV/VCR SETUP - Then press s or B until your area with the Auto Clock signal, Auto Clock setting is not possible. This may take from 10... the Clock (cont'd) Auto Clock Setting You can have the TV/VCR/DVD set the clock, the TV/VCR/DVD will automatically monitor the correct time and date broadcast by the PBS station. Once you turn off the TV/VCR/DVD and let the PBS channel update the clock. Details are on...
...SLEEP SELECT 123 CH. 456 789 +100 0 +10 SPEED C.RESET ZOOM VOL. SETTING CLOCK - Helpful Hints • You must use the TV/VCR/DVD remote control to set . Press B. - TV/VCR SETUP - Then press s or B until your area with the Auto Clock signal, Auto Clock setting is not possible. This may take from 10... the Clock (cont'd) Auto Clock Setting You can have the TV/VCR/DVD set the clock, the TV/VCR/DVD will automatically monitor the correct time and date broadcast by the PBS station. Once you turn off the TV/VCR/DVD and let the PBS channel update the clock. Details are on...
User manual, English (US)
Page 26
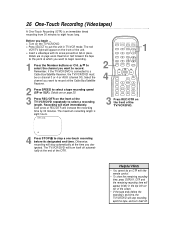
q Insert a videotape with the remote control. • To show the remaining recording time, press DISPLAY. Rewind or fast forward the tape to the point at the time you designated. Remember, if the TV/VCR/DVD is connected to begin ... Details are on channel 3 or 4 or AUX (channel 00). 26 One-Touch...ANGLE 1 3 Press REC/OTR on the front of REC/OTR will stop a one-touch recording before the recording's end time, the TV/VCR/DVD will increase the recording time by 30 minutes. q Press SELECT to stop recording, eject the tape, and turn itself off automatically at the...
q Insert a videotape with the remote control. • To show the remaining recording time, press DISPLAY. Rewind or fast forward the tape to the point at the time you designated. Remember, if the TV/VCR/DVD is connected to begin ... Details are on channel 3 or 4 or AUX (channel 00). 26 One-Touch...ANGLE 1 3 Press REC/OTR on the front of REC/OTR will stop a one-touch recording before the recording's end time, the TV/VCR/DVD will increase the recording time by 30 minutes. q Press SELECT to stop recording, eject the tape, and turn itself off automatically at the...

User manual, English (US)
Page 27
... press STOP on the screen. AUX will appear on the VCR or Camcorder. 3 The TV/VCR/DVD will begin. 7 To stop copying, press STOP/EJECT on the TV/VCR/DVD, then stop the tape on the front of the unit. 4 Point the TV/VCR/DVD remote control at the same time. If the power is in the unit... supplied). Press 0, 0 on and a videotape is in TV/VCR mode. Copying will record your tape. Press SELECT so the red VCR/TV light appears on the VCR or Camcorder. Rerecording (Tape Duplication) 27 AUDIO and VIDEO OUT Jacks on source unit (VCR or Camcorder) VIDEO AUDIO OUT Audio Cable from AUDIO OUT ...
... press STOP on the screen. AUX will appear on the VCR or Camcorder. 3 The TV/VCR/DVD will begin. 7 To stop copying, press STOP/EJECT on the TV/VCR/DVD, then stop the tape on the front of the unit. 4 Point the TV/VCR/DVD remote control at the same time. If the power is in the unit... supplied). Press 0, 0 on and a videotape is in TV/VCR mode. Copying will record your tape. Press SELECT so the red VCR/TV light appears on the VCR or Camcorder. Rerecording (Tape Duplication) 27 AUDIO and VIDEO OUT Jacks on source unit (VCR or Camcorder) VIDEO AUDIO OUT Audio Cable from AUDIO OUT ...

User manual, English (US)
Page 38
... Tracking Adjustment when you the best possible picture quality. The tape will start again instead. v/w buttons on the front of the TV/VCR/DVD or the CH. If REPEAT PLAY is ON, playback will not rewind automatically during playback. Tracking returns to give you insert a... a better picture using the manual tracking controls (see Auto Return details on page 31. To rewind a tape automatically after timer recordings, see below). Manual Tracking To adjust the tracking manually, press the CHANNEL v/w buttons on the remote control during timer recording or One-Touch Recording....
... Tracking Adjustment when you the best possible picture quality. The tape will start again instead. v/w buttons on the front of the TV/VCR/DVD or the CH. If REPEAT PLAY is ON, playback will not rewind automatically during playback. Tracking returns to give you insert a... a better picture using the manual tracking controls (see Auto Return details on page 31. To rewind a tape automatically after timer recordings, see below). Manual Tracking To adjust the tracking manually, press the CHANNEL v/w buttons on the remote control during timer recording or One-Touch Recording....

User manual, English (US)
Page 73
... as Dolby Digital). Not all obstacles between the remote control and the TV/VCR/DVD. • Inspect and replace the batteries in the unit, keep the power on the DVD. Remote control does not operate the TV/VCR/DVD. • Aim the remote control directly at least two hours but do not have set the TV/VCR/DVD to restore the volume. • Check the audio...
... as Dolby Digital). Not all obstacles between the remote control and the TV/VCR/DVD. • Inspect and replace the batteries in the unit, keep the power on the DVD. Remote control does not operate the TV/VCR/DVD. • Aim the remote control directly at least two hours but do not have set the TV/VCR/DVD to restore the volume. • Check the audio...

User manual, English (US)
Page 74
SLP : 11.12 mm/sec. 74 Specifications General TV/VCR CRT : 27 inch in-line gun, 110˚ deflection tube Television system : NTSC-M Closed Caption... 20 Hz to 20 kHz Signal-to-noise ratio output jack Audio CD: 100 dB (EIAJ) Dynamic range output jack DVD (linear sound): 85 dB Audio CD: 84 dB (EIAJ) Total distortion factor Audio CD: 0.07% (EIAJ) Wow... mm) Depth: 19-11/16" (500 mm) Weight: 86 lbs (39 kg) Accessories: Remote Control with two AA batteries Owner's Manual Designs and specifications are subject to change without notice and without our legal obligation.
SLP : 11.12 mm/sec. 74 Specifications General TV/VCR CRT : 27 inch in-line gun, 110˚ deflection tube Television system : NTSC-M Closed Caption... 20 Hz to 20 kHz Signal-to-noise ratio output jack Audio CD: 100 dB (EIAJ) Dynamic range output jack DVD (linear sound): 85 dB Audio CD: 84 dB (EIAJ) Total distortion factor Audio CD: 0.07% (EIAJ) Wow... mm) Depth: 19-11/16" (500 mm) Weight: 86 lbs (39 kg) Accessories: Remote Control with two AA batteries Owner's Manual Designs and specifications are subject to change without notice and without our legal obligation.
User manual, English (US)
Page 76
... 20-22 closed captions 39 coaxial digital audio out jack .10, 17 color 24 connections 8-10, 27 contents, table of 4 contrast 24 controls remote 14-15 tv/vcr/dvd 16 copyright protection 3, 27 counter 24, 34 daylight-savings time 23 disc tray 13, 16 disc menu button 15, 48 display... button 14, 24, 69 display settings 68 duplication 27 dvd light 16 dvd video 6 ejecting a tape 73 enter button ...
... 20-22 closed captions 39 coaxial digital audio out jack .10, 17 color 24 connections 8-10, 27 contents, table of 4 contrast 24 controls remote 14-15 tv/vcr/dvd 16 copyright protection 3, 27 counter 24, 34 daylight-savings time 23 disc tray 13, 16 disc menu button 15, 48 display... button 14, 24, 69 display settings 68 duplication 27 dvd light 16 dvd video 6 ejecting a tape 73 enter button ...


