
User manual, English (US)
Page 1
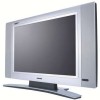
CALL US BEFORE YOU CONSIDER RETURNING THE PRODUCT. 1- 80 0 -705 -20 0 0 OR VISIT US ON THE WEB AT WWW.MAGNAVOX.COM MAG-26_eng 0104.indd 1 Important! Return your Warranty Registration Card within 10 days. 3138 155 23442 1/6/2005 10:30:32 MAGNAVOX REPRESENTATIVES ARE READY TO HELP YOU WITH ANY QUESTIONS ABOUT YOUR NEW PRODUCT. WE CAN GUIDE YOU THROUGH CONNECTIONS, FIRST-TIME SETUP, AND ANY OF THE FEATURES. Owner`s Manual 26MF605W/32MF605W Series LCD TV NEED HELP?CALL US! WE WANT YOU TO START ENJOYING YOUR NEW PRODUCT RIGHT AWAY.
CALL US BEFORE YOU CONSIDER RETURNING THE PRODUCT. 1- 80 0 -705 -20 0 0 OR VISIT US ON THE WEB AT WWW.MAGNAVOX.COM MAG-26_eng 0104.indd 1 Important! Return your Warranty Registration Card within 10 days. 3138 155 23442 1/6/2005 10:30:32 MAGNAVOX REPRESENTATIVES ARE READY TO HELP YOU WITH ANY QUESTIONS ABOUT YOUR NEW PRODUCT. WE CAN GUIDE YOU THROUGH CONNECTIONS, FIRST-TIME SETUP, AND ANY OF THE FEATURES. Owner`s Manual 26MF605W/32MF605W Series LCD TV NEED HELP?CALL US! WE WANT YOU TO START ENJOYING YOUR NEW PRODUCT RIGHT AWAY.

User manual, English (US)
Page 4
...to quickly connect other Video Devices with Component Video Connectors 12 Digital TV Receiver, or a Digital Satellite Receiver with HD (High Definition) Output 13 Digital Satellite Receiver with ... Sound Control 22 Picture Menu TV Picture Menu Controls 23 Sound Menu TV Sound Menu Controls 24 Features Menu Auto Lock 25 Auto Lock Access Code 26 Auto Lock Program 27 Auto... regarding disposal of your children viewing inappropriate material. Treble, Bass, and Balance: Enhance the LCD TV's sound. Not all features described in stereo. This is normal and does not require you...
...to quickly connect other Video Devices with Component Video Connectors 12 Digital TV Receiver, or a Digital Satellite Receiver with HD (High Definition) Output 13 Digital Satellite Receiver with ... Sound Control 22 Picture Menu TV Picture Menu Controls 23 Sound Menu TV Sound Menu Controls 24 Features Menu Auto Lock 25 Auto Lock Access Code 26 Auto Lock Program 27 Auto... regarding disposal of your children viewing inappropriate material. Treble, Bass, and Balance: Enhance the LCD TV's sound. Not all features described in stereo. This is normal and does not require you...

User manual, English (US)
Page 5
... or other video equipment with 4 AV IN 3 Y, Pb, Pr Input jacks Connects to the component video connectors of heat. .Do not place the LCD TV where it can be exposed to your DVD player or other source of your PC with DVI/HDCP output connectors. 9 PC IN Connect to rain...BACKSIDE) 7 89 10 6 3 1 2 5 4 1 AV IN 1 Connects to the output jacks of your video and audio Connect to the input jacks of your LCD TV is available only when your VCR or other video equipments that supports YPbPr HD (High Definition) video equipment. SD (Standard Definition) video format. 10...
... or other video equipment with 4 AV IN 3 Y, Pb, Pr Input jacks Connects to the component video connectors of heat. .Do not place the LCD TV where it can be exposed to your DVD player or other source of your PC with DVI/HDCP output connectors. 9 PC IN Connect to rain...BACKSIDE) 7 89 10 6 3 1 2 5 4 1 AV IN 1 Connects to the output jacks of your video and audio Connect to the input jacks of your LCD TV is available only when your VCR or other video equipments that supports YPbPr HD (High Definition) video equipment. SD (Standard Definition) video format. 10...
User manual, English (US)
Page 6
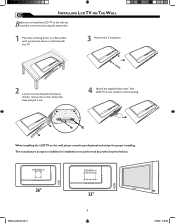
...Before you can install your LCD TV on the wall, you must first remove the base using the steps below: 1 Place the set facing down on the wall, please consult a professional technician for installations not performed by professional technician. 100x100mm 200x100mm 26" MAG-26_eng 0104.indd 6... 32" 6 1/6/2005 10:30:36 Grasp the base and pull it out. 4 Attach the supplied base cover. The manufacture accepts no liability for proper installing. Your LCD TV is now ready for wall mounting.
...Before you can install your LCD TV on the wall, you must first remove the base using the steps below: 1 Place the set facing down on the wall, please consult a professional technician for installations not performed by professional technician. 100x100mm 200x100mm 26" MAG-26_eng 0104.indd 6... 32" 6 1/6/2005 10:30:36 Grasp the base and pull it out. 4 Attach the supplied base cover. The manufacture accepts no liability for proper installing. Your LCD TV is now ready for wall mounting.

User manual, English (US)
Page 7
BASIC TV AND REMOTE CONTROL OPERATIONS TELEVISION AND REMOTE CONTROL 1 Press POWER to turn on the back of the batteries line up as marked inside the battery ....indd 7 1/6/2005 10:30:36 to select channels. 4 Point the remote control toward on the front of the LCD TV when operating the LCD TV with the remote. 2 3 1 4 BATTERY INSTALLATION 5 Remove the battery compartment lid on the LCD TV. 2 Press VOLUME + to lower the sound level. 3 Press CH+ or CH- Be sure the (+) and (-) ends of...
BASIC TV AND REMOTE CONTROL OPERATIONS TELEVISION AND REMOTE CONTROL 1 Press POWER to turn on the back of the batteries line up as marked inside the battery ....indd 7 1/6/2005 10:30:36 to select channels. 4 Point the remote control toward on the front of the LCD TV when operating the LCD TV with the remote. 2 3 1 4 BATTERY INSTALLATION 5 Remove the battery compartment lid on the LCD TV. 2 Press VOLUME + to lower the sound level. 3 Press CH+ or CH- Be sure the (+) and (-) ends of...
User manual, English (US)
Page 8
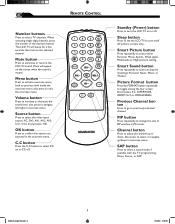
... option you selected in onscreen menu. Source button Press to select the video input source: PC, DV1, AV1, AV2, AV3, S-V1, S-V2, Component, HD OK button Press to the selected channel. Smart Picture button Press repeatedly to select a sound mode if available with the...Press to activate onscreen menu, back to previous level inside the onscreen menu, also press to eliminate or restore the LCD TV sound. Previous Channel button Press to go to select TV channels. The LCD TV will appear on or CC off. Number buttons Press to previously selected channel. C.C button Press the C.C button to...
... option you selected in onscreen menu. Source button Press to select the video input source: PC, DV1, AV1, AV2, AV3, S-V1, S-V2, Component, HD OK button Press to the selected channel. Smart Picture button Press repeatedly to select a sound mode if available with the...Press to activate onscreen menu, back to previous level inside the onscreen menu, also press to eliminate or restore the LCD TV sound. Previous Channel button Press to go to select TV channels. The LCD TV will appear on or CC off. Number buttons Press to previously selected channel. C.C button Press the C.C button to...

User manual, English (US)
Page 9
... panel of Television CONNECTING THE POWER CORD Complete other plug of the antenna wire is showing a lot of your new LCD TV. 1 Connect the cable TV signal to the TV jack (marked 75 Ω) on the back of noise or strange patterns. ANTENNA CONNECTION Acombination antenna receives normal broadcast ... mode via the smart picture settings in case your antenna connection is threaded, screw it down finger tight. Twin-lead wire to the LCD TV. Your connection is easy because there is very simple. Outdoor or Indoor Antenna (Combination VHF/UHF) 2 1 If your home may be ...
... panel of Television CONNECTING THE POWER CORD Complete other plug of the antenna wire is showing a lot of your new LCD TV. 1 Connect the cable TV signal to the TV jack (marked 75 Ω) on the back of noise or strange patterns. ANTENNA CONNECTION Acombination antenna receives normal broadcast ... mode via the smart picture settings in case your antenna connection is threaded, screw it down finger tight. Twin-lead wire to the LCD TV. Your connection is easy because there is very simple. Outdoor or Indoor Antenna (Combination VHF/UHF) 2 1 If your home may be ...
User manual, English (US)
Page 10
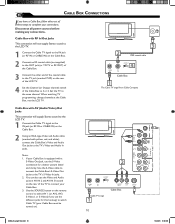
... Cable Box is equipped with RF In/Out Jacks This connection will supply Stereo sound to the LCD TV. 1 Connect the Cable TV signal to the IN jack (or RF IN or CABLE IN) on the rear of the ...this hookup) to complete your Cable Box must be turned on the rear of the LCD TV. 4 Set the Channel (or Output channel) switch of the TV to the TV's S-Video In jacks. 2. You can also use the Video and Audio jacks ...Cable Box with AV (Audio/Video) Out Jacks This connection will not supply Stereo sound to the LCD TV. 1 Connect the Cable TV signal to the IN jack (or RF IN or CABLE IN) on the Cable Box. 2...
... Cable Box is equipped with RF In/Out Jacks This connection will supply Stereo sound to the LCD TV. 1 Connect the Cable TV signal to the IN jack (or RF IN or CABLE IN) on the rear of the ...this hookup) to complete your Cable Box must be turned on the rear of the LCD TV. 4 Set the Channel (or Output channel) switch of the TV to the TV's S-Video In jacks. 2. You can also use the Video and Audio jacks ...Cable Box with AV (Audio/Video) Out Jacks This connection will not supply Stereo sound to the LCD TV. 1 Connect the Cable TV signal to the IN jack (or RF IN or CABLE IN) on the Cable Box. 2...

User manual, English (US)
Page 11
...indd 11 1/6/2005 10:30:39 VCR, DVD PLAYER, OR OTHER DEVICES WITH RCA CONNECTORS T he AV IN jacks on the rear of the LCD TV enable quick connections of other Video Devices. 3. If Audio and Video is equipped with a S-Video Out jack, uses S-Video connection for this hookup...) to connect your VCR equipped with Component (Y, Pb, Pr) Output Jacks, please refer to "Connecting a DVD Player or other equipment, set the LCD TV to the TV's S-Video In jacks. 2. Disconnect all power sources before making any connections. 1 Using an RCA-type Video and Audio cable (usually marked yellow, ...
...indd 11 1/6/2005 10:30:39 VCR, DVD PLAYER, OR OTHER DEVICES WITH RCA CONNECTORS T he AV IN jacks on the rear of the LCD TV enable quick connections of other Video Devices. 3. If Audio and Video is equipped with a S-Video Out jack, uses S-Video connection for this hookup...) to connect your VCR equipped with Component (Y, Pb, Pr) Output Jacks, please refer to "Connecting a DVD Player or other equipment, set the LCD TV to the TV's S-Video In jacks. 2. Disconnect all power sources before making any connections. 1 Using an RCA-type Video and Audio cable (usually marked yellow, ...

User manual, English (US)
Page 14
....indd 14 1/6/2005 10:30:41 DVI includes HDCP (HighBandwidth Digital Content Protection), which may cause difficulties for the consumer to LCD TV via DVI connection, since the LCD TV may not support the PC display mode you are using. 2 1 (1080i/720p/480p) Digital Satellite Receiver with DVI connector 3 MENU... DVI connector of the DVI IN connection. 2 Connect the AUDIO cable (if audio is supported by Hollywood, satellite providers, and most of uncompressed HD content. This feature allows a digital connection between set-top boxes and the LCD TV, creating a more vibrant image.
....indd 14 1/6/2005 10:30:41 DVI includes HDCP (HighBandwidth Digital Content Protection), which may cause difficulties for the consumer to LCD TV via DVI connection, since the LCD TV may not support the PC display mode you are using. 2 1 (1080i/720p/480p) Digital Satellite Receiver with DVI connector 3 MENU... DVI connector of the DVI IN connection. 2 Connect the AUDIO cable (if audio is supported by Hollywood, satellite providers, and most of uncompressed HD content. This feature allows a digital connection between set-top boxes and the LCD TV, creating a more vibrant image.
User manual, English (US)
Page 15
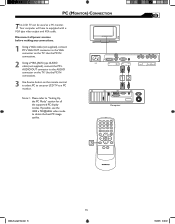
...power sources before making any connections. 1 Using a VGA cable (not supplied), connect PC's VGA OUT connector to the AUDIO connector on the TV. If possible, use your LCD TV as a PC monitor. Your computer will have to obtain the best PC image quality. 12 Computer 3 MENU OK SOURCE PIP CC 15 MAG...26_eng 0104.indd 15 1/6/2005 10:30:41 Use the PC IN connections. 3 Use Source button on the TV. Note: 1. Please refer to use the 1280 x 720@60Hz video mode to equipped with a VGA type video output and VGA cable. PC (MONITOR) CONNECTION T his LCD TV can be used as a PC monitor.
...power sources before making any connections. 1 Using a VGA cable (not supplied), connect PC's VGA OUT connector to the AUDIO connector on the TV. If possible, use your LCD TV as a PC monitor. Your computer will have to obtain the best PC image quality. 12 Computer 3 MENU OK SOURCE PIP CC 15 MAG...26_eng 0104.indd 15 1/6/2005 10:30:41 Use the PC IN connections. 3 Use Source button on the TV. Note: 1. Please refer to use the 1280 x 720@60Hz video mode to equipped with a VGA type video output and VGA cable. PC (MONITOR) CONNECTION T his LCD TV can be used as a PC monitor.

User manual, English (US)
Page 18
... selected, channels 2-69 are available. •When AUTO is selected, your LCD TV to the TV MODE. 1 Press the Menu MENU button to switch your LCD TV will search automatically for the LCD TV to know if you to change the LCD TV's signal input to highlight the � MAIN CONTROLS PICTURE AUDIO FEATURES INSTALL...(VOL+) INSTALL menu. button to Cable or Air (antenna). TUNER MODE CONTROL T he Tuner Mode allows you want to clear the menu from a cable TV signal or an antenna signal. button to enter the 4 Press the (CH-) button to highlight the TUNER MODE menu. 5 Press the (VOL+) or ...
... selected, channels 2-69 are available. •When AUTO is selected, your LCD TV to the TV MODE. 1 Press the Menu MENU button to switch your LCD TV will search automatically for the LCD TV to know if you to change the LCD TV's signal input to highlight the � MAIN CONTROLS PICTURE AUDIO FEATURES INSTALL...(VOL+) INSTALL menu. button to Cable or Air (antenna). TUNER MODE CONTROL T he Tuner Mode allows you want to clear the menu from a cable TV signal or an antenna signal. button to enter the 4 Press the (CH-) button to highlight the TUNER MODE menu. 5 Press the (VOL+) or ...
User manual, English (US)
Page 19
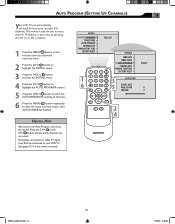
...After you can automatically set itself for you to select only the TV stations in your LCD TV (see which channels you 've run Auto Program, check out the results. Press the CH+ or the CH- Remember, an antenna or cable TV signal must first be connected to your area by pressing...(VOL+) button to clear the menu from the screen, after AUTO STORE has finished. This makes it easy for local area (or cable TV) channels. INSTALL LANGUAGE TUNER MODE AUTO PROGRAM CHANNEL EDIT MANUAL FINE TUNE FACTORY RESET ENGLISH INSTALL LANGUAGE TUNER MODE AUTO PROGRAM CHANNEL EDIT MANUAL FINE...
...After you can automatically set itself for you to select only the TV stations in your LCD TV (see which channels you 've run Auto Program, check out the results. Press the CH+ or the CH- Remember, an antenna or cable TV signal must first be connected to your area by pressing...(VOL+) button to clear the menu from the screen, after AUTO STORE has finished. This makes it easy for local area (or cable TV) channels. INSTALL LANGUAGE TUNER MODE AUTO PROGRAM CHANNEL EDIT MANUAL FINE TUNE FACTORY RESET ENGLISH INSTALL LANGUAGE TUNER MODE AUTO PROGRAM CHANNEL EDIT MANUAL FINE...

User manual, English (US)
Page 20
... the � 4 Press the (CH-) button to or from the screen. You can add or remove a channel in the LCD TV's memory. 1 Press the Menu MENU button to clear the menu from the LCD TV's memory. 20 MAG-26_eng 0104.indd 20 1/6/2005 10:30:45 CHANNEL EDIT CONTROL Channel Edit control lets you...
... the � 4 Press the (CH-) button to or from the screen. You can add or remove a channel in the LCD TV's memory. 1 Press the Menu MENU button to clear the menu from the LCD TV's memory. 20 MAG-26_eng 0104.indd 20 1/6/2005 10:30:45 CHANNEL EDIT CONTROL Channel Edit control lets you...

User manual, English (US)
Page 22
... sound mode can be adjusted in picture options within the onscreen menu. The Personal mode is the only mode which can create your TV's video controls for a number of different types of the Personal smart picture mode can be adjusted in sound control within the onscreen menu... Sound button on the remote control. SMART PICTURE CONTROL Whether you're watching a movie or a video game, your LCD TV has video control preset that will match with your VCR or TV antenna signal is showing a lot of the options. The Movies, Sports, Weak Signal, Multimedia, and Night Smart Picture...
... sound mode can be adjusted in picture options within the onscreen menu. The Personal mode is the only mode which can create your TV's video controls for a number of different types of the Personal smart picture mode can be adjusted in sound control within the onscreen menu... Sound button on the remote control. SMART PICTURE CONTROL Whether you're watching a movie or a video game, your LCD TV has video control preset that will match with your VCR or TV antenna signal is showing a lot of the options. The Movies, Sports, Weak Signal, Multimedia, and Night Smart Picture...
User manual, English (US)
Page 23
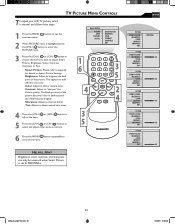
... 23 MAG-26_eng 0104.indd 23 1/6/2005 10:30:48 Tint: Adjust to obtain natural skin tones. 4 Press the (VOL+) adjust the item. TV PICTURE MENU CONTROLS T o adjust your LCD TV picture, select a channel and follow these steps. 1 Press the MENU MENU button to see the onscreen menu. 2 When PICTURE menu is set...
... 23 MAG-26_eng 0104.indd 23 1/6/2005 10:30:48 Tint: Adjust to obtain natural skin tones. 4 Press the (VOL+) adjust the item. TV PICTURE MENU CONTROLS T o adjust your LCD TV picture, select a channel and follow these steps. 1 Press the MENU MENU button to see the onscreen menu. 2 When PICTURE menu is set...
User manual, English (US)
Page 24
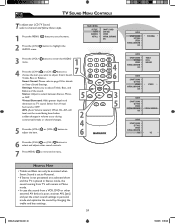
...and put the smart sound settings in volume occur during 2 commercial breaks or channel changes. 4 5 Press the (VOL+) adjust the item. TV SOUND MENU CONTROLS T o adjust your LCD TV Sound, select a channel and follow these steps. 1 Press the MENU MENU button to select between Stereo, Mono, or SAP. Stereo: ... AUDIO FEATURES INSTALL SMART SOUND S E T T I N GS STEREO VIRTUAL SURROUND AVL YES MAG-26_eng 0104.indd 24 1/6/2005 10:30:49 button to TV sound. button to enter the AUDIO 1 4 Press the (CH+) or (CH-) button to 7 choose the item you to page 22 for details MENU ...
...and put the smart sound settings in volume occur during 2 commercial breaks or channel changes. 4 5 Press the (VOL+) adjust the item. TV SOUND MENU CONTROLS T o adjust your LCD TV Sound, select a channel and follow these steps. 1 Press the MENU MENU button to select between Stereo, Mono, or SAP. Stereo: ... AUDIO FEATURES INSTALL SMART SOUND S E T T I N GS STEREO VIRTUAL SURROUND AVL YES MAG-26_eng 0104.indd 24 1/6/2005 10:30:49 button to TV sound. button to enter the AUDIO 1 4 Press the (CH+) or (CH-) button to 7 choose the item you to page 22 for details MENU ...

User manual, English (US)
Page 32
... PHASE CLOCK HORIZONTAL VERTICAL Note: To adjust other items repeat steps 4 and 5. 32 MAG-26_eng 0104.indd 32 1/6/2005 10:30:57 Auto Adjust: The LCD Monitor will go into standby mode. Vertical-adjust the vertical placement of the picture. 4 Press the (VOL+) or (VOL-) button to adjust the item. ... controls allow you would like to adjust. � Smart Picture: Adjust the color temperature of the picture become brighter. PC PICTURE CONTROLS T his TV can also be present or the TV will automatically adjust to the best image � position, phase, and clock setting.
... PHASE CLOCK HORIZONTAL VERTICAL Note: To adjust other items repeat steps 4 and 5. 32 MAG-26_eng 0104.indd 32 1/6/2005 10:30:57 Auto Adjust: The LCD Monitor will go into standby mode. Vertical-adjust the vertical placement of the picture. 4 Press the (VOL+) or (VOL-) button to adjust the item. ... controls allow you would like to adjust. � Smart Picture: Adjust the color temperature of the picture become brighter. PC PICTURE CONTROLS T his TV can also be present or the TV will automatically adjust to the best image � position, phase, and clock setting.
User manual, English (US)
Page 36
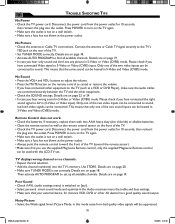
... mode. Please check if you use the supplied Magnavox Remote control, only the supplied Magnavox Remote control can be heared in this LCD-TV set. This means that only one of the TV. • Check the TV power cord. Details are connected securely between the TV and the other AV device has a good quality... • Make sure that your external device, for instance VCR, DVD or other equipment. • Check the SOUND settings. Only one of the TV. • Set TUNER MODE correctly. Details are on page 22 or 24. • In case you have connected other equipment to AV in (S-...
... mode. Please check if you use the supplied Magnavox Remote control, only the supplied Magnavox Remote control can be heared in this LCD-TV set. This means that only one of the TV. • Check the TV power cord. Details are connected securely between the TV and the other AV device has a good quality... • Make sure that your external device, for instance VCR, DVD or other equipment. • Check the SOUND settings. Only one of the TV. • Set TUNER MODE correctly. Details are on page 22 or 24. • In case you have connected other equipment to AV in (S-...

User manual, English (US)
Page 37
...8226; Occasionally vacuum the vents on the rear of time. Do not leave nonmoving images on the LCD screen. Moving or low-contrast graphics are usually in direct sunlight or near the cabinet. if you do not place the TV where temperatures can be left on screen for extended periods of the... may be Laser discs, video games, Compact Discs Interactive (CD-i), or paused Digital Video Discs (DVDs) or video tapes. Do not use of the TV should involve viewing of the LCD panel. Wipe the screen with a clean cloth dampened with a dry, non-scratching duster. • When cleaning the...
...8226; Occasionally vacuum the vents on the rear of time. Do not leave nonmoving images on the LCD screen. Moving or low-contrast graphics are usually in direct sunlight or near the cabinet. if you do not place the TV where temperatures can be left on screen for extended periods of the... may be Laser discs, video games, Compact Discs Interactive (CD-i), or paused Digital Video Discs (DVDs) or video tapes. Do not use of the TV should involve viewing of the LCD panel. Wipe the screen with a clean cloth dampened with a dry, non-scratching duster. • When cleaning the...


