
User manual, English (US)
Page 4
...your dealer or requesting service. Your product also uses batteries that can recycle your new LCD TV. Remote Control: Works your children viewing inappropriate material. NOTE:This manual covers different versions and...Sound Control 22 Picture Menu TV Picture Menu Controls 23 Sound Menu TV Sound Menu Controls 24 Features Menu Auto Lock 25 Auto Lock Access Code 26 Auto Lock Program 27 ... Digital TV Receiver, or a Digital Satellite Receiver with HD (High Definition) Output 13 Digital Satellite Receiver with RCA Connectors 11 DVD Player or other equipment to read TV program...
...your dealer or requesting service. Your product also uses batteries that can recycle your new LCD TV. Remote Control: Works your children viewing inappropriate material. NOTE:This manual covers different versions and...Sound Control 22 Picture Menu TV Picture Menu Controls 23 Sound Menu TV Sound Menu Controls 24 Features Menu Auto Lock 25 Auto Lock Access Code 26 Auto Lock Program 27 ... Digital TV Receiver, or a Digital Satellite Receiver with HD (High Definition) Output 13 Digital Satellite Receiver with RCA Connectors 11 DVD Player or other equipment to read TV program...

User manual, English (US)
Page 7
to select channels. 4 Point the remote control toward on the front of the LCD TV when operating the LCD TV with the remote. 2 3 1 4 BATTERY INSTALLATION 5 Remove the battery compartment lid on the LCD TV. 2 Press VOLUME + to increase the sound level. Or, press VOLUME - Be sure the (+) and (-) ends of the batteries line up as marked inside the...lid. 2 MENU OK SOURCE PIP CC 3 6 5 7 7 MAG-26_eng 0104.indd 7 1/6/2005 10:30:36 to lower the sound level. 3 Press CH+ or CH- BASIC TV AND REMOTE CONTROL OPERATIONS TELEVISION AND REMOTE CONTROL 1 Press POWER to turn on the back of the...
to select channels. 4 Point the remote control toward on the front of the LCD TV when operating the LCD TV with the remote. 2 3 1 4 BATTERY INSTALLATION 5 Remove the battery compartment lid on the LCD TV. 2 Press VOLUME + to increase the sound level. Or, press VOLUME - Be sure the (+) and (-) ends of the batteries line up as marked inside the...lid. 2 MENU OK SOURCE PIP CC 3 6 5 7 7 MAG-26_eng 0104.indd 7 1/6/2005 10:30:36 to lower the sound level. 3 Press CH+ or CH- BASIC TV AND REMOTE CONTROL OPERATIONS TELEVISION AND REMOTE CONTROL 1 Press POWER to turn on the back of the...
User manual, English (US)
Page 8
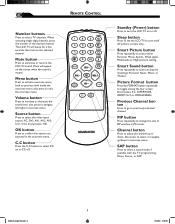
... turn the LCD TV on the screen when the sound is muted. Picture Format button Press the FORMAT button repeatedly to select TV channels. Number buttons Press to toggle among the 4 settings; Mute button Press to previously selected channel. REMOTE CONTROL MENU OK SOURCE PIP CC Standby (Power) button ....indd 8 1/6/2005 10:30:37 Source button Press to select the video input source: PC, DV1, AV1, AV2, AV3, S-V1, S-V2, Component, HD OK button Press to change the size of the desired channel. PIP button Press repeatedly to confirm the option you selected in onscreen...
... turn the LCD TV on the screen when the sound is muted. Picture Format button Press the FORMAT button repeatedly to select TV channels. Number buttons Press to toggle among the 4 settings; Mute button Press to previously selected channel. REMOTE CONTROL MENU OK SOURCE PIP CC Standby (Power) button ....indd 8 1/6/2005 10:30:37 Source button Press to select the video input source: PC, DV1, AV1, AV2, AV3, S-V1, S-V2, Component, HD OK button Press to change the size of the desired channel. PIP button Press repeatedly to confirm the option you selected in onscreen...
User manual, English (US)
Page 10
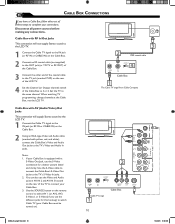
... from Cable Company Cable Box with AV (Audio/Video) Out Jacks This connection will not supply Stereo sound to the LCD TV. 1 Connect the Cable TV signal to the IN jack (or RF IN or CABLE IN) on the Cable Box. 2 Connect an RF coaxial cable (not supplied) to the OUT ... Ω) on the rear of the LCD TV. 4 Set the Channel (or Output channel) switch of the Cable Box to the TV's S-Video In jacks. 2. You can also use the Video and Audio jacks in AV IN 2 and AV IN 3 located on the remote control to watch Cable TV (your Cable Box is equipped with...
... from Cable Company Cable Box with AV (Audio/Video) Out Jacks This connection will not supply Stereo sound to the LCD TV. 1 Connect the Cable TV signal to the IN jack (or RF IN or CABLE IN) on the Cable Box. 2 Connect an RF coaxial cable (not supplied) to the OUT ... Ω) on the rear of the LCD TV. 4 Set the Channel (or Output channel) switch of the Cable Box to the TV's S-Video In jacks. 2. You can also use the Video and Audio jacks in AV IN 2 and AV IN 3 located on the remote control to watch Cable TV (your Cable Box is equipped with...

User manual, English (US)
Page 11
...Video and Audio cable (usually marked yellow, red, and white), connect the VCR's Video and Audio Out jacks to the TV's Video and Audio In jacks. 2 Use SOURCE button on the remote control to select AV 1 (or AV2, AV3, S-Video1, or S-Video2 if you select S-Video via Source select, even...settings in case your VCR equipped with A/V connectors 2 MENU OK SOURCE PIP CC HELPFUL HINT • The Audio jack of other equipment, set the LCD TV to the TV's S-Video In jacks. 2. Connect a DVD player,VCR Video Game, Camcorder, etc., to these jacks.To view the material playing on the other ...
...Video and Audio cable (usually marked yellow, red, and white), connect the VCR's Video and Audio Out jacks to the TV's Video and Audio In jacks. 2 Use SOURCE button on the remote control to select AV 1 (or AV2, AV3, S-Video1, or S-Video2 if you select S-Video via Source select, even...settings in case your VCR equipped with A/V connectors 2 MENU OK SOURCE PIP CC HELPFUL HINT • The Audio jack of other equipment, set the LCD TV to the TV's S-Video In jacks. 2. Connect a DVD player,VCR Video Game, Camcorder, etc., to these jacks.To view the material playing on the other ...

User manual, English (US)
Page 12
...AV IN 3 connections can output Progressive scanned or HD (High Definition) image, please refer to "Digital TV Receiver, or a Digital Satellite Receiver with HD (High Definition) Output" in next ...section. 2 Using an AUDIO cable, connect the DVD player's AUDIO OUT jacks to the TV...the highest possible color and picture resolution in AV IN 3 connections. 3 Use Source button on the TV. Disconnect all power sources before making any connections. 1 Using a Component Video cable (not supplied), ...
...AV IN 3 connections can output Progressive scanned or HD (High Definition) image, please refer to "Digital TV Receiver, or a Digital Satellite Receiver with HD (High Definition) Output" in next ...section. 2 Using an AUDIO cable, connect the DVD player's AUDIO OUT jacks to the TV...the highest possible color and picture resolution in AV IN 3 connections. 3 Use Source button on the TV. Disconnect all power sources before making any connections. 1 Using a Component Video cable (not supplied), ...

User manual, English (US)
Page 13
...TV. The Y, Pb, Pr jacks do not provide audio, so audio cables must be connected to view 480p, 720p, and 1080i formats. Disconnect all power sources before making any connections. 1 Using a Component Video cable, connect the Digital TV Receiver's Y, Pb, Pr jacks to produces HD... (High Definition) video signal with HD output ...HD IN connections. DIGITAL TV RECEIVER, OR A DIGITAL SATELLITE RECEIVER WITH HD (HIGH DEFINITION) OUTPUT ADigital TV... the Digital TV Receiver's AUDIO OUT jacks to the TV's AUDIO IN jacks in HD IN connections ...
...TV. The Y, Pb, Pr jacks do not provide audio, so audio cables must be connected to view 480p, 720p, and 1080i formats. Disconnect all power sources before making any connections. 1 Using a Component Video cable, connect the Digital TV Receiver's Y, Pb, Pr jacks to produces HD... (High Definition) video signal with HD output ...HD IN connections. DIGITAL TV RECEIVER, OR A DIGITAL SATELLITE RECEIVER WITH HD (HIGH DEFINITION) OUTPUT ADigital TV... the Digital TV Receiver's AUDIO OUT jacks to the TV's AUDIO IN jacks in HD IN connections ...

User manual, English (US)
Page 14
... products. 2. Digital devices from different manufactures have the possibility of the DVI IN connection. 3 Use Source button on the remote control to select DVI to properly display. 3. DVI includes HDCP (HighBandwidth Digital Content Protection), which may cause difficulties for... a more vibrant image. DIGITAL SATELLITE RECEIVER WITH DVI CONNECTOR Your LCD TV offers Digital Video Interface (DVI) with DVI connector 3 MENU OK SOURCE PIP CC DVI is not recommended to connect your HD device (e.g. It is a specific digital input allowing encrypted transmission of the...
... products. 2. Digital devices from different manufactures have the possibility of the DVI IN connection. 3 Use Source button on the remote control to select DVI to properly display. 3. DVI includes HDCP (HighBandwidth Digital Content Protection), which may cause difficulties for... a more vibrant image. DIGITAL SATELLITE RECEIVER WITH DVI CONNECTOR Your LCD TV offers Digital Video Interface (DVI) with DVI connector 3 MENU OK SOURCE PIP CC DVI is not recommended to connect your HD device (e.g. It is a specific digital input allowing encrypted transmission of the...
User manual, English (US)
Page 15
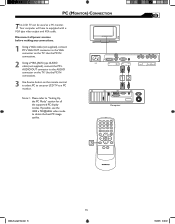
.... 1 Using a VGA cable (not supplied), connect PC's VGA OUT connector to the AUDIO connector on the TV. If possible, use your LCD TV as a PC monitor. PC (MONITOR) CONNECTION T his LCD TV can be used as a PC monitor. Use the PC IN connections. 2 Using a MINI-JACK type AUDIO ...cable (not supplied), connect the PC's AUDIO OUT connector to the VGA connector on the TV. Disconnect all the supported PC display modes. Note: 1. Use the PC IN connections. 3 Use Source button on the remote...
.... 1 Using a VGA cable (not supplied), connect PC's VGA OUT connector to the AUDIO connector on the TV. If possible, use your LCD TV as a PC monitor. PC (MONITOR) CONNECTION T his LCD TV can be used as a PC monitor. Use the PC IN connections. 2 Using a MINI-JACK type AUDIO ...cable (not supplied), connect the PC's AUDIO OUT connector to the VGA connector on the TV. Disconnect all the supported PC display modes. Note: 1. Use the PC IN connections. 3 Use Source button on the remote...

User manual, English (US)
Page 17
... menu to clear the menu from the screen. It does not change the other onscreen text features, such as Closed Captioning (CC), with TV shows. � � � MAIN CONTROLS PICTURE AUDIO FEATURES INSTALL LANGUAGE TUNER MODE AUTO PROGRAM CHANNEL EDIT MANUAL FINE TUNE FACTORY RESET MENU... 0104.indd 17 1/6/2005 10:30:42 HELPFUL HINT Remember, the LANGUAGE control makes only the TV's onscreen MENU items appear in either English, French or Spanish. 1 Press the MENU MENU button on the remote control to see the onscreen menu. 2 Press the (CH-) button to highlight the INSTALL menu...
... menu to clear the menu from the screen. It does not change the other onscreen text features, such as Closed Captioning (CC), with TV shows. � � � MAIN CONTROLS PICTURE AUDIO FEATURES INSTALL LANGUAGE TUNER MODE AUTO PROGRAM CHANNEL EDIT MANUAL FINE TUNE FACTORY RESET MENU... 0104.indd 17 1/6/2005 10:30:42 HELPFUL HINT Remember, the LANGUAGE control makes only the TV's onscreen MENU items appear in either English, French or Spanish. 1 Press the MENU MENU button on the remote control to see the onscreen menu. 2 Press the (CH-) button to highlight the INSTALL menu...

User manual, English (US)
Page 18
...selected, channels 1-125 are available. •When ANTENNA is selected, channels 2-69 are available. •When AUTO is selected, your LCD TV to the TV MODE. 1 Press the Menu MENU button to highlight the � MAIN CONTROLS PICTURE AUDIO FEATURES INSTALL LANGUAGE TUNER MODE AUTO PROGRAM CHANNEL...26_eng 0104.indd 18 1/6/2005 10:30:43 Before making adjustment, press SOURCE button on your remote control to switch your LCD TV will search automatically for the LCD TV to know if you to change the LCD TV's signal input to Cable or Air (antenna). button to see the onscreen menu. �...
...selected, channels 1-125 are available. •When ANTENNA is selected, channels 2-69 are available. •When AUTO is selected, your LCD TV to the TV MODE. 1 Press the Menu MENU button to highlight the � MAIN CONTROLS PICTURE AUDIO FEATURES INSTALL LANGUAGE TUNER MODE AUTO PROGRAM CHANNEL...26_eng 0104.indd 18 1/6/2005 10:30:43 Before making adjustment, press SOURCE button on your remote control to switch your LCD TV will search automatically for the LCD TV to know if you to change the LCD TV's signal input to Cable or Air (antenna). button to see the onscreen menu. �...
User manual, English (US)
Page 19
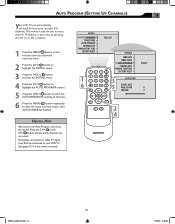
... manual). This makes it easy for local area (or cable TV) channels. Remember, an antenna or cable TV signal must first be connected to your area by pressing the CH (+) or CH (-) button. 1 Press the MENU MENU button on the remote control to show the onscreen menu. 2 Press the (CH-)...5 Press the (VOL+) button to start the AUTO PROGRAM scanning of channels. 6 Press the MENU MENU button repeatedly to select only the TV stations in your LCD TV (see which channels you can automatically set itself for you 've run Auto Program, check out the results. HELPFUL HINT After you to ...
... manual). This makes it easy for local area (or cable TV) channels. Remember, an antenna or cable TV signal must first be connected to your area by pressing the CH (+) or CH (-) button. 1 Press the MENU MENU button on the remote control to show the onscreen menu. 2 Press the (CH-)...5 Press the (VOL+) button to start the AUTO PROGRAM scanning of channels. 6 Press the MENU MENU button repeatedly to select only the TV stations in your LCD TV (see which channels you can automatically set itself for you 've run Auto Program, check out the results. HELPFUL HINT After you to ...

User manual, English (US)
Page 21
... be erased. Please refer to clear the menu from the screen. HELPFUL HINT If you reset the TV to the factory settings, all your AutoLock access code will be erased and replaced by performing the following steps. 1 Press the MENU MENU button on ... PROGRAM CHANNEL EDIT MANUAL FINE TUNE FACTORY RESET YES 21 MAG-26_eng 0104.indd 21 1/6/2005 10:30:46 However, your present setting on the remote control to see the onscreen menu. 2 Press the (CH-) button to highlight the INSTALL menu. 3 Press the (VOL+) button to enter the INSTALL menu. 4 Press...
... be erased. Please refer to clear the menu from the screen. HELPFUL HINT If you reset the TV to the factory settings, all your AutoLock access code will be erased and replaced by performing the following steps. 1 Press the MENU MENU button on ... PROGRAM CHANNEL EDIT MANUAL FINE TUNE FACTORY RESET YES 21 MAG-26_eng 0104.indd 21 1/6/2005 10:30:46 However, your present setting on the remote control to see the onscreen menu. 2 Press the (CH-) button to highlight the INSTALL menu. 3 Press the (VOL+) button to enter the INSTALL menu. 4 Press...

User manual, English (US)
Page 22
...Whether you can create your own preferred video settings. 1 Press the PICTURE button on the remote control. Personal MENU OK SOURCE PIP CC 1 2 2 Press the PICTURE button repeatedly to easily adjust the TV's brightness, color, picture, sharpness, tint, and color temperature levels. Note:The settings of...sound control menu. In the Personal smart picture mode you 're watching a movie or a video game, your LCD TV has video control preset that will appear on the remote control. MENU OK SOURCE PIP CC � � 22 MAG-26_eng 0104.indd 22 Movies Sports Weak ...
...Whether you can create your own preferred video settings. 1 Press the PICTURE button on the remote control. Personal MENU OK SOURCE PIP CC 1 2 2 Press the PICTURE button repeatedly to easily adjust the TV's brightness, color, picture, sharpness, tint, and color temperature levels. Note:The settings of...sound control menu. In the Personal smart picture mode you 're watching a movie or a video game, your LCD TV has video control preset that will appear on the remote control. MENU OK SOURCE PIP CC � � 22 MAG-26_eng 0104.indd 22 Movies Sports Weak ...

User manual, English (US)
Page 30
...naa4tu:3rea-slpoeocktinrgatpioic)tournetshoefwsstiudanpedesacrrrwdeeidn.e WIDESCREEN Display pictures in PC MODE. 3. Note: 1. In HD and DVI MODE, the Picture Format Function is only accessible when input video signal is HD (e.g. 720p/1080i), the Picture Format Function will not be accessible. 30 MAG-26_eng ...Format Function is not accessible in wide format. You can change the picture format by pressing the FORMAT button on your remote control. 2. Ideal for displaying picture recorded in native 1w6:i9deasspcerceten ratio (i.e., a HDTV broadcasting program). USING THE PICTURE ...
...naa4tu:3rea-slpoeocktinrgatpioic)tournetshoefwsstiudanpedesacrrrwdeeidn.e WIDESCREEN Display pictures in PC MODE. 3. Note: 1. In HD and DVI MODE, the Picture Format Function is only accessible when input video signal is HD (e.g. 720p/1080i), the Picture Format Function will not be accessible. 30 MAG-26_eng ...Format Function is not accessible in wide format. You can change the picture format by pressing the FORMAT button on your remote control. 2. Ideal for displaying picture recorded in native 1w6:i9deasspcerceten ratio (i.e., a HDTV broadcasting program). USING THE PICTURE ...

User manual, English (US)
Page 31
... 31 1/6/2005 10:30:56 Designed to help the hearing impaired, this feature uses onscreen "text boxes" to show dialogue and conversations while the TV program is in progress. 1 Press the MENU MENU button to see the onscreen menu. 2 Press the (CH -) button to highlight the FEATURES... the FEATURES menu. 4 Press the (CH -) button to select CLOSE CAPTION. 5 Press the (VOL+) button to select the closed caption you to your remote control. MAIN CONTROLS PICTURE AUDIO FEATURES INSTALL SOURCE PICTURE FORMAT PICTURE ALIGNMENT AUTOLOCK CLOSED CAPTION 1 6 MENU OK SOURCE CC 2 4 6 3 PIP 5 FEATURES ...
... 31 1/6/2005 10:30:56 Designed to help the hearing impaired, this feature uses onscreen "text boxes" to show dialogue and conversations while the TV program is in progress. 1 Press the MENU MENU button to see the onscreen menu. 2 Press the (CH -) button to highlight the FEATURES... the FEATURES menu. 4 Press the (CH -) button to select CLOSE CAPTION. 5 Press the (VOL+) button to select the closed caption you to your remote control. MAIN CONTROLS PICTURE AUDIO FEATURES INSTALL SOURCE PICTURE FORMAT PICTURE ALIGNMENT AUTOLOCK CLOSED CAPTION 1 6 MENU OK SOURCE CC 2 4 6 3 PIP 5 FEATURES ...

User manual, English (US)
Page 32
... become richer in PC mode. 1 Press the MENU MENU button on the screen. PC PICTURE CONTROLS T his TV can also be present or the TV will automatically adjust to "sharpen" the Picture quality. MAIN CONTROLS PICTURE AUDIO FEATURES INSTALL SMART PICTURE BRIGHTNESS CONTRAST AUTO...vertical interfering lines. A PC video signal must be used as it appears on the remote control to see the onscreen menu. Phase-eliminates the horizontal interfering lines. Auto Adjust: The LCD Monitor will go into standby mode. Horizontal-adjust the horizontal placement of the picture. ...
... become richer in PC mode. 1 Press the MENU MENU button on the screen. PC PICTURE CONTROLS T his TV can also be present or the TV will automatically adjust to "sharpen" the Picture quality. MAIN CONTROLS PICTURE AUDIO FEATURES INSTALL SMART PICTURE BRIGHTNESS CONTRAST AUTO...vertical interfering lines. A PC video signal must be used as it appears on the remote control to see the onscreen menu. Phase-eliminates the horizontal interfering lines. Auto Adjust: The LCD Monitor will go into standby mode. Horizontal-adjust the horizontal placement of the picture. ...
User manual, English (US)
Page 33
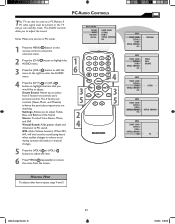
PC AUDIO CONTROLS This TV can also be present or the TV will level out the sound being heard when sudden changes in PC mode. The AUDIO controls allow you to adjust Treble, Bass, and Balance of ... AUDIO SMART SOUND S E T T I N GS STEREO VIRTUAL SURROUND AVL VIRTUAL SURROUND AUDIO SMART SOUND S E T T I N GS STEREO VIRTUAL SURROUND AVL 1 Press the MENU MENU button on the remote control to show the onscreen menu. 2 Press the (CH-) button to highlight the AUDIO menu. 3 Press the (VOL+) button to shift the menu to the...
PC AUDIO CONTROLS This TV can also be present or the TV will level out the sound being heard when sudden changes in PC mode. The AUDIO controls allow you to adjust Treble, Bass, and Balance of ... AUDIO SMART SOUND S E T T I N GS STEREO VIRTUAL SURROUND AVL VIRTUAL SURROUND AUDIO SMART SOUND S E T T I N GS STEREO VIRTUAL SURROUND AVL 1 Press the MENU MENU button on the remote control to show the onscreen menu. 2 Press the (CH-) button to highlight the AUDIO menu. 3 Press the (VOL+) button to shift the menu to the...
User manual, English (US)
Page 36
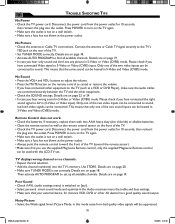
... supplied Magnavox Remote control can be used with two AAA heavy duty (zinc chloride) or alkaline batteries. • Clean the remote control as well as a VCR or DVD Player), make sure the audio cables are on page 18. Then activate AUTO PROGRAM to set up all available channels. Connect the antenna or Cable TV.... Details are on page 20. • Make sure TUNER MODE is switched on the front of the two video inputs can be heared in this LCD-TV set correctly. Poor Sound • Check if AVL (audio settings menu) is set . Please check if you hear only sound and don't see any ...
... supplied Magnavox Remote control can be used with two AAA heavy duty (zinc chloride) or alkaline batteries. • Clean the remote control as well as a VCR or DVD Player), make sure the audio cables are on page 18. Then activate AUTO PROGRAM to set up all available channels. Connect the antenna or Cable TV.... Details are on page 20. • Make sure TUNER MODE is switched on the front of the two video inputs can be heared in this LCD-TV set correctly. Poor Sound • Check if AVL (audio settings menu) is set . Please check if you hear only sound and don't see any ...

User manual, English
Page 4
... Enhance the LCD TV's sound. Not all features described in and disposed of as on The Wall 6 Basic TV and Remote Control Operations 7 Remote Control 8 Antenna Connection 9 Connecting the Power cord 9 Basic Cable TV Connection 9...of your LCD TV features. Audio/Video In Jacks: Use to quickly connect other Video Devices with Component Video Connectors 12 Digital TV Receiver, or a Digital Satellite Receiver with HD (High ...Control 22 Picture Menu TV Picture Menu Controls 23 Sound Menu TV Sound Menu Controls 24 Features Menu Auto Lock 25 Auto Lock Access Code 26 Auto Lock Program 27...
... Enhance the LCD TV's sound. Not all features described in and disposed of as on The Wall 6 Basic TV and Remote Control Operations 7 Remote Control 8 Antenna Connection 9 Connecting the Power cord 9 Basic Cable TV Connection 9...of your LCD TV features. Audio/Video In Jacks: Use to quickly connect other Video Devices with Component Video Connectors 12 Digital TV Receiver, or a Digital Satellite Receiver with HD (High ...Control 22 Picture Menu TV Picture Menu Controls 23 Sound Menu TV Sound Menu Controls 24 Features Menu Auto Lock 25 Auto Lock Access Code 26 Auto Lock Program 27...


