User manual, English (US)
Page 3
... cart, stand, tripod, bracket, or table specified by the manufacturer. 12. Note to the Cable TV system installer: This reminder is provided to call the Cable TV system installer's attention to Article 820-40 of the set and cause product damage and/or personal injury... 6. Wall or Ceiling Mounting - Follow all warnings. 4. B. Care should be serviced by applying excessive pull force to avoid injury from power lines. 20. Read these instructions. 3. A polarized plug has two blades with a dry cloth. 7. Refer all batteries correctly, with the manufacturer's instructions. 8. ...
... cart, stand, tripod, bracket, or table specified by the manufacturer. 12. Note to the Cable TV system installer: This reminder is provided to call the Cable TV system installer's attention to Article 820-40 of the set and cause product damage and/or personal injury... 6. Wall or Ceiling Mounting - Follow all warnings. 4. B. Care should be serviced by applying excessive pull force to avoid injury from power lines. 20. Read these instructions. 3. A polarized plug has two blades with a dry cloth. 7. Refer all batteries correctly, with the manufacturer's instructions. 8. ...
User manual, English (US)
Page 4
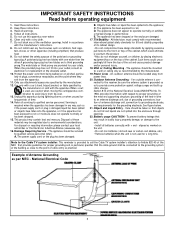
... 9 Setup Menus Menu Language 10 Cable TV Control 11 Auto Program (Setting TV Channels 12 Channel Edit 13 On-screen Menus TV Picture 14 Clock 15 On-Timer 16 Start-Up Channel 17 Start-Up Time 18 Closed Captions 19 Sleep Timer 20 Stereo Programming 21 Volume Bar 22 Here...) channel capability Closed Captioning: Allows you to block the viewing of certain channels if you set the picture's color, tint, contrast, etc., for setting TV controls. SmartPicture™: Lets you do not want . All rights reserved. 4 NOTE:This owner's manual explains multiple models. Automatic Channel...
... 9 Setup Menus Menu Language 10 Cable TV Control 11 Auto Program (Setting TV Channels 12 Channel Edit 13 On-screen Menus TV Picture 14 Clock 15 On-Timer 16 Start-Up Channel 17 Start-Up Time 18 Closed Captions 19 Sleep Timer 20 Stereo Programming 21 Volume Bar 22 Here...) channel capability Closed Captioning: Allows you to block the viewing of certain channels if you set the picture's color, tint, contrast, etc., for setting TV controls. SmartPicture™: Lets you do not want . All rights reserved. 4 NOTE:This owner's manual explains multiple models. Automatic Channel...
User manual, English (US)
Page 5
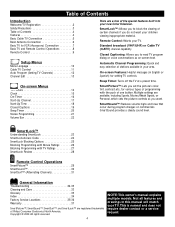
... RF coaxial cable (to connect the Cable Box to your Cable TV system, see AV on the TV using Cable TV, set the TV to the TV. To get to the TV's AV channel, go to the TV) may be a single cable (75 ohm) or may include a Cable Converter Box. Your Cable Box may have a Cable Box...: Connect the OUT jack of TV Cable TV Company Cable TV Signal Cable TV Signal Cable Box RF Coaxial Cable 75Ω Helpful Hints If you have separate Audio and Video Out jacks instead. Go to tune...
... RF coaxial cable (to connect the Cable Box to your Cable TV system, see AV on the TV using Cable TV, set the TV to the TV. To get to the TV's AV channel, go to the TV) may be a single cable (75 ohm) or may include a Cable Converter Box. Your Cable Box may have a Cable Box...: Connect the OUT jack of TV Cable TV Company Cable TV Signal Cable TV Signal Cable Box RF Coaxial Cable 75Ω Helpful Hints If you have separate Audio and Video Out jacks instead. Go to tune...
User manual, English (US)
Page 6
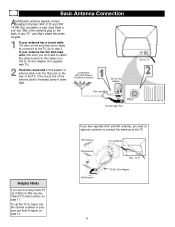
... section on the rear of the adapter or antenna cable onto the 75Ω jack on page 11. UHF Antenna U/V Combiner VHF Antenna Rear of TV Helpful Hints If you 're ready to connect it down tight. and that's where the antenna goes. 1 If your antenna has flat twin-lead wire... (300 ohm), you need to attach the antenna wires to the screws on a 300 to 75 ohm adapter (not supplied with TV). 2 Push the round end of the TV. Basic Antenna Connection Acombination antenna receives normal broadcast channels (VHF 2-13 and UHF 14-69).Your connection is easy since there is...
... section on the rear of the adapter or antenna cable onto the 75Ω jack on page 11. UHF Antenna U/V Combiner VHF Antenna Rear of TV Helpful Hints If you 're ready to connect it down tight. and that's where the antenna goes. 1 If your antenna has flat twin-lead wire... (300 ohm), you need to attach the antenna wires to the screws on a 300 to 75 ohm adapter (not supplied with TV). 2 Push the round end of the TV. Basic Antenna Connection Acombination antenna receives normal broadcast channels (VHF 2-13 and UHF 14-69).Your connection is easy since there is...
User manual, English (US)
Page 7
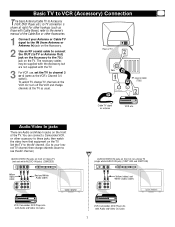
... Audio/Video In jacks There are not supplied with Cable Boxes), refer to the 75Ω jack on front of non-stereo TV (single white AUDIO IN jack) (13MT143S and 20MT133S) VIDEO AUDIO MENU - You can connect a Camcorder,VCR, or other accessory to see the AV channel.) AUDIO/VIDEO IN jacks... on the front of Stereo TV (red and white AUDIO IN jacks) (20MS233S) Yellow Video cable Red and White Audio cables VCR, Camcorder...
... Audio/Video In jacks There are not supplied with Cable Boxes), refer to the 75Ω jack on front of non-stereo TV (single white AUDIO IN jack) (13MT143S and 20MT133S) VIDEO AUDIO MENU - You can connect a Camcorder,VCR, or other accessory to see the AV channel.) AUDIO/VIDEO IN jacks... on the front of Stereo TV (red and white AUDIO IN jacks) (20MS233S) Yellow Video cable Red and White Audio cables VCR, Camcorder...
User manual, English (US)
Page 8
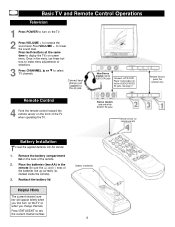
.... See page 7. Place the batteries (two AA) in the menu, use these buttons to make menu adjustments or selections. 3 Press CHANNEL ;8 or 9 to select TV channels. Helpful Hints The current channel number will appear briefly when you change channels. Press STATUS/EXIT to the ; to display the...Stereo models (red and white AUDIO IN jacks) Remote sensor on the back of the remote. 2. Be sure the (+) and (-) ends of the TV when operating the TV. Press both buttons at the same time to lower the sound level. Reattach the battery lid. Press VOLUME - to increase the sound level. Remote...
.... See page 7. Place the batteries (two AA) in the menu, use these buttons to make menu adjustments or selections. 3 Press CHANNEL ;8 or 9 to select TV channels. Helpful Hints The current channel number will appear briefly when you change channels. Press STATUS/EXIT to the ; to display the...Stereo models (red and white AUDIO IN jacks) Remote sensor on the back of the remote. 2. Be sure the (+) and (-) ends of the TV when operating the TV. Press both buttons at the same time to lower the sound level. Reattach the battery lid. Press VOLUME - to increase the sound level. Remote...

User manual, English (US)
Page 9
POWER Button Press to turn the TV on page 20. Number Buttons Press to clear the screen after adjusting the controls. Buttons Press to change to set the clock or the On-Timer. Press to select TV channels. Buttons Press to select or adjust menu items. SLEEP Button Press to the selected channel...Press to automatically turn off . CLOCK Button Press to access the Clock menu, where you desire.The TV will pause for different types of the channel you can set the TV to access or remove the TV's on page 31. Details are on page 30. 9 A/CH (alternate channel) Button Press to control...
POWER Button Press to turn the TV on page 20. Number Buttons Press to clear the screen after adjusting the controls. Buttons Press to change to set the clock or the On-Timer. Press to select TV channels. Buttons Press to select or adjust menu items. SLEEP Button Press to the selected channel...Press to automatically turn off . CLOCK Button Press to access the Clock menu, where you desire.The TV will pause for different types of the channel you can set the TV to access or remove the TV's on page 31. Details are on page 30. 9 A/CH (alternate channel) Button Press to control...

User manual, English (US)
Page 10
...-screen menu to be shown in English or Spanish. Menu Language Helpful Hints The Language control only makes the TV's on -screen text features, such as Closed Captions. It does not change the other on -screen menus appear in either English or Spanish. 1 Press MENU ...
...-screen menu to be shown in English or Spanish. Menu Language Helpful Hints The Language control only makes the TV's on -screen text features, such as Closed Captions. It does not change the other on -screen menus appear in either English or Spanish. 1 Press MENU ...
User manual, English (US)
Page 11
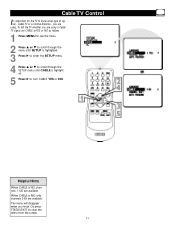
Helpful Hints When CABLE is YES, channels 1-125 are available. Or, press STATUS/EXIT to know what type of signal - Cable TV Control It's important for the TV to clear the menu from the screen. 11 When CABLE is highlighted. 5 Press : to turn CABLE YES or NO. The menu will disappear when you... are using a Cable TV signal, set CABLE to YES or NO as follows. 1 Press MENU to see the menu. 2 Press 8 or 9 to scroll through the menu until SETUP is...
Helpful Hints When CABLE is YES, channels 1-125 are available. Or, press STATUS/EXIT to know what type of signal - Cable TV Control It's important for the TV to clear the menu from the screen. 11 When CABLE is highlighted. 5 Press : to turn CABLE YES or NO. The menu will disappear when you... are using a Cable TV signal, set CABLE to YES or NO as follows. 1 Press MENU to see the menu. 2 Press 8 or 9 to scroll through the menu until SETUP is...
User manual, English (US)
Page 12
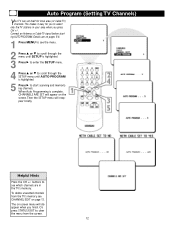
Helpful Hints Press the CH +/- The on page 13. Connect an Antenna or Cable TV signal before starting AUTO PROGRAM. When Auto Programming is complete, CHANNELS ARE SET will ... area when you finish. Or, press STATUS/EXIT to clear the menu from the TV's memory, see which channels are on the screen.Then the SETUP menu will disappear when you press CH ...+/-. Auto Program (Setting TV Channels) Your TV can set itself for local area (or Cable TV) channels.This makes it easy for you to select only the TV stations in the TV's memory. To delete unwanted channels from...
Helpful Hints Press the CH +/- The on page 13. Connect an Antenna or Cable TV signal before starting AUTO PROGRAM. When Auto Programming is complete, CHANNELS ARE SET will ... area when you finish. Or, press STATUS/EXIT to clear the menu from the TV's memory, see which channels are on the screen.Then the SETUP menu will disappear when you press CH ...+/-. Auto Program (Setting TV Channels) Your TV can set itself for local area (or Cable TV) channels.This makes it easy for you to select only the TV stations in the TV's memory. To delete unwanted channels from...
User manual, English (US)
Page 13
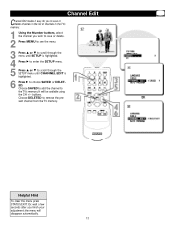
buttons. Choose DELETED to the TV's memory. It will disappear automatically. 13 the menu will be available using the CH +/- Channel Edit Channel Edit makes it easy for you to save ... menu until CHANNEL EDIT is highlighted. 6 Press : to choose SAVED or DELETED. Choose SAVED to add the channel to remove the present channel from the TV memory. Helpful Hint To clear the menu press STATUS/EXIT. Or, wait a few seconds after you wish to save or delete channels in the list...
buttons. Choose DELETED to the TV's memory. It will disappear automatically. 13 the menu will be available using the CH +/- Channel Edit Channel Edit makes it easy for you to save ... menu until CHANNEL EDIT is highlighted. 6 Press : to choose SAVED or DELETED. Choose SAVED to add the channel to remove the present channel from the TV memory. Helpful Hint To clear the menu press STATUS/EXIT. Or, wait a few seconds after you wish to save or delete channels in the list...
User manual, English (US)
Page 14
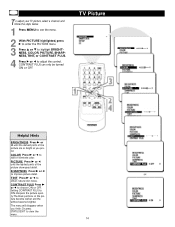
... tones. PICTURE Press - to choose ON or OFF. TINT Press - Setting CONTRAST PLUS to improve picture detail. TV Picture Helpful Hints BRIGHTNESS Press - to add or eliminate color. or ; CONTRAST PLUS Press or ; T o adjust your TV picture, select a channel and follow the steps below. 1 Press MENU to see the menu. 2 With PICTURE highlighted...
... tones. PICTURE Press - to choose ON or OFF. TINT Press - Setting CONTRAST PLUS to improve picture detail. TV Picture Helpful Hints BRIGHTNESS Press - to add or eliminate color. or ; CONTRAST PLUS Press or ; T o adjust your TV picture, select a channel and follow the steps below. 1 Press MENU to see the menu. 2 With PICTURE highlighted...
User manual, English (US)
Page 15
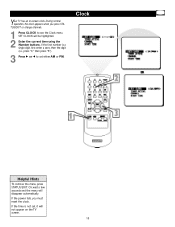
... or PM. If the time is a single digit, first enter a zero, then the digit (i.e., press "0," then press "8"). 3 Press : or ; to see the Clock menu. Your TV has an on the...
... or PM. If the time is a single digit, first enter a zero, then the digit (i.e., press "0," then press "8"). 3 Press : or ; to see the Clock menu. Your TV has an on the...
User manual, English (US)
Page 16
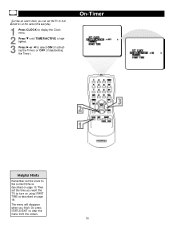
Just like an alarm clock, you want the TV to turn itself on page 18. Or, press STATUS/EXIT to select ON (if activating the Timer) or OFF (if deactivating the Timer). On-Timer Helpful Hints Remember, set the clock to the current time as described on page 15.Then, set the time you can set the TV to turn on using START TIME as described on at the same time everyday. 1 Press CLOCK to display the Clock menu. 2 Press 9 until TIMER ACTIVE is highlighted. 3 Press : or ; The menu will disappear when you finish. to clear the menu from the screen. 16
Just like an alarm clock, you want the TV to turn itself on page 18. Or, press STATUS/EXIT to select ON (if activating the Timer) or OFF (if deactivating the Timer). On-Timer Helpful Hints Remember, set the clock to the current time as described on page 15.Then, set the time you can set the TV to turn on using START TIME as described on at the same time everyday. 1 Press CLOCK to display the Clock menu. 2 Press 9 until TIMER ACTIVE is highlighted. 3 Press : or ; The menu will disappear when you finish. to clear the menu from the screen. 16

User manual, English (US)
Page 17
Or, use CH +/- to start on page 16. 1 Press CLOCK to see the Clock menu. 2 Press 9 until CHANNEL is highlighted. 3 Press the Number buttons to enter the channel you would like the TV to select a channel. 17 Start-Up Channel Used with the Timer feature, you can select a specific channel that the TV will tune to when the TV turns itself on.Timer details are on .
Or, use CH +/- to start on page 16. 1 Press CLOCK to see the Clock menu. 2 Press 9 until CHANNEL is highlighted. 3 Press the Number buttons to enter the channel you would like the TV to select a channel. 17 Start-Up Channel Used with the Timer feature, you can select a specific channel that the TV will tune to when the TV turns itself on.Timer details are on .
User manual, English (US)
Page 18
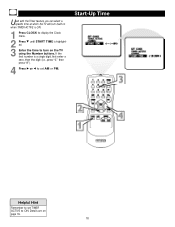
to set TIMER ACTIVE to ON. Details are on the TV using the Number buttons. Used with the Timer feature, you can select a specific time at which the TV will turn on page 16. 18 Start-Up Time Helpful Hint Remember to display the Clock menu. 2 Press 9 until START TIME is a single digit, first enter a zero, then the digit (i.e., press "0," then press "8"). 4 Press : or ; If the first number is highlighted. 3 Enter the time to turn itself on when TIMER ACTIVE is ON. 1 Press CLOCK to set AM or PM.
to set TIMER ACTIVE to ON. Details are on the TV using the Number buttons. Used with the Timer feature, you can select a specific time at which the TV will turn on page 16. 18 Start-Up Time Helpful Hint Remember to display the Clock menu. 2 Press 9 until START TIME is a single digit, first enter a zero, then the digit (i.e., press "0," then press "8"). 4 Press : or ; If the first number is highlighted. 3 Enter the time to turn itself on when TIMER ACTIVE is ON. 1 Press CLOCK to set AM or PM.
User manual, English (US)
Page 19
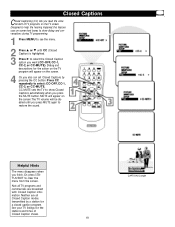
... the screen. Or, press STATUS/EXIT to select: CC-OFF, CC-1, CC-2, or CC-MUTE. CC MUTE sets the TV to restore the sound. MUTE will appear on the screen.The TV volume will appear on the screen. 4 Or, you also can set Closed Captions by a station for the stations and times... of TV programs on the TV program will be disabled until CC (Closed Caption) is highlighted. 3 Press : to select the Closed Caption option you press the MUTE button. Helpful Hints The ...
... the screen. Or, press STATUS/EXIT to select: CC-OFF, CC-1, CC-2, or CC-MUTE. CC MUTE sets the TV to restore the sound. MUTE will appear on the screen.The TV volume will appear on the screen. 4 Or, you also can set Closed Captions by a station for the stations and times... of TV programs on the TV program will be disabled until CC (Closed Caption) is highlighted. 3 Press : to select the Closed Caption option you press the MUTE button. Helpful Hints The ...
User manual, English (US)
Page 20
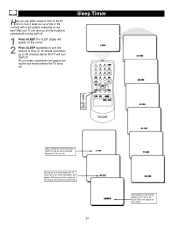
... an on-screen countdown will appear during the last minute will cancel the SLEEP timer. 20 During the last 10 seconds before the TV will appear on the screen. 2 Press SLEEP repeatedly to pick the amount of the TV, only to have it wake you all that trouble by automatically turning itself off... . Well, your ears? Sleep Timer After setting the SLEEP timer, press SLEEP to see the time remaining before the TV turns off. Have you ever fallen asleep in front of time (in 15 minute increments up at two in the morning with a test pattern screeching...
... an on-screen countdown will appear during the last minute will cancel the SLEEP timer. 20 During the last 10 seconds before the TV will appear on the screen. 2 Press SLEEP repeatedly to pick the amount of the TV, only to have it wake you all that trouble by automatically turning itself off... . Well, your ears? Sleep Timer After setting the SLEEP timer, press SLEEP to see the time remaining before the TV turns off. Have you ever fallen asleep in front of time (in 15 minute increments up at two in the morning with a test pattern screeching...
User manual, English (US)
Page 21
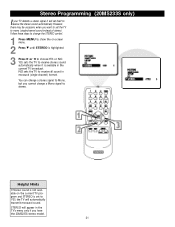
...STEREO control. 1 Press MENU to show the on the current TV program and STEREO is available in the current TV broadcast. NO sets the TV to receive all sound in the TV's menu only if you cannot change a stereo signal to Mono, but you have the 20MS233S stereo model. 21 You can ...change a Mono signal to choose YES or NO. YES sets the TV to receive stereo sound automatically when it will set the TV to mono (single-channel sound instead of stereo). Stereo Programming (20MS233S only) If your TV detects a stereo signal, it is set to YES...
...STEREO control. 1 Press MENU to show the on the current TV program and STEREO is available in the current TV broadcast. NO sets the TV to receive all sound in the TV's menu only if you cannot change a stereo signal to Mono, but you have the 20MS233S stereo model. 21 You can ...change a Mono signal to choose YES or NO. YES sets the TV to receive stereo sound automatically when it will set the TV to mono (single-channel sound instead of stereo). Stereo Programming (20MS233S only) If your TV detects a stereo signal, it is set to YES...
User manual, English (US)
Page 22
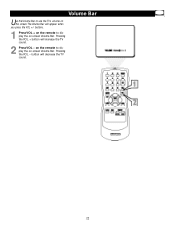
Pressing the VOL - buttons. 1 Press VOL + on the remote to display the on-screen Volume Bar. Pressing the VOL + button will decrease the TV sound. 22 on the remote to display the on the screen.The Volume Bar will appear when you press the VOL +/- button will increase the TV sound. 2 Press VOL - Volume Bar Use the Volume Bar to see the TV's volume on -screen Volume Bar.
Pressing the VOL - buttons. 1 Press VOL + on the remote to display the on-screen Volume Bar. Pressing the VOL + button will decrease the TV sound. 22 on the remote to display the on the screen.The Volume Bar will appear when you press the VOL +/- button will increase the TV sound. 2 Press VOL - Volume Bar Use the Volume Bar to see the TV's volume on -screen Volume Bar.


