
User manual, English (US)
Page 2
... by one of your purchase at http://www.magnavox.com 2 Model No Serial No Visit our World Wide Web Site at once. Owner Confirmation Your completed Warranty Registration Card serves as the owner of the best-built, best-backed products available today.We'll do not remove product covering. Model Registration Returning your Warranty Registration Card right away guarantees you 're...
... by one of your purchase at http://www.magnavox.com 2 Model No Serial No Visit our World Wide Web Site at once. Owner Confirmation Your completed Warranty Registration Card serves as the owner of the best-built, best-backed products available today.We'll do not remove product covering. Model Registration Returning your Warranty Registration Card right away guarantees you 're...
User manual, English (US)
Page 3
... power-supply cord or plug is grounded so as close to the point of these design standards by applying excessive pull force to environmental considerations. If an outside antenna is connected to the receiver, be mounted to avoid injury from power lines. 20. The appliance has been exposed to operate normally or exhibits a marked change in accordance with the manufacturer's instructions. 8. Disposal of cable...
... power-supply cord or plug is grounded so as close to the point of these design standards by applying excessive pull force to environmental considerations. If an outside antenna is connected to the receiver, be mounted to avoid injury from power lines. 20. The appliance has been exposed to operate normally or exhibits a marked change in accordance with the manufacturer's instructions. 8. Disposal of cable...
User manual, English (US)
Page 4
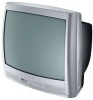
...Features 4 Basic Cable TV Connection 5 Basic Antenna Connection 6 Basic TV to VCR (Accessory) Connection 7 Basic TV and Remote Control Operations 8 Remote Control 9 Setup Menus Menu Language 10 Cable TV Control 11 Auto Program (Setting TV Channels 12 Channel Edit 13 On-screen Menus TV Picture 14 Clock 15 On-Timer 16 Start-Up Channel 17 Start-Up Time 18 Closed Captions 19 Sleep Timer 20 Stereo Programming 21 Volume Bar 22 Here are available, including Sports, Movies,Weak Signals, or Personal, which sets the picture controls as on-screen text. Multiple settings are a few...
...Features 4 Basic Cable TV Connection 5 Basic Antenna Connection 6 Basic TV to VCR (Accessory) Connection 7 Basic TV and Remote Control Operations 8 Remote Control 9 Setup Menus Menu Language 10 Cable TV Control 11 Auto Program (Setting TV Channels 12 Channel Edit 13 On-screen Menus TV Picture 14 Clock 15 On-Timer 16 Start-Up Channel 17 Start-Up Time 18 Closed Captions 19 Sleep Timer 20 Stereo Programming 21 Volume Bar 22 Here are available, including Sports, Movies,Weak Signals, or Personal, which sets the picture controls as on-screen text. Multiple settings are a few...
User manual, English (US)
Page 5
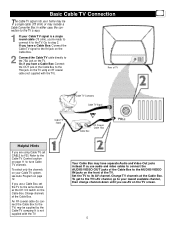
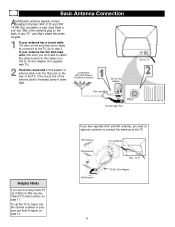
... the TV screen. 5 Basic Cable TV Connection The Cable TV signal into your home may be supplied by the Cable TV company. Refer to the Cable TV Control section on page 11 to the 75Ω jack on page 12. If you use audio and video cables to connect the AUDIO/VIDEO OUT jacks of the Cable Box to your lowest available channel, then change channels down until you are using an RF coaxial cable (not supplied with the TV. Set the TV to step 2. Rear...
... the TV screen. 5 Basic Cable TV Connection The Cable TV signal into your home may be supplied by the Cable TV company. Refer to the Cable TV Control section on page 11 to the 75Ω jack on page 12. If you use audio and video cables to connect the AUDIO/VIDEO OUT jacks of the Cable Box to your lowest available channel, then change channels down until you are using an RF coaxial cable (not supplied with the TV. Set the TV to step 2. Rear...
User manual, English (US)
Page 6
... Lead Wire Round Cable 75Ω Rear of TV Helpful Hints If you are not using Cable TV, set the TV to select only the channel numbers in your antenna has flat twin-lead wire (300 ohm), you first need an optional combiner to connect the antennas to the TV. If you have separate UHF and VHF antennas, you 're ready to 75 ohm adapter (not supplied with TV). 2 Push the...
... Lead Wire Round Cable 75Ω Rear of TV Helpful Hints If you are not using Cable TV, set the TV to select only the channel numbers in your antenna has flat twin-lead wire (300 ohm), you first need an optional combiner to connect the antennas to the TV. If you have separate UHF and VHF antennas, you 're ready to 75 ohm adapter (not supplied with TV). 2 Push the...
User manual, English (US)
Page 7
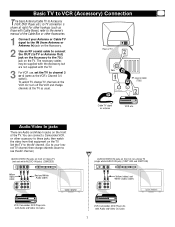
... TV. 3 For VCR use, set the TV to channel 3 or 4 (same as usual. Ω Rear of TV Ω RF coaxial cable (75Ω) Cable TV signal or antenna VCR, etc. The necessary cables may be supplied with the Accessory, but are Audio and Video In jacks on the TV. Or, turn off the VCR and change TV channels at right. with Audio and Video Out jacks AUDIO/VIDEO IN jacks on the TV. VOLUME + CHANNEL POWER ANTENNA IN OUT OUT ANTENNA VIDEO OUT AUDIO IN IN Yellow (video) and White (audio) cables VIDEO AUDIO MENU - Audio/Video...
... TV. 3 For VCR use, set the TV to channel 3 or 4 (same as usual. Ω Rear of TV Ω RF coaxial cable (75Ω) Cable TV signal or antenna VCR, etc. The necessary cables may be supplied with the Accessory, but are Audio and Video In jacks on the TV. Or, turn off the VCR and change TV channels at right. with Audio and Video Out jacks AUDIO/VIDEO IN jacks on the TV. VOLUME + CHANNEL POWER ANTENNA IN OUT OUT ANTENNA VIDEO OUT AUDIO IN IN Yellow (video) and White (audio) cables VIDEO AUDIO MENU - Audio/Video...
User manual, English (US)
Page 8
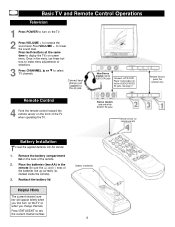
... the remote. Non-Stereo models (white AUDIO IN jack) Connect a VCR, DVD Player, Camcorder, etc. See page 7. Connect headphones (not supplied) to see the current channel number. Stereo models (red and white AUDIO IN jacks) Remote sensor on the TV. 2 Press VOLUME + to increase the sound level. Press STATUS/EXIT to the ; Battery Installation 8 Be sure the (+) and (-) ends of the TV when operating the TV. Reattach the battery lid. Basic TV and Remote Control Operations Television 1 Press POWER to turn on...
... the remote. Non-Stereo models (white AUDIO IN jack) Connect a VCR, DVD Player, Camcorder, etc. See page 7. Connect headphones (not supplied) to see the current channel number. Stereo models (red and white AUDIO IN jacks) Remote sensor on the TV. 2 Press VOLUME + to increase the sound level. Press STATUS/EXIT to the ; Battery Installation 8 Be sure the (+) and (-) ends of the TV when operating the TV. Reattach the battery lid. Basic TV and Remote Control Operations Television 1 Press POWER to turn on...

User manual, English (US)
Page 9
... remove the TV's on the screen. Details are on page 31. Remote Control VOL (volume) +/- Press to five previously viewed channels. MENU Button Press to see the channel number and the time on -screen menu. Details are on page 20. Buttons Press to switch between the current channel and the previous channel. A/CH (alternate channel) Button Press to adjust the TV sound level. CH (channel) +/- SMART SOUND Button Press to select Closed Captions. CC Button Press to control the volume level during program and commercial changes...
... remove the TV's on the screen. Details are on page 31. Remote Control VOL (volume) +/- Press to five previously viewed channels. MENU Button Press to see the channel number and the time on -screen menu. Details are on page 20. Buttons Press to switch between the current channel and the previous channel. A/CH (alternate channel) Button Press to adjust the TV sound level. CH (channel) +/- SMART SOUND Button Press to select Closed Captions. CC Button Press to control the volume level during program and commercial changes...
User manual, English (US)
Page 12
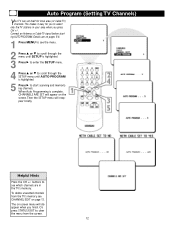
Connect an Antenna or Cable TV signal before starting AUTO PROGRAM. Helpful Hints Press the CH +/- buttons to see which channels are on page 13. The on the screen.Then the SETUP menu will disappear when you finish. When Auto Programming is highlighted. 5 Press : to start scanning and memorizing channels. To delete unwanted channels from the screen. 12 Auto Program (Setting TV Channels) Your TV can set itself for local area (or Cable TV) channels.This makes it easy for...
Connect an Antenna or Cable TV signal before starting AUTO PROGRAM. Helpful Hints Press the CH +/- buttons to see which channels are on page 13. The on the screen.Then the SETUP menu will disappear when you finish. When Auto Programming is highlighted. 5 Press : to start scanning and memorizing channels. To delete unwanted channels from the screen. 12 Auto Program (Setting TV Channels) Your TV can set itself for local area (or Cable TV) channels.This makes it easy for...
User manual, English (US)
Page 14
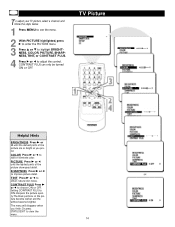
TV Picture Helpful Hints BRIGHTNESS Press - to ON sharpens the picture quality.The black portions of the picture become darker and the whites become brighter. or ; Setting CONTRAST PLUS to add or eliminate color. CONTRAST PLUS can only be turned ON or OFF. or ; to highlight BRIGHTNESS, COLOR, PICTURE, SHARPNESS,TINT, or CONTRAST PLUS. 4 Press : or ; T o adjust your TV picture, select a channel and follow the steps below...
TV Picture Helpful Hints BRIGHTNESS Press - to ON sharpens the picture quality.The black portions of the picture become darker and the whites become brighter. or ; Setting CONTRAST PLUS to add or eliminate color. CONTRAST PLUS can only be turned ON or OFF. or ; to highlight BRIGHTNESS, COLOR, PICTURE, SHARPNESS,TINT, or CONTRAST PLUS. 4 Press : or ; T o adjust your TV picture, select a channel and follow the steps below...
User manual, English (US)
Page 19
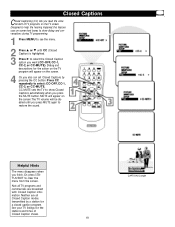
... on the screen.The TV volume will appear on the screen. 4 Or, you press MUTE again to see the menu. 2 Press 8 or 9 until you also can set Closed Captions by a station for the stations and times of TV programs on the TV screen. Designed to help the hearing impaired, this feature uses on the TV program will be disabled until CC (Closed Caption) is highlighted. 3 Press : to show Closed Captions automatically...
... on the screen.The TV volume will appear on the screen. 4 Or, you press MUTE again to see the menu. 2 Press 8 or 9 until you also can set Closed Captions by a station for the stations and times of TV programs on the TV screen. Designed to help the hearing impaired, this feature uses on the TV program will be disabled until CC (Closed Caption) is highlighted. 3 Press : to show Closed Captions automatically...
User manual, English (US)
Page 25
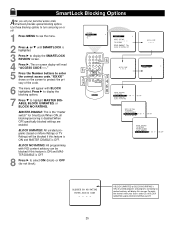
... MASTER DISABLE is highlighted. 3 Press : to display the SMARTLOCK REVIEW screen. 4 Press :. MASTER DISABLE: This is disabled.When OFF, specifically blocked settings are enabled. The on Movie Ratings or TV Ratings) will display this message.To watch the channel, enter your personal access code, SmartLock provides special blocking options. BLOCK UNRATED: All unrated programs (based on -screen display will appear with NO content advisory...
... MASTER DISABLE is highlighted. 3 Press : to display the SMARTLOCK REVIEW screen. 4 Press :. MASTER DISABLE: This is disabled.When OFF, specifically blocked settings are enabled. The on Movie Ratings or TV Ratings) will display this message.To watch the channel, enter your personal access code, SmartLock provides special blocking options. BLOCK UNRATED: All unrated programs (based on -screen display will appear with NO content advisory...
User manual, English (US)
Page 26
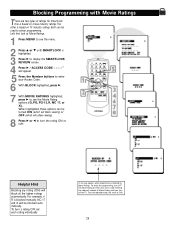
.... One is based on TV industry ratings. Then the blocked ratings will block all Movie Ratings until SMARTLOCK is blocked manually, NC 17 and X will appear. 5 Press the Number buttons to display the SMARTLOCK REVIEW screen. 4 Press :."ACCESS CODE - - - -" will be blocked automatically. Both can be used to ON. 26 Helpful Hint Blocking any rating (ON) will reset to censor programming. To turn the rating...
.... One is based on TV industry ratings. Then the blocked ratings will block all Movie Ratings until SMARTLOCK is blocked manually, NC 17 and X will appear. 5 Press the Number buttons to display the SMARTLOCK REVIEW screen. 4 Press :."ACCESS CODE - - - -" will be blocked automatically. Both can be used to ON. 26 Helpful Hint Blocking any rating (ON) will reset to censor programming. To turn the rating...
User manual, English (US)
Page 27
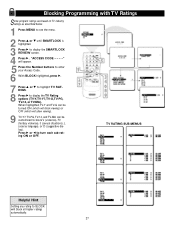
... Helpful Hint Setting any rating to block V (violence), FV (fantasy violence), S (sexual situations), L (coarse language), or D (suggestive dialog). to display the SMARTLOCK REVIEW screen. 4 Press :. Blocking Programming with TV Ratings Some program ratings are based on TV industry ratings as described below. 1 Press MENU to see the menu. 2 Press 8 or 9 until SMARTLOCK is highlighted. 3 Press : to turn each sub-rating ON or OFF. "ACCESS CODE...
... Helpful Hint Setting any rating to block V (violence), FV (fantasy violence), S (sexual situations), L (coarse language), or D (suggestive dialog). to display the SMARTLOCK REVIEW screen. 4 Press :. Blocking Programming with TV Ratings Some program ratings are based on TV industry ratings as described below. 1 Press MENU to see the menu. 2 Press 8 or 9 until SMARTLOCK is highlighted. 3 Press : to turn each sub-rating ON or OFF. "ACCESS CODE...
User manual, English (US)
Page 29
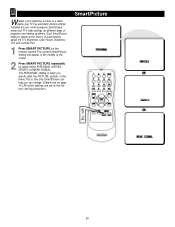
... of programs and viewing conditions. SmartPicture 29 Each SmartPicture setting is the only SmartPicture setting you can change. (Details are on the remote control.The current SmartPicture setting will appear in the menu.This is preset at the factory during production. SmartPicture resets your TV's video settings for your TV has automatic picture settings matched for different types of the screen. 2 Press SMART PICTURE repeatedly to automatically adjust the TV's Brightness, Color, Picture, Sharpness...
... of programs and viewing conditions. SmartPicture 29 Each SmartPicture setting is the only SmartPicture setting you can change. (Details are on the remote control.The current SmartPicture setting will appear in the menu.This is preset at the factory during production. SmartPicture resets your TV's video settings for your TV has automatic picture settings matched for different types of the screen. 2 Press SMART PICTURE repeatedly to automatically adjust the TV's Brightness, Color, Picture, Sharpness...

User manual, English (US)
Page 30
This provides a more consistent sound by reducing the peaks and valleys that occur during program changes or commercial breaks. 1 Press SMART SOUND on the remote control.The current SmartSound setting will appear in the middle of broadcast programming and commercials are not the same.With SmartSound, you can have the TV level the sound. SmartSound In many cases, the volume levels of the screen (ON or OFF). 2 Press SMART SOUND repeatedly to toggle between ON or OFF. 30
This provides a more consistent sound by reducing the peaks and valleys that occur during program changes or commercial breaks. 1 Press SMART SOUND on the remote control.The current SmartSound setting will appear in the middle of broadcast programming and commercials are not the same.With SmartSound, you can have the TV level the sound. SmartSound In many cases, the volume levels of the screen (ON or OFF). 2 Press SMART SOUND repeatedly to toggle between ON or OFF. 30

User manual, English (US)
Page 32
... necessary. Check the wall outlet for TV installation and adjustment of the television when sending commands. Is it secured properly to restore the sound. Unplug the TV's power cord from old batteries.The remote may have questions about your TV is not working. Troubleshooting If you have to YES. If using a typical antenna, set CABLE to be replaced. 32 Check the television power cord. If Cable TV channels are using an AC power strip or surge...
... necessary. Check the wall outlet for TV installation and adjustment of the television when sending commands. Is it secured properly to restore the sound. Unplug the TV's power cord from old batteries.The remote may have questions about your TV is not working. Troubleshooting If you have to YES. If using a typical antenna, set CABLE to be replaced. 32 Check the television power cord. If Cable TV channels are using an AC power strip or surge...
User manual, English (US)
Page 33
... or using CHANNEL EDIT. Designed to help the user with VCRs (or other chemicals on page 12. Troubleshooting TV will not display any unwanted channel numbers. Details are on a TV or VCR. You cannot remember the Access Code for the input of the cabinet finish. You can use with specific feature controls (color adjustment, programming, etc.). Details are on or near the cabinet.They might cause permanent marring of audio and video signals. Closed Caption •...
... or using CHANNEL EDIT. Designed to help the user with VCRs (or other chemicals on page 12. Troubleshooting TV will not display any unwanted channel numbers. Details are on a TV or VCR. You cannot remember the Access Code for the input of the cabinet finish. You can use with specific feature controls (color adjustment, programming, etc.). Details are on or near the cabinet.They might cause permanent marring of audio and video signals. Closed Caption •...

User manual, English (US)
Page 34
... panel 8 Glossary 33 Hookups 5-7 Language (of menus 10 Master Disable 23, 25 MENU button 9 Movie Ratings 23, 26 MUTE button 9, 19 Number buttons 9 Picture 14 POWER button 8, 9 Remote control Batteries 8 Buttons 9 Sensor 8 Service 35-37 Set Clock 15 Setup, First-Time Use 10-12 Sharpness 14 SLEEP button 9, 20 Sleep Timer 20 SmartLock Access Code 24 Blocking options 25 Movie Ratings 23, 26 Review 28 TV Ratings 23, 27 SmartSurf 31 SMART PICTURE button 9, 29 SMART SOUND button 9, 30 Start Channel (for Timer...
... panel 8 Glossary 33 Hookups 5-7 Language (of menus 10 Master Disable 23, 25 MENU button 9 Movie Ratings 23, 26 MUTE button 9, 19 Number buttons 9 Picture 14 POWER button 8, 9 Remote control Batteries 8 Buttons 9 Sensor 8 Service 35-37 Set Clock 15 Setup, First-Time Use 10-12 Sharpness 14 SLEEP button 9, 20 Sleep Timer 20 SmartLock Access Code 24 Blocking options 25 Movie Ratings 23, 26 Review 28 TV Ratings 23, 27 SmartSurf 31 SMART PICTURE button 9, 29 SMART SOUND button 9, 30 Start Channel (for Timer...
User manual, English (US)
Page 37
... original warranty period. Your warranty does not cover: • labor charges for installation or setup of the product, adjustment of customer controls on the product, and installation or repair of antenna systems outside of the product. • product repair and/or part replacement because of misuse, accident, unauthorized repair or other cause not within the control of Magnavox. • reception problems caused by signal conditions or cable or antenna...
... original warranty period. Your warranty does not cover: • labor charges for installation or setup of the product, adjustment of customer controls on the product, and installation or repair of antenna systems outside of the product. • product repair and/or part replacement because of misuse, accident, unauthorized repair or other cause not within the control of Magnavox. • reception problems caused by signal conditions or cable or antenna...


