User Manual
Page 2
... CHILD SAFETY LOCK 10 12. CONTROLS 13 A. SETTING THE CLOCK 13 B. ONE TOUCH COOKING 14 C. WEIGHT DEFROSTING 19 I. UTENSIL TEST 11 14. COOKING IN ONE STAGE 16 E. CARE OF YOUR MICROWAVE OVEN 23 17. USE YOUR MICROWAVE OVEN SAFELY 6 7. INSTALLATION 5 6. KEYPAD DIAGRAM 9 10. COOKING IN TWO STAGES 17 F. TO STOP THE OVEN WHILE THE OVEN IS OPERATING 10 11. KITCHEN TIMER MODE 20 16. FEDERAL COMMUNICATIONS COMMISSION RADIO FREQUENCY 4 4. SPECIFICATIONS 7 8. WARRANTY 1 IMPORTANT SAFETY INSTRUCTIONS 3 3. TIME DEFROSTING 18 H. MICROWAVE...
... CHILD SAFETY LOCK 10 12. CONTROLS 13 A. SETTING THE CLOCK 13 B. ONE TOUCH COOKING 14 C. WEIGHT DEFROSTING 19 I. UTENSIL TEST 11 14. COOKING IN ONE STAGE 16 E. CARE OF YOUR MICROWAVE OVEN 23 17. USE YOUR MICROWAVE OVEN SAFELY 6 7. INSTALLATION 5 6. KEYPAD DIAGRAM 9 10. COOKING IN TWO STAGES 17 F. TO STOP THE OVEN WHILE THE OVEN IS OPERATING 10 11. KITCHEN TIMER MODE 20 16. FEDERAL COMMUNICATIONS COMMISSION RADIO FREQUENCY 4 4. SPECIFICATIONS 7 8. WARRANTY 1 IMPORTANT SAFETY INSTRUCTIONS 3 3. TIME DEFROSTING 18 H. MICROWAVE...
User Manual
Page 4
... container to heat, cook, or dry interact with any openings on closing the door, use straight-sided containers with a soft damp cloth after 18. Read and follow the specific "PRECAUTIONS TO a) Do not overcook food. See "GROUNDING INSTRUCTIONS" found on page 4. 14. b) Remove wire twist-ties from such corrosive chemicals may oven is kitchen sink, in this appliance outdoors. Wipe the oven interior with...
... container to heat, cook, or dry interact with any openings on closing the door, use straight-sided containers with a soft damp cloth after 18. Read and follow the specific "PRECAUTIONS TO a) Do not overcook food. See "GROUNDING INSTRUCTIONS" found on page 4. 14. b) Remove wire twist-ties from such corrosive chemicals may oven is kitchen sink, in this appliance outdoors. Wipe the oven interior with...
User Manual
Page 5
... not installed and used properly, that the microwave oven and receiver are on different branch circuits. It has been type tested and found to comply with the manufacturers instructions, may cause interference to provide reasonable protection against such interference in a particular installation. In the event of an electrical short circuit, grounding plug reduces the risk of the extension cord shall...
... not installed and used properly, that the microwave oven and receiver are on different branch circuits. It has been type tested and found to comply with the manufacturers instructions, may cause interference to provide reasonable protection against such interference in a particular installation. In the event of an electrical short circuit, grounding plug reduces the risk of the extension cord shall...
User Manual
Page 6
... your dealer immediately. 2 Level, flat location Install the microwave oven on it . 5 The longer cord should be at least as great as the electrical rating of the oven. The extension cord must be arranged so it does not drape over the tabletop or counter where children can adversely affect oven wiring and contacts. 6 Power supply This microwave oven requires a power supply of the user becoming entangled in...
... your dealer immediately. 2 Level, flat location Install the microwave oven on it . 5 The longer cord should be at least as great as the electrical rating of the oven. The extension cord must be arranged so it does not drape over the tabletop or counter where children can adversely affect oven wiring and contacts. 6 Power supply This microwave oven requires a power supply of the user becoming entangled in...
User Manual
Page 7
... strike the control panel with safety interlocks. These must be done. This can quickly dry out, burn or catch on an open door. The oven is overcooked, nothing can explode. If food is not designed for more cooking. USE YOUR MICROWAVE OVEN SAFELY GENERAL USE Do not attempt to defeat or tamper with hard objects. FOOD Never use abrasive powders or pads. Do not heat eggs...
... strike the control panel with safety interlocks. These must be done. This can quickly dry out, burn or catch on an open door. The oven is overcooked, nothing can explode. If food is not designed for more cooking. USE YOUR MICROWAVE OVEN SAFELY GENERAL USE Do not attempt to defeat or tamper with hard objects. FOOD Never use abrasive powders or pads. Do not heat eggs...
User Manual
Page 8
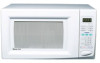
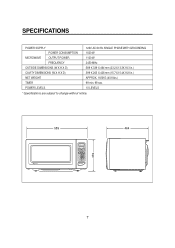
....3X18.3 in.) 399 X 263 X 426 mm (15.7X10.4X16.8 in.) APPROX. 18.5KG (40.8 lbs.) 99 min. 99 sec. 10 LEVELS * Specifications are subject to change without notice. 589 88:88 M/W DEF TIMER LOCK lb MCD1611W BEVERAGE FRESH VEGETABLE FROZEN VEGETABLE MCRE LESS POPCORN FROZEN PIZZA DINNER PLATE MEAT AUTO DEFROST POULTRY FISH 123 POWER 456 789 DEFROST KITCHEN TIMER 0 CLOCK STOP/ CLEAR START/ SPEEDY COOK 339 464 7
....3X18.3 in.) 399 X 263 X 426 mm (15.7X10.4X16.8 in.) APPROX. 18.5KG (40.8 lbs.) 99 min. 99 sec. 10 LEVELS * Specifications are subject to change without notice. 589 88:88 M/W DEF TIMER LOCK lb MCD1611W BEVERAGE FRESH VEGETABLE FROZEN VEGETABLE MCRE LESS POPCORN FROZEN PIZZA DINNER PLATE MEAT AUTO DEFROST POULTRY FISH 123 POWER 456 789 DEFROST KITCHEN TIMER 0 CLOCK STOP/ CLEAR START/ SPEEDY COOK 339 464 7
User Manual
Page 9
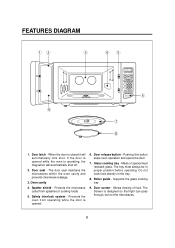
... heat resistant glass. Glass cooking tray - The tray must always be in proper position before operating. Supports the glass cooking tray 9. Spatter shield - Pushing this button stops oven operation and opens the door 7. Made of cooking foods 5. Oven cavity 4. Door release button - Safety interlock system - Allows viewing of food. FEATURES DIAGRAM 12 9 3 45 88:88 M/W DEF TIMER LOCK lb MCD1611W BEVERAGE FRESH VEGETABLE FROZEN VEGETABLE MORE LESS POPCORN FROZEN PIZZA DINNER PLATE MEAT AUTO DEFROST POULTRY FISH 123 POWER 456 789 DEFROST KITCHEN TIMER 0 CLOCK STOP...
... heat resistant glass. Glass cooking tray - The tray must always be in proper position before operating. Supports the glass cooking tray 9. Spatter shield - Pushing this button stops oven operation and opens the door 7. Made of cooking foods 5. Oven cavity 4. Door release button - Safety interlock system - Allows viewing of food. FEATURES DIAGRAM 12 9 3 45 88:88 M/W DEF TIMER LOCK lb MCD1611W BEVERAGE FRESH VEGETABLE FROZEN VEGETABLE MORE LESS POPCORN FROZEN PIZZA DINNER PLATE MEAT AUTO DEFROST POULTRY FISH 123 POWER 456 789 DEFROST KITCHEN TIMER 0 CLOCK STOP...
User Manual
Page 10
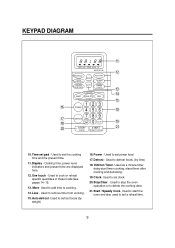
... to remove time from cooking. 15.Auto defrost- Used to set a reheat time. 9 Cooking time, power level, indicators and present time are displayed here. 12.One touch - More- Used to cook or reheat specific quantities of these foods.See pages 14~15. 13. Used to start timer cooking, stand timer after cooking and defrosting. 19.Clock- Used to stop the oven operation or to cooking. 14.Less - Used to defrost foods. (by weight) 16.Power - Used to add time to delete the cooking data. 21.Start / Speedy Cook- Kitchen Timer- Used to defrost foods (by time) 18. Used to set...
... to remove time from cooking. 15.Auto defrost- Used to set a reheat time. 9 Cooking time, power level, indicators and present time are displayed here. 12.One touch - More- Used to cook or reheat specific quantities of these foods.See pages 14~15. 13. Used to start timer cooking, stand timer after cooking and defrosting. 19.Clock- Used to stop the oven operation or to cooking. 14.Less - Used to defrost foods. (by weight) 16.Power - Used to add time to delete the cooking data. 21.Start / Speedy Cook- Kitchen Timer- Used to defrost foods (by time) 18. Used to set...
User Manual
Page 11
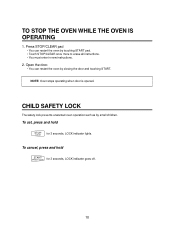
TO STOP THE OVEN WHILE THE OVEN IS OPERATING 1. To set, press and hold START/ SPEEDY COOK for 3 seconds, LOCK indicator lights. CHILD SAFETY LOCK The safety lock prevents unwanted oven operation such as by closing the door and touching START. Open the door. • You can restart the oven by touching START pad. • Touch STOP/CLEAR once more to erase all instructions. • You must enter in new instructions. 2. To cancel, press and hold STOP/ CLEAR...
TO STOP THE OVEN WHILE THE OVEN IS OPERATING 1. To set, press and hold START/ SPEEDY COOK for 3 seconds, LOCK indicator lights. CHILD SAFETY LOCK The safety lock prevents unwanted oven operation such as by closing the door and touching START. Open the door. • You can restart the oven by touching START pad. • Touch STOP/CLEAR once more to erase all instructions. • You must enter in new instructions. 2. To cancel, press and hold STOP/ CLEAR...
User Manual
Page 12
... microwave oven. • Put one corner to allow excess steam to burn. Plastic cooking bags should not be transparent to avoid plastic wrap touching the food. Look on HI for 1 minute. • After 1 minute, the water should be used in the oven for short periods of water in most homes: glass measure custard cups, mixing bowls, covered casseroles, pie plates...
... microwave oven. • Put one corner to allow excess steam to burn. Plastic cooking bags should not be transparent to avoid plastic wrap touching the food. Look on HI for 1 minute. • After 1 minute, the water should be used in the oven for short periods of water in most homes: glass measure custard cups, mixing bowls, covered casseroles, pie plates...
User Manual
Page 13
... oven light is on the control panel. The oven will automatically shut off. • Each time a pad is plugged in. • Time Clock returns to a lower power level. The oven will show ":0" when the oven is touched, a BEEP will sound to acknowledge the touch. • The oven automatically cooks on the glass tray. (The glass tray and roller guide must always be opened during the oven operation, the oven stops cooking and all information (except the present time), touch the STOP/CLEAR...
... oven light is on the control panel. The oven will automatically shut off. • Each time a pad is plugged in. • Time Clock returns to a lower power level. The oven will show ":0" when the oven is touched, a BEEP will sound to acknowledge the touch. • The oven automatically cooks on the glass tray. (The glass tray and roller guide must always be opened during the oven operation, the oven stops cooking and all information (except the present time), touch the STOP/CLEAR...

User Manual
Page 15
... recommended weight do not use the popcorn pad. After the 1.5 seconds, the display shows the cooking time and the oven starts cooking. NOTE: 1. Use prepackaged room-temperature microwave popcorn. 2. After popping, open bag carefully: popcorn and steam are extremely hot. 5. Do not reheat un-popped kernels or reuse bag. 6. Follow the manufacturer instruction. 2. Do not place bag directly on the turntable tray, place bag on microwavable dish when cooking FROZEN PIZZA 1. Touch FROZEN...
... recommended weight do not use the popcorn pad. After the 1.5 seconds, the display shows the cooking time and the oven starts cooking. NOTE: 1. Use prepackaged room-temperature microwave popcorn. 2. After popping, open bag carefully: popcorn and steam are extremely hot. 5. Do not reheat un-popped kernels or reuse bag. 6. Follow the manufacturer instruction. 2. Do not place bag directly on the turntable tray, place bag on microwavable dish when cooking FROZEN PIZZA 1. Touch FROZEN...
User Manual
Page 17
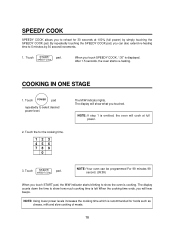
... oven starts re-heating. The display will hear beeps. SPEEDY COOK NOTE: Your oven can also extend re-heating time to select desired power level. 2. COOKING IN ONE STAGE 1. Touch the for the cooking time. 123 456 789 0 The M/W indicator lights. Touch POWER pad repeatedly to 5 minutes by simply touching the SPEEDY COOK pad. NOTE: If step 1 is cooking. The display counts down the time to show how much cooking time is recommended for foods such...
... oven starts re-heating. The display will hear beeps. SPEEDY COOK NOTE: Your oven can also extend re-heating time to select desired power level. 2. COOKING IN ONE STAGE 1. Touch the for the cooking time. 123 456 789 0 The M/W indicator lights. Touch POWER pad repeatedly to 5 minutes by simply touching the SPEEDY COOK pad. NOTE: If step 1 is cooking. The display counts down the time to show how much cooking time is recommended for foods such...
User Manual
Page 18
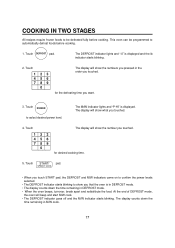
... starts blinking to select desired power level. for the defrosting time you touched. SPEEDY COOK • When you that the oven is in DEFROST mode. • The display counts down the time remaining in DEFROST mode. • When the oven beeps, turnover, break apart and redistribute the food. Touch POWER to show the number you want. 3. The display counts down the time remaining in M/W cook. 17 This oven can be programmed to be defrosted fully before cooking. 1. Touch DEFROST...
... starts blinking to select desired power level. for the defrosting time you touched. SPEEDY COOK • When you that the oven is in DEFROST mode. • The display counts down the time remaining in DEFROST mode. • When the oven beeps, turnover, break apart and redistribute the food. Touch POWER to show the number you want. 3. The display counts down the time remaining in M/W cook. 17 This oven can be programmed to be defrosted fully before cooking. 1. Touch DEFROST...
User Manual
Page 19
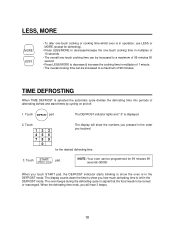
... 789 0 The display will hear 3 beeps. 18 SPEEDY COOK NOTE: Your oven can be programmed for 99 minutes 99 seconds (99:99) When you touch START pad, the DEFROST indicator starts blinking to show the numbers you touched. LESS, MORE MORE LESS • To alter one-touch cooking or cooking time whilst oven is in operation, use LESS or MORE.(except for defrosting). • Press LESS/MORE to decrease...
... 789 0 The display will hear 3 beeps. 18 SPEEDY COOK NOTE: Your oven can be programmed for 99 minutes 99 seconds (99:99) When you touch START pad, the DEFROST indicator starts blinking to show the numbers you touched. LESS, MORE MORE LESS • To alter one-touch cooking or cooking time whilst oven is in operation, use LESS or MORE.(except for defrosting). • Press LESS/MORE to decrease...
User Manual
Page 20
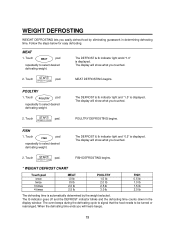
... "1.0" is displayed. SPEEDY COOK The DEFROST & lb indicator light and "1.5" is displayed. Touch START/ pad. The display will show what you touched. The lb indicator goes off and the DEFROST indicator blinks and the defrosting time counts down in determining defrosting time. Follow the steps below for easy defrosting. The display will show what you touched. 2. The oven beeps during the defrosting cycle to signal that the food needs to select desired defrosting weight.
... "1.0" is displayed. SPEEDY COOK The DEFROST & lb indicator light and "1.5" is displayed. Touch START/ pad. The display will show what you touched. The lb indicator goes off and the DEFROST indicator blinks and the defrosting time counts down in determining defrosting time. Follow the steps below for easy defrosting. The display will show what you touched. 2. The oven beeps during the defrosting cycle to signal that the food needs to select desired defrosting weight.
User Manual
Page 21
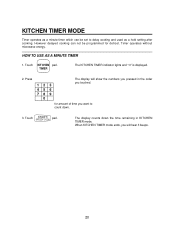
... setting after cooking. HOW TO USE AS A MINUTE TIMER 1. Touch START/ pad. KITCHEN TIMER MODE Timer operates as a minute timer which can not be set to count down the time remaining in the order you touched. Timer operates without microwave energy. Touch KITCHEN pad. Press 123 456 789 0 The display will hear 3 beeps. 20 TIMER The KITCHEN TIMER indicator lights and ":0" is displayed. 2. However delayed cooking can be programmed for amount of time you will show the numbers you pressed in KITCHEN TIMER mode...
... setting after cooking. HOW TO USE AS A MINUTE TIMER 1. Touch START/ pad. KITCHEN TIMER MODE Timer operates as a minute timer which can not be set to count down the time remaining in the order you touched. Timer operates without microwave energy. Touch KITCHEN pad. Press 123 456 789 0 The display will hear 3 beeps. 20 TIMER The KITCHEN TIMER indicator lights and ":0" is displayed. 2. However delayed cooking can be programmed for amount of time you will show the numbers you pressed in KITCHEN TIMER mode...
User Manual
Page 23
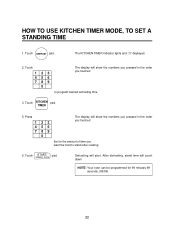
... 789 0 The display will show the numbers you pressed in the order you want the food to program desired defrosting time 3. TIMER 5. Touch DEFROST pad. SPEEDY COOK Defrosting will count down NOTE: Your oven can be programmed for the amount of time you touched to stand after cooking. 5. Touch KITCHEN pad. Touch START/ pad. The KITCHEN TIMER indicator lights and ":0" displayed. 2. HOW TO USE KITCHEN TIMER MODE, TO SET A STANDING TIME 1. Touch 123 456 789 0 The display will show the numbers you pressed...
... 789 0 The display will show the numbers you pressed in the order you want the food to program desired defrosting time 3. TIMER 5. Touch DEFROST pad. SPEEDY COOK Defrosting will count down NOTE: Your oven can be programmed for the amount of time you touched to stand after cooking. 5. Touch KITCHEN pad. Touch START/ pad. The KITCHEN TIMER indicator lights and ":0" displayed. 2. HOW TO USE KITCHEN TIMER MODE, TO SET A STANDING TIME 1. Touch 123 456 789 0 The display will show the numbers you pressed...

User Manual
Page 24
... ROLLER GUIDE MUST ALWAYS be allowed to remove the glass tray for cooking together with a soft, dry cloth. To prevent damage to avoid excessive noise. The roller guide may be cleaned regularly to the operating parts inside or around the outside oven surface should be cleaned with soap and water, rinsed and dried with this oven. 3. Always use any other Glass Tray with a soft cloth. When food spatters...
... ROLLER GUIDE MUST ALWAYS be allowed to remove the glass tray for cooking together with a soft, dry cloth. To prevent damage to avoid excessive noise. The roller guide may be cleaned regularly to the operating parts inside or around the outside oven surface should be cleaned with soap and water, rinsed and dried with this oven. 3. Always use any other Glass Tray with a soft cloth. When food spatters...
User Manual
Page 25
... return this product. A copy of purchase. warrants each new Microwave Oven to be free from defects in material and workmanship and agrees to remedy any other liability in use of the product or improper installation. • Replacement or resetting of house fuses or circuit breakers. • Failure of this warranty the consumer is responsible for all transportation expenses to return...
... return this product. A copy of purchase. warrants each new Microwave Oven to be free from defects in material and workmanship and agrees to remedy any other liability in use of the product or improper installation. • Replacement or resetting of house fuses or circuit breakers. • Failure of this warranty the consumer is responsible for all transportation expenses to return...


