
Manual - English
Page 5
...Line of Sight ...1 A Word on the Safe Usage of GPS Maps ...2 From Source to Destination...2 Placement of Your GPS Receiver for Optimal Satellite Reception ...2 Signal Acquisition Time ...2 GPS Maps and Your Safety ...3 Chapter 2: Magellan RoadMate ...4 Front View ...4 Rear View ...5 Top View ...6 ...11 Installing the Windshield Mount ...11 Chapter 4: Antenna Position ...13 Chapter 5: Magellan RoadMate Tools Installation ...14 Installing the Software ...14 Connecting Your Magellan RoadMate ...14 Chapter 6: Magellan RoadMate Music Manager ...15 Chapter 7: Music Player ...16 Single Song Play ...16 ...
...Line of Sight ...1 A Word on the Safe Usage of GPS Maps ...2 From Source to Destination...2 Placement of Your GPS Receiver for Optimal Satellite Reception ...2 Signal Acquisition Time ...2 GPS Maps and Your Safety ...3 Chapter 2: Magellan RoadMate ...4 Front View ...4 Rear View ...5 Top View ...6 ...11 Installing the Windshield Mount ...11 Chapter 4: Antenna Position ...13 Chapter 5: Magellan RoadMate Tools Installation ...14 Installing the Software ...14 Connecting Your Magellan RoadMate ...14 Chapter 6: Magellan RoadMate Music Manager ...15 Chapter 7: Music Player ...16 Single Song Play ...16 ...
Manual - English
Page 23
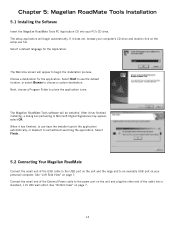
... setup application will begin the installation process. Select Finish. 5.2 Connecting Your Magellan RoadMate Connect the small end of the cable into your personal computer. The Magellan RoadMate Tools software will appear to exit without launching the application. The Welcome screen will be... installed. Choose a destination for the Application. Chapter 5: Magellan RoadMate Tools Installation 5.1 Installing the Software Insert the Magellan RoadMate Tools PC Application CD into a standard, 110 VAC wall outlet. If it has finished, to ...
... setup application will begin the installation process. Select Finish. 5.2 Connecting Your Magellan RoadMate Connect the small end of the cable into your personal computer. The Magellan RoadMate Tools software will appear to exit without launching the application. The Welcome screen will be... installed. Choose a destination for the Application. Chapter 5: Magellan RoadMate Tools Installation 5.1 Installing the Software Insert the Magellan RoadMate Tools PC Application CD into a standard, 110 VAC wall outlet. If it has finished, to ...

Manual - English
Page 32
... of all images in pixels, the size, and the format (image type). When you to set the view properties, the sequence of the Photo Viewer software. 23 Slideshow - Chapter 9: Photo Viewer 9.2.4 Properties To view information on the selected file or folder, press Properties. A thumbnail of the image will display the current...
... of all images in pixels, the size, and the format (image type). When you to set the view properties, the sequence of the Photo Viewer software. 23 Slideshow - Chapter 9: Photo Viewer 9.2.4 Properties To view information on the selected file or folder, press Properties. A thumbnail of the image will display the current...

Manual - English
Page 37
GPS Exchange file format (.GPS,.XML); Click on Next. Next, choose how the data is separated and...header row, this row will generate an error so you should start importing data. If your Magellan RoadMate. 28 You now need to the appropriate column. Click on The Save POI file button. Assign a name ...to import and click Open. Magellan Waypoint file format (.WPT,.RTE); Select the POI file you wish to your Magellan RoadMate. Close the POI File Editor. Chapter 10: Magellan RoadMate POI Manager 10.7 Importing a Data FIle The POI Manager software supports ASCII file format (....
GPS Exchange file format (.GPS,.XML); Click on Next. Next, choose how the data is separated and...header row, this row will generate an error so you should start importing data. If your Magellan RoadMate. 28 You now need to the appropriate column. Click on The Save POI file button. Assign a name ...to import and click Open. Magellan Waypoint file format (.WPT,.RTE); Select the POI file you wish to your Magellan RoadMate. Close the POI File Editor. Chapter 10: Magellan RoadMate POI Manager 10.7 Importing a Data FIle The POI Manager software supports ASCII file format (....

Manual - English
Page 79
... instructions are in order to display in Navigation Mode. Select Clear All if you choose to prevent your Magellan RoadMate using the Magellan RoadMate POI Manager software (see "POI Categories" on the Map screen. For a list of the Magellan RoadMate. To access these features, press the MENU key on the unit and select Navigation Options. 14.1 Configuration...
... instructions are in order to display in Navigation Mode. Select Clear All if you choose to prevent your Magellan RoadMate using the Magellan RoadMate POI Manager software (see "POI Categories" on the Map screen. For a list of the Magellan RoadMate. To access these features, press the MENU key on the unit and select Navigation Options. 14.1 Configuration...
Manual - English
Page 98
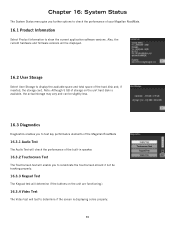
... current application software versions. Also, the current hardware and firmware versions will test to determine if the screen is available, the actual storage may vary and can be slightly less. 16.3 Diagnostics Diagnostics enables you to test key performance elements of the Magellan RoadMate 16.3.1 Audio...of the built-in speaker. 16.3.2 Touchscreen Test The Touchscreen test will enable you further options to check the performance of your Magellan RoadMate. 16.1 Product Information Select Product Information to display the available space and total space of storage on the unit hard disk ...
... current application software versions. Also, the current hardware and firmware versions will test to determine if the screen is available, the actual storage may vary and can be slightly less. 16.3 Diagnostics Diagnostics enables you to test key performance elements of the Magellan RoadMate 16.3.1 Audio...of the built-in speaker. 16.3.2 Touchscreen Test The Touchscreen test will enable you further options to check the performance of your Magellan RoadMate. 16.1 Product Information Select Product Information to display the available space and total space of storage on the unit hard disk ...

Manual - English
Page 103
Appendix C PC Requirements • IBM Compatible PC, Pentium or higher • Microsoft ® WIndows® 2000 or XP • 128 MB RAM • CD Drive for Software Installation • DVD Drive for Map Upgrades • USB Port 96
Appendix C PC Requirements • IBM Compatible PC, Pentium or higher • Microsoft ® WIndows® 2000 or XP • 128 MB RAM • CD Drive for Software Installation • DVD Drive for Map Upgrades • USB Port 96


