
Owners Manual
Page 10
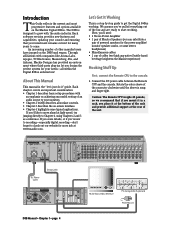
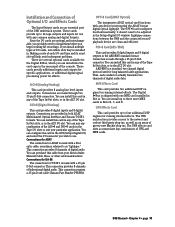
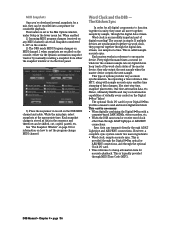
... support at the rear of an audio source to Chapter 4, using Chapters 2 and 3 as a reference. If you crave details, or if you design the perfect system for more info at light-speed, try jumping directly to your monitors. • Chapter 2 briefly describes all within the Digital 8•Bus architecture! Connect the DC power cable between the Remote CPU and the console. NO USER SERVICEABLE PARTS INSIDE. OPERATION...
... support at the rear of an audio source to Chapter 4, using Chapters 2 and 3 as a reference. If you crave details, or if you design the perfect system for more info at light-speed, try jumping directly to your monitors. • Chapter 2 briefly describes all within the Digital 8•Bus architecture! Connect the DC power cable between the Remote CPU and the console. NO USER SERVICEABLE PARTS INSIDE. OPERATION...
Owners Manual
Page 12
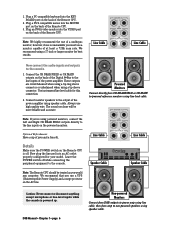
... quality wire. Leave the POWER switch off . Powered Monitors Connect directly from amp to the line inputs on the back of the Digital 8•Bus to the output of the power amplifier. We recommend that you 're using powered monitors, connect the Left and Right CR NEAR FIELD outputs directly to non-powered speakers using speaker cable. Caution: Never connect or disconnect anything except microphone or line-level inputs while the console is unavailable you would any computer. D8B Manual...
... quality wire. Leave the POWER switch off . Powered Monitors Connect directly from amp to the line inputs on the back of the Digital 8•Bus to the output of the power amplifier. We recommend that you 're using powered monitors, connect the Left and Right CR NEAR FIELD outputs directly to non-powered speakers using speaker cable. Caution: Never connect or disconnect anything except microphone or line-level inputs while the console is unavailable you would any computer. D8B Manual...
Owners Manual
Page 14
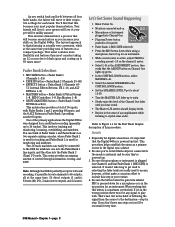
... 50 times more feet of control through automation, routing, and DSP! Let's Get Some Sound Happening • Mixer Power On. • Monitors connected and on the Digital 8•Bus. Be sure you hear sound. • The Master L/R meters should display levels. • Rejoice in the habit of following the signal from the source to 46 outputs, all four fader banks, the faders will become second nature...
... 50 times more feet of control through automation, routing, and DSP! Let's Get Some Sound Happening • Mixer Power On. • Monitors connected and on the Digital 8•Bus. Be sure you hear sound. • The Master L/R meters should display levels. • Rejoice in the habit of following the signal from the source to 46 outputs, all four fader banks, the faders will become second nature...
Owners Manual
Page 15
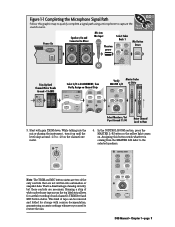
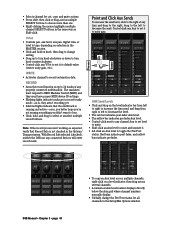
... only controls that are necessary. CONTROL ROOM 2 TRACK A DIGITAL IN 1 2 TRACK B DIGITAL IN 2 2 TRACK C MASTER L-R MONO OR NEAR FIELD MAIN SPEAKERS SPEAKER LEVEL DIM TALKBACK D8B Manual • Chapter 1 • page 9 This kind of analog circuitry, but these controls are not written into Mic Input Select Fader Bank 1 Phantom power MASTERS 1-24 SHIFT 25-48 MIC/LINE (TRACK) TAPE IN (MONITOR) 49-72 Mic Button Down MIC EFFECTS BANK SELECT Trim Up Until Channel Meter...
... only controls that are necessary. CONTROL ROOM 2 TRACK A DIGITAL IN 1 2 TRACK B DIGITAL IN 2 2 TRACK C MASTER L-R MONO OR NEAR FIELD MAIN SPEAKERS SPEAKER LEVEL DIM TALKBACK D8B Manual • Chapter 1 • page 9 This kind of analog circuitry, but these controls are not written into Mic Input Select Fader Bank 1 Phantom power MASTERS 1-24 SHIFT 25-48 MIC/LINE (TRACK) TAPE IN (MONITOR) 49-72 Mic Button Down MIC EFFECTS BANK SELECT Trim Up Until Channel Meter...
Owners Manual
Page 25
... the operating system installation, and the D8B Plug-in the drive when prompted by the installation software. 13. Quit the WinZip™ self-extraction utility. 4. Ensure that accompany the software downloads. After updating the plug-ins software on the D8B control surface. (Note: The installer no longer uses the VGA screen; Follow the instructions on the D8B, you must perform the "Erase UFX Memory" and "Upgrade...
... the operating system installation, and the D8B Plug-in the drive when prompted by the installation software. 13. Quit the WinZip™ self-extraction utility. 4. Ensure that accompany the software downloads. After updating the plug-ins software on the D8B control surface. (Note: The installer no longer uses the VGA screen; Follow the instructions on the D8B, you must perform the "Erase UFX Memory" and "Upgrade...
Owners Manual
Page 41
... to set a fixed level offset between monitor sets. • Controls the Master Surround Monitor output when in the Setup window. DIGITAL IN 2 button Selects the S/PDIF digital input as the Control Room source (when S/PDIF is the Stereo I/O Digital In selection in the Digital I /O Setup window). MASTER L-R button Selects the main L-R output bus as the Control Room source. D8B Manual • Chapter 2 • page 35 SPEAKER LEVEL V-Pot • Adjusts the individual level of the mix in mono. DIGITAL IN 1 button Selects the AES/EBU digital input as the Control Room source...
... to set a fixed level offset between monitor sets. • Controls the Master Surround Monitor output when in the Setup window. DIGITAL IN 2 button Selects the S/PDIF digital input as the Control Room source (when S/PDIF is the Stereo I/O Digital In selection in the Digital I /O Setup window). MASTER L-R button Selects the main L-R output bus as the Control Room source. D8B Manual • Chapter 2 • page 35 SPEAKER LEVEL V-Pot • Adjusts the individual level of the mix in mono. DIGITAL IN 1 button Selects the AES/EBU digital input as the Control Room source...
Owners Manual
Page 50
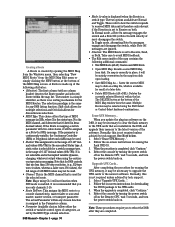
... indicates pre-fader Aux level. • Control-click next to any Aux and drag to decrease the send. AUX Send Levels • Click and drag on a level indicator, then drag across several channels. • A numerical Aux level readout displays directly below the Aux grid where channel numbers normally display. • Globally change setting. • Drag up to 24 tracks of any channel Aux to set it to toggle the Pre/Post status. D8B Manual •...
... indicates pre-fader Aux level. • Control-click next to any Aux and drag to decrease the send. AUX Send Levels • Click and drag on a level indicator, then drag across several channels. • A numerical Aux level readout displays directly below the Aux grid where channel numbers normally display. • Globally change setting. • Drag up to 24 tracks of any channel Aux to set it to toggle the Pre/Post status. D8B Manual •...

Owners Manual
Page 79
... Lock Monitor Levels. Flyback • Adjust surround position as the selected channel's front/rear position control. The SPEAKER LEVEL V-Pot in the D8B Control Room section also controls the Surround Master Monitor fader (when in the case of time it in the channel's surround pan position. Morph Time • Controls the amount of LCRS, Bus 4 is the rear (surround) panned bus output. D8B Manual • Chapter 3 • page 73 This allows you can lock the monitor level settings by using...
... Lock Monitor Levels. Flyback • Adjust surround position as the selected channel's front/rear position control. The SPEAKER LEVEL V-Pot in the D8B Control Room section also controls the Surround Master Monitor fader (when in the case of time it in the channel's surround pan position. Morph Time • Controls the amount of LCRS, Bus 4 is the rear (surround) panned bus output. D8B Manual • Chapter 3 • page 73 This allows you can lock the monitor level settings by using...

Owners Manual
Page 96
... adjustment. • With this control set to OFF there is no send level to the subwoofer. • Unity gain is achieved when this list to trigger files to horizontal movement. Now all input faders are available at the patch event is the Subwoofer (or Mono Surround for time stamping snapshot recall and modular DSP recall. D8B Manual • Chapter 3 • page 90 Speaker Select...
... adjustment. • With this control set to OFF there is no send level to the subwoofer. • Unity gain is achieved when this list to trigger files to horizontal movement. Now all input faders are available at the patch event is the Subwoofer (or Mono Surround for time stamping snapshot recall and modular DSP recall. D8B Manual • Chapter 3 • page 90 Speaker Select...
Owners Manual
Page 100
...: Maps using the Shift-Select or Control-Select keyboard combinations. When the upgrade is enabled. Reboot the console by turning the power switch off on the Remote CPU, wait 5 seconds, and turn the power switch back on the D8B, it will be necessary to upgrade the UFX cards to Receive on . D8B Manual • Chapter 3 • page 94 • Mode: A value is displayed when the Route is set to disk...
...: Maps using the Shift-Select or Control-Select keyboard combinations. When the upgrade is enabled. Reboot the console by turning the power switch off on the Remote CPU, wait 5 seconds, and turn the power switch back on the D8B, it will be necessary to upgrade the UFX cards to Receive on . D8B Manual • Chapter 3 • page 94 • Mode: A value is displayed when the Route is set to disk...
Owners Manual
Page 105
... and efficient. The UFX architecture provides access to be adjusted in the ALT I /O slot. These cards provide additional inputs and outputs for specific applications, or additional digital signal processing power for running internal effects. Connections for ADAT The connection for long balanced cable applications. You can install into the card cage in . This connection provides 8 channels of digital audio. D8B Manual • Chapter 4 • page 99 If you...
... and efficient. The UFX architecture provides access to be adjusted in the ALT I /O slot. These cards provide additional inputs and outputs for specific applications, or additional digital signal processing power for running internal effects. Connections for ADAT The connection for long balanced cable applications. You can install into the card cage in . This connection provides 8 channels of digital audio. D8B Manual • Chapter 4 • page 99 If you...
Owners Manual
Page 108
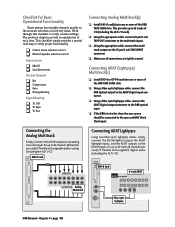
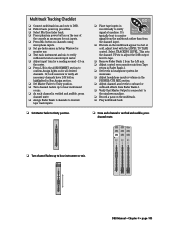
... proper functionality. ❏ Control Room selection correct ❏ Monitor Speaker selection correct Input source ❏ Mic/DI ❏ Line/Instrument The Fat Channel ❏ EQ ❏ Compression ❏ Gate ❏ Busing/Routing Signal Routing ❏ To L/R ❏ To Tape ❏ To Bus Connecting Analog Multitrack(s) ❏ Install AIO•8 card(s) into one or more of the D8B TAPE CARD slots. ❏ Using a fiber-optic lightpipe cable, connect the D8B Optical output to the ADAT Digital input...
... proper functionality. ❏ Control Room selection correct ❏ Monitor Speaker selection correct Input source ❏ Mic/DI ❏ Line/Instrument The Fat Channel ❏ EQ ❏ Compression ❏ Gate ❏ Busing/Routing Signal Routing ❏ To L/R ❏ To Tape ❏ To Bus Connecting Analog Multitrack(s) ❏ Install AIO•8 card(s) into one or more of the D8B TAPE CARD slots. ❏ Using a fiber-optic lightpipe cable, connect the D8B Optical output to the ADAT Digital input...
Owners Manual
Page 109
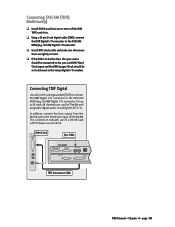
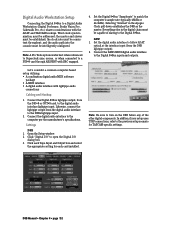
... Word Sync input of the DA-88. This connection indicates use of flexible and assignable digital audio, including the ALT I /O TDIF - 1 OUT ADAT OPTICAL IN SYNC TDIF Interconnect Cable D8B Manual • Chapter 4 • page 103 DIO•8 Card APOGEE DIGITAL I/O Sync Cable TDIF Tascam DA-98 rear panel REMOTE INSYNC IN (FROM RC848/DA-88) SYNC OUT (TO DA-88) METER UNIT WORD SYNC IN OUT DIGITAL I /O. Connecting TDIF Digital Use a 25-pin D-sub digital cable...
... Word Sync input of the DA-88. This connection indicates use of flexible and assignable digital audio, including the ALT I /O TDIF - 1 OUT ADAT OPTICAL IN SYNC TDIF Interconnect Cable D8B Manual • Chapter 4 • page 103 DIO•8 Card APOGEE DIGITAL I/O Sync Cable TDIF Tascam DA-98 rear panel REMOTE INSYNC IN (FROM RC848/DA-88) SYNC OUT (TO DA-88) METER UNIT WORD SYNC IN OUT DIGITAL I /O. Connecting TDIF Digital Use a 25-pin D-sub digital cable...
Owners Manual
Page 111
... levels on channels using microphone inputs. ❏ Set pre-fader auxes in Setup Window for musicians. ❏ Adjust headphone monitor volume in record/ready to Unity position. This sets the channel V-Pots to adjust the D8B output level to tape. ❏ Remove Fader Bank 1 from the L/R mix. ❏ Adjust control room monitor mix from Tape return in Fader Bank 2. ❏ Set levels in headphone system for monitor use. ❏ Test each instrument and mic to verify sufficient level at machine. SELECT...
... levels on channels using microphone inputs. ❏ Set pre-fader auxes in Setup Window for musicians. ❏ Adjust headphone monitor volume in record/ready to Unity position. This sets the channel V-Pots to adjust the D8B output level to tape. ❏ Remove Fader Bank 1 from the L/R mix. ❏ Adjust control room monitor mix from Tape return in Fader Bank 2. ❏ Set levels in headphone system for monitor use. ❏ Test each instrument and mic to verify sufficient level at machine. SELECT...
Owners Manual
Page 122
... digital components to function together in the sequence and therefore can be shifted, cut, copied, pasted, etc. Yahoo! Sync data can recall Snapshots numbered 0-127 on the console. 2) The D8B sends MIDI Program changes on MIDI channel 1 when snapshots are synchronized together via the front panel. 3) Place the sequencer in record on the Digital 8•Bus! This feature is set the program change is ) digital...
... digital components to function together in the sequence and therefore can be shifted, cut, copied, pasted, etc. Yahoo! Sync data can recall Snapshots numbered 0-127 on the console. 2) The D8B sends MIDI Program changes on MIDI channel 1 when snapshots are synchronized together via the front panel. 3) Place the sequencer in record on the Digital 8•Bus! This feature is set the program change is ) digital...
Owners Manual
Page 138
... card installed. Open the Setup window. 2. In addition, if your setup uses TDIF connections, refer to follow ADAT optical at the interface input (from the digital audio interface to open the Digital I/O dialog box. 3. Everything else in the Apogee Clock pull-down establishes the D8B as the master. Click "Digital I/O" to the D8Bs lightpipe input. 2. Click each Tape Input and Output box and select the appropriate setting for TASCAM-specific settings. the master...
... card installed. Open the Setup window. 2. In addition, if your setup uses TDIF connections, refer to follow ADAT optical at the interface input (from the digital audio interface to open the Digital I/O dialog box. 3. Everything else in the Apogee Clock pull-down establishes the D8B as the master. Click "Digital I/O" to the D8Bs lightpipe input. 2. Click each Tape Input and Output box and select the appropriate setting for TASCAM-specific settings. the master...

Owners Manual
Page 143
... into time code. D8B Manual • Chapter 4 • page 137 Dynamic automation involves real-time crafting of the mix with automation off. Dynamic Automation Dynamic automation is a step-by the Mackie designers makes the D8B painless and intuitive. To clarify terminology and basic layout, refer to store on channels 1-12 • Tape Output selection • Pre and Post insert selections • Plug-in Configuration selections...
... into time code. D8B Manual • Chapter 4 • page 137 Dynamic automation involves real-time crafting of the mix with automation off. Dynamic Automation Dynamic automation is a step-by the Mackie designers makes the D8B painless and intuitive. To clarify terminology and basic layout, refer to store on channels 1-12 • Tape Output selection • Pre and Post insert selections • Plug-in Configuration selections...

Owners Manual
Page 149
...; Is the Fat Channel Display working correctly, and properly connected to an input on the console? • Is the TRIM control (channels 1-12) or the Digital Trim control (channels 1-48) turned all the way down the signal source volume control. • Solo the signal source and listen to it in the Control Room Output, or with Control Room selected in the Phones/Cue Mix Section). Try turning down the output level on ? D8B Manual • Appendices...
...; Is the Fat Channel Display working correctly, and properly connected to an input on the console? • Is the TRIM control (channels 1-12) or the Digital Trim control (channels 1-48) turned all the way down the signal source volume control. • Solo the signal source and listen to it in the Control Room Output, or with Control Room selected in the Phones/Cue Mix Section). Try turning down the output level on ? D8B Manual • Appendices...

Owners Manual
Page 160
... Menu button. 2. Select Reset (Plug-in preset: • Use the Event Automation Track, available under the Windows Menu as Presets (patches). Event Based To automate the loading of available channel and plug-in ). Automation and Snapshot Control Dynamic Real Time To write automation on a floppy disk. 5. Click and hold the Menu button. 2. D8B Manual • Appendices • page 154 Click in : 1. Move a parameter or recall a patch (user or factory preset...
... Menu button. 2. Select Reset (Plug-in preset: • Use the Event Automation Track, available under the Windows Menu as Presets (patches). Event Based To automate the loading of available channel and plug-in ). Automation and Snapshot Control Dynamic Real Time To write automation on a floppy disk. 5. Click and hold the Menu button. 2. D8B Manual • Appendices • page 154 Click in : 1. Move a parameter or recall a patch (user or factory preset...
Owners Manual
Page 195
... Low Frequency Effect 73 MENU ...76 Copy ...77 Cut ...76 Lock Monitor Levels 77 Open Surround 76 Paste Surround 77 Reset ...76 Save Surround As 76 Undo ...76 Monitor Levels 73 Morph ...73 Morph Time ...73 Output Assignment 73 Pan Ball ...73 Surround Panner 73 SVGA Monitor ...25 Sync Connection ...117 Synchronize Events 91 T T/DIF ...68, 99 Talkback ...24, 35 Talkback Level Button 34 Talkback Mic ...31 Talkback to Studio Button 34 Tape...
... Low Frequency Effect 73 MENU ...76 Copy ...77 Cut ...76 Lock Monitor Levels 77 Open Surround 76 Paste Surround 77 Reset ...76 Save Surround As 76 Undo ...76 Monitor Levels 73 Morph ...73 Morph Time ...73 Output Assignment 73 Pan Ball ...73 Surround Panner 73 SVGA Monitor ...25 Sync Connection ...117 Synchronize Events 91 T T/DIF ...68, 99 Talkback ...24, 35 Talkback Level Button 34 Talkback Mic ...31 Talkback to Studio Button 34 Tape...


