User Manual
Page 13
... Audio Ports Configuration 22 Realtek Audio Console 23 Overview of Components 25 CPU Socket ...27 DIMM Slots...28 PCI_E1~5: PCIe Expansion Slots 29 M2_1~2: M.2 Slots (Key M 30 SATA1~6: SATA 6Gb/s Connectors 31 JFP1, JFP2: Front Panel Connectors 31 CPU_PWR1~2, ATX_PWR1: Power Connectors 32 CPU_FAN1, PUMP_FAN1, SYS_FAN1~4: Fan Connectors 33 JUSB3~4: USB... Connectors 34 JUSB1~2: USB 2.0 Connectors 34 JAUD1: Front Audio Connector 35 JCOM1: Serial Port Connector 35 JCI1: Chassis Intrusion Connector 36 JBAT1: Clear CMOS (Reset BIOS) Jumper 37 EZ Debug LED...37 Contents 13
... Audio Ports Configuration 22 Realtek Audio Console 23 Overview of Components 25 CPU Socket ...27 DIMM Slots...28 PCI_E1~5: PCIe Expansion Slots 29 M2_1~2: M.2 Slots (Key M 30 SATA1~6: SATA 6Gb/s Connectors 31 JFP1, JFP2: Front Panel Connectors 31 CPU_PWR1~2, ATX_PWR1: Power Connectors 32 CPU_FAN1, PUMP_FAN1, SYS_FAN1~4: Fan Connectors 33 JUSB3~4: USB... Connectors 34 JUSB1~2: USB 2.0 Connectors 34 JAUD1: Front Audio Connector 35 JCOM1: Serial Port Connector 35 JCI1: Chassis Intrusion Connector 36 JBAT1: Clear CMOS (Reset BIOS) Jumper 37 EZ Debug LED...37 Contents 13

User Manual
Page 26
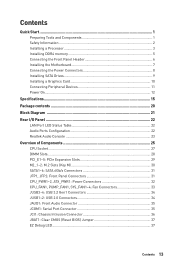
...ATX_PWR1 Power Connectors CPU Socket AM4 CPU Socket DIMMA1/A2/B1/B2 DIMM Slots JAUD1 JBAT1 JCI1 Front Audio Connector Clear CMOS (Reset BIOS) Jumper Chassis Intrusion Connector JCOM1 Serial Port Connector JFP1, JFP2 JRAINBOW1~2 JRGB1~2 Front Panel Connectors Addressable RGB LED connectors RGB LED ...connectors JUSB1~2 USB 2.0 Connectors JUSB3~4 USB 3.2 Gen1 Connectors M2_1~2 M.2 Slots (Key M) PCI_E1~5 PCIe Expansion Slots SATA1~6 SATA 6Gb/s Connectors Page 33 32 27 28 35 37 36 35 31 39 38 34 34 30...
...ATX_PWR1 Power Connectors CPU Socket AM4 CPU Socket DIMMA1/A2/B1/B2 DIMM Slots JAUD1 JBAT1 JCI1 Front Audio Connector Clear CMOS (Reset BIOS) Jumper Chassis Intrusion Connector JCOM1 Serial Port Connector JFP1, JFP2 JRAINBOW1~2 JRGB1~2 Front Panel Connectors Addressable RGB LED connectors RGB LED ...connectors JUSB1~2 USB 2.0 Connectors JUSB3~4 USB 3.2 Gen1 Connectors M2_1~2 M.2 Slots (Key M) PCI_E1~5 PCIe Expansion Slots SATA1~6 SATA 6Gb/s Connectors Page 33 32 27 28 35 37 36 35 31 39 38 34 34 30...

User Manual
Page 36
...chassis intrusion switch cable. Resetting the chassis intrusion warning 1. Go to Reset. 3. Close the chassis cover. 3. Set Chassis Intrusion to BIOS > SETTINGS > Security > Chassis Intrusion Configuration. 2. Once the chassis cover is opened again, a warning message will be displayed on ...on the chassis. 2. Connect the JCI1 connector to select Yes. 6. Press F10 to save and exit and then press the Enter key to BIOS > SETTINGS > Security > Chassis Intrusion Configuration. 4. Normal (default) Trigger the chassis intrusion event Using chassis intrusion detector 1. Go ...
...chassis intrusion switch cable. Resetting the chassis intrusion warning 1. Go to Reset. 3. Close the chassis cover. 3. Set Chassis Intrusion to BIOS > SETTINGS > Security > Chassis Intrusion Configuration. 2. Once the chassis cover is opened again, a warning message will be displayed on ...on the chassis. 2. Connect the JCI1 connector to select Yes. 6. Press F10 to save and exit and then press the Enter key to BIOS > SETTINGS > Security > Chassis Intrusion Configuration. 4. Normal (default) Trigger the chassis intrusion event Using chassis intrusion detector 1. Go ...

User Manual
Page 41
... you purchased. Entering BIOS Setup Press Delete key, when the Press DEL key to enter Setup Menu, F11 to confirm your choice. Important y BIOS items are continuously update for BIOS item description. BIOS Setup 41 Therefore, the description may vary from the latest BIOS and should always keep... unless you press F10, a confirmation window appears and it to the HELP information panel for better system performance. y The BIOS items will vary with BIOS. Select between Advanced mode and EZ mode F8: Load Overclocking Profile F9: Save Overclocking Profile F10: Save Change and Reset...
... you purchased. Entering BIOS Setup Press Delete key, when the Press DEL key to enter Setup Menu, F11 to confirm your choice. Important y BIOS items are continuously update for BIOS item description. BIOS Setup 41 Therefore, the description may vary from the latest BIOS and should always keep... unless you press F10, a confirmation window appears and it to the HELP information panel for better system performance. y The BIOS items will vary with BIOS. Select between Advanced mode and EZ mode F8: Load Overclocking Profile F9: Save Overclocking Profile F10: Save Change and Reset...
User Manual
Page 42
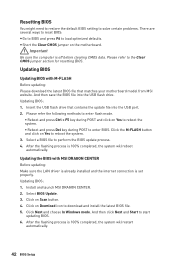
...% completed, the system will reboot automatically. Please refer the following methods to enter flash mode. ƒ Reboot and press Ctrl + F5 key during POST to start updating BIOS. 6. Install and launch MSI DRAGON CENTER. 2. y Short the Clear CMOS jumper on Scan button. 4. Click on Yes to reboot the system. ƒ Reboot and press...
...% completed, the system will reboot automatically. Please refer the following methods to enter flash mode. ƒ Reboot and press Ctrl + F5 key during POST to start updating BIOS. 6. Install and launch MSI DRAGON CENTER. 2. y Short the Clear CMOS jumper on Scan button. 4. Click on Yes to reboot the system. ƒ Reboot and press...
User Manual
Page 44
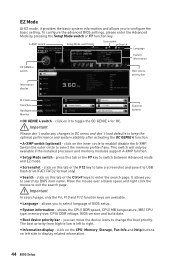
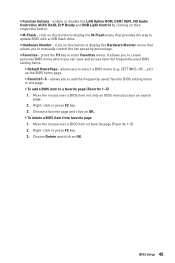
y A-XMP switch (optional) - y Setup Mode switch - press this tab or the F7 key to display related information. 44 BIOS Setup y Boot device priority bar - click on the CPU, Memory, Storage, Fan Info and Help buttons on left to configure the basic setting. Important...right click the mouse to enable/ disable the A-XMP. Important In search page, only the F6, F10 and F12 function keys are available. Switch the outer circle to select language of BIOS setup. y Search - allows you to select the memory profile if any changes in OC menu and don't load defaults...
y A-XMP switch (optional) - y Setup Mode switch - press this tab or the F7 key to display related information. 44 BIOS Setup y Boot device priority bar - click on the CPU, Memory, Storage, Fan Info and Help buttons on left to configure the basic setting. Important...right click the mouse to enable/ disable the A-XMP. Important In search page, only the F6, F10 and F12 function keys are available. Switch the outer circle to select language of BIOS setup. y Search - allows you to select the memory profile if any changes in OC menu and don't load defaults...
User Manual
Page 45
...allows you can save and access favorite/ frequently-used / favorite BIOS setting items in one page. ƒ To add a BIOS item to update BIOS with a USB flash drive. Right-click or press F2 key. 3. Right-click or press F2 key. 3. enable or disable the LAN Option ROM, CSM/ UEFI...1~5) 2. allows you to enter Favorites menu. Move the mouse over a BIOS item not only on BIOS menu but also on OK. ƒ To delete a BIOS item from favorite page 1. y Hardware Monitor - press the F3 key to select a BIOS menu (e.g. y Function buttons - allows you to manually control the fan ...
...allows you can save and access favorite/ frequently-used / favorite BIOS setting items in one page. ƒ To add a BIOS item to update BIOS with a USB flash drive. Right-click or press F2 key. 3. Right-click or press F2 key. 3. enable or disable the LAN Option ROM, CSM/ UEFI...1~5) 2. allows you to enter Favorites menu. Move the mouse over a BIOS item not only on BIOS menu but also on OK. ƒ To delete a BIOS item from favorite page 1. y Hardware Monitor - press the F3 key to select a BIOS menu (e.g. y Function buttons - allows you to manually control the fan ...

User Manual
Page 46
...display - A-XMP switch Setup Mode switch Screenshot Search Language System information OC GENIE 4 switch Boot device priority bar BIOS menu selection BIOS menu selection Menu display y BIOS menu selection - allows you to manage overclocking profiles. ƒ HARDWARE MONITOR - allows you to adjust the frequency... and voltage. Advanced Mode Press Setup Mode switch or F7 function key can switch between EZ Mode and Advanced Mode in BIOS setup. provides BIOS setting items and information to update BIOS with a USB flash drive. ƒ OC PROFILE - allows you to...
...display - A-XMP switch Setup Mode switch Screenshot Search Language System information OC GENIE 4 switch Boot device priority bar BIOS menu selection BIOS menu selection Menu display y BIOS menu selection - allows you to manage overclocking profiles. ƒ HARDWARE MONITOR - allows you to adjust the frequency... and voltage. Advanced Mode Press Setup Mode switch or F7 function key can switch between EZ Mode and Advanced Mode in BIOS setup. provides BIOS setting items and information to update BIOS with a USB flash drive. ƒ OC PROFILE - allows you to...

User Manual
Page 47
... elements. The format is . Read-only. Press Enter to switch between date elements. The time format is . BIOS Setup 47 through Dec. Use tab key to Sat, determined by users. Advanced f PCI Subsystem Settings Sets PCI, PCI express interface protocol and latency timer.... The year can be adjusted by BIOS. f System Time Sets the system time. f DMI Information Shows system information, desktop Board ...
... elements. The format is . Read-only. Press Enter to switch between date elements. The time format is . BIOS Setup 47 through Dec. Use tab key to Sat, determined by users. Advanced f PCI Subsystem Settings Sets PCI, PCI express interface protocol and latency timer.... The year can be adjusted by BIOS. f System Time Sets the system time. f DMI Information Shows system information, desktop Board ...
User Manual
Page 51
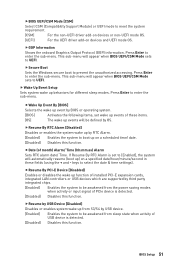
...fResume by USB device. [Enabled] Enables the system to be defined by BIOS or operating system. [BIOS] Activates the following items, set to boot up from sleep state when ... time/ date. [Disabled] Disables this function. This sub-menu will appear when BIOS UEFI/CSM Mode sets to UEFI. f Wake Up Event Setup Sets system wake ... and UEFI mode OS. fWake Up Event By [BIOS] Selects the wake up event by OS. BIOS Setup 51 fSecure Boot Sets the Windows secure boot ...-menu will appear when BIOS UEFI/CSM Mode sets to UEFI. fDate (of USB device is detected. ...
...fResume by USB device. [Enabled] Enables the system to be defined by BIOS or operating system. [BIOS] Activates the following items, set to boot up from sleep state when ... time/ date. [Disabled] Disables this function. This sub-menu will appear when BIOS UEFI/CSM Mode sets to UEFI. f Wake Up Event Setup Sets system wake ... and UEFI mode OS. fWake Up Event By [BIOS] Selects the wake up event by OS. BIOS Setup 51 fSecure Boot Sets the Windows secure boot ...-menu will appear when BIOS UEFI/CSM Mode sets to UEFI. fDate (of USB device is detected. ...

User Manual
Page 52
...Full Screen Logo Display [Enabled] Enables or disables to Hot Key. f Info Block effect [Unlock] Sets the state of... Secure Erase+ function. Boot Sets the sequence of keys as a hot key to wake the system. f Bootup NumLock State [On...[Disabled] Enables or disables the POST beep. fHot Key [Ctrl+Space] Selects a combination of system boot devices...Key] Enables the system to be awakened from S3/ S4/ S5 state when activity of any key on PS/2 keyboard is detected. [Hot Key...] Enables the system to be awakened from S3/ S4/ S5 state when activity of hot key...
...Full Screen Logo Display [Enabled] Enables or disables to Hot Key. f Info Block effect [Unlock] Sets the state of... Secure Erase+ function. Boot Sets the sequence of keys as a hot key to wake the system. f Bootup NumLock State [On...[Disabled] Enables or disables the POST beep. fHot Key [Ctrl+Space] Selects a combination of system boot devices...Key] Enables the system to be awakened from S3/ S4/ S5 state when activity of any key on PS/2 keyboard is detected. [Hot Key...] Enables the system to be awakened from S3/ S4/ S5 state when activity of hot key...

User Manual
Page 53
...prompted to UEFI. [UEFI] [LEGACY+UEFI] Enables UEFI BIOS boot mode support only. After setting the administrator password, the state of this item will be configured automatically by BIOS when BIOS UEFI/CSM Mode sets to enter a new password. f ...password. f Trusted Computing Sets TPM (Trusted Platform Module) function. This item will be requested for entering the BIOS Setup. f Password Check [Setup] Selects a condition that will request the password. [Setup] [Boot] A...appear on OS installation requirement. You may also press Esc key to change the BIOS items with user password.
...prompted to UEFI. [UEFI] [LEGACY+UEFI] Enables UEFI BIOS boot mode support only. After setting the administrator password, the state of this item will be configured automatically by BIOS when BIOS UEFI/CSM Mode sets to enter a new password. f ...password. f Trusted Computing Sets TPM (Trusted Platform Module) function. This item will be requested for entering the BIOS Setup. f Password Check [Setup] Selects a condition that will request the password. [Setup] [Boot] A...appear on OS installation requirement. You may also press Esc key to change the BIOS items with user password.
User Manual
Page 54
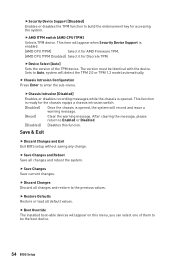
fSecurity Device Support [Disabled] Enables or disables the TPM function to build the endorsement key for the chassis equips a chassis intrusion switch. [Enabled] Once the chassis is opened . This item will appear on this funcion. f Discard Changes .... Sets to Auto, system will record and issue a warning message. [Reset] Clear the warning message. Save & Exit f Discard Changes and Exit Exit BIOS setup without saving any change. f Restore Defaults Restore or load all changes and reboot the system. This function is ready for accessing the system. f Save...
fSecurity Device Support [Disabled] Enables or disables the TPM function to build the endorsement key for the chassis equips a chassis intrusion switch. [Enabled] Once the chassis is opened . This item will appear on this funcion. f Discard Changes .... Sets to Auto, system will record and issue a warning message. [Reset] Clear the warning message. Save & Exit f Discard Changes and Exit Exit BIOS setup without saving any change. f Restore Defaults Restore or load all changes and reboot the system. This function is ready for accessing the system. f Save...
User Manual
Page 57
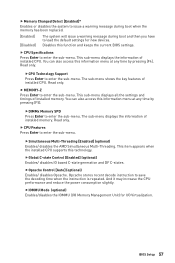
...] (optional) Enables/ disables IO based C-state generation and DF C-states. BIOS Setup 57 Disables this technology. Read only. fIOMMU Mode (optional) Enables/disables the IOMMU (I /O Virtualization. The sub-menu shows the key features of installed CPU. fDIMMx Memory SPD Press Enter to enter the sub-... installed memory. Read only. This item appears when the installed CPU supports this function and keeps the current BIOS settings. fOpcache Control [Auto] (optional) Enables/ disables Opcache. And it may increase the CPU performance and reduce the power consumption...
...] (optional) Enables/ disables IO based C-state generation and DF C-states. BIOS Setup 57 Disables this technology. Read only. fIOMMU Mode (optional) Enables/disables the IOMMU (I /O Virtualization. The sub-menu shows the key features of installed CPU. fDIMMx Memory SPD Press Enter to enter the sub-... installed memory. Read only. This item appears when the installed CPU supports this function and keeps the current BIOS settings. fOpcache Control [Auto] (optional) Enables/ disables Opcache. And it may increase the CPU performance and reduce the power consumption...

User Manual
Page 62
... XMP How to enable A-XMP Power on and press Delete key to Profile 1 or Profile 2. Method 1. Profile 2 Toggle Profile1 Toggle A-XMP Indicator Method 2. Here are only available when the system is supported. 62 BIOS Setup Note y Profile 1 is manufacturer verifies profile. BIOS EZ button Click A-XMP button 1 or 2 to enable A-XMP...
... XMP How to enable A-XMP Power on and press Delete key to Profile 1 or Profile 2. Method 1. Profile 2 Toggle Profile1 Toggle A-XMP Indicator Method 2. Here are only available when the system is supported. 62 BIOS Setup Note y Profile 1 is manufacturer verifies profile. BIOS EZ button Click A-XMP button 1 or 2 to enable A-XMP...

User Manual
Page 63
... by mirroring data between the hard drives and provides enhanced read performance. Go to enter BIOS Setup menu. 6. Press F10 to save configuration and exit, and then reboot and press Delete key to BIOS > SETTINGS > Advanced > RAIDXpert2 Configuration Utility sub-menu. AMD RAID Configuration .... 4. RAID 10 (Striped RAID1 Sets) uses four hard drives to create a combination of the space on and press Delete key to enter BIOS Setup menu. 2. Go to BIOS > SETTINGS > Advanced > Integrated Peripherals > SATA Mode and change setting to UEFI. 5. RAIDABLE (also known as RAID Ready...
... by mirroring data between the hard drives and provides enhanced read performance. Go to enter BIOS Setup menu. 6. Press F10 to save configuration and exit, and then reboot and press Delete key to BIOS > SETTINGS > Advanced > RAIDXpert2 Configuration Utility sub-menu. AMD RAID Configuration .... 4. RAID 10 (Striped RAID1 Sets) uses four hard drives to create a combination of the space on and press Delete key to enter BIOS Setup menu. 2. Go to BIOS > SETTINGS > Advanced > Integrated Peripherals > SATA Mode and change setting to UEFI. 5. RAIDABLE (also known as RAID Ready...


