User Manual
Page 2
Preface 1-2 Table of Content Preface Table of Content ...1-2 Regulations Information...1-5 FCC-B Radio Frequency Interference Statement 1-5 FCC Conditions ...1-6 Safety Instructions...1-7 Safety Guideline for Using Lithium Battery 1-9 WEEE Statement ...1-13 Trademarks ...1-20 Release History...1-20 Introductions Manual Map ...2-2 Unpacking...2-3 Specification...2-4 Product Overview ...2-9 Top-Open View ...2-9 Front Side View ...2-13 Left Side View...2-15 Right Side View ...2-17
Preface 1-2 Table of Content Preface Table of Content ...1-2 Regulations Information...1-5 FCC-B Radio Frequency Interference Statement 1-5 FCC Conditions ...1-6 Safety Instructions...1-7 Safety Guideline for Using Lithium Battery 1-9 WEEE Statement ...1-13 Trademarks ...1-20 Release History...1-20 Introductions Manual Map ...2-2 Unpacking...2-3 Specification...2-4 Product Overview ...2-9 Top-Open View ...2-9 Front Side View ...2-13 Left Side View...2-15 Right Side View ...2-17

User Manual
Page 3
Preface 1-3 Rear Side View...2-19 Bottom Side View ...2-20 Getting Started Power Management ...3-2 ECO Engine--Power Saving Function 3-2 AC Adapter ...3-4 Battery Pack ...3-6 Using the Battery Pack...3-9 Basic Operations ...3-11 Safety and Comfort Tips...3-11 Having a Good Work Habit...3-12 Knowing the Keyboard ...3-13 Knowing the Touchpad ...3-17 About Hard Disk Drive...3-20 Connecting the External Devices 3-21 Using the External Optical Storage Device 3-21 Connecting the Peripheral Devices 3-23 Connecting the Communication Devices 3-26 Safely Remove Hardware ...3-27
Preface 1-3 Rear Side View...2-19 Bottom Side View ...2-20 Getting Started Power Management ...3-2 ECO Engine--Power Saving Function 3-2 AC Adapter ...3-4 Battery Pack ...3-6 Using the Battery Pack...3-9 Basic Operations ...3-11 Safety and Comfort Tips...3-11 Having a Good Work Habit...3-12 Knowing the Keyboard ...3-13 Knowing the Touchpad ...3-17 About Hard Disk Drive...3-20 Connecting the External Devices 3-21 Using the External Optical Storage Device 3-21 Connecting the Peripheral Devices 3-23 Connecting the Communication Devices 3-26 Safely Remove Hardware ...3-27
User Manual
Page 8
... The equipment has obvious signs of the building. 1-8 Preface Place the power cord in a safe place. If any add-on top of battery recommended by the manufacturer only. Do not place anything on card or module. Always unplug the power cord before inserting any of the following ...situations arises, get the equipment checked by improper battery replacement, use the same or equivalent type of the power cord. To prevent explosion caused by a service personnel: Š The power ...
... The equipment has obvious signs of the building. 1-8 Preface Place the power cord in a safe place. If any add-on top of battery recommended by the manufacturer only. Do not place anything on card or module. Always unplug the power cord before inserting any of the following ...situations arises, get the equipment checked by improper battery replacement, use the same or equivalent type of the power cord. To prevent explosion caused by a service personnel: Š The power ...
User Manual
Page 22
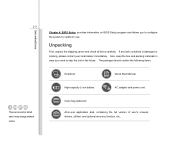
... that this notebook. Chapter 3, Getting Started, gives the basic operation instructions on using this notebook. Introductions 2-2 Congratulations on becoming a user of installing and uninstalling the battery; It is damaged or missing, please contact the vendor where you a delightful and professional experience in using notebook. We are also provided to read these...
... that this notebook. Chapter 3, Getting Started, gives the basic operation instructions on using this notebook. Introductions 2-2 Congratulations on becoming a user of installing and uninstalling the battery; It is damaged or missing, please contact the vendor where you a delightful and professional experience in using notebook. We are also provided to read these...
User Manual
Page 23
... is damaged or missing, please contact your local dealer immediately. The package should contain the following items: Notebook Quick Start Manual High-capacity Li-ion battery AC adapter and power cord Carry bag (optional) All-in the future. 2-3 These accessories listed above may change without notice. Unpacking First, unpack the shipping...
... is damaged or missing, please contact your local dealer immediately. The package should contain the following items: Notebook Quick Start Manual High-capacity Li-ion battery AC adapter and power cord Carry bag (optional) All-in the future. 2-3 These accessories listed above may change without notice. Unpacking First, unpack the shipping...
User Manual
Page 24
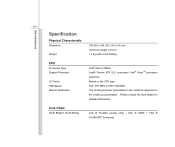
...) / Intel ® GS45 + Intel ® ICH9M-SFF Enhanced 2-4 Introductions Specification Physical Characteristic Dimension Weight 330 (W) x 224 (D) x 20~6 (H) mm (minimum height is 6mm) 1.4 kg (with 4 cell battery) CPU Processor Type Support Processor L2 Cache FSB Speed Special Notification Intel® Micro FCBGA Intel® Penryn SFF ULV processor/ Intel® AtomTM processor...
...) / Intel ® GS45 + Intel ® ICH9M-SFF Enhanced 2-4 Introductions Specification Physical Characteristic Dimension Weight 330 (W) x 224 (D) x 20~6 (H) mm (minimum height is 6mm) 1.4 kg (with 4 cell battery) CPU Processor Type Support Processor L2 Cache FSB Speed Special Notification Intel® Micro FCBGA Intel® Penryn SFF ULV processor/ Intel® AtomTM processor...

User Manual
Page 25
Introductions 2-5 Memory Technology Memory Maximum DDR2 800MHz DDR2 SO-DIMM X 1 slot 2GB /4GB (optional) Power AC Adapter Battery Type RTC Battery Special Notification 40W, 20V (optional) 4 cells 8 cells (optional) Yes The actual battery pack that comes with the package may vary without notice. Storage (Items listed here may vary without notice) HDD form factor...
Introductions 2-5 Memory Technology Memory Maximum DDR2 800MHz DDR2 SO-DIMM X 1 slot 2GB /4GB (optional) Power AC Adapter Battery Type RTC Battery Special Notification 40W, 20V (optional) 4 cells 8 cells (optional) Yes The actual battery pack that comes with the package may vary without notice. Storage (Items listed here may vary without notice) HDD form factor...

User Manual
Page 28
However, please always contact the authorized dealer or service center for the upgrade service due to any attempt to replace the components of the product may be noticed that the memory, hard disk drive, optical storage drive, and battery pack preinstalled in the product users purchased may cause the warranty void. Introductions 2-8 Upgrade and Warranty Please be replaceable and upgradable by user's request.
However, please always contact the authorized dealer or service center for the upgrade service due to any attempt to replace the components of the product may be noticed that the memory, hard disk drive, optical storage drive, and battery pack preinstalled in the product users purchased may cause the warranty void. Introductions 2-8 Upgrade and Warranty Please be replaceable and upgradable by user's request.
User Manual
Page 33
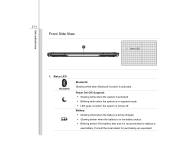
... white when the system is in low battery status. Š Blinking amber if the battery fails and it is recommended to replace a new battery. Status LED 1. Consult the local dealer for purchasing an equivalent Battery: Š Glowing white when the battery is being charged. Š Glowing amber when the battery is in suspend mode. Š LED...
... white when the system is in low battery status. Š Blinking amber if the battery fails and it is recommended to replace a new battery. Status LED 1. Consult the local dealer for purchasing an equivalent Battery: Š Glowing white when the battery is being charged. Š Glowing amber when the battery is in suspend mode. Š LED...
User Manual
Page 34
... device. Hard Disk: Blinking white when the system is activated. Introductions 2-14 Wireless LAN and 3G/ Wireless LAN and WiMAX type of battery recommended by the manufacturer. Š Battery LED goes out when it is fully charged or when the AC adapter is enabled. Š LED goes out when all functions are...
... device. Hard Disk: Blinking white when the system is activated. Introductions 2-14 Wireless LAN and 3G/ Wireless LAN and WiMAX type of battery recommended by the manufacturer. Š Battery LED goes out when it is fully charged or when the AC adapter is enabled. Š LED goes out when all functions are...
User Manual
Page 39
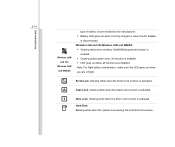
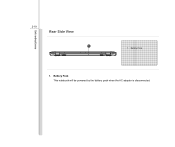
Introductions 2-19 Rear Side View 1 1. Battery Pack This notebook will be powered by the battery pack when the AC adapter is disconnected. Battery Pack 1.
Introductions 2-19 Rear Side View 1 1. Battery Pack This notebook will be powered by the battery pack when the AC adapter is disconnected. Battery Pack 1.
User Manual
Page 40
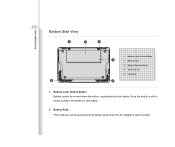
Battery Pack This notebook will be moved when the button is positioned on lock status. SIM Card Slot 5. Introductions 2-20 Bottom Side View 1 2 3 1. Battery Pack 3. Once the button is slid to unlock position, the battery is disconnected. Battery Lock/ Unlock Button 4 2. Ventilator 5 5 1. Battery Release Button 4. Battery Lock/ Unlock Button Battery cannot be powered by the battery pack when the AC adapter is removable. 2.
Battery Pack This notebook will be moved when the button is positioned on lock status. SIM Card Slot 5. Introductions 2-20 Bottom Side View 1 2 3 1. Battery Pack 3. Once the button is slid to unlock position, the battery is disconnected. Battery Lock/ Unlock Button 4 2. Ventilator 5 5 1. Battery Release Button 4. Battery Lock/ Unlock Button Battery cannot be powered by the battery pack when the AC adapter is removable. 2.
User Manual
Page 41
Insert your SIM card into the SIM card slot properly to cool the system. Battery Release Button It is designed to activate the internet connecting function. 5. DO NOT block the ventilator for releasing the battery pack. SIM card slot (optional) The notebook provides a SIM Card slot in the battery bay. Slide it with one hand and pull the battery pack carefully with the other. 4. Introductions 2-21 3. Ventilator The ventilator is a bounce-back device as a preparation for air circulation.
Insert your SIM card into the SIM card slot properly to cool the system. Battery Release Button It is designed to activate the internet connecting function. 5. DO NOT block the ventilator for releasing the battery pack. SIM card slot (optional) The notebook provides a SIM Card slot in the battery bay. Slide it with one hand and pull the battery pack carefully with the other. 4. Introductions 2-21 3. Ventilator The ventilator is a bounce-back device as a preparation for air circulation.

User Manual
Page 43
Press and hold the Fn button, and then press the F5 button repeatedly to switch among these 5 different modes or to extend the battery running time while performing different tasks with this ECO Engine off recurrently. Gaming Mode Select this mode while playing multimedia applications Power Saving Function ECO ... presently, read the icon on behalf of each mode appearing on the display when selected. Gaming mode, Movie mode, Presentation mode, Office mode, and Turbo Battery mode, to turn this notebook.
Press and hold the Fn button, and then press the F5 button repeatedly to switch among these 5 different modes or to extend the battery running time while performing different tasks with this ECO Engine off recurrently. Gaming Mode Select this mode while playing multimedia applications Power Saving Function ECO ... presently, read the icon on behalf of each mode appearing on the display when selected. Gaming mode, Movie mode, Presentation mode, Office mode, and Turbo Battery mode, to turn this notebook.

User Manual
Page 44
Turbo Battery Mode Select this mode while dealing with office documentation tasks. ECO Off Selected to maximize the battery running time. Office Mode Select this mode to disable ECO Engine. Getting Started 3-3 Presentation Mode Select this mode while performing presentation applications.
Turbo Battery Mode Select this mode while dealing with office documentation tasks. ECO Off Selected to maximize the battery running time. Office Mode Select this mode to disable ECO Engine. Getting Started 3-3 Presentation Mode Select this mode while performing presentation applications.

User Manual
Page 45
... model may damage either the notebook or other devices attached to find the AC adapter and power cord. 2. When the AC adapter is connected, the battery is being charged immediately. Plug the DC end of the adapter to the notebook, and the male end of the power cord to the connector...
... model may damage either the notebook or other devices attached to find the AC adapter and power cord. 2. When the AC adapter is connected, the battery is being charged immediately. Plug the DC end of the adapter to the notebook, and the male end of the power cord to the connector...
User Manual
Page 47
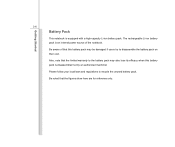
...to disassemble the battery pack on their own. The rechargeable Li-ion battery pack is an internal power source of that the figures show here are for reference only. Also, note that the limited warranty to the battery pack may also lose its efficacy when this battery pack may be... damaged if users try to recycle the unused battery pack. Be noted that this battery pack is equipped with a high-capacity Li-ion battery pack. Getting Started 3-6 Battery Pack This notebook is disassembled not...
...to disassemble the battery pack on their own. The rechargeable Li-ion battery pack is an internal power source of that the figures show here are for reference only. Also, note that the limited warranty to the battery pack may also lose its efficacy when this battery pack may be... damaged if users try to recycle the unused battery pack. Be noted that this battery pack is equipped with a high-capacity Li-ion battery pack. Getting Started 3-6 Battery Pack This notebook is disassembled not...

User Manual
Page 48
... power supply. To remove the battery pack, following the steps below: 1. Take the battery pack out of the battery tray. Push and hold the release button to the battery releasing direction as shown on the bottom side. 4. Locate the battery release button on the bottom side. 5. Getting Started 3-7 Releasing the Battery Pack It is always recommended...
... power supply. To remove the battery pack, following the steps below: 1. Take the battery pack out of the battery tray. Push and hold the release button to the battery releasing direction as shown on the bottom side. 4. Locate the battery release button on the bottom side. 5. Getting Started 3-7 Releasing the Battery Pack It is always recommended...

User Manual
Page 49
Fasten the battery pack by pressing it forward to make sure the battery pack is securely fastened. 2 3 4 Getting Started 3-8 Replacing the Battery Pack To insert the battery pack, following the steps below: 1. Press the lock/unlock button to the Lock position to the "Lock" position 4. Align the front edge of the battery pack to the location with correct orientation. 3. Place the battery pack into the battery tray vertically with "open" 1 mark shown aside the battery tray 2.
Fasten the battery pack by pressing it forward to make sure the battery pack is securely fastened. 2 3 4 Getting Started 3-8 Replacing the Battery Pack To insert the battery pack, following the steps below: 1. Press the lock/unlock button to the Lock position to the "Lock" position 4. Align the front edge of the battery pack to the location with correct orientation. 3. Place the battery pack into the battery tray vertically with "open" 1 mark shown aside the battery tray 2.
User Manual
Page 50
...will be idle for a while or shorten the suspend timer's time period. Š Turn off the system if you won't be lost. Conserving Battery Power Efficient battery power is not managed well, the saved data and customized settings may present a risk of fire or explosion, which could cause serious injury. Š.... Š Connect an AC adapter to maintain a normal operation. Keep away from the reach of children. Š Do not use rusty or damaged batteries. Š Dispose of batteries according to temperatures above +60° C (+140° F). Š Do not temper with your area. Check with...
...will be idle for a while or shorten the suspend timer's time period. Š Turn off the system if you won't be lost. Conserving Battery Power Efficient battery power is not managed well, the saved data and customized settings may present a risk of fire or explosion, which could cause serious injury. Š.... Š Connect an AC adapter to maintain a normal operation. Keep away from the reach of children. Š Do not use rusty or damaged batteries. Š Dispose of batteries according to temperatures above +60° C (+140° F). Š Do not temper with your area. Check with...


