
User Manual
Page 28
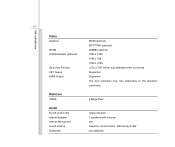
Supported Supported The best resolution may vary depending on the television connected. 2 Mega Pixel Azalia Interface 2 speakers with housing yes Adjust by volume button, K/B hot-key & SW yes (optional) 2-7 Introductions Video Graphics VRAM LCD Resolution (optional) Dual View Function CRT Output HDMI Output WebCam CMOS Audio Sound Codec chip Internal Speaker Internal Microphone Sound Volume Subwoofer MXM (optional) MCP77MH (optional) 256MB (optional) 1680 x 1050 1366 x 768 1920 x 1080 LCD or CRT will be auto detected when connected.
Supported Supported The best resolution may vary depending on the television connected. 2 Mega Pixel Azalia Interface 2 speakers with housing yes Adjust by volume button, K/B hot-key & SW yes (optional) 2-7 Introductions Video Graphics VRAM LCD Resolution (optional) Dual View Function CRT Output HDMI Output WebCam CMOS Audio Sound Codec chip Internal Speaker Internal Microphone Sound Volume Subwoofer MXM (optional) MCP77MH (optional) 256MB (optional) 1680 x 1050 1366 x 768 1920 x 1080 LCD or CRT will be auto detected when connected.
User Manual
Page 30
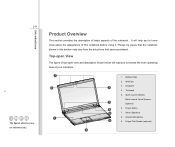
... Quick Launch Touch Sensors 7 (optional) 6 6. Touchpad 5. Finger Print Reader (optional) 4 Introductions Product Overview This section provides the description of basic aspects of your notebook. 1 8 3 1. Internal Microphone 9 9. Keyboard 2 4. Please be aware that users purchased. 2-9 The figures show here are for reference only. It will lead you to browse the main operating area...
... Quick Launch Touch Sensors 7 (optional) 6 6. Touchpad 5. Finger Print Reader (optional) 4 Introductions Product Overview This section provides the description of basic aspects of your notebook. 1 8 3 1. Internal Microphone 9 9. Keyboard 2 4. Please be aware that users purchased. 2-9 The figures show here are for reference only. It will lead you to browse the main operating area...
User Manual
Page 33
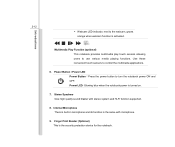
... notebook. Multimedia Play Function (optional) This notebook provides multimedia play touch sensors allowing users to turn the notebook power ON and OFF. Internal Microphone There is built-in microphone and its function is activated. Finger Print Reader (Optional) This is turned on. 7. Power Button / Power LED Power Button:Press the ..., grows orange when webcam function is the same with stereo system and Hi-Fi function supported. 8. Stereo Speakers Give high quality sound blaster with microphone. 9. Use these convenient touch sensors to control the multimedia applications. 6.
... notebook. Multimedia Play Function (optional) This notebook provides multimedia play touch sensors allowing users to turn the notebook power ON and OFF. Internal Microphone There is built-in microphone and its function is activated. Finger Print Reader (Optional) This is turned on. 7. Power Button / Power LED Power Button:Press the ..., grows orange when webcam function is the same with stereo system and Hi-Fi function supported. 8. Stereo Speakers Give high quality sound blaster with microphone. 9. Use these convenient touch sensors to control the multimedia applications. 6.

User Manual
Page 39
USB Port 4. The SPDIF connector is also Optical Device Drive 1. Mic In: Used for an external audio device. Connect the Center and Subwoofer speakers here. Line In: Used for an external microphone. Headphone out/SPDIF out : Used for speakers or headphones. Audio Port Connectors Make high quality sound blaster with stereo system and Hi-Fi function supported. Connect the Rear speakers here. Audio Port Connectors 2. Connect your speakers to the proper connectors as shown below. Introductions 2-18 Left Side View 2 4 1 3 1. RJ-11 Connector 3.
USB Port 4. The SPDIF connector is also Optical Device Drive 1. Mic In: Used for an external audio device. Connect the Center and Subwoofer speakers here. Line In: Used for an external microphone. Headphone out/SPDIF out : Used for speakers or headphones. Audio Port Connectors Make high quality sound blaster with stereo system and Hi-Fi function supported. Connect the Rear speakers here. Audio Port Connectors 2. Connect your speakers to the proper connectors as shown below. Introductions 2-18 Left Side View 2 4 1 3 1. RJ-11 Connector 3.


