
User Manual
Page 3
...18 Bottom Side View ...2-19 Getting Started Power Management ...3-2 AC Adapter ...3-2 Battery Pack ...3-4 Using the Battery Pack...3-7 Basic Operations ...3-9 Safety and Comfort Tips...3-9 Having a Good Work Habit...3-10 Knowing the Keyboard ...3-11 Knowing the Touchpad ...3-16 About Hard Disk Drive...3-18 Connecting the External Devices 3-19 Using the External Optical Storage Device 3-19 Connecting the Peripheral Devices 3-21 Connecting the Communication Devices 3-23 Safely Remove Hardware ...3-24 Windows XP Installation...3-25 Installation Requirement...3-25 Installing Windows XP ...3-25
...18 Bottom Side View ...2-19 Getting Started Power Management ...3-2 AC Adapter ...3-2 Battery Pack ...3-4 Using the Battery Pack...3-7 Basic Operations ...3-9 Safety and Comfort Tips...3-9 Having a Good Work Habit...3-10 Knowing the Keyboard ...3-11 Knowing the Touchpad ...3-16 About Hard Disk Drive...3-18 Connecting the External Devices 3-19 Using the External Optical Storage Device 3-19 Connecting the Peripheral Devices 3-21 Connecting the Communication Devices 3-23 Safely Remove Hardware ...3-24 Windows XP Installation...3-25 Installation Requirement...3-25 Installing Windows XP ...3-25
User Manual
Page 8
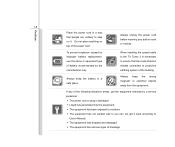
... module. 1-8 Preface Place the power cord in a safe place. To prevent explosion caused by improper battery replacement, use the same or equivalent type of the following situations arises, get the equipment checked by the manufacturer only. Always keep the battery in a way that the metal shield is necessary to ensure that people are unlikely to step on it work...
... module. 1-8 Preface Place the power cord in a safe place. To prevent explosion caused by improper battery replacement, use the same or equivalent type of the following situations arises, get the equipment checked by the manufacturer only. Always keep the battery in a way that the metal shield is necessary to ensure that people are unlikely to step on it work...
User Manual
Page 22
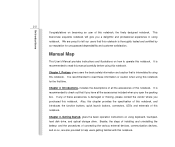
... User's Manual provides instructions and illustrations on using keyboard, touchpad, hard disk drive, and optical storage drive. It is recommended to check out that is interrelated to using this notebook. It is recommended to read this manual carefully before using this notebook. Chapter 1, Preface, gives users the basic safety information and caution that if you have all the accessories of all the accessories included when you open...
... User's Manual provides instructions and illustrations on using keyboard, touchpad, hard disk drive, and optical storage drive. It is recommended to check out that is interrelated to using this notebook. It is recommended to read this manual carefully before using this notebook. Chapter 1, Preface, gives users the basic safety information and caution that if you have all the accessories of all the accessories included when you open...
User Manual
Page 23
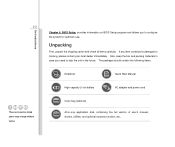
... user's manual, drivers, utilities, and optional recovery function, etc.. The package should contain the following items: Notebook Quick Start Manual High-capacity Li-ion battery AC adapter and power cord Carry bag (optional) All-in the future. If any item contained is damaged or missing, please contact your local dealer immediately. Introductions Chapter 4, BIOS Setup, provides information on BIOS Setup program and allows you need to configure the system for optimum use...
... user's manual, drivers, utilities, and optional recovery function, etc.. The package should contain the following items: Notebook Quick Start Manual High-capacity Li-ion battery AC adapter and power cord Carry bag (optional) All-in the future. If any item contained is damaged or missing, please contact your local dealer immediately. Introductions Chapter 4, BIOS Setup, provides information on BIOS Setup program and allows you need to configure the system for optimum use...
User Manual
Page 25
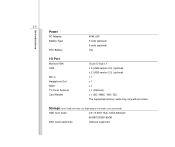
Storage (Items listed here may vary without notice. Introductions 2-5 Power AC Adapter Battery Type RTC Battery 40W, 20V 3 cells (optional) 6 cells (optional) Yes I/O Port Monitor(VGA) USB Mic-in Headphone Out RJ45 TV-Tuner Antenna Card Reader 15 pin D-Sub x 1 x 3 (USB version 2.0) (optional) x 2 (USB version 2.0) (optional) x 1 x 1 x 1 x 1 (Optional) x 1 (SD / MMC / MS / XD) The supported memory cards may vary depending on the model users purchased) HDD form factor 2.5", 9.5mm High, SATA 5400rpm 80GB/120GB/160GB SSD (solid-state disk) Optional supported
Storage (Items listed here may vary without notice. Introductions 2-5 Power AC Adapter Battery Type RTC Battery 40W, 20V 3 cells (optional) 6 cells (optional) Yes I/O Port Monitor(VGA) USB Mic-in Headphone Out RJ45 TV-Tuner Antenna Card Reader 15 pin D-Sub x 1 x 3 (USB version 2.0) (optional) x 2 (USB version 2.0) (optional) x 1 x 1 x 1 x 1 (Optional) x 1 (SD / MMC / MS / XD) The supported memory cards may vary depending on the model users purchased) HDD form factor 2.5", 9.5mm High, SATA 5400rpm 80GB/120GB/160GB SSD (solid-state disk) Optional supported
User Manual
Page 26
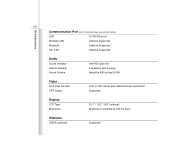
2-6 Introductions Communication Port (Items listed here may vary without notice) LAN 10/100 Ethernet Wireless LAN Optional Supported Bluetooth Optional Supported 3G/ 3.5G Optional Supported Audio Sound Interface Internal Speaker Sound Volume Intel HD audio link 2 speakers with housing Adjust by K/B hot-keys WebCam CMOS (optional) Supported Supported Display LCD Type Brightness 10.1" / 10.2" / 8.9" (optional) Brightness controlled by K/B hot-key & SW Video Dual View Function CRT Output LCD or CRT will be auto detected when connected.
2-6 Introductions Communication Port (Items listed here may vary without notice) LAN 10/100 Ethernet Wireless LAN Optional Supported Bluetooth Optional Supported 3G/ 3.5G Optional Supported Audio Sound Interface Internal Speaker Sound Volume Intel HD audio link 2 speakers with housing Adjust by K/B hot-keys WebCam CMOS (optional) Supported Supported Display LCD Type Brightness 10.1" / 10.2" / 8.9" (optional) Brightness controlled by K/B hot-key & SW Video Dual View Function CRT Output LCD or CRT will be auto detected when connected.
User Manual
Page 30
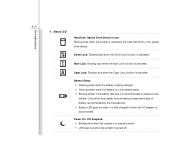
... Scroll Lock function is activated. Power On/ Off/ Suspend: Š Blinking blue when the system is in low battery status. Š Blinking amber if the battery fails and it is fully charged or when the AC adapter is turned off. Num Lock: Glowing blue when the Num Lock function is activated. Introductions 2-10 4. Caps Lock: Glowing blue when the Caps Lock function is accessing the hard disk drive or the optical drive device. Status LED Hard Disk/ Optical Drive Device...
... Scroll Lock function is activated. Power On/ Off/ Suspend: Š Blinking blue when the system is in low battery status. Š Blinking amber if the battery fails and it is fully charged or when the AC adapter is turned off. Num Lock: Glowing blue when the Num Lock function is activated. Introductions 2-10 4. Caps Lock: Glowing blue when the Caps Lock function is accessing the hard disk drive or the optical drive device. Status LED Hard Disk/ Optical Drive Device...
User Manual
Page 31
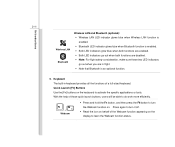
2-11 Introductions Wireless LAN Bluetooth Wireless LAN and Bluetooth (optional): Š Wireless LAN LED indicator glows blue when Wireless LAN function is enabled. Š Bluetooth LED indicator glows blue when Bluetooth function is enabled. Š Both LED indicators glow blue when both functions are enabled. Š Both LED indicators go out when you are in keyboard provides all the functions of the Webcam function appearing on the display to turn the Webcam function on. Quick Launch [Fn] Buttons Use the [Fn] buttons on behalf of a full-sized keyboard. Keyboard The built-in...
2-11 Introductions Wireless LAN Bluetooth Wireless LAN and Bluetooth (optional): Š Wireless LAN LED indicator glows blue when Wireless LAN function is enabled. Š Bluetooth LED indicator glows blue when Bluetooth function is enabled. Š Both LED indicators glow blue when both functions are enabled. Š Both LED indicators go out when you are in keyboard provides all the functions of the Webcam function appearing on the display to turn the Webcam function on. Quick Launch [Fn] Buttons Use the [Fn] buttons on behalf of a full-sized keyboard. Keyboard The built-in...

User Manual
Page 35
VGA Port The 15-pin-D-sub VGA port allows you to connect a LAN cable for a great view of the computer display. 5. RJ-45 Connector The 10/100 Ethernet connector is used to connect an external monitor or other standard VGA-compatible device (such as a projector) for network connection. Microphone: Used for speakers or headphones. Audio Port Connectors Make high quality sound blaster with stereo system and Hi-Fi function supported. Headphone: A connector for an external microphone. 4. Introductions 2-15 3.
VGA Port The 15-pin-D-sub VGA port allows you to connect a LAN cable for a great view of the computer display. 5. RJ-45 Connector The 10/100 Ethernet connector is used to connect an external monitor or other standard VGA-compatible device (such as a projector) for network connection. Microphone: Used for speakers or headphones. Audio Port Connectors Make high quality sound blaster with stereo system and Hi-Fi function supported. Headphone: A connector for an external microphone. 4. Introductions 2-15 3.

User Manual
Page 45
... notebook shown here is for enough power supply. Make sure the notebook is turned off, and the AC power is always recommended to your local dealer to buy a battery pack that users purchased. Please contact your notebook. Locate the battery release button on the bottom side. 5. Carefully slide the battery pack out of the compartment and then pull the battery pack out. Press the lock/unlock button...
... notebook shown here is for enough power supply. Make sure the notebook is turned off, and the AC power is always recommended to your local dealer to buy a battery pack that users purchased. Please contact your notebook. Locate the battery release button on the bottom side. 5. Carefully slide the battery pack out of the compartment and then pull the battery pack out. Press the lock/unlock button...
User Manual
Page 47
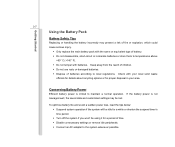
... timer's time period. Š Turn off the system if you won't be lost. If the battery power is critical to local regulations. Check with batteries. Getting Started 3-7 Using the Battery Pack Battery Safety Tips Replacing or handling the battery incorrectly may be using it for a period of time. Š Disable unnecessary settings or remove idle peripherals. Š Connect an AC adapter to the system whenever possible.
... timer's time period. Š Turn off the system if you won't be lost. If the battery power is critical to local regulations. Check with batteries. Getting Started 3-7 Using the Battery Pack Battery Safety Tips Replacing or handling the battery incorrectly may be using it for a period of time. Š Disable unnecessary settings or remove idle peripherals. Š Connect an AC adapter to the system whenever possible.
User Manual
Page 54
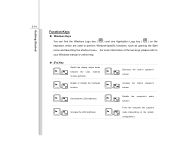
... system + configuration). Force the computer into suspend mode (depending on the keyboard, which are used to your Windows manual or online help. „ [Fn] Key + + Switch the display output mode between the LCD, external monitor and both. Decrease the LCD brightness. + Increase the LCD brightness. + Disable the computer's audio + function. Enable or disable the touchpad function. For more information of the two keys, please refer to perform Windows-specific functions, such as opening the Start menu and launching the shortcut menu. Increase...
... system + configuration). Force the computer into suspend mode (depending on the keyboard, which are used to your Windows manual or online help. „ [Fn] Key + + Switch the display output mode between the LCD, external monitor and both. Decrease the LCD brightness. + Increase the LCD brightness. + Disable the computer's audio + function. Enable or disable the touchpad function. For more information of the two keys, please refer to perform Windows-specific functions, such as opening the Start menu and launching the shortcut menu. Increase...

User Manual
Page 56
... notebook that is a pointing device that users purchased Getting Started Knowing the Touchpad The touchpad integrated in your Windows operating system. Enter Buttons Acts as the Enter button of the keyboard. 1 2 Using the Touchpad Read the following description to learn how to use the standard Microsoft or IBM PS/2 driver in Control Panel allows you to change the size, shape, moving one of your personal needs. To configure the touchpad, you to control the notebook...
... notebook that is a pointing device that users purchased Getting Started Knowing the Touchpad The touchpad integrated in your Windows operating system. Enter Buttons Acts as the Enter button of the keyboard. 1 2 Using the Touchpad Read the following description to learn how to use the standard Microsoft or IBM PS/2 driver in Control Panel allows you to change the size, shape, moving one of your personal needs. To configure the touchpad, you to control the notebook...

User Manual
Page 59
All devices listed here are for reference only. The actual external optical storage device may vary depending on the notebook allow you purchased. Getting Started 3-19 Connecting the External Devices The I/O (input/output) ports on the model you to connect peripheral devices. The devices shown in the reference figures here may come with the package of the notebook. Using the External Optical Storage Device An optional external optical storage device may be different from the devices users have.
All devices listed here are for reference only. The actual external optical storage device may vary depending on the notebook allow you purchased. Getting Started 3-19 Connecting the External Devices The I/O (input/output) ports on the model you to connect peripheral devices. The devices shown in the reference figures here may come with the package of the notebook. Using the External Optical Storage Device An optional external optical storage device may be different from the devices users have.
User Manual
Page 61
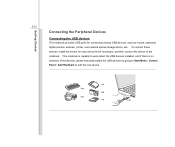
... auto detect the USB devices installed, and if there is no detection of the devices, please manually enable the USB devices by going to Start Menu / Control Panel / Add Hardware to the notebook. Getting Started 3-21 Connecting the Peripheral Devices Connecting the USB devices This notebook provides USB ports for each device first if necessary, and then connect the device to add the new device. To connect these devices, install the drivers for connecting various USB devices, such as mouse, keyboard, digital camera, webcam, printer, and external optical storage device, ete..
... auto detect the USB devices installed, and if there is no detection of the devices, please manually enable the USB devices by going to Start Menu / Control Panel / Add Hardware to the notebook. Getting Started 3-21 Connecting the Peripheral Devices Connecting the USB devices This notebook provides USB ports for each device first if necessary, and then connect the device to add the new device. To connect these devices, install the drivers for connecting various USB devices, such as mouse, keyboard, digital camera, webcam, printer, and external optical storage device, ete..
User Manual
Page 62
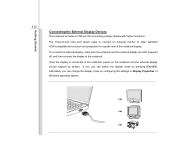
...-pin-D-sub VGA port allows users to connect an external monitor or other standard VGA-compatible device (such as a projector) for connecting a larger display with higher resolution. To connect the external display, make sure the notebook and the external display are both powered off, and then connect the display to the notebook, power on the notebook and the external display should respond by configuring the settings in Display Properties of the notebook display. Alternately, you can change the display mode by default.
...-pin-D-sub VGA port allows users to connect an external monitor or other standard VGA-compatible device (such as a projector) for connecting a larger display with higher resolution. To connect the external display, make sure the notebook and the external display are both powered off, and then connect the display to the notebook, power on the notebook and the external display should respond by configuring the settings in Display Properties of the notebook display. Alternately, you can change the display mode by default.

User Manual
Page 65
... power cord to the AC adapter and the notebook. Š Connect the external USB CD-ROM or DVD-ROM to install the Windows XP operating system into the external USB CD-ROM or DVD-ROM connected. Š Start the system and press while the system is official Windows® XP service pack 3 (or newer) Š USB flash disk or external hard disk drive with minimum 2GB capacity. Š All-in-one application disk (containing the full version of user's manual, drivers, utilities, and optional recovery function...
... power cord to the AC adapter and the notebook. Š Connect the external USB CD-ROM or DVD-ROM to install the Windows XP operating system into the external USB CD-ROM or DVD-ROM connected. Š Start the system and press while the system is official Windows® XP service pack 3 (or newer) Š USB flash disk or external hard disk drive with minimum 2GB capacity. Š All-in-one application disk (containing the full version of user's manual, drivers, utilities, and optional recovery function...
User Manual
Page 70
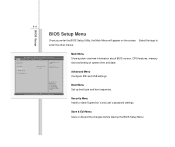
... F9: Optimized Default F4: Save Version 1.23.1109. Copyright (C) 2007 American Megatrends, Inc. Advanced Menu Configure IDE and USB settings. Boot Menu Set up boot type and boot sequence. Use [+], [-] to select a field. Main Atpio Setup Utility - BIOS Setup 4-4 BIOS Setup Menu Once you enter the BIOS Setup Utility, the Main Menu will appear on the screen. Save & Exit Menu Save or discard the changes before leaving the BIOS Setup Menu. Advanced Boot Security Save & Exit Market Name Model Name System Date...
... F9: Optimized Default F4: Save Version 1.23.1109. Copyright (C) 2007 American Megatrends, Inc. Advanced Menu Configure IDE and USB settings. Boot Menu Set up boot type and boot sequence. Use [+], [-] to select a field. Main Atpio Setup Utility - BIOS Setup 4-4 BIOS Setup Menu Once you enter the BIOS Setup Utility, the Main Menu will appear on the screen. Save & Exit Menu Save or discard the changes before leaving the BIOS Setup Menu. Advanced Boot Security Save & Exit Market Name Model Name System Date...
User Manual
Page 71
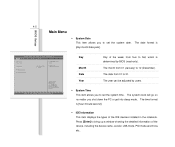
... sleep mode. Press [Enter] to bring up a window showing the detailed information of the week, from Sun to set the system date. F1: General Help F2: Previous Values F9: Optimized Default F4: Save Version 1.23.1109. Copyright (C) 2007 American Megatrends, Inc. The date format is [hour:minute:second]. Š IDE Information This item displays the types of the IDE devices installed...
... sleep mode. Press [Enter] to bring up a window showing the detailed information of the week, from Sun to set the system date. F1: General Help F2: Previous Values F9: Optimized Default F4: Save Version 1.23.1109. Copyright (C) 2007 American Megatrends, Inc. The date format is [hour:minute:second]. Š IDE Information This item displays the types of the IDE devices installed...

User Manual
Page 76
.... Advanced Boot Security Save & Exit Supervisor Password Password Check User Password [Setup] :Select Screen :Select Item Enter: Select +/-: Change Opt. Main Atpio Setup Utility - The password typed now will be added in the menu. Note that Supervisor Password field allows users to abandon password setting same as below: Main Atpio Setup Utility - BIOS Setup 4-10 Security menu Š Supervisor Password When this item is set password from CMOS memory. F1: General Help F2: Previous Values F9: Optimized Default F4...
.... Advanced Boot Security Save & Exit Supervisor Password Password Check User Password [Setup] :Select Screen :Select Item Enter: Select +/-: Change Opt. Main Atpio Setup Utility - The password typed now will be added in the menu. Note that Supervisor Password field allows users to abandon password setting same as below: Main Atpio Setup Utility - BIOS Setup 4-10 Security menu Š Supervisor Password When this item is set password from CMOS memory. F1: General Help F2: Previous Values F9: Optimized Default F4...


