
User Manual
Page 5
... of the leak. Use caution when installing or modifying telephone lines. 5. Avoid using the telephone function (other than a cordless type) during a lightning storm. 2. Do not use this model properly, read the instruction manual carefully and keep this model, please contact your future reference. CD-ROM Drive Notice CAUTION: This appliance contains a laser system and is specifically designed for your nearest "AUTHORIZED service station." V To...
... of the leak. Use caution when installing or modifying telephone lines. 5. Avoid using the telephone function (other than a cordless type) during a lightning storm. 2. Do not use this model properly, read the instruction manual carefully and keep this model, please contact your future reference. CD-ROM Drive Notice CAUTION: This appliance contains a laser system and is specifically designed for your nearest "AUTHORIZED service station." V To...
User Manual
Page 6
.... Notebook Preface Safety Instructions 1. Lay this User Guide for air convection and to moisture. All cautions and warnings on card or module. 9. w The equipment has not worked well or you can not get the equipment checked by a service personnel: w The power cord or plug is damaged. VI w The equipment was dropped and damaged. Make sure that people are used for possible use...
.... Notebook Preface Safety Instructions 1. Lay this User Guide for air convection and to moisture. All cautions and warnings on card or module. 9. w The equipment has not worked well or you can not get the equipment checked by a service personnel: w The power cord or plug is damaged. VI w The equipment was dropped and damaged. Make sure that people are used for possible use...
User Manual
Page 9
... MICRO-STAR INTERNATIONAL. Please note that the setting diagrams or values in this guide. Contact our technical staff at: support@msi.com.tw. Notebook Preface Copyright Notice The material in the preparation of this document, but no guarantee is the intellectual property of its contents. We take every care in this guide is given as the Notebook specification and equipment...
... MICRO-STAR INTERNATIONAL. Please note that the setting diagrams or values in this guide. Contact our technical staff at: support@msi.com.tw. Notebook Preface Copyright Notice The material in the preparation of this document, but no guarantee is the intellectual property of its contents. We take every care in this guide is given as the Notebook specification and equipment...
User Manual
Page 11
... View 2-12 Rear View 2-13 Bottom View 2-14 Power Management 2-16 AC Adapter 2-16 Battery Pack 2-17 Using the Battery Pack 2-20 Basic Operations 2-22 Safety and Comfort Tips 2-22 Have a Good Work Habit 2-23 Knowing the Keyboard 2-24 Knowing the Touchpad 2-29 About Hard Disk Drive 2-33 Using the Optical Storage 2-34 Customizing this Notebook Connecting the External Devices 3-2 Connecting the Peripheral Devices 3-3 Connecting the Communication Devices 3-6 PC Card Installation 3-7 Installing the PC card 3-7 XI
... View 2-12 Rear View 2-13 Bottom View 2-14 Power Management 2-16 AC Adapter 2-16 Battery Pack 2-17 Using the Battery Pack 2-20 Basic Operations 2-22 Safety and Comfort Tips 2-22 Have a Good Work Habit 2-23 Knowing the Keyboard 2-24 Knowing the Touchpad 2-29 About Hard Disk Drive 2-33 Using the Optical Storage 2-34 Customizing this Notebook Connecting the External Devices 3-2 Connecting the Peripheral Devices 3-3 Connecting the Communication Devices 3-6 PC Card Installation 3-7 Installing the PC card 3-7 XI
User Manual
Page 14
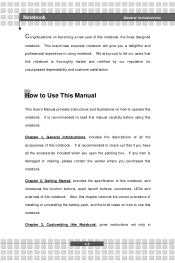
... the function buttons, quick launch buttons, connectors, LEDs and externals of installing or uninstalling the battery pack, and the brief ideas on how to operate this notebook. Also, this chapter instructs the correct procedure of this notebook. Chapter 1, General Introductions, includes the descriptions of all the accessories included when you purchased this Notebook, gives instructions not only in using this notebook. Notebook General Introductions Congratulations on becoming a new user...
... the function buttons, quick launch buttons, connectors, LEDs and externals of installing or uninstalling the battery pack, and the brief ideas on how to operate this notebook. Also, this chapter instructs the correct procedure of this notebook. Chapter 1, General Introductions, includes the descriptions of all the accessories included when you purchased this Notebook, gives instructions not only in using this notebook. Notebook General Introductions Congratulations on becoming a new user...
User Manual
Page 15
Notebook General Introductions connecting the mouse, keyboard, webcam, printer, external monitor, IEEE 1394 devices, and communication devices, but also in installing and removing the PC card. Chapter 4, BIOS setup, provides information on BIOS Setup program and allows you to configure the system for optimum use. 1-3
Notebook General Introductions connecting the mouse, keyboard, webcam, printer, external monitor, IEEE 1394 devices, and communication devices, but also in installing and removing the PC card. Chapter 4, BIOS setup, provides information on BIOS Setup program and allows you to configure the system for optimum use. 1-3
User Manual
Page 21
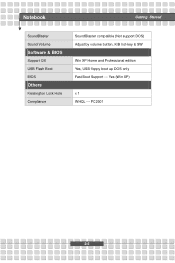
PC2001 2-5 Yes (Win XP) x 1 WHQL --- Notebook Getting Started SoundBlaster Sound Volume Software & BIOS Support OS USB Flash Boot BIOS Others Kensington Lock Hole Compliance SoundBlaster compatible (Not support DOS) Adjust by volume button, K/B hot-key & SW Win XP Home and Professional edition Yes, USB floppy boot up DOS only Fast Boot Support ---
PC2001 2-5 Yes (Win XP) x 1 WHQL --- Notebook Getting Started SoundBlaster Sound Volume Software & BIOS Support OS USB Flash Boot BIOS Others Kensington Lock Hole Compliance SoundBlaster compatible (Not support DOS) Adjust by volume button, K/B hot-key & SW Win XP Home and Professional edition Yes, USB floppy boot up DOS only Fast Boot Support ---
User Manual
Page 23
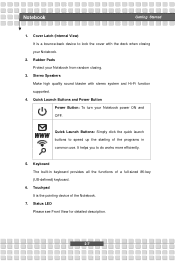
...-Fi function supported. 4. Rubber Pads Protect your Notebook power ON and OFF. Status LED Please see Front View for detailed description. 2-7 Quick Launch Buttons and Power Button Power Button: To turn your Notebook from random closing your Notebook. 2. Cover Latch (Internal View) It is the pointing device of the programs in keyboard provides all the functions of a full-sized 86-key (US-defined) keyboard. 6. Touchpad It is a bounce-back device to do works more efficiently. 5. Keyboard...
...-Fi function supported. 4. Rubber Pads Protect your Notebook power ON and OFF. Status LED Please see Front View for detailed description. 2-7 Quick Launch Buttons and Power Button Power Button: To turn your Notebook from random closing your Notebook. 2. Cover Latch (Internal View) It is the pointing device of the programs in keyboard provides all the functions of a full-sized 86-key (US-defined) keyboard. 6. Touchpad It is a bounce-back device to do works more efficiently. 5. Keyboard...
User Manual
Page 25
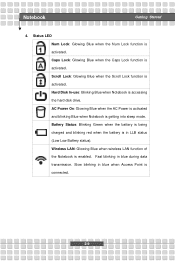
... wireless LAN function of the Notebook is getting into sleep mode. AC Power On: Glowing Blue when the AC Power is activated and blinking Blue when Notebook is enabled. Hard Disk In-use: Blinking Blue when Notebook is activated. Status LED Num Lock: Glowing Blue when the Num Lock function is accessing the hard disk drive. Scroll Lock: Glowing Blue when the Scroll Lock function is activated. Caps Lock: Glowing Blue when the Caps Lock function is activated. Fast blinking in LLB status (Low Low Battery status). Notebook Getting Started 4. Battery...
... wireless LAN function of the Notebook is getting into sleep mode. AC Power On: Glowing Blue when the AC Power is activated and blinking Blue when Notebook is enabled. Hard Disk In-use: Blinking Blue when Notebook is activated. Status LED Num Lock: Glowing Blue when the Num Lock function is accessing the hard disk drive. Scroll Lock: Glowing Blue when the Scroll Lock function is activated. Caps Lock: Glowing Blue when the Caps Lock function is activated. Fast blinking in LLB status (Low Low Battery status). Notebook Getting Started 4. Battery...
User Manual
Page 27
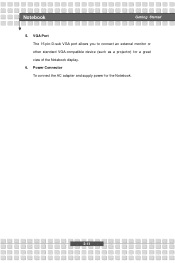
Power Connector To connect the AC adapter and supply power for a great view of the Notebook display. 6. VGA Port The 15-pin-D-sub VGA port allows you to connect an external monitor or other standard VGA-compatible device (such as a projector) for the Notebook. 2-11 Notebook Getting Started 5.
Power Connector To connect the AC adapter and supply power for a great view of the Notebook display. 6. VGA Port The 15-pin-D-sub VGA port allows you to connect an external monitor or other standard VGA-compatible device (such as a projector) for the Notebook. 2-11 Notebook Getting Started 5.
User Manual
Page 28
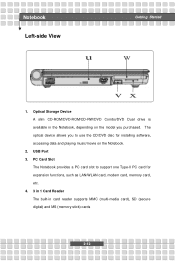
... Card Slot The Notebook provides a PC card slot to support one Type-II PC card for installing software, accessing data and playing music/movie on the model you to use the CD/DVD disc for expansion functions, such as LAN/WLAN card, modem card, memory card, etc. 4. 3 in 1 Card Reader The built-in the Notebook, depending on the Notebook. 2. USB Port 3. The optical device allows you purchased. Notebook Left-side View u Getting Started w vx 1. Optical Storage Device A slim CD-ROM/DVD-ROM/CD-RW/DVD...
... Card Slot The Notebook provides a PC card slot to support one Type-II PC card for installing software, accessing data and playing music/movie on the model you to use the CD/DVD disc for expansion functions, such as LAN/WLAN card, modem card, memory card, etc. 4. 3 in 1 Card Reader The built-in the Notebook, depending on the Notebook. 2. USB Port 3. The optical device allows you purchased. Notebook Left-side View u Getting Started w vx 1. Optical Storage Device A slim CD-ROM/DVD-ROM/CD-RW/DVD...
User Manual
Page 36
... batteries. w Connect an AC adapter to maintain a normal operation. Conserving Battery Power Efficient battery power is not managed well, the saved data and customized settings may present a risk of time. w Do not temper with the same or equivalent type of batteries according to temperatures above +60° C (+140° F). w Only replace the main battery pack with batteries. Notebook Getting Started Using the Battery Pack Battery Safety Tips Replacing or handling the battery...
... batteries. w Connect an AC adapter to maintain a normal operation. Conserving Battery Power Efficient battery power is not managed well, the saved data and customized settings may present a risk of time. w Do not temper with the same or equivalent type of batteries according to temperatures above +60° C (+140° F). w Only replace the main battery pack with batteries. Notebook Getting Started Using the Battery Pack Battery Safety Tips Replacing or handling the battery...
User Manual
Page 43
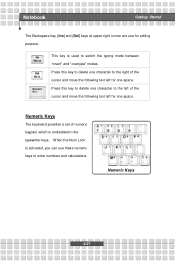
... numeric keys to enter numbers and calculations. Numeric Keys The keyboard provides a set of the cursor and move the following text left for editing purpose. This key is embedded in the typewriter keys. Press this key to delete one character to the left of the cursor and move the following text left for one space. Press this key to switch the typing mode...
... numeric keys to enter numbers and calculations. Numeric Keys The keyboard provides a set of the cursor and move the following text left for editing purpose. This key is embedded in the typewriter keys. Press this key to delete one character to the left of the cursor and move the following text left for one space. Press this key to switch the typing mode...
User Manual
Page 48
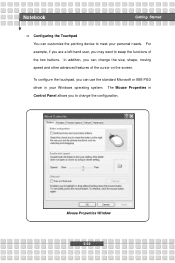
To configure the touchpad, you to change the size, shape, moving speed and other advanced features of the two buttons. The Mouse Properties in Control Panel allows you can use the standard Microsoft or IBM PS/2 driver in your personal needs. Mouse Properties Window 2-32 Notebook Getting Started n Configuring the Touchpad You can customize the pointing device to meet your Windows operating system. For example, if you are a left-hand user, you can change the configuration. In addition, you may want to swap the functions of the cursor on the screen.
To configure the touchpad, you to change the size, shape, moving speed and other advanced features of the two buttons. The Mouse Properties in Control Panel allows you can use the standard Microsoft or IBM PS/2 driver in your personal needs. Mouse Properties Window 2-32 Notebook Getting Started n Configuring the Touchpad You can customize the pointing device to meet your Windows operating system. For example, if you are a left-hand user, you can change the configuration. In addition, you may want to swap the functions of the cursor on the screen.
User Manual
Page 54
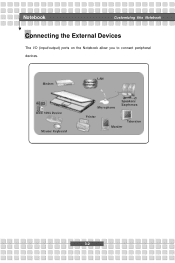
Notebook Customizing this Notebook Connecting the External Devices The I/O (input/output) ports on the Notebook allow you to connect peripheral devices. Modem IEEE 1394 Device Mouse/ Keyboard LAN Microphone Speakers/ Earphones Printer Televsion Moniter 3-2
Notebook Customizing this Notebook Connecting the External Devices The I/O (input/output) ports on the Notebook allow you to connect peripheral devices. Modem IEEE 1394 Device Mouse/ Keyboard LAN Microphone Speakers/ Earphones Printer Televsion Moniter 3-2
User Manual
Page 55
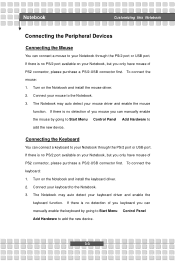
... your mouse driver and enable the mouse function. Notebook Customizing this Notebook Connecting the Peripheral Devices Connecting the Mouse You can connect a keyboard to your Notebook through the PS/2 port or USB port. Connect your keyboard to the Notebook. 3. Connect your mouse to the Notebook. 3. To connect the mouse: 1. Turn on the Notebook and install the keyboard driver. 2. The Notebook may auto detect your Notebook, but you only have mouse of you keyboard you can manually enable the keyboard by going to Start Menu à Control Panel à Add Hardware to...
... your mouse driver and enable the mouse function. Notebook Customizing this Notebook Connecting the Peripheral Devices Connecting the Mouse You can connect a keyboard to your Notebook through the PS/2 port or USB port. Connect your keyboard to the Notebook. 3. Connect your mouse to the Notebook. 3. To connect the mouse: 1. Turn on the Notebook and install the keyboard driver. 2. The Notebook may auto detect your Notebook, but you only have mouse of you keyboard you can manually enable the keyboard by going to Start Menu à Control Panel à Add Hardware to...
User Manual
Page 56
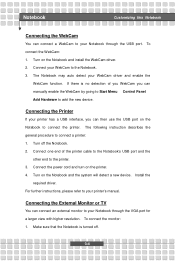
... connect the printer. Connect the power cord and turn on the Notebook and install the WebCam driver. 2. Connecting the External Monitor or TV You can manually enable the WebCam by going to Start Menu à Control Panel à Add Hardware to your printer's manual. To connect the WebCam: 1. Connect one end of you WebCam you can then use the USB port on the Notebook and the system will detect a new device. For further instructions, please refer to the printer. 3. To connect the monitor: 1. Make...
... connect the printer. Connect the power cord and turn on the Notebook and install the WebCam driver. 2. Connecting the External Monitor or TV You can manually enable the WebCam by going to Start Menu à Control Panel à Add Hardware to your printer's manual. To connect the WebCam: 1. Connect one end of you WebCam you can then use the USB port on the Notebook and the system will detect a new device. For further instructions, please refer to the printer. 3. To connect the monitor: 1. Make...
User Manual
Page 57
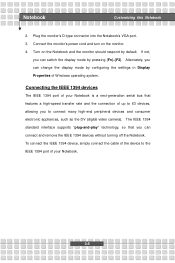
... Notebook 2. If not, you can change the display mode by pressing [Fn]+[F2]. Connect the monitor's power cord and turn on the Notebook and the monitor should respond by default. Turn on the monitor. 4. To connect the IEEE 1394 device, simply connect the cable of the device to the IEEE 1394 port of your Notebook is a next-generation serial bus that you to 63 devices, allowing you can switch the display mode by configuring the settings in Display...
... Notebook 2. If not, you can change the display mode by pressing [Fn]+[F2]. Connect the monitor's power cord and turn on the Notebook and the monitor should respond by default. Turn on the monitor. 4. To connect the IEEE 1394 device, simply connect the cable of the device to the IEEE 1394 port of your Notebook is a next-generation serial bus that you to 63 devices, allowing you can switch the display mode by configuring the settings in Display...

User Manual
Page 58
For more instructions or detailed steps on dialing-up through the modem, please consult your MIS staff or Internet service provider (ISP) for help . 1. You are strongly recommended to install the modem driver included in the software CD of your Notebook to 100Mbps. Using the Modem The built-in 10/100 Base-T LAN module supports data transfer rate up to use only No...
For more instructions or detailed steps on dialing-up through the modem, please consult your MIS staff or Internet service provider (ISP) for help . 1. You are strongly recommended to install the modem driver included in the software CD of your Notebook to 100Mbps. Using the Modem The built-in 10/100 Base-T LAN module supports data transfer rate up to use only No...
User Manual
Page 71
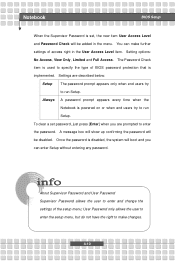
... the type of BIOS password protection that is set, the new item User Access Level and Password Check will be added in the User Access Level item. Once the password is powered on or when end users try to enter and change the settings of access right in the menu. Always A password prompt appears every time when the Notebook is disabled, the system will boot and you are described below: Setup The password prompt...
... the type of BIOS password protection that is set, the new item User Access Level and Password Check will be added in the User Access Level item. Once the password is powered on or when end users try to enter and change the settings of access right in the menu. Always A password prompt appears every time when the Notebook is disabled, the system will boot and you are described below: Setup The password prompt...


