
User Manual
Page 2
... Manual Map 2-2 Unpacking 2-2 Product Overview 2-3 Top-Open View 2-3 Right Side View 2-6 Left Side View 2-7 Rear Side View 2-8 Specification 2-9 Chapter 3: Getting Started Begin to Use the Slidebook 3-2 Power Management 3-3 AC Power 3-3 Battery Power 3-3 Powering ON 3-4 Power Management in Windows OS 3-5 Energy Saving Tips 3-7 Basic Operations 3-8 1-2
... Manual Map 2-2 Unpacking 2-2 Product Overview 2-3 Top-Open View 2-3 Right Side View 2-6 Left Side View 2-7 Rear Side View 2-8 Specification 2-9 Chapter 3: Getting Started Begin to Use the Slidebook 3-2 Power Management 3-3 AC Power 3-3 Battery Power 3-3 Powering ON 3-4 Power Management in Windows OS 3-5 Energy Saving Tips 3-7 Basic Operations 3-8 1-2
User Manual
Page 12
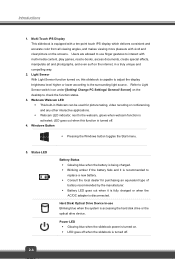
... system is accessing the hard disk drive or the optical drive device. Power LED Š Glowing blue when the slidebook power is turned off . 4. Windows Button Š Pressing the Windows button toggles the Start menu. 5. Status LED Battery Status Š Glowing blue when the battery is being charged....; Hard Disk/ Optical Drive Device In-use finger gestures to the webcam, glows when webcam function is disconnected. LED goes out when this slidebook is turned off . 2-4 Light Sensor With Light Sensor function turned on the screens. Webcam/ Webcam LED Š This built-in a ...
... system is accessing the hard disk drive or the optical drive device. Power LED Š Glowing blue when the slidebook power is turned off . 4. Windows Button Š Pressing the Windows button toggles the Start menu. 5. Status LED Battery Status Š Glowing blue when the battery is being charged....; Hard Disk/ Optical Drive Device In-use finger gestures to the webcam, glows when webcam function is disconnected. LED goes out when this slidebook is turned off . 2-4 Light Sensor With Light Sensor function turned on the screens. Webcam/ Webcam LED Š This built-in a ...
User Manual
Page 29
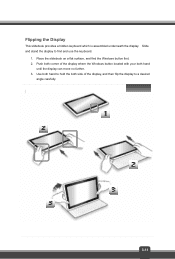
Slide and stand the display to a desired angle carefully. 3-11 Use both hand to hold the both hand until the display can move no further. 3. Place the slidebook on a flat surface, and find and use the keyboard. 1. Push both corner of the display where the Windows button located with your both side of the display, and then flip the display to find the Windows button first. 2. Flipping the Display This slidebook provides a hidden keyboard which is assembled underneath the display.
Slide and stand the display to a desired angle carefully. 3-11 Use both hand to hold the both hand until the display can move no further. 3. Place the slidebook on a flat surface, and find and use the keyboard. 1. Push both corner of the display where the Windows button located with your both side of the display, and then flip the display to find the Windows button first. 2. Flipping the Display This slidebook provides a hidden keyboard which is assembled underneath the display.

