
User Manual
Page 2
... Manual Map 2-2 Unpacking 2-2 Product Overview 2-3 Top-Open View 2-3 Right Side View 2-6 Left Side View 2-7 Rear Side View 2-8 Specification 2-9 Chapter 3: Getting Started Begin to Use the Slidebook 3-2 Power Management 3-3 AC Power 3-3 Battery Power 3-3 Powering ON 3-4 Power Management in Windows OS 3-5 Energy Saving Tips 3-7 Basic Operations 3-8 1-2
... Manual Map 2-2 Unpacking 2-2 Product Overview 2-3 Top-Open View 2-3 Right Side View 2-6 Left Side View 2-7 Rear Side View 2-8 Specification 2-9 Chapter 3: Getting Started Begin to Use the Slidebook 3-2 Power Management 3-3 AC Power 3-3 Battery Power 3-3 Powering ON 3-4 Power Management in Windows OS 3-5 Energy Saving Tips 3-7 Basic Operations 3-8 1-2
User Manual
Page 10
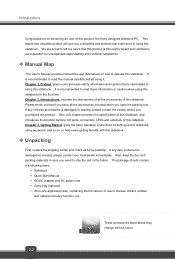
... connectors, LEDs and externals of user's manual, drivers, utilities, and optional recovery function, etc.. The package should contain the following items: y Slidebook y Quick Start Manual y AC/DC adapter and AC power cord y Carry bag (optional) y All-in the future. Introductions Congratulations on becoming... basic safety information and caution that if you have all the accessories included when you purchased this product, the finely designed slidebook PC. Please check out that is thoroughly tested and certified by our reputation for the first time. Chapter 2, Introductions, includes...
... connectors, LEDs and externals of user's manual, drivers, utilities, and optional recovery function, etc.. The package should contain the following items: y Slidebook y Quick Start Manual y AC/DC adapter and AC power cord y Carry bag (optional) y All-in the future. Introductions Congratulations on becoming... basic safety information and caution that if you have all the accessories included when you purchased this product, the finely designed slidebook PC. Please check out that is thoroughly tested and certified by our reputation for the first time. Chapter 2, Introductions, includes...

User Manual
Page 11
Please be aware that users purchased. Top-open View The figure of top-open view and description shown below will help you to know more about the appearance of this slidebook before using it. The figures shown here are for reference only 2-3 It will lead you to browse the main operating area of the slidebook. ™ Product Overview This section provides the description of basic aspects of this section may vary from the actual one that the slidebook shown in this slidebook.
Please be aware that users purchased. Top-open View The figure of top-open view and description shown below will help you to know more about the appearance of this slidebook before using it. The figures shown here are for reference only 2-3 It will lead you to browse the main operating area of the slidebook. ™ Product Overview This section provides the description of basic aspects of this section may vary from the actual one that the slidebook shown in this slidebook.
User Manual
Page 12
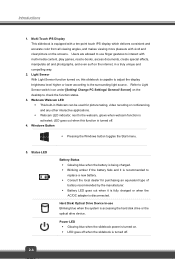
...indicator, next to the webcam, glows when webcam function is turned on the desktop to the surrounding light source. LED goes out when this slidebook is capable to adjust the display brightness level higher or lower according to check the function status. 3. Refer to interact with vivid and clear...amber if the battery fails and it is fully charged or when the AC/DC adapter is turned off . 4. Multi-Touch IPS Display This slidebook is equipped with a ten-point touch IPS display which delivers consistent and accurate color from all viewing angles, and makes viewing more pleasure with...
...indicator, next to the webcam, glows when webcam function is turned on the desktop to the surrounding light source. LED goes out when this slidebook is capable to adjust the display brightness level higher or lower according to check the function status. 3. Refer to interact with vivid and clear...amber if the battery fails and it is fully charged or when the AC/DC adapter is turned off . 4. Multi-Touch IPS Display This slidebook is equipped with a ten-point touch IPS display which delivers consistent and accurate color from all viewing angles, and makes viewing more pleasure with...
User Manual
Page 14
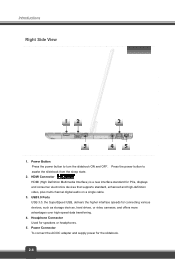
Power Connector To connect the AC/DC adapter and supply power for speakers or headphones. 5. Headphone Connector Used for the slidebook. 2-6 Press the power button to turn the slidebook ON and OFF. USB3.0 Ports USB 3.0, the SuperSpeed USB, delivers the higher interface speeds for PCs, displays and consumer electronics devices that supports standard... storage devices, hard drives, or video cameras, and offers more advantages over high-speed data transferring. 4. Power Button Press the power button to awake the slidebook from the sleep state. 2.
Power Connector To connect the AC/DC adapter and supply power for speakers or headphones. 5. Headphone Connector Used for the slidebook. 2-6 Press the power button to turn the slidebook ON and OFF. USB3.0 Ports USB 3.0, the SuperSpeed USB, delivers the higher interface speeds for PCs, displays and consumer electronics devices that supports standard... storage devices, hard drives, or video cameras, and offers more advantages over high-speed data transferring. 4. Power Button Press the power button to awake the slidebook from the sleep state. 2.

User Manual
Page 15
Left Side View 1. Reserved for network connection. 2. RJ-45 Connector The 10/100/1000 Ethernet connector is used to connect a LAN cable for future usage Please do not try to remove the cover, or it will void the warranty of the slidebook. 2-7
Left Side View 1. Reserved for network connection. 2. RJ-45 Connector The 10/100/1000 Ethernet connector is used to connect a LAN cable for future usage Please do not try to remove the cover, or it will void the warranty of the slidebook. 2-7

User Manual
Page 16
...Volume Up or Volume Down button to cool the system. Whenever the display is designed to increase or decrease the sound volume of the slidebook. 2-8 Press this Display Lock button to fit the display automatically. Introductions Rear Side View 1. Be noted that the supported memory cards ...in G-sensor module, this function. 4. Reserved for air circulation. 5. Ventilator The ventilator is rotated, the screen will void the warranty of the slidebook. 3. DO NOT block the ventilator for future usage Please do not try to remove the cover, or it will be rotated and expanded to ...
...Volume Up or Volume Down button to cool the system. Whenever the display is designed to increase or decrease the sound volume of the slidebook. 2-8 Press this Display Lock button to fit the display automatically. Introductions Rear Side View 1. Be noted that the supported memory cards ...in G-sensor module, this function. 4. Reserved for air circulation. 5. Ventilator The ventilator is rotated, the screen will void the warranty of the slidebook. 3. DO NOT block the ventilator for future usage Please do not try to remove the cover, or it will be rotated and expanded to ...
User Manual
Page 20
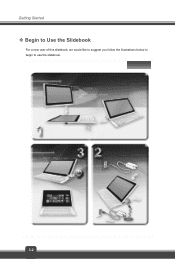
Getting Started ™ Begin to Use the Slidebook For a new user of this slidebook, we would like to suggest you follow the illustrations below to begin to use the slidebook. 3-2
Getting Started ™ Begin to Use the Slidebook For a new user of this slidebook, we would like to suggest you follow the illustrations below to begin to use the slidebook. 3-2

User Manual
Page 21
...for the first time. Conserving Battery Power Efficient battery power is disassembled by non-authorized technicians. Battery Power This slidebook is equipped with a built-in use . Please follow your slidebook; To optimize battery life and avoid a sudden power loss, read the tips below: Š Suspend system ... pack may be damaged if users try to disassemble the battery pack on their own. using other adapter model may damage either the slidebook or other devices attached to the system whenever possible. 3-3 The rechargeable Li-ion battery pack is an internal power source of time....
...for the first time. Conserving Battery Power Efficient battery power is disassembled by non-authorized technicians. Battery Power This slidebook is equipped with a built-in use . Please follow your slidebook; To optimize battery life and avoid a sudden power loss, read the tips below: Š Suspend system ... pack may be damaged if users try to disassemble the battery pack on their own. using other adapter model may damage either the slidebook or other devices attached to the system whenever possible. 3-3 The rechargeable Li-ion battery pack is an internal power source of time....

User Manual
Page 22
... battery cells that consuming the battery power completely once a month is necessary. Š The actual charging time will be recharged when the slidebook is connected to power on the slidebook. 3-4 Powering ON Long press the Power Button to the AC power. Getting Started Charging the Battery Pack The built-in battery pack...
... battery cells that consuming the battery power completely once a month is necessary. Š The actual charging time will be recharged when the slidebook is connected to power on the slidebook. 3-4 Powering ON Long press the Power Button to the AC power. Getting Started Charging the Battery Pack The built-in battery pack...

User Manual
Page 26
Getting Started ™ Basic Operations If you are a beginner to the slidebook, please read the following instructions to work anywhere. However, choosing a good workspace is a portable platform that allows you have to assure your slidebook for a long period of time. 3-8 Safety and Comfort Tips The slidebook is important if you to work with your own safety, and make yourself comfortable during the operations.
Getting Started ™ Basic Operations If you are a beginner to the slidebook, please read the following instructions to work anywhere. However, choosing a good workspace is a portable platform that allows you have to assure your slidebook for a long period of time. 3-8 Safety and Comfort Tips The slidebook is important if you to work with your own safety, and make yourself comfortable during the operations.

User Manual
Page 27
... and chair and adjust their height to support your knees and elbows have an optimal view. 7. When sitting on the desk naturally to fit your slidebook in the space where may cause you body regularly. 10. Adjust the angle/position of time. 3-9 Remember to take a break after working for a period of...
... and chair and adjust their height to support your knees and elbows have an optimal view. 7. When sitting on the desk naturally to fit your slidebook in the space where may cause you body regularly. 10. Adjust the angle/position of time. 3-9 Remember to take a break after working for a period of...
User Manual
Page 28
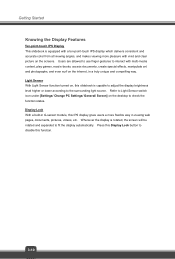
Getting Started Knowing the Display Features Ten-point-touch IPS Display This slidebook is equipped with a ten-point-touch IPS display which delivers consistent and accurate color from all viewing angles, and makes viewing more flexible way in ... surrounding light source. Display Lock With a built-in a truly unique and compelling way. Light Sensor With Light Sensor function turned on the screens. Press this slidebook is rotated, the screen will be rotated and expanded to interact with vivid and clear picture on , this Display Lock button to check the function...
Getting Started Knowing the Display Features Ten-point-touch IPS Display This slidebook is equipped with a ten-point-touch IPS display which delivers consistent and accurate color from all viewing angles, and makes viewing more flexible way in ... surrounding light source. Display Lock With a built-in a truly unique and compelling way. Light Sensor With Light Sensor function turned on the screens. Press this slidebook is rotated, the screen will be rotated and expanded to interact with vivid and clear picture on , this Display Lock button to check the function...
User Manual
Page 29
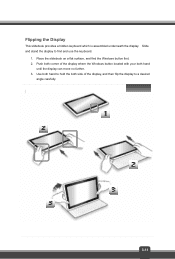
Place the slidebook on a flat surface, and find and use the keyboard. 1. Slide and stand the display to hold the both hand until the display can move no further. 3. Push both corner of the display where the Windows button located with your both side of the display, and then flip the display to a desired angle carefully. 3-11 Use both hand to find the Windows button first. 2. Flipping the Display This slidebook provides a hidden keyboard which is assembled underneath the display.
Place the slidebook on a flat surface, and find and use the keyboard. 1. Slide and stand the display to hold the both hand until the display can move no further. 3. Push both corner of the display where the Windows button located with your both side of the display, and then flip the display to a desired angle carefully. 3-11 Use both hand to find the Windows button first. 2. Flipping the Display This slidebook provides a hidden keyboard which is assembled underneath the display.
User Manual
Page 34
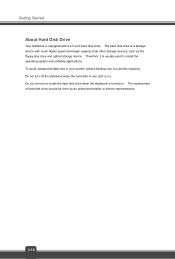
... used to install the operating system and software applications. Do not remove or install the hard disk drive when the slidebook is turned on . Getting Started About Hard Disk Drive Your slidebook is equipped with much higher speed and larger capacity than other storage devices, such as the floppy disk drive and...
... used to install the operating system and software applications. Do not remove or install the hard disk drive when the slidebook is turned on . Getting Started About Hard Disk Drive Your slidebook is equipped with much higher speed and larger capacity than other storage devices, such as the floppy disk drive and...
User Manual
Page 35
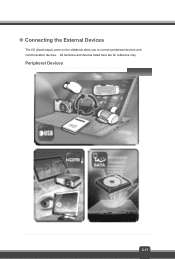
™ Connecting the External Devices The I/O (input/output) ports on the slidebook allow you to connect peripheral devices and communication devices. All functions and devices listed here are for reference only. Peripheral Devices 3-17
™ Connecting the External Devices The I/O (input/output) ports on the slidebook allow you to connect peripheral devices and communication devices. All functions and devices listed here are for reference only. Peripheral Devices 3-17
