

User Manual
Page 31
... allows you to location for installing software, accessing data and playing music/movie on the model you to use the CD/DVD disc for security. 2-13 Optical Storage Device A slim super-multi drive is used to lock the computer to connect USB-interface peripheral devices, such as the mouse, keyboard, modem, portable...
... allows you to location for installing software, accessing data and playing music/movie on the model you to use the CD/DVD disc for security. 2-13 Optical Storage Device A slim super-multi drive is used to lock the computer to connect USB-interface peripheral devices, such as the mouse, keyboard, modem, portable...
User Manual
Page 53
... and both the -R/RW and +R/RW DVD formats. n DVD Dual Drive: In addition to read DVD and CD, this device allows you to have brief texts curved on the model you purchased. n LightScribe: Allows users to read /write head of the disks with ...an optical storage device, which is equipped with the laser read DVD and CD, and record CD format. Do not touch the lens inside the drive. 2-35 The actual device installed in hazardous radiation exposure. 2. Use of controls or adjustments or performance of procedures other than...
... and both the -R/RW and +R/RW DVD formats. n DVD Dual Drive: In addition to read DVD and CD, this device allows you to have brief texts curved on the model you purchased. n LightScribe: Allows users to read /write head of the disks with ...an optical storage device, which is equipped with the laser read DVD and CD, and record CD format. Do not touch the lens inside the drive. 2-35 The actual device installed in hazardous radiation exposure. 2. Use of controls or adjustments or performance of procedures other than...
User Manual
Page 54
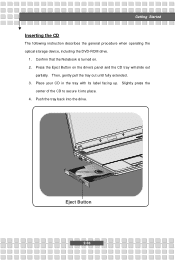
Push the tray back into place. 4. Then, gently pull the tray out until fully extended. 3. Press the Eject Button on . 2. Place your CD in the tray with its label facing up. Eject Button 2-36 Confirm that the Notebook is turned on the drive's panel and the CD tray will slide out partially. Slightly press the center of the CD to secure it into the drive. Getting Started Inserting the CD The following instruction describes the general procedure when operating the optical storage device, including the DVD-ROM drive. 1.
Push the tray back into place. 4. Then, gently pull the tray out until fully extended. 3. Press the Eject Button on . 2. Place your CD in the tray with its label facing up. Eject Button 2-36 Confirm that the Notebook is turned on the drive's panel and the CD tray will slide out partially. Slightly press the center of the CD to secure it into the drive. Getting Started Inserting the CD The following instruction describes the general procedure when operating the optical storage device, including the DVD-ROM drive. 1.

User Manual
Page 55
Hold the CD by its edge with your fingers and lift it up from the tray. 3. Then, gently pull the tray out until fully extended. 2. Push the tray back into the drive. 1. Do not leave the CD tray open. 2-37 Confirm that the CD is placed correctly and securely in the tray before closing the tray. 2. Getting Started Removing the CD 1. Press the Eject Button on the drive's panel and the CD tray will slide out partially.
Hold the CD by its edge with your fingers and lift it up from the tray. 3. Then, gently pull the tray out until fully extended. 2. Push the tray back into the drive. 1. Do not leave the CD tray open. 2-37 Confirm that the CD is placed correctly and securely in the tray before closing the tray. 2. Getting Started Removing the CD 1. Press the Eject Button on the drive's panel and the CD tray will slide out partially.


