
User Manual
Page 1
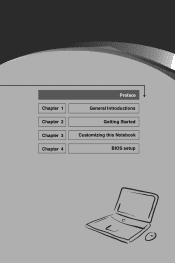
Chapter 1 Chapter 2 Chapter 3 Chapter 4 Preface General Introductions Getting Started Customizing this Notebook BIOS setup
Chapter 1 Chapter 2 Chapter 3 Chapter 4 Preface General Introductions Getting Started Customizing this Notebook BIOS setup
User Manual
Page 11
w AMI® is a registered trademark of the Personal Notebook Memory Card International Association. Release History Version 1.0 2.0 Revision Note First Release For Vista and XP version Date 04, 2007 08, 2007 XI Windows® XP and Vista are registered trademarks of American Megatrends Inc. w PCMCIA and CardBus are the properties of their respective owners. w Microsoft is a registered trademark of Microsoft Corporation. Preface Trademarks All trademarks are registered trademarks of Microsoft Corporation.
w AMI® is a registered trademark of the Personal Notebook Memory Card International Association. Release History Version 1.0 2.0 Revision Note First Release For Vista and XP version Date 04, 2007 08, 2007 XI Windows® XP and Vista are registered trademarks of American Megatrends Inc. w PCMCIA and CardBus are the properties of their respective owners. w Microsoft is a registered trademark of Microsoft Corporation. Preface Trademarks All trademarks are registered trademarks of Microsoft Corporation.

User Manual
Page 13
... Have a Good Work Habit 2-24 Knowing the Keyboard 2-25 Knowing the Touchpad 2-30 About Hard Disk Drive 2-33 Using the Optical Storage 2-34 Customizing this Notebook Connecting the External Devices 3-2 Connecting the Peripheral Devices 3-3 Connecting the Communication Devices 3-6 Express Card Installation 3-7 Installing the Express card 3-7 XIII
... Have a Good Work Habit 2-24 Knowing the Keyboard 2-25 Knowing the Touchpad 2-30 About Hard Disk Drive 2-33 Using the Optical Storage 2-34 Customizing this Notebook Connecting the External Devices 3-2 Connecting the Peripheral Devices 3-3 Connecting the Communication Devices 3-6 Express Card Installation 3-7 Installing the Express card 3-7 XIII

User Manual
Page 15
Chapter 1 Chapter 2 Chapter 3 Chapter 4 Preface General Introductions Getting Started Customizing this Notebook BIOS setup
Chapter 1 Chapter 2 Chapter 3 Chapter 4 Preface General Introductions Getting Started Customizing this Notebook BIOS setup

User Manual
Page 16
...using this notebook. This brand-new exquisite notebook will give you purchased this notebook. 1-2 Chapter 2, Getting Started, provides the specification of this notebook, and introduces the function buttons, quick launch buttons, connectors, LEDs and externals of this notebook, the finely designed notebook. How ...to Use This Manual This User's Manual provides instructions and illustrations on how to operate this notebook. Chapter 1, General Introductions, includes the descriptions of ...
...using this notebook. This brand-new exquisite notebook will give you purchased this notebook. 1-2 Chapter 2, Getting Started, provides the specification of this notebook, and introduces the function buttons, quick launch buttons, connectors, LEDs and externals of this notebook, the finely designed notebook. How ...to Use This Manual This User's Manual provides instructions and illustrations on how to operate this notebook. Chapter 1, General Introductions, includes the descriptions of ...
User Manual
Page 17
Chapter 4, BIOS setup, provides information on BIOS Setup program and allows you to configure the system for optimum use. 1-3 General Introductions Chapter 3, Customizing this Notebook, gives instructions not only in connecting the mouse, keyboard, webcam, printer, external monitor, IEEE 1394 devices, and communication devices, but also in installing and removing the PC card.
Chapter 4, BIOS setup, provides information on BIOS Setup program and allows you to configure the system for optimum use. 1-3 General Introductions Chapter 3, Customizing this Notebook, gives instructions not only in connecting the mouse, keyboard, webcam, printer, external monitor, IEEE 1394 devices, and communication devices, but also in installing and removing the PC card.
User Manual
Page 18
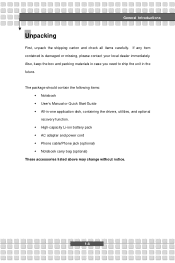
w High-capacity Li-ion battery pack w AC adapter and power cord w Phone cable/Phone jack (optional) w Notebook carry bag (optional) These accessories listed above may change without notice. 1-4 The package should contain the following items: w Notebook w User's Manual or Quick Start Guide w All-in the future. Also, keep the box and packing materials...
w High-capacity Li-ion battery pack w AC adapter and power cord w Phone cable/Phone jack (optional) w Notebook carry bag (optional) These accessories listed above may change without notice. 1-4 The package should contain the following items: w Notebook w User's Manual or Quick Start Guide w All-in the future. Also, keep the box and packing materials...

User Manual
Page 19
Chapter 1 Chapter 2 Chapter 3 Chapter 4 Preface General Introductions Getting Started Customizing this Notebook BIOS setup
Chapter 1 Chapter 2 Chapter 3 Chapter 4 Preface General Introductions Getting Started Customizing this Notebook BIOS setup
User Manual
Page 24
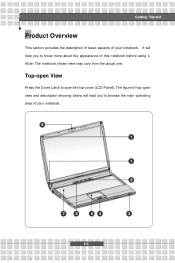
It will lead you to browse the main operating area of your notebook. The figure of top-open the top cover (LCD Panel). Top-open View Press the Cover Latch to open view and description showing below will help you to know more about the appearance of this notebook before using it. Note: The notebook shown here may vary from the actual one. Getting Started Product Overview This section provides the description of basic aspects of your notebook. 8 1 1 2 7 6 5 4 3 2-6
It will lead you to browse the main operating area of your notebook. The figure of top-open the top cover (LCD Panel). Top-open View Press the Cover Latch to open view and description showing below will help you to know more about the appearance of this notebook before using it. Note: The notebook shown here may vary from the actual one. Getting Started Product Overview This section provides the description of basic aspects of your notebook. 8 1 1 2 7 6 5 4 3 2-6
User Manual
Page 25
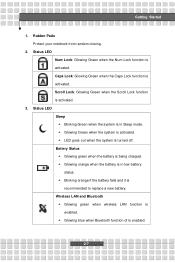
... is activated. Getting Started 1. Status LED Num Lock: Glowing Green when the Num Lock function is recommended to replace a new battery. Rubber Pads Protect your notebook from random closing. 2. w LED goes out when the system is being charged. Battery Status w Glowing green when the battery is turned off. w Glowing blue when...
... is activated. Getting Started 1. Status LED Num Lock: Glowing Green when the Num Lock function is recommended to replace a new battery. Rubber Pads Protect your notebook from random closing. 2. w LED goes out when the system is being charged. Battery Status w Glowing green when the battery is turned off. w Glowing blue when...
User Manual
Page 26
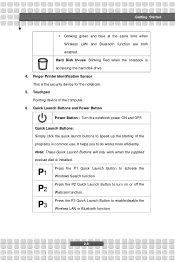
... LAN or Bluetooth function. 2-8 Note: These Quick Launch Buttons will only work when the supplied preload disk is the security device for the notebook. 5. P3 Press the P3 Quick Launch Button to turn on or off the Webcam function. Quick Launch Buttons: Simply click the quick launch... buttons to do works more efficiently. Touchpad Pointing device of the programs in common use : Blinking Red when the notebook is accessing the hard disk drive. 4. It helps you to speed up the starting of the computer.. 6. Quick Launch Buttons and Power Button...
... LAN or Bluetooth function. 2-8 Note: These Quick Launch Buttons will only work when the supplied preload disk is the security device for the notebook. 5. P3 Press the P3 Quick Launch Button to turn on or off the Webcam function. Quick Launch Buttons: Simply click the quick launch... buttons to do works more efficiently. Touchpad Pointing device of the programs in common use : Blinking Red when the notebook is accessing the hard disk drive. 4. It helps you to speed up the starting of the computer.. 6. Quick Launch Buttons and Power Button...
User Manual
Page 30
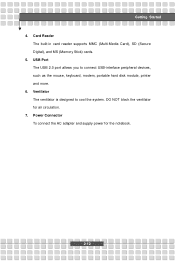
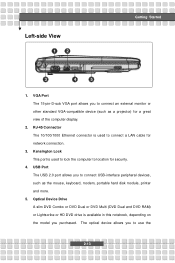
DO NOT block the ventilator for the notebook. 2-12 Power Connector To connect the AC adapter and supply power for air circulation. 7. USB Port The USB 2.0 port allows you to cool the system. Ventilator The ventilator is designed to connect USB-interface peripheral devices, such as the mouse, keyboard, modem, portable hard disk module, printer and more. 6. Card Reader The built-in card reader supports MMC (Multi-Media Card), SD (Secure Digital), and MS (Memory Stick) cards. 5. Getting Started 4.
DO NOT block the ventilator for the notebook. 2-12 Power Connector To connect the AC adapter and supply power for air circulation. 7. USB Port The USB 2.0 port allows you to cool the system. Ventilator The ventilator is designed to connect USB-interface peripheral devices, such as the mouse, keyboard, modem, portable hard disk module, printer and more. 6. Card Reader The built-in card reader supports MMC (Multi-Media Card), SD (Secure Digital), and MS (Memory Stick) cards. 5. Getting Started 4.
User Manual
Page 31
... to lock the computer to location for network connection. 3. USB Port The USB 2.0 port allows you purchased. Kensington Lock This port is available in this notebook, depending on the model you to use the 2-13 Optical Device Drive A slim DVD Combo or DVD Dual or DVD Multi (DVD Dual and DVD...
... to lock the computer to location for network connection. 3. USB Port The USB 2.0 port allows you purchased. Kensington Lock This port is available in this notebook, depending on the model you to use the 2-13 Optical Device Drive A slim DVD Combo or DVD Dual or DVD Multi (DVD Dual and DVD...

User Manual
Page 33
Rear View 1 Getting Started 1. Battery Pack (Rear View) This notebook will be powered by the battery pack when the AC adapter is disconnected. 2-15
Rear View 1 Getting Started 1. Battery Pack (Rear View) This notebook will be powered by the battery pack when the AC adapter is disconnected. 2-15
User Manual
Page 34
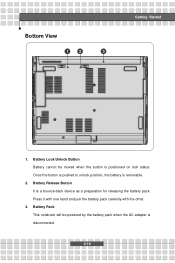
Bottom View 1 2 3 Getting Started 1. Press it with one hand and pull the battery pack carefully with the other. 3. Once the button is pushed to unlock position, the battery is a bounce-back device as a preparation for releasing the battery pack. Battery Release Button It is removable. 2. Battery Pack This notebook will be moved when the button is disconnected. 2-16 Battery Lock/Unlock Button Battery cannot be powered by the battery pack when the AC adapter is positioned on lock status.
Bottom View 1 2 3 Getting Started 1. Press it with one hand and pull the battery pack carefully with the other. 3. Once the button is pushed to unlock position, the battery is a bounce-back device as a preparation for releasing the battery pack. Battery Release Button It is removable. 2. Battery Pack This notebook will be moved when the button is disconnected. 2-16 Battery Lock/Unlock Button Battery cannot be powered by the battery pack when the AC adapter is positioned on lock status.
User Manual
Page 35
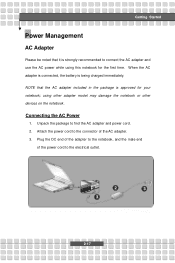
Unpack the package to the electrical outlet. 2 3 3 2-17 using this notebook for your notebook; Connecting the AC Power 1. Plug the DC end of the adapter to the notebook, and the male end of the AC adapter. 3. Getting Started Power Management AC Adapter Please be noted that the AC adapter included in the package ... being charged immediately. Attach the power cord to connect the AC adapter and use the AC power while using other adapter model may damage the notebook or other devices on the...
Unpack the package to the electrical outlet. 2 3 3 2-17 using this notebook for your notebook; Connecting the AC Power 1. Plug the DC end of the adapter to the notebook, and the male end of the AC adapter. 3. Getting Started Power Management AC Adapter Please be noted that the AC adapter included in the package ... being charged immediately. Attach the power cord to connect the AC adapter and use the AC power while using other adapter model may damage the notebook or other devices on the...
User Manual
Page 36
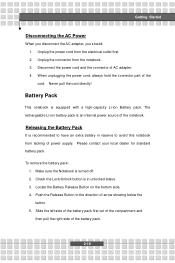
... pack. Never pull the cord directly! The rechargeable Li-ion battery pack is an internal power source of AC adapter. 4. Make sure the Notebook is equipped with a high-capacity Li-ion Battery pack. Locate the Battery Release Button on the bottom side. 4. Unplug the connector from the... electrical outlet first. 2. Check the Lock/Unlock button is recommended to have an extra battery in unlocked status. 3. Battery Pack This notebook is turned off. 2. When unplugging the power cord, always hold the connector part of the battery pack. 2-18 Slide the left side of ...
... pack. Never pull the cord directly! The rechargeable Li-ion battery pack is an internal power source of AC adapter. 4. Make sure the Notebook is equipped with a high-capacity Li-ion Battery pack. Locate the Battery Release Button on the bottom side. 4. Unplug the connector from the... electrical outlet first. 2. Check the Lock/Unlock button is recommended to have an extra battery in unlocked status. 3. Battery Pack This notebook is turned off. 2. When unplugging the power cord, always hold the connector part of the battery pack. 2-18 Slide the left side of ...
User Manual
Page 40
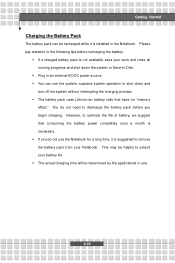
You do not use the Notebook for a long time, it is not available, save your work and close all running programs and shut down and turn off the system without interrupting ... the applications in an external AC/DC power source. w You can be helpful to extend your Notebook. However, to discharge the battery pack before recharging the battery: w If a charged battery pack is installed in the Notebook. This may be recharged while it is necessary. Getting Started Charging the Battery Pack The battery...
You do not use the Notebook for a long time, it is not available, save your work and close all running programs and shut down and turn off the system without interrupting ... the applications in an external AC/DC power source. w You can be helpful to extend your Notebook. However, to discharge the battery pack before recharging the battery: w If a charged battery pack is installed in the Notebook. This may be recharged while it is necessary. Getting Started Charging the Battery Pack The battery...
User Manual
Page 41
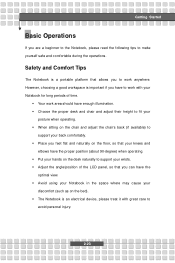
... However, choosing a good workspace is an electrical device, please treat it with your knees and elbows have the optimal view. w Avoid using your Notebook in the space where may cause your back comfortably. w Choose the proper desk and chair and adjust their height to fit your wrists. w Place... read the following tips to make yourself safe and comfortable during the operations. Safety and Comfort Tips The Notebook is a portable platform that your Notebook for long periods of the LCD panel, so that you have enough illumination. Getting Started Basic Operations If you to work with...
... However, choosing a good workspace is an electrical device, please treat it with your knees and elbows have the optimal view. w Avoid using your Notebook in the space where may cause your back comfortably. w Choose the proper desk and chair and adjust their height to fit your wrists. w Place... read the following tips to make yourself safe and comfortable during the operations. Safety and Comfort Tips The Notebook is a portable platform that your Notebook for long periods of the LCD panel, so that you have enough illumination. Getting Started Basic Operations If you to work with...

User Manual
Page 42
Getting Started Sit straight and keep the following tips in mind when operating. w Change your hands and feet with your Notebook for a period of time. 2-24 Keep your posture frequently. Please keep a good posture. Adjust the angle and position of time; Adjust the chair's height. w Remember ...
Getting Started Sit straight and keep the following tips in mind when operating. w Change your hands and feet with your Notebook for a period of time. 2-24 Keep your posture frequently. Please keep a good posture. Adjust the angle and position of time; Adjust the chair's height. w Remember ...

