
User Guide
Page 2
... the right to the correctness of their respective owners. We take every care in the United States and/or other information: http://global.msi.com.tw/index.php? W indows® 95/98/2000/NT/XP are registered trademarks or trademarks of purchase or local distributor. Alternatively...updates, and other countries. func=faqIndex Contact our technical staff at: http://support.msi.com.tw/ ii Copyright Notice The material in this document, but no solution can be obtained from the user's manual, please contact your place of NVIDIA Corporation in the preparation of this document is...
... the right to the correctness of their respective owners. We take every care in the United States and/or other information: http://global.msi.com.tw/index.php? W indows® 95/98/2000/NT/XP are registered trademarks or trademarks of purchase or local distributor. Alternatively...updates, and other countries. func=faqIndex Contact our technical staff at: http://support.msi.com.tw/ ii Copyright Notice The material in this document, but no solution can be obtained from the user's manual, please contact your place of NVIDIA Corporation in the preparation of this document is...

User Guide
Page 3
... into the opening that people can not get the equipment checked by the m an uf ac t ur er. iii Lay this User's Manual for air convection hence protects the equip- ment from humidity. 4. Make sure the voltage of breakage. 12. Always Unplug the Power Cord before...instructions carefully. 2. Keep this equipment on the equipment should be - The openings on card or module. 9. fore connecting the equipment to User's Manual. † The equipment has dropped and damaged. † The equipment has obvious sign of the power source and adjust properly 110/220V be noted...
... into the opening that people can not get the equipment checked by the m an uf ac t ur er. iii Lay this User's Manual for air convection hence protects the equip- ment from humidity. 4. Make sure the voltage of breakage. 12. Always Unplug the Power Cord before...instructions carefully. 2. Keep this equipment on the equipment should be - The openings on card or module. 9. fore connecting the equipment to User's Manual. † The equipment has dropped and damaged. † The equipment has obvious sign of the power source and adjust properly 110/220V be noted...

User Guide
Page 20
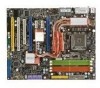
...mainboard. 12 ATX 24-Pin Power Connector This connector allows you like to use the 20-pin ATX power supply...firmly into the c on the mainbnoard have to connect to the ATX power supply and have to work together to ensure stable operation of...This connector connects to connect an ATX 24-pin power supply. If you'd like . To connect the ATX 24-pin power supply, make sure... dam age will be caused. You may use the 20-pin ATX power supply, please plug your power supply along with pin 1 ...GND +3.3V GND -12V +3.3V +3.3V 1 13 13 ATX 12V Power Connector (2x4-Pin) This 12V power connector is ...
...mainboard. 12 ATX 24-Pin Power Connector This connector allows you like to use the 20-pin ATX power supply...firmly into the c on the mainbnoard have to connect to the ATX power supply and have to work together to ensure stable operation of...This connector connects to connect an ATX 24-pin power supply. If you'd like . To connect the ATX 24-pin power supply, make sure... dam age will be caused. You may use the 20-pin ATX power supply, please plug your power supply along with pin 1 ...GND +3.3V GND -12V +3.3V +3.3V 1 13 13 ATX 12V Power Connector (2x4-Pin) This 12V power connector is ...

User Guide
Page 25
... Control Panel. Check the box 3. En-17 Right click on the system and install the NVIDIA ForceWare Windows Vista driver. Go to your graphics card manual). Then press Apply. (concerning the details of multiGPU settings, please refer to 3D Settings on the top menu options, and check the Show SLI Visual...
... Control Panel. Check the box 3. En-17 Right click on the system and install the NVIDIA ForceWare Windows Vista driver. Go to your graphics card manual). Then press Apply. (concerning the details of multiGPU settings, please refer to 3D Settings on the top menu options, and check the Show SLI Visual...

User Guide
Page 33
... , a message as below for general use only. Adjust the Date, Tim e fields. 3. If you need the detailed settings of BIOS, please see the manual in English version on MSI website. Important The configuration above are for optimal system performance. 2. Setup Date/ Time : Select the Standard CMOS Features and press to enter the...
... , a message as below for general use only. Adjust the Date, Tim e fields. 3. If you need the detailed settings of BIOS, please see the manual in English version on MSI website. Important The configuration above are for optimal system performance. 2. Setup Date/ Time : Select the Standard CMOS Features and press to enter the...


