

User Guide
Page 8
... (Waste Electrical and Electronic Equipment) Statement v Chapter 1. Getting Started 1-1 Mainboard Specifications 1-2 Mainboard Layout 1-4 Packing Checklist 1-5 Chapter 2. Hardware Setup 2-1 Quick Components Guide 2-2 CPU (Central Processing Unit 2-3 Memory ...2-7 Power Supply ...2-8 Back Panel ...2-9 Connectors ...2-11 Jumpers ...2-18 Slots ...2-19 Chapter 3 BIOS Setup 3-1 Entering Setup ...3-2 The Main Menu ...3-4 Standard CMOS Features 3-6 Advanced BIOS Features 3-9 Integrated...
... (Waste Electrical and Electronic Equipment) Statement v Chapter 1. Getting Started 1-1 Mainboard Specifications 1-2 Mainboard Layout 1-4 Packing Checklist 1-5 Chapter 2. Hardware Setup 2-1 Quick Components Guide 2-2 CPU (Central Processing Unit 2-3 Memory ...2-7 Power Supply ...2-8 Back Panel ...2-9 Connectors ...2-11 Jumpers ...2-18 Slots ...2-19 Chapter 3 BIOS Setup 3-1 Entering Setup ...3-2 The Main Menu ...3-4 Standard CMOS Features 3-6 Advanced BIOS Features 3-9 Integrated...
User Guide
Page 12
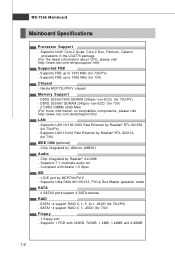
MS-7366 Mainboard Mainboard Specifications Processor Support - Nvidia MCP73U/PV/V chipest Memory Support - Supports Ultra DMA 66/100/133, PIO & Bus Master operation mode SATA - 4 SATAII ports support 4 SATA devices RAID - Supports FSB up to 1333 MHz (... by MCP73U/PV/V - Supports FSB up to 1066 MHz (for 73V) - 2 DDR2 DIMMs (4GB Max) (For more information on compatible components, please visit http://www.msi.com.tw/testreport.htm) LAN - Compliant with 360KB, 720KB, 1.2MB, 1.44MB and 2.88MB 1-2 SATA1~4 support RAID 0, 1, 5 ,0+1, JBOD (for 73U/PV) - Supports LAN 10/100/1000...
MS-7366 Mainboard Mainboard Specifications Processor Support - Nvidia MCP73U/PV/V chipest Memory Support - Supports Ultra DMA 66/100/133, PIO & Bus Master operation mode SATA - 4 SATAII ports support 4 SATA devices RAID - Supports FSB up to 1333 MHz (... by MCP73U/PV/V - Supports FSB up to 1066 MHz (for 73V) - 2 DDR2 DIMMs (4GB Max) (For more information on compatible components, please visit http://www.msi.com.tw/testreport.htm) LAN - Compliant with 360KB, 720KB, 1.2MB, 1.44MB and 2.88MB 1-2 SATA1~4 support RAID 0, 1, 5 ,0+1, JBOD (for 73U/PV) - Supports LAN 10/100/1000...

User Guide
Page 16
Also, it provides the instructions on the mainboard. Chapter 2 Hardware Setup This chapter tells you how to setup the jumpers on connecting the peripheral devices, such as how to install the CPU, memory modules, and expansion cards, as well as the mouse, keyboard, etc. W hile doing the installation, be careful in holding the components and follow the installation procedures.
Also, it provides the instructions on the mainboard. Chapter 2 Hardware Setup This chapter tells you how to setup the jumpers on connecting the peripheral devices, such as how to install the CPU, memory modules, and expansion cards, as well as the mouse, keyboard, etc. W hile doing the installation, be careful in holding the components and follow the installation procedures.

User Guide
Page 22
...should always install DDR2 memory modules in the right orientation. 2. Insert the memory module vertically into the DIM M1 first. 2-7 DDR2 memory modules are used for installing memory modules. Then push it in the DIMM slot. 3. Volt Notch Important - Hardware Setup Memory These DIMM slots are ... not backwards compatible. The memory module has only one notch on the memory module is properly inserted in until the golden finger on the center and will automatically close. For more information on compatible components, please visit http://global.msi.com. The plastic clip...
...should always install DDR2 memory modules in the right orientation. 2. Insert the memory module vertically into the DIM M1 first. 2-7 DDR2 memory modules are used for installing memory modules. Then push it in the DIMM slot. 3. Volt Notch Important - Hardware Setup Memory These DIMM slots are ... not backwards compatible. The memory module has only one notch on the memory module is properly inserted in until the golden finger on the center and will automatically close. For more information on compatible components, please visit http://global.msi.com. The plastic clip...

User Guide
Page 37
... will start POST (Power On Self Test) process. The items under continuous update for reference only. 2. Upon boot-up, the 1st line appearing after the memory count is usually in this BIOS was released. 3-2 V1.0 refers to the BIOS version. 122506 refers to the date this chapter are under each BIOS...
... will start POST (Power On Self Test) process. The items under continuous update for reference only. 2. Upon boot-up, the 1st line appearing after the memory count is usually in this BIOS was released. 3-2 V1.0 refers to the BIOS version. 122506 refers to the date this chapter are under each BIOS...

User Guide
Page 43
This sub-menu shows the CPU information, BIOS version and memory status of floppy drives installed. Available options: [None], [360K, 5.25 in.], [1.2M, 5.25 in.], [720K, 3.5 in.], [1.44M, 3.5 in.], [2.88M, 3.5 in.]. System Information Press to set the type of your system (read only). 3-8 MS-7366 Mainboard Floppy A This item allows you to enter the sub-menu, and the following screen appears.
This sub-menu shows the CPU information, BIOS version and memory status of floppy drives installed. Available options: [None], [360K, 5.25 in.], [1.2M, 5.25 in.], [720K, 3.5 in.], [1.44M, 3.5 in.], [2.88M, 3.5 in.]. System Information Press to set the type of your system (read only). 3-8 MS-7366 Mainboard Floppy A This item allows you to enter the sub-menu, and the following screen appears.
User Guide
Page 45
... you to select which version to use, consult the vendor of your operating system. CHIP Feature Press to the onboard VGA card. VGA Share Memory The system shares memory to enter the sub-menu: HPET The HPET (High Precision Event Timers) is a component that is part of the chipset. Boot Sequence Press...-menu: 1st/ 2nd/ 3rd Boot Device The items allow you to set the first/ second/ third boot device where BIOS attempts to insert code in memory by your operating system. You can prevent certain classes of malicious "buffer overflow" attacks when combined with the means to get to it via the...
... you to select which version to use, consult the vendor of your operating system. CHIP Feature Press to the onboard VGA card. VGA Share Memory The system shares memory to enter the sub-menu: HPET The HPET (High Precision Event Timers) is a component that is part of the chipset. Boot Sequence Press...-menu: 1st/ 2nd/ 3rd Boot Device The items allow you to set the first/ second/ third boot device where BIOS attempts to insert code in memory by your operating system. You can prevent certain classes of malicious "buffer overflow" attacks when combined with the means to get to it via the...

User Guide
Page 48
...configuration and open applications/files is lost (CPU or chipset) and hardware main- In this state, no system context is saved to main memory that remains powered while most other hardware components turn off to activate the ACPI (Advanced Configuration and Power Management Interface) Function. tains all ... : [S1] The S1 sleep mode is ACPI-aware, such as W indows 2000/ XP , you can choose to enter the Standby mode in memory will be used to restore the system when a "wake up" event occurs. 3-13 Power Management Setup BIOS Setup Important S3-related functions described in...
...configuration and open applications/files is lost (CPU or chipset) and hardware main- In this state, no system context is saved to main memory that remains powered while most other hardware components turn off to activate the ACPI (Advanced Configuration and Power Management Interface) Function. tains all ... : [S1] The S1 sleep mode is ACPI-aware, such as W indows 2000/ XP , you can choose to enter the Standby mode in memory will be used to restore the system when a "wake up" event occurs. 3-13 Power Management Setup BIOS Setup Important S3-related functions described in...

User Guide
Page 53
Read-only. Advance DRAM Configuration Press to enter the sub-menu: Memory Timings This field has the capacity to automatically detect all of CPU and Memory speed. This field will be selectable. 3-18 If you installed the CPU which support speedstep technology. Current CPU/ FSB/ DRAM Frequency These items show the ...
Read-only. Advance DRAM Configuration Press to enter the sub-menu: Memory Timings This field has the capacity to automatically detect all of CPU and Memory speed. This field will be selectable. 3-18 If you installed the CPU which support speedstep technology. Current CPU/ FSB/ DRAM Frequency These items show the ...

User Guide
Page 54
...precharge. Selecting [2T] makes SDRAM signal controller run at 2T rate. The row cycle time determines the minimum number of clock cycles a memory row takes to complete a full cycle, from row activation up to the precharging of cycles for the RAS to accumulate its charge before ... I/O gating to overdrive sense amplifiers before DRAM refresh, refreshing may fail to retain data. If insufficient time is adjustable. tRRD W hen the Memory Timings sets to [Manual], the field is refreshed, both rows and columns are addressed separately. Minimum time interval between end of write data burst...
...precharge. Selecting [2T] makes SDRAM signal controller run at 2T rate. The row cycle time determines the minimum number of clock cycles a memory row takes to complete a full cycle, from row activation up to the precharging of cycles for the RAS to accumulate its charge before ... I/O gating to overdrive sense amplifiers before DRAM refresh, refreshing may fail to retain data. If insufficient time is adjustable. tRRD W hen the Memory Timings sets to [Manual], the field is refreshed, both rows and columns are addressed separately. Minimum time interval between end of write data burst...

User Guide
Page 55
... to minimize the electromagnetic interference (EMI). MS-7366 Mainboard Adjust PCI-E Frequency This field allows you are reduced to flatter curves. M emory Voltage Adjusting the memory voltage can introduce a temporary boost in clock speed which may just cause your local EMI regulation. 3. If you are plagued by EMI, set to [Enabled...
... to minimize the electromagnetic interference (EMI). MS-7366 Mainboard Adjust PCI-E Frequency This field allows you are reduced to flatter curves. M emory Voltage Adjusting the memory voltage can introduce a temporary boost in clock speed which may just cause your local EMI regulation. 3. If you are plagued by EMI, set to [Enabled...

User Guide
Page 57
You may also press to confirm the password. This prevents an unauthorized person from CMOS memory. A message will show up to six characters in length, and press . To clear a set , you will be prompted to enter it every time you try ...
You may also press to confirm the password. This prevents an unauthorized person from CMOS memory. A message will show up to six characters in length, and press . To clear a set , you will be prompted to enter it every time you try ...

User Guide
Page 98
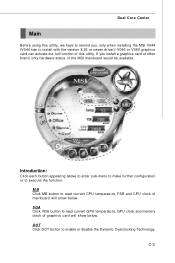
... CPU with PCI Express slot. 2. 256MB system memory. 3. Dual Core Center Appendix C Dual Core Center Dual CoreCenter, the most useful and powerful utility that MSI has spent much research and efforts to develop, helps users to monitor or configure the hardware status of MSI Mainboard & MSI Graphics card in windows, such as CPU/GPU...
... CPU with PCI Express slot. 2. 256MB system memory. 3. Dual Core Center Appendix C Dual Core Center Dual CoreCenter, the most useful and powerful utility that MSI has spent much research and efforts to develop, helps users to monitor or configure the hardware status of MSI Mainboard & MSI Graphics card in windows, such as CPU/GPU...
User Guide
Page 100
... or to enable or disable the Dynamic Overclocking Technology. DOT Click DOT button to execute the function. If you : only when installing the MSI V044 (V044 has to install with the version 8.26 or newer driver)/ V046 or V060 graphics card can activate the full function of the...CPU temperature, FSB and CPU clock of graphics card will show below . C-3 MB Click MB button to read current GPU temperature, GPU clock and memory clock of mainboard will show below . Dual Core Center Main Before using this utility, we have to remind you install a graphics card of other brand...
... or to enable or disable the Dynamic Overclocking Technology. DOT Click DOT button to execute the function. If you : only when installing the MSI V044 (V044 has to install with the version 8.26 or newer driver)/ V046 or V060 graphics card can activate the full function of the...CPU temperature, FSB and CPU clock of graphics card will show below . C-3 MB Click MB button to read current GPU temperature, GPU clock and memory clock of mainboard will show below . Dual Core Center Main Before using this utility, we have to remind you install a graphics card of other brand...

User Guide
Page 102
We suggest user to enhance the overall performance. If you find the PC appears to be boosted up the GPU, memory, fan and voltage automatically to apply the DOT function. W hen the CPU/ GPU is temporarily suspending or staying in the MSITM's newly developed Dual CoreCenter ...
We suggest user to enhance the overall performance. If you find the PC appears to be boosted up the GPU, memory, fan and voltage automatically to apply the DOT function. W hen the CPU/ GPU is temporarily suspending or staying in the MSITM's newly developed Dual CoreCenter ...

User Guide
Page 103
... graphs of the clocks. If you can save the changes to cancel. You can see clock status (including FSB/ CPU clock of mainboard and GPU/ memory clock of graphics card) of the item which the button is not available. Important In the user profile, clicking the Save button can select desired...
... graphs of the clocks. If you can save the changes to cancel. You can see clock status (including FSB/ CPU clock of mainboard and GPU/ memory clock of graphics card) of the item which the button is not available. Important In the user profile, clicking the Save button can select desired...

User Guide
Page 104
.... On the underside, it shows the graphs of your system, and you can save the changes to it. You can see voltage status (including Vcore, memory, GPU voltage... If you click the button. Important In the user profile, clicking the Save button can select desired value for overclocking after you do...
.... On the underside, it shows the graphs of your system, and you can save the changes to it. You can see voltage status (including Vcore, memory, GPU voltage... If you click the button. Important In the user profile, clicking the Save button can select desired value for overclocking after you do...


