User Guide
Page 16
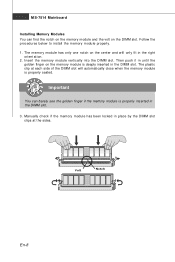
... of the DIMM slot will automatically close when the memory module is properly seated. Volt Notch En-8 The memory module has only one notch on . 2. Manually check if the memory m odule has been locked in place by the DIMM slot clips at the sides. Important You can find the notch on... the memory module and the volt on the memory module is deeply inserted in the DIMM slot. MS-7514 Mainboard Installing Memory Modules You can barely see the golden finger if the memory module is properly inserted in the DIMM slot. 3. Follow the...
... of the DIMM slot will automatically close when the memory module is properly seated. Volt Notch En-8 The memory module has only one notch on . 2. Manually check if the memory m odule has been locked in place by the DIMM slot clips at the sides. Important You can find the notch on... the memory module and the volt on the memory module is deeply inserted in the DIMM slot. MS-7514 Mainboard Installing Memory Modules You can barely see the golden finger if the memory module is properly inserted in the DIMM slot. 3. Follow the...
User Guide
Page 28
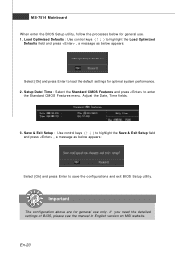
...and press to load the default settings for optimal system performance. 2. If you need the detailed settings of BIOS, please see the manual in English version on MSI website. Load Optimized Defaults : Use control keys (↑↓ ) to highlight the Load Optimized Defaults field and press , a ...the configurations and exit BIOS Setup utility. Important The configuration above are for general use . 1. En-20 Adjust the Date, Tim e fields. 3. MS-7514 Mainboard W hen enter the BIOS Setup utility, follow the processes below for general use only. Save & Exit Setup : Use control keys (↑&#...
...and press to load the default settings for optimal system performance. 2. If you need the detailed settings of BIOS, please see the manual in English version on MSI website. Load Optimized Defaults : Use control keys (↑↓ ) to highlight the Load Optimized Defaults field and press , a ...the configurations and exit BIOS Setup utility. Important The configuration above are for general use . 1. En-20 Adjust the Date, Tim e fields. 3. MS-7514 Mainboard W hen enter the BIOS Setup utility, follow the processes below for general use only. Save & Exit Setup : Use control keys (↑&#...
User Manual
Page 22
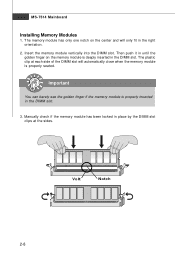
... the DIMM slot clips at each side of the DIMM slot will only fit in the DIMM slot. 3. Manually check if the memory module has been locked in the DIMM slot. Volt Notch 2-8 MS-7514 Mainboard Installing Memory Modules 1. Then push it in until the golden finger on the center and will...
... the DIMM slot clips at each side of the DIMM slot will only fit in the DIMM slot. 3. Manually check if the memory module has been locked in the DIMM slot. Volt Notch 2-8 MS-7514 Mainboard Installing Memory Modules 1. Then push it in until the golden finger on the center and will...

User Manual
Page 90
... for better cooling effect. In the default profile, the Save button is lit up with red color will be shown. On the underside, it . Important 1. MS-7514 Mainboard FAN Speed In the FAN Speed sub-menu, you can save the changes to it shows the graphs of the fan speed. Or... click the Default button to disabled the "CPU Smart FAN Target" item in the BIOS. 2. When you set the fan speed manually, please make sure to restore the default values.
... for better cooling effect. In the default profile, the Save button is lit up with red color will be shown. On the underside, it . Important 1. MS-7514 Mainboard FAN Speed In the FAN Speed sub-menu, you can save the changes to it shows the graphs of the fan speed. Or... click the Default button to disabled the "CPU Smart FAN Target" item in the BIOS. 2. When you set the fan speed manually, please make sure to restore the default values.


