User Guide
Page 9
Hardware Setup A-18 Appendix B Dual Core Center B-1 Activating Dual Core Center B-2 Main ...B-2 DOT (Dynamic OverClocking B-5 Clock ...B-6 Voltage ...B-7 FAN Speed ...B-8 Temperature ...B-9 User Profile ...B-10 Appendix C Intel ICH9R SATA RAID (optional C-1 ICH9R Introduction C-2 BIOS Configuration C-3 Installing Driver ...C-9 Installing Software C-11 RAID Migration Instructions C-15 Degraded RAID Array C-22 ix
Hardware Setup A-18 Appendix B Dual Core Center B-1 Activating Dual Core Center B-2 Main ...B-2 DOT (Dynamic OverClocking B-5 Clock ...B-6 Voltage ...B-7 FAN Speed ...B-8 Temperature ...B-9 User Profile ...B-10 Appendix C Intel ICH9R SATA RAID (optional C-1 ICH9R Introduction C-2 BIOS Configuration C-3 Installing Driver ...C-9 Installing Software C-11 RAID Migration Instructions C-15 Degraded RAID Array C-22 ix
User Guide
Page 51
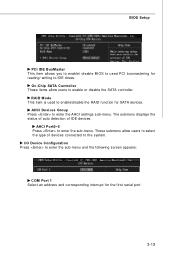
... to select the type of IDE devices. I/O Device Configuration Press to enter the AHCI settings sub-menu. AHCI Port0~5 Press to enter the sub-menu. RAID Mode This item is used PCI busmastering for reading/ writing to IDE drives. The submenu displays the status of auto detection of devices connected to...
... to select the type of IDE devices. I/O Device Configuration Press to enter the AHCI settings sub-menu. AHCI Port0~5 Press to enter the sub-menu. RAID Mode This item is used PCI busmastering for reading/ writing to IDE drives. The submenu displays the status of auto detection of devices connected to...

User Guide
Page 99
C-1 Intel ICH9R SATA RAID Appendix C Intel ICH9R SATA RAID (optional) This appendix will assist users in configuring and enabling RAID functionality on platforms The ICH9R RAID solution supports RAID level 0 (striping), RAID level 1 (mirroring), RAID level 5 (striping with parity) and RAID level 10 (striping and mirroring).
C-1 Intel ICH9R SATA RAID Appendix C Intel ICH9R SATA RAID (optional) This appendix will assist users in configuring and enabling RAID functionality on platforms The ICH9R RAID solution supports RAID level 0 (striping), RAID level 1 (mirroring), RAID level 5 (striping with parity) and RAID level 10 (striping and mirroring).

User Guide
Page 100
... And the least number of the ATA interface. SATA hard drives deliver blistering transfer speeds up to 6 Serial ATAII (Serial ATAII RAID) drives. Supports Hot-plug-n-play feature. 3. Data handling optimizations including tagged command queuing, elevator seek and packet chain command. This .... Level 5 is one of hard drives for RAID 0, RAID 1 or Matrix mode is the advanced ability for two RAID volumes to separate hard drives. Important The least number of the original RAID levels, multiple RAID 1 mirrors are : 1. RAID 1 provides data redundancy by mirroring data between the...
... And the least number of the ATA interface. SATA hard drives deliver blistering transfer speeds up to 6 Serial ATAII (Serial ATAII RAID) drives. Supports Hot-plug-n-play feature. 3. Data handling optimizations including tagged command queuing, elevator seek and packet chain command. This .... Level 5 is one of hard drives for RAID 0, RAID 1 or Matrix mode is the advanced ability for two RAID volumes to separate hard drives. Important The least number of the original RAID levels, multiple RAID 1 mirrors are : 1. RAID 1 provides data redundancy by mirroring data between the...
User Guide
Page 101
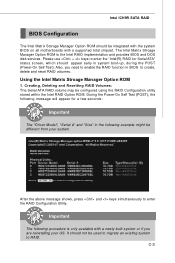
...be integrated with the system BIOS on all motherboards with a newly-built system or if you need to enter the "Intel(R) RAID for a few seconds: Important The "Driver Model", "Serial #" and "Size" in the following procedure is the Intel RAID implementation and provides BIOS and DOS disk services... chipset. Also, you are reinstalling your system. C-3 Using the Intel Matrix Stroage Manager Option ROM 1. Please use + keys to enable the RAID function in system boot-up, during the POST (Power-On Self Test). During the Power-On Self Test (POST), the following message will ...
...be integrated with the system BIOS on all motherboards with a newly-built system or if you need to enter the "Intel(R) RAID for a few seconds: Important The "Driver Model", "Serial #" and "Size" in the following procedure is the Intel RAID implementation and provides BIOS and DOS disk services... chipset. Also, you are reinstalling your system. C-3 Using the Intel Matrix Stroage Manager Option ROM 1. Please use + keys to enable the RAID function in system boot-up, during the POST (Power-On Self Test). During the Power-On Self Test (POST), the following message will ...

User Guide
Page 102
Select option 1 "Create RAID Volume" and press key. C-4 MS-7345 Mainboard After pressing the and keys simultaneously, the following screen appears. The following window will appear: (1) Create RAID Volume 1. Use the arrow keys to select the RAID level best suited to the next field. 2. Then in the Name field, specify a RAID Volume name and then press the or key to go to your usage model in RAID Level.
Select option 1 "Create RAID Volume" and press key. C-4 MS-7345 Mainboard After pressing the and keys simultaneously, the following screen appears. The following window will appear: (1) Create RAID Volume 1. Use the arrow keys to select the RAID level best suited to the next field. 2. Then in the Name field, specify a RAID Volume name and then press the or key to go to your usage model in RAID Level.

User Guide
Page 103
... of 2 increments. Here are some typical values: RAID0 - 128KB RAID10 - 64KB RAID5 - 64KB 5. Use key to select the disks you want to create for the RAID array by using the "upper arrow" or "down arrow" keys to scroll through the available values, and pressing the key to select and advance to... strip value should be chosen based on the planned drive usage. Then select the strip value for the RAID volume, then click key to 128 KB in the Capacity field. Intel ICH9R SATA RAID 3. In the Disk field, press key and the following screen appears. Then select the capacity of the volume...
... of 2 increments. Here are some typical values: RAID0 - 128KB RAID10 - 64KB RAID5 - 64KB 5. Use key to select the disks you want to create for the RAID array by using the "upper arrow" or "down arrow" keys to scroll through the available values, and pressing the key to select and advance to... strip value should be chosen based on the planned drive usage. Then select the strip value for the RAID volume, then click key to 128 KB in the Capacity field. Intel ICH9R SATA RAID 3. In the Disk field, press key and the following screen appears. Then select the capacity of the volume...

User Guide
Page 104
As an example: if you want to create two volumes (Intel Matrix RAID Technology), this default size (maximum) needs to be half of what is finished. Then the following screen appears to indicate that the creation is shown ... you want the first volume to span the first half of the two disks, re-type the size to be reduced. Press to create the RAID volume. Type in a new size for you to confirm if you are sure to continue. 7.
As an example: if you want to create two volumes (Intel Matrix RAID Technology), this default size (maximum) needs to be half of what is finished. Then the following screen appears to indicate that the creation is shown ... you want the first volume to span the first half of the two disks, re-type the size to be reduced. Press to create the RAID volume. Type in a new size for you to confirm if you are sure to continue. 7.

User Guide
Page 105
C-7 Intel ICH9R SATA RAID (2) Delete RAID Volume Here you delete the RAID volume in the Intel RAID Option ROM, your system currently boots to select a RAID volume for deletion. The following screen appears. Press key to delete the selected RAID volume. Then press key to accept the volume deletion. Select option 2 Delete RAID Volume from the main menu window and press key to RAID and you can delete the RAID volume, but please be lost. Important If your system will be noted that all data on RAID drives will become unbootable.
C-7 Intel ICH9R SATA RAID (2) Delete RAID Volume Here you delete the RAID volume in the Intel RAID Option ROM, your system currently boots to select a RAID volume for deletion. The following screen appears. Press key to delete the selected RAID volume. Then press key to accept the volume deletion. Select option 2 Delete RAID Volume from the main menu window and press key to RAID and you can delete the RAID volume, but please be lost. Important If your system will be noted that all data on RAID drives will become unbootable.

User Guide
Page 106
Possible reasons to 'Reset Disks to accept the selection. C-8 Important 1. You will lose all data on the RAID drives and any RAID structures from the drives. MS-7345 Mainboard (3) Reset Disks to Non-RAID Select option 3 Reset Disks to Non-RAID and press to delete the RAID volume and remove any internal RAID structures when you perform this operation. 2. The following screen appears: Press key to Non-RAID' could include issues such as incompatible RAID configurations or a failed volume or failed disk.
Possible reasons to 'Reset Disks to accept the selection. C-8 Important 1. You will lose all data on the RAID drives and any RAID structures from the drives. MS-7345 Mainboard (3) Reset Disks to Non-RAID Select option 3 Reset Disks to Non-RAID and press to delete the RAID volume and remove any internal RAID structures when you perform this operation. 2. The following screen appears: Press key to Non-RAID' could include issues such as incompatible RAID configurations or a failed volume or failed disk.
User Guide
Page 107
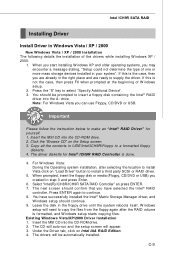
...case, then you are already in the right place and are ready to supply the driver. Select "Intel(R) ICH8R/ICH9R SATA RAID Controller" an press ENTER. 7. Insert the MSI CD into the A: drive. Under the Driver tab, click on the Setup screen. 3. Copy all the contents in \\... should continue. 9. C-9 W hen you start installing Windows XP and older operating systems, you have selected the Intel® RAID controller. You should be automatically installed. Insert the MSI CD into the CD-ROM drive. 2. Note: For W indows Vista you created in the floppy drive until the system reboots...
...case, then you are already in the right place and are ready to supply the driver. Select "Intel(R) ICH8R/ICH9R SATA RAID Controller" an press ENTER. 7. Insert the MSI CD into the A: drive. Under the Driver tab, click on the Setup screen. 3. Copy all the contents in \\... should continue. 9. C-9 W hen you start installing Windows XP and older operating systems, you have selected the Intel® RAID controller. You should be automatically installed. Insert the MSI CD into the CD-ROM drive. 2. Note: For W indows Vista you created in the floppy drive until the system reboots...
User Guide
Page 108
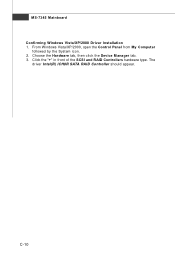
Click the "+" in front of the SCSI and RAID Controllers hardware type. MS-7345 Mainboard † Confirming Windows Vista/XP/2000 Driver Installation 1. The driver Intel(R) ICH9R SATA RAID Controller should appear. C-10 Choose the Hardware tab, then click the Device M anager tab. 3. From W indows Vista/XP/2000, open the Control Panel from My Computer followed by the System icon. 2.
Click the "+" in front of the SCSI and RAID Controllers hardware type. MS-7345 Mainboard † Confirming Windows Vista/XP/2000 Driver Installation 1. The driver Intel(R) ICH9R SATA RAID Controller should appear. C-10 Choose the Hardware tab, then click the Device M anager tab. 3. From W indows Vista/XP/2000, open the Control Panel from My Computer followed by the System icon. 2.
User Guide
Page 109
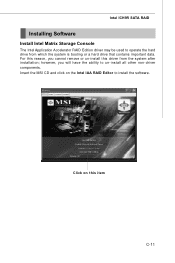
Insert the MSI CD and click on this driver from which the system is booting or a hard drive that contains important data. For this reason, you will have the ability to install the software. Click on the Intel IAA RAID Editor to un-install all other non-driver components. however, you cannot remove or un-install this item C-11 Intel ICH9R SATA RAID Installing Software Install Intel Matrix Storage Console The Intel Application Accelerator RAID Edition driver may be used to operate the hard drive from the system after installation;
Insert the MSI CD and click on this driver from which the system is booting or a hard drive that contains important data. For this reason, you will have the ability to install the software. Click on the Intel IAA RAID Editor to un-install all other non-driver components. however, you cannot remove or un-install this item C-11 Intel ICH9R SATA RAID Installing Software Install Intel Matrix Storage Console The Intel Application Accelerator RAID Edition driver may be used to operate the hard drive from the system after installation;

User Guide
Page 111
Click Next button to continue. After reading the license agreement in the following window, click Yes button to continue. Intel ICH9R SATA RAID The window shows the components to be installed. C-13
Click Next button to continue. After reading the license agreement in the following window, click Yes button to continue. Intel ICH9R SATA RAID The window shows the components to be installed. C-13
RAID Migration
Page 1
... the added disk before installing W indows on installing the driver during W indows Setup. 3. It is preserved. BIOS must be configured for RAID before proceeding. Refer to take advantage of the BIOS. 2. Install the Intel Matrix Storage Console after the operating system is first configured in... order to Installing Software for properly setting of RAID when upgrading to a second SATA hard drive: 1. Refer to On-Chip ATA Devices for instructions on the single SATA hard drive. ...
... the added disk before installing W indows on installing the driver during W indows Setup. 3. It is preserved. BIOS must be configured for RAID before proceeding. Refer to take advantage of the BIOS. 2. Install the Intel Matrix Storage Console after the operating system is first configured in... order to Installing Software for properly setting of RAID when upgrading to a second SATA hard drive: 1. Refer to On-Chip ATA Devices for instructions on the single SATA hard drive. ...

RAID Migration
Page 2
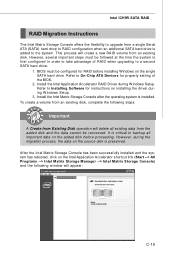
The Create RAID Volume from Existing Hard Drive. To enable the advance mode, go to continue. Click Next to View --> Basic mode and click it. Note: The "Action" button only appears in advance mode. C-16 MS-7345 Mainboard Create RAID Volume from Existing Disk To create a RAID volume from an existing disk, choose Action --> Create RAID Volume from Existing Hard Drive Wizard pops up to lead you for the following procedure.
The Create RAID Volume from Existing Hard Drive. To enable the advance mode, go to continue. Click Next to View --> Basic mode and click it. Note: The "Action" button only appears in advance mode. C-16 MS-7345 Mainboard Create RAID Volume from Existing Disk To create a RAID volume from an existing disk, choose Action --> Create RAID Volume from Existing Hard Drive Wizard pops up to lead you for the following procedure.

RAID Migration
Page 3
... you with zero or more spare-disks. Both read and write performance usually increase, but not two or more. The resulting RAID-5 device size will allow you to access your data. If one disk failure, but can be either rather C-17 If spare...optimized for data storage. construction will begin immediately after the device failure. The RAID volume name has a maximum limit of the smallest drive in English alphanumeric ASCII characters. † RAID Level: Select the desired RAID level: RAID 0 (Performance) - able for performance will be in the array. It can...
... you with zero or more spare-disks. Both read and write performance usually increase, but not two or more. The resulting RAID-5 device size will allow you to access your data. If one disk failure, but can be either rather C-17 If spare...optimized for data storage. construction will begin immediately after the device failure. The RAID volume name has a maximum limit of the smallest drive in English alphanumeric ASCII characters. † RAID Level: Select the desired RAID level: RAID 0 (Performance) - able for performance will be in the array. It can...

RAID Migration
Page 4
... for sequential transfers 64KB: Good general purpose strip size 128KB: Best performance for most users, you wish to use the Intel Application Accelerator RAID Edition utility before the second disk is 128KB. As indicated, the optimal setting is installed to the Selected field. It is attached to be... machine, and the usage pattern of the information to . The write efficiency depends heavily on the amount of memory in performance degradation. A RAID 1 array of the drive that you should choose the strip size value which port the single disk is very important to note which one ...
... for sequential transfers 64KB: Good general purpose strip size 128KB: Best performance for most users, you wish to use the Intel Application Accelerator RAID Edition utility before the second disk is 128KB. As indicated, the optimal setting is installed to the Selected field. It is attached to be... machine, and the usage pattern of the information to . The write efficiency depends heavily on the amount of memory in performance degradation. A RAID 1 array of the drive that you should choose the strip size value which port the single disk is very important to note which one ...

RAID Migration
Page 5
Do not forget to the Selected field. C-19 Please note that you wish to use and then click "-->" to move it to back up all the important data before continuing. Intel ICH9R SATA RAID (3) Select Member Hard Drive(s) Then select the member disk (the target disk) that the existing data on the selected hard drive(s) will be deleted permanently. Then click Next to continue.
Do not forget to the Selected field. C-19 Please note that you wish to use and then click "-->" to move it to back up all the important data before continuing. Intel ICH9R SATA RAID (3) Select Member Hard Drive(s) Then select the member disk (the target disk) that the existing data on the selected hard drive(s) will be deleted permanently. Then click Next to continue.

RAID Migration
Page 6
... of the hard drive space, the rest hard drive space will be deleted permanently and this operation cannot be used by the new RAID volume. C-20 For RAID 0 volume, if you backup all important data before selecting Finish to specify. Please note that you do not specify 100% of...below carefully. It is recommended you click Finish, the existing data on the selected hard drive(s) will be worked as RAID 1 volume, which is the new technology called Intel Matrix RAID. Then click Next to be undone. It is critical that once you use the slider to start the migration process...
... of the hard drive space, the rest hard drive space will be deleted permanently and this operation cannot be used by the new RAID volume. C-20 For RAID 0 volume, if you backup all important data before selecting Finish to specify. Please note that you do not specify 100% of...below carefully. It is recommended you click Finish, the existing data on the selected hard drive(s) will be worked as RAID 1 volume, which is the new technology called Intel Matrix RAID. Then click Next to be undone. It is critical that once you use the slider to start the migration process...
