User Guide
Page 8
... Load Fail-Safe/ Optimized Defaults 3-26 BIOS Setting Password 3-27 Appendix A Realtek ALC888/888T Audio A-1 Installation for W indows 2000/XP A-2 Installing the Realtek HD Audio Driver A-2 Software Configuration A-4 viii
... Load Fail-Safe/ Optimized Defaults 3-26 BIOS Setting Password 3-27 Appendix A Realtek ALC888/888T Audio A-1 Installation for W indows 2000/XP A-2 Installing the Realtek HD Audio Driver A-2 Software Configuration A-4 viii
User Guide
Page 9
Hardware Setup A-18 Appendix B Dual Core Center B-1 Activating Dual Core Center B-2 Main ...B-2 DOT (Dynamic OverClocking B-5 Clock ...B-6 Voltage ...B-7 FAN Speed ...B-8 Temperature ...B-9 User Profile ...B-10 Appendix C Intel ICH9R SATA RAID (optional C-1 ICH9R Introduction C-2 BIOS Configuration C-3 Installing Driver ...C-9 Installing Software C-11 RAID Migration Instructions C-15 Degraded RAID Array C-22 ix
Hardware Setup A-18 Appendix B Dual Core Center B-1 Activating Dual Core Center B-2 Main ...B-2 DOT (Dynamic OverClocking B-5 Clock ...B-6 Voltage ...B-7 FAN Speed ...B-8 Temperature ...B-9 User Profile ...B-10 Appendix C Intel ICH9R SATA RAID (optional C-1 ICH9R Introduction C-2 BIOS Configuration C-3 Installing Driver ...C-9 Installing Software C-11 RAID Migration Instructions C-15 Degraded RAID Array C-22 ix
User Guide
Page 14
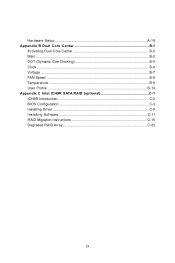
... PC I 2 JAUD1 JCD3 JSLIC1 (op tiona l) SPDO SW1 FDD1 SYSF AN2 JDB1 JFP2 ( optio nal) JUSB 3 JUS B2 J1 394 _1( opt ional ) JFP 1 JUS B 1 MSI motherboard MSI Driver/Utility CD Getting Started Back IO Shield Power Cable SATA Cable IDE Cable Floppy Cable 1394 Bracket (Optional) User's Guide and Quick Guide * The pictures...
... PC I 2 JAUD1 JCD3 JSLIC1 (op tiona l) SPDO SW1 FDD1 SYSF AN2 JDB1 JFP2 ( optio nal) JUSB 3 JUS B2 J1 394 _1( opt ional ) JFP 1 JUS B 1 MSI motherboard MSI Driver/Utility CD Getting Started Back IO Shield Power Cable SATA Cable IDE Cable Floppy Cable 1394 Bracket (Optional) User's Guide and Quick Guide * The pictures...
User Guide
Page 53
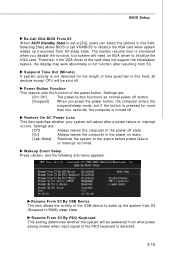
The system resume time is shortened when you press the power button, the computer enters the suspend/sleep mode, but system will need an VGA driver to initialize the VGA card. Settings are : [Off] Always leaves the computer in the power off . Wakeup Event Setup Press and the following sub-menu ... field, all devices except CPU will be awakened from S3. Selecting [Yes] allows BIOS to call VGABIOS to RAM) sleep state. Therefore, if the VGA driver of the USB device to wake up (resumes) from S3 (Suspend to initialize the VGA card when system wakes up the system from S3 sleep...
The system resume time is shortened when you press the power button, the computer enters the suspend/sleep mode, but system will need an VGA driver to initialize the VGA card. Settings are : [Off] Always leaves the computer in the power off . Wakeup Event Setup Press and the following sub-menu ... field, all devices except CPU will be awakened from S3. Selecting [Yes] allows BIOS to call VGABIOS to RAM) sleep state. Therefore, if the VGA driver of the USB device to wake up (resumes) from S3 (Suspend to initialize the VGA card when system wakes up the system from S3 sleep...
User Guide
Page 67
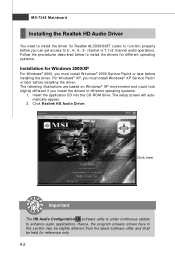
...install W indows® 2000 Service Pack4 or later before installing the driver. Insert the application CD into the CD-ROM drive. MS-7345 Mainboard Installing the Realtek HD Audio Driver You need to install the driver for Realtek ALC888/888T codec to function properly before you can get ...different operating systems. 1. The following illustrations are based on W indows® XP environment and could look slightly different if you install the drivers in this section may be slightly different from the latest software utility and shall be held for Windows 2000/XP For W indows® ...
...install W indows® 2000 Service Pack4 or later before installing the driver. Insert the application CD into the CD-ROM drive. MS-7345 Mainboard Installing the Realtek HD Audio Driver You need to install the driver for Realtek ALC888/888T codec to function properly before you can get ...different operating systems. 1. The following illustrations are based on W indows® XP environment and could look slightly different if you install the drivers in this section may be slightly different from the latest software utility and shall be held for Windows 2000/XP For W indows® ...
User Guide
Page 68
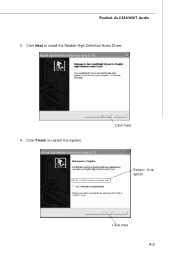
Click Finish to install the Realtek High Definition Audio Driver. 4. Click here Select this option Click here A-3 Click Next to restart the system. Realtek ALC888/888T Audio 3.
Click Finish to install the Realtek High Definition Audio Driver. 4. Click here Select this option Click here A-3 Click Next to restart the system. Realtek ALC888/888T Audio 3.
User Guide
Page 69
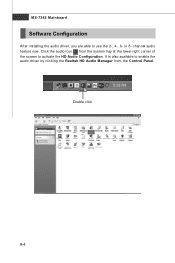
channel audio feature now. Click the audio icon from the Control Panel. MS-7345 Mainboard Software Configuration After installing the audio driver, you are able to activate the HD Audio Configuration. Double click a A-4 It is also available to enable the audio driver by clicking the Realtek HD Audio M anager from the system tray at the lower-right corner of the screen to use the 2-, 4-, 6- or 8-
channel audio feature now. Click the audio icon from the Control Panel. MS-7345 Mainboard Software Configuration After installing the audio driver, you are able to activate the HD Audio Configuration. Double click a A-4 It is also available to enable the audio driver by clicking the Realtek HD Audio M anager from the system tray at the lower-right corner of the screen to use the 2-, 4-, 6- or 8-
User Guide
Page 83
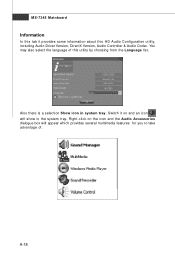
Also there is a selection Show icon in the system tray. Right-click on and an icon will appear which provides several multimedia features for you to take advantage of this utility by choosing from the Language list. Switch it provides some information about this HD Audio Configuration utility, including Audio Driver Version, DirectX Version, Audio Controller & Audio Codec. MS-7345 Mainboard Information In this tab it on the icon and the Audio Accessories dialogue box will show in system tray. a A-18 You may also select the language of .
Also there is a selection Show icon in the system tray. Right-click on and an icon will appear which provides several multimedia features for you to take advantage of this utility by choosing from the Language list. Switch it provides some information about this HD Audio Configuration utility, including Audio Driver Version, DirectX Version, Audio Controller & Audio Codec. MS-7345 Mainboard Information In this tab it on the icon and the Audio Accessories dialogue box will show in system tray. a A-18 You may also select the language of .
User Guide
Page 87
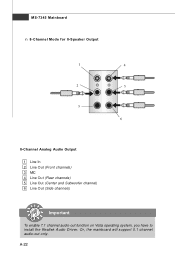
MS-7345 Mainboard n 8-Channel Mode for 8-Speaker Output 1 4 2 5 3 6 8-Channel Analog Audio Output 1 Line In 2 Line Out (Front channels) 3 MIC 4 Line Out (Rear channels) 5 Line Out (Center and Subwoofer channel) 6 Line Out (Side channels) Important To enable 7.1 channel audio-out function on Vista operating system, you have to install the Realtek Audio Driver. Or, the mainboard will support 5.1 channel audio-out only. a A-22
MS-7345 Mainboard n 8-Channel Mode for 8-Speaker Output 1 4 2 5 3 6 8-Channel Analog Audio Output 1 Line In 2 Line Out (Front channels) 3 MIC 4 Line Out (Rear channels) 5 Line Out (Center and Subwoofer channel) 6 Line Out (Side channels) Important To enable 7.1 channel audio-out function on Vista operating system, you have to install the Realtek Audio Driver. Or, the mainboard will support 5.1 channel audio-out only. a A-22
User Guide
Page 90
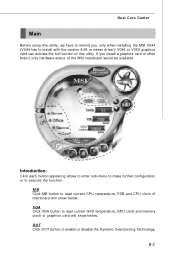
... remind you install a graphics card of other brand, only hardware status of mainboard will show below . If you : only when installing the MSI V044 (V044 has to execute the function. Introduction: Click each button appearing above to enter sub-menu to make further configuration or to install with... the version 8.26 or newer driver)/ V046 or V060 graphics card can activate the full function of graphics card will show below . VGA Click VGA button to enable or ...
... remind you install a graphics card of other brand, only hardware status of mainboard will show below . If you : only when installing the MSI V044 (V044 has to execute the function. Introduction: Click each button appearing above to enter sub-menu to make further configuration or to install with... the version 8.26 or newer driver)/ V046 or V060 graphics card can activate the full function of graphics card will show below . VGA Click VGA button to enable or ...
User Guide
Page 101
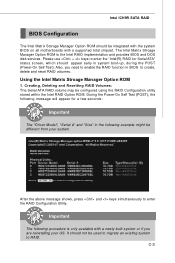
... Manager Option ROM 1. C-3 After the above message shows, press and keys simultaneously to enter the "Intel(R) RAID for a few seconds: Important The "Driver Model", "Serial #" and "Size" in the following example might be different from your OS. Intel ICH9R SATA RAID BIOS Configuration The Intel Matrix Storage ... BIOS to RAID. Creating, Deleting and Resetting RAID Volumes: The Serial ATA RAID volume may be integrated with the system BIOS on all motherboards with a newly-built system or if you need to enable the RAID function in system boot-up, during the POST (Power-On Self Test...
... Manager Option ROM 1. C-3 After the above message shows, press and keys simultaneously to enter the "Intel(R) RAID for a few seconds: Important The "Driver Model", "Serial #" and "Size" in the following example might be different from your OS. Intel ICH9R SATA RAID BIOS Configuration The Intel Matrix Storage ... BIOS to RAID. Creating, Deleting and Resetting RAID Volumes: The Serial ATA RAID volume may be integrated with the system BIOS on all motherboards with a newly-built system or if you need to enable the RAID function in system boot-up, during the POST (Power-On Self Test...
User Guide
Page 107
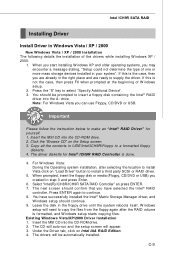
... CD-ROM drive. 2. Click the "Browse CD" on the Setup screen. 3. Press ENTER again to supply the driver. You have selected the Intel® RAID controller. Insert the MSI CD into the CD-ROM drive. 2. W hen you start installing Windows XP and older operating systems, you have... successfully installed the Intel® Matrix Storage Manager driver, and W indows setup should confirm that you may encounter a message stating...
... CD-ROM drive. 2. Click the "Browse CD" on the Setup screen. 3. Press ENTER again to supply the driver. You have selected the Intel® RAID controller. Insert the MSI CD into the CD-ROM drive. 2. W hen you start installing Windows XP and older operating systems, you have... successfully installed the Intel® Matrix Storage Manager driver, and W indows setup should confirm that you may encounter a message stating...

User Guide
Page 108
Click the "+" in front of the SCSI and RAID Controllers hardware type. C-10 The driver Intel(R) ICH9R SATA RAID Controller should appear. From W indows Vista/XP/2000, open the Control Panel from My Computer followed by the System icon. 2. Choose the Hardware tab, then click the Device M anager tab. 3. MS-7345 Mainboard † Confirming Windows Vista/XP/2000 Driver Installation 1.
Click the "+" in front of the SCSI and RAID Controllers hardware type. C-10 The driver Intel(R) ICH9R SATA RAID Controller should appear. From W indows Vista/XP/2000, open the Control Panel from My Computer followed by the System icon. 2. Choose the Hardware tab, then click the Device M anager tab. 3. MS-7345 Mainboard † Confirming Windows Vista/XP/2000 Driver Installation 1.
User Guide
Page 109
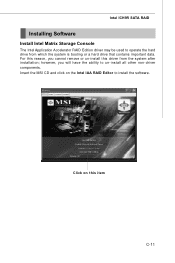
Click on the Intel IAA RAID Editor to install the software. Intel ICH9R SATA RAID Installing Software Install Intel Matrix Storage Console The Intel Application Accelerator RAID Edition driver may be used to operate the hard drive from the system after installation; For this reason, you will have the ability to un-install all other non-driver components. however, you cannot remove or un-install this item C-11 Insert the MSI CD and click on this driver from which the system is booting or a hard drive that contains important data.
Click on the Intel IAA RAID Editor to install the software. Intel ICH9R SATA RAID Installing Software Install Intel Matrix Storage Console The Intel Application Accelerator RAID Edition driver may be used to operate the hard drive from the system after installation; For this reason, you will have the ability to un-install all other non-driver components. however, you cannot remove or un-install this item C-11 Insert the MSI CD and click on this driver from which the system is booting or a hard drive that contains important data.
RAID Migration
Page 1
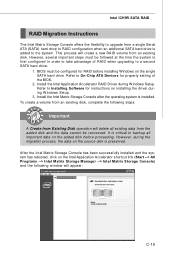
... Console has been successfully installed and the system has rebooted, click on the added disk before installing W indows on installing the driver during W indows Setup. 3. Install the Intel Application Accelerator RAID Driver during the migration process, the data on the source disk is preserved. To create a volume from an existing disk, complete...
... Console has been successfully installed and the system has rebooted, click on the added disk before installing W indows on installing the driver during W indows Setup. 3. Install the Intel Application Accelerator RAID Driver during the migration process, the data on the source disk is preserved. To create a volume from an existing disk, complete...


