
User Manual
Page 2
... an outlet on , the user is encouraged to try to correct the interference by the party responsible for compliance could void the user's authority to operate the equipment. 2. Shield interface cables and AC power cord, if any must be determined by turning the equipment off and on a circuit different from that...
... an outlet on , the user is encouraged to try to correct the interference by the party responsible for compliance could void the user's authority to operate the equipment. 2. Shield interface cables and AC power cord, if any must be determined by turning the equipment off and on a circuit different from that...

User Manual
Page 3
Preface FCC Conditions This device complies with part 15 of the FCC Rules. III This device must accept any interference received, including interference that may not cause harmful interference. 2. This device may cause undesired operation. Operation is subject to the following two conditions: 1.
Preface FCC Conditions This device complies with part 15 of the FCC Rules. III This device must accept any interference received, including interference that may not cause harmful interference. 2. This device may cause undesired operation. Operation is subject to the following two conditions: 1.
User Manual
Page 13
Preface Getting Started Specification ...2-2 Product View ...2-6 Top-open View 2-6 Front View 2-10 Right-side View 2-11 Left-side View 2-13 Rear View 2-14 Bottom View 2-15 Power Management 2-17 AC Adapter 2-17 Battery Pack 2-19 Using the Battery Pack 2-22 Basic Operations 2-24 Safety and Comfort Tips 2-24 Have a Good Work Habit 2-25 Knowing the Keyboard 2-26 Knowing the Touchpad 2-32 About Fingerprint Identification (Optional, for 87-Key Series Only)........2-36 About Hard Disk Drive 2-46 Using the Optical Storage 2-47 XIII
Preface Getting Started Specification ...2-2 Product View ...2-6 Top-open View 2-6 Front View 2-10 Right-side View 2-11 Left-side View 2-13 Rear View 2-14 Bottom View 2-15 Power Management 2-17 AC Adapter 2-17 Battery Pack 2-19 Using the Battery Pack 2-22 Basic Operations 2-24 Safety and Comfort Tips 2-24 Have a Good Work Habit 2-25 Knowing the Keyboard 2-26 Knowing the Touchpad 2-32 About Fingerprint Identification (Optional, for 87-Key Series Only)........2-36 About Hard Disk Drive 2-46 Using the Optical Storage 2-47 XIII
User Manual
Page 17
... certified by our reputation for unsurpassed dependability and customer satisfaction. How to Use This Manual This User's Manual provides instructions and illustrations on how to operate this notebook. Also, this chapter instructs the correct procedure of this notebook. General Introductions Congratulations on becoming a new user of this notebook. Chapter 2, Getting Started...
... certified by our reputation for unsurpassed dependability and customer satisfaction. How to Use This Manual This User's Manual provides instructions and illustrations on how to operate this notebook. Also, this chapter instructs the correct procedure of this notebook. General Introductions Congratulations on becoming a new user of this notebook. Chapter 2, Getting Started...

User Manual
Page 25
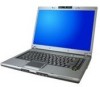
Getting Started Product Overview This section provides you the description of basic aspects of your Notebook. The figure of top-open the top cover (LCD Panel). u{ v w x |y ~z } 2-6 It will lead you to browse the main operating area of your NOTEBOOK. Top-open View Press the Cover Latch to open view and description showing below will help you to know more about the appearance of this Notebook before using it.
Getting Started Product Overview This section provides you the description of basic aspects of your Notebook. The figure of top-open the top cover (LCD Panel). u{ v w x |y ~z } 2-6 It will lead you to browse the main operating area of your NOTEBOOK. Top-open View Press the Cover Latch to open view and description showing below will help you to know more about the appearance of this Notebook before using it.
User Manual
Page 41
... or for proper disposal in your area. w Dispose of time. Check with batteries. If the battery power is critical to maintain a normal operation. w Connect an AC adapter to help optimizing battery life and avoid a sudden power loss. Conserving Battery Power Efficient battery power is not managed... well, the saved data and customized settings may present a risk of battery. w Suspend system operation if the system will be lost. w Turn off the system if you won't be using it for a while or shorten the Suspend Timer...
... or for proper disposal in your area. w Dispose of time. Check with batteries. If the battery power is critical to maintain a normal operation. w Connect an AC adapter to help optimizing battery life and avoid a sudden power loss. Conserving Battery Power Efficient battery power is not managed... well, the saved data and customized settings may present a risk of battery. w Suspend system operation if the system will be lost. w Turn off the system if you won't be using it for a while or shorten the Suspend Timer...
User Manual
Page 42
... be recharged while it is necessary. w If you begin charging. Getting Started Charging the Battery Pack The battery pack can use the system, suspend system operation or shut down the system or Save-to discharge the battery pack before recharging the battery: w If a charged battery pack is installed in the Notebook...
... be recharged while it is necessary. w If you begin charging. Getting Started Charging the Battery Pack The battery pack can use the system, suspend system operation or shut down the system or Save-to discharge the battery pack before recharging the battery: w If a charged battery pack is installed in the Notebook...
User Manual
Page 43
w Choose the proper desk and chair and adjust their height to support your posture when operating. w The Notebook is important if you feet flat and naturally on the desk naturally to fit your wrists. w Put your hands on the floor, so ... enough illumination. w Place you have to work area should have the proper position (about 90-degree) when operating. w Avoid using your Notebook in the space where may cause your back comfortably. Getting Started Basic Operations If you are a beginner to the Notebook, please read the following tips to avoid personal injury. 2-24...
w Choose the proper desk and chair and adjust their height to support your posture when operating. w The Notebook is important if you feet flat and naturally on the desk naturally to fit your wrists. w Put your hands on the floor, so ... enough illumination. w Place you have to work area should have the proper position (about 90-degree) when operating. w Avoid using your Notebook in the space where may cause your back comfortably. Getting Started Basic Operations If you are a beginner to the Notebook, please read the following tips to avoid personal injury. 2-24...

User Manual
Page 44
... to work with optimal comfort. Adjust the chair's height. w Stretch and exercise you . Getting Started Sit straight and keep the following tips in mind when operating. otherwise, it may cause discomfort or injury to you body regularly. Please keep a good posture. Adjust the desk's height. w Change your Notebook for a period of...
... to work with optimal comfort. Adjust the chair's height. w Stretch and exercise you . Getting Started Sit straight and keep the following tips in mind when operating. otherwise, it may cause discomfort or injury to you body regularly. Please keep a good posture. Adjust the desk's height. w Change your Notebook for a period of...

User Manual
Page 52
... as a miniature duplicate of the pad, lift your finger to the 2-33 Now, you can move your finger and replace it on a proper location of operating your Notebook. n Point and Click When you can act as the mouse, the whole touchpad can press and hold the left button to drop the...
... as a miniature duplicate of the pad, lift your finger to the 2-33 Now, you can move your finger and replace it on a proper location of operating your Notebook. n Point and Click When you can act as the mouse, the whole touchpad can press and hold the left button to drop the...

User Manual
Page 53
Getting Started desired location; Move the cursor by sliding your wrist on the desk comfortably. 2-34 Using the Touchpad Put your fingertip. finally, release the left button to finish the drag-and-drop operation.
Getting Started desired location; Move the cursor by sliding your wrist on the desk comfortably. 2-34 Using the Touchpad Put your fingertip. finally, release the left button to finish the drag-and-drop operation.
User Manual
Page 54
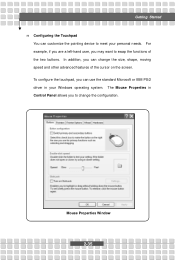
The Mouse Properties in your personal needs. Mouse Properties Window 2-35 In addition, you to swap the functions of the cursor on the screen. For example, if you are a left-hand user, you can customize the pointing device to meet your Windows operating system. To configure the touchpad, you may want to change the size, shape, moving speed and other advanced features of the two buttons. Getting Started n Configuring the Touchpad You can use the standard Microsoft or IBM PS/2 driver in Control Panel allows you can change the configuration.
The Mouse Properties in your personal needs. Mouse Properties Window 2-35 In addition, you to swap the functions of the cursor on the screen. For example, if you are a left-hand user, you can customize the pointing device to meet your Windows operating system. To configure the touchpad, you may want to change the size, shape, moving speed and other advanced features of the two buttons. Getting Started n Configuring the Touchpad You can use the standard Microsoft or IBM PS/2 driver in Control Panel allows you can change the configuration.

User Manual
Page 65
... representative. 2-46 Therefore, it is on . Do not turn off the Notebook when the Hard Disk In-use LED is usually used to install the operating system and software applications. 1. Do not remove or install the hard disk drive when the Notebook is turned on . 3. To avoid unexpected data loss in...
... representative. 2-46 Therefore, it is on . Do not turn off the Notebook when the Hard Disk In-use LED is usually used to install the operating system and software applications. 1. Do not remove or install the hard disk drive when the Notebook is turned on . 3. To avoid unexpected data loss in...

User Manual
Page 68
Eject Button 2-49 Getting Started Inserting the CD The following instruction describes the general procedure when operating the optical storage device, including the DVD-ROM drive. 1. Then, gently pull the tray out until fully extended. 3. Press the Eject Button on . 2. Place your CD in the tray with its label facing up. Confirm that the Notebook is turned on the drive's panel and the CD tray will slide out partially. Push the tray back into place. 4. Slightly press the center of the CD to secure it into the drive.
Eject Button 2-49 Getting Started Inserting the CD The following instruction describes the general procedure when operating the optical storage device, including the DVD-ROM drive. 1. Then, gently pull the tray out until fully extended. 3. Press the Eject Button on . 2. Place your CD in the tray with its label facing up. Confirm that the Notebook is turned on the drive's panel and the CD tray will slide out partially. Push the tray back into place. 4. Slightly press the center of the CD to secure it into the drive.
User Manual
Page 74
... (digital video camera). The IEEE 1394 standard interface supports "plug-and-play" technology, so that features a high-speed transfer rate and the connection of Windows operating system. Turn on the monitor. 4. Plug the monitor's D-type connector into the Notebook's VGA port. 3. Customizing this Notebook Connecting the External Monitor or TV You...
... (digital video camera). The IEEE 1394 standard interface supports "plug-and-play" technology, so that features a high-speed transfer rate and the connection of Windows operating system. Turn on the monitor. 4. Plug the monitor's D-type connector into the Notebook's VGA port. 3. Customizing this Notebook Connecting the External Monitor or TV You...

User Manual
Page 77
Customizing this Notebook Removing the PC card 1. Pull it may cause interference or damage to the PC card. 2. Eject Button 1. Push the Eject Button and the PC card will slide out. Reattach the dummy card back to make it stretch out. 2. otherwise, it out of the slot. 3. Do not hold the "golden finger" when installing the PC card; Press the Eject Button to the slot. Before removing the PC card, you should stop the device in Windows operating system. 3-8
Customizing this Notebook Removing the PC card 1. Pull it may cause interference or damage to the PC card. 2. Eject Button 1. Push the Eject Button and the PC card will slide out. Reattach the dummy card back to make it stretch out. 2. otherwise, it out of the slot. 3. Do not hold the "golden finger" when installing the PC card; Press the Eject Button to the slot. Before removing the PC card, you should stop the device in Windows operating system. 3-8

User Manual
Page 86
When set to Enabled, the system always operates in DOS system or boot your operating system and applications. Legacy USB Support If you want optimize the processor, set to use of PCI clocks for PCI device latency timer register. If ...
When set to Enabled, the system always operates in DOS system or boot your operating system and applications. Legacy USB Support If you want optimize the processor, set to use of PCI clocks for PCI device latency timer register. If ...

User Manual
Page 87
Boot menu BIOS Setup Boot Settings Configuration Configure settings during system boot. Boot Device Priority --1st, 2nd, and 3rd Boot Device The three items allow you to set the sequence of boot devices where BIOS attempts to load the disk operating system. 4-8
Boot menu BIOS Setup Boot Settings Configuration Configure settings during system boot. Boot Device Priority --1st, 2nd, and 3rd Boot Device The three items allow you to set the sequence of boot devices where BIOS attempts to load the disk operating system. 4-8


