
User Manual
Page 1
... the Personal Computer Memory Card International Association. Trademarks * All trademarks are registered trademarks of Microsoft Corporation. If you bought may be slightly different from the illustrations and descriptions in this guide. Release History Version 1.0 1.1 Revision Note First release Update marketing name Date February 2004 October 2004 G52-B1003XU 1 Notice Please note that the setting diagrams or values...
... the Personal Computer Memory Card International Association. Trademarks * All trademarks are registered trademarks of Microsoft Corporation. If you bought may be slightly different from the illustrations and descriptions in this guide. Release History Version 1.0 1.1 Revision Note First release Update marketing name Date February 2004 October 2004 G52-B1003XU 1 Notice Please note that the setting diagrams or values...

User Manual
Page 3
... to work refer to ... One Recovery CD (optional). Accessories: - Phone cable/Phone jack (optional). - One User's Guide and one Quick Guide. check the package contents glance at this computer install the battery turn on using this computer act as your media center to increase excellent performance and wireless Internet access. AC adapter and power cord. - Notebook PC carry bag (optional). 3 High-capacity Li-ion battery pack. - In addition, its built-in 4-in-1 card reader, high...
... to work refer to ... One Recovery CD (optional). Accessories: - Phone cable/Phone jack (optional). - One User's Guide and one Quick Guide. check the package contents glance at this computer install the battery turn on using this computer act as your media center to increase excellent performance and wireless Internet access. AC adapter and power cord. - Notebook PC carry bag (optional). 3 High-capacity Li-ion battery pack. - In addition, its built-in 4-in-1 card reader, high...
User Manual
Page 6
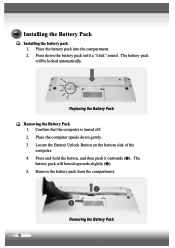
Replacing the Battery Pack Removing the Battery Pack 1. The battery pack will bound upwards slightly ( ). 5. Installing the Battery Pack Installing the battery pack 1. Place the computer upside down the battery pack until a "click" sound. Place the battery pack into the compartment. 2. Press down gently. 3. Remove the battery pack from the compartment. Removing the Battery Pack 6 Press and hold the button, and then push it outwards ( ). Locate the Battery Unlock Button on the...
Replacing the Battery Pack Removing the Battery Pack 1. The battery pack will bound upwards slightly ( ). 5. Installing the Battery Pack Installing the battery pack 1. Place the computer upside down the battery pack until a "click" sound. Place the battery pack into the compartment. 2. Press down gently. 3. Remove the battery pack from the compartment. Removing the Battery Pack 6 Press and hold the button, and then push it outwards ( ). Locate the Battery Unlock Button on the...
User Manual
Page 7
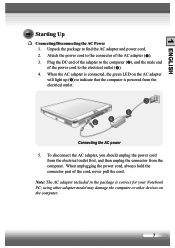
.... 7 Connecting the AC power 5. Note: The AC adapter included in the package is powered from the computer. using other adapter model may damage the computer or other devices on the AC adapter will light up ( ) to the connector of the cord, never pull the cord. When unplugging the power cord, always hold the connector part of the AC adapter ( ). 3. Attach the power cord to indicate...
.... 7 Connecting the AC power 5. Note: The AC adapter included in the package is powered from the computer. using other adapter model may damage the computer or other devices on the AC adapter will light up ( ) to the connector of the cord, never pull the cord. When unplugging the power cord, always hold the connector part of the AC adapter ( ). 3. Attach the power cord to indicate...
User Manual
Page 8
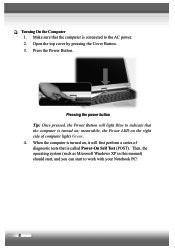
... a series of computer lights Green. 4. Press the Power Button. When the computer is turned on , it will light Blue to indicate that the computer is turned on ; Then, the operating system (such as Microsoft Windows XP in this manual) should start, and you can start to the AC power. 2. Open the top cover by pressing the Cover Button. 3. Turning On the Computer 1. Make sure that is connected to work with your Notebook PC...
... a series of computer lights Green. 4. Press the Power Button. When the computer is turned on , it will light Blue to indicate that the computer is turned on ; Then, the operating system (such as Microsoft Windows XP in this manual) should start, and you can start to the AC power. 2. Open the top cover by pressing the Cover Button. 3. Turning On the Computer 1. Make sure that is connected to work with your Notebook PC...

User Manual
Page 9
Scroll Lock: glows Green when the Scroll Lock function is accessing the hard disk drive. Hard Disk In-use: blinks Green when the computer is activated. blinks Green when the system is being charged (with AC adapter connected); Battery Status: glows Green when the battery is in suspend mode. glows Orange when low battery power (less than 5%); System LEDs Wireless LAN: glows Green when the wireless LAN function of your E-mail. Wireless LAN: to receive and send your computer. User-defined: allows you...
Scroll Lock: glows Green when the Scroll Lock function is accessing the hard disk drive. Hard Disk In-use: blinks Green when the computer is activated. blinks Green when the system is being charged (with AC adapter connected); Battery Status: glows Green when the battery is in suspend mode. glows Orange when low battery power (less than 5%); System LEDs Wireless LAN: glows Green when the wireless LAN function of your E-mail. Wireless LAN: to receive and send your computer. User-defined: allows you...

