User Guide
Page 2
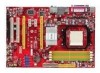
...174; and Pentium® are the properties of Intel Corporation. Award® is a registered trademark of Novell, Inc. Visit the MSI website for further guidance. We take every care in the preparation of this document is the intellectual property of purchase or local distributor.... the right to the correctness of AMD Corporation. Alternatively, please try the following help resources for FAQ, technical guide, BIOS updates, driver updates, and other countries. Our products are registered trademarks of its contents. PS/2 and OS®/2 are registered trademarks or trademarks...
...174; and Pentium® are the properties of Intel Corporation. Award® is a registered trademark of Novell, Inc. Visit the MSI website for further guidance. We take every care in the preparation of this document is the intellectual property of purchase or local distributor.... the right to the correctness of AMD Corporation. Alternatively, please try the following help resources for FAQ, technical guide, BIOS updates, driver updates, and other countries. Our products are registered trademarks of its contents. PS/2 and OS®/2 are registered trademarks or trademarks...
User Guide
Page 9
D-Bracket™ 2 Connector: JDB1 2-19 Button ...2-20 Clear CMOS Button: SW2 2-20 Slots ...2-20 PCI (Peripheral Component Interconnect) Express Slots 2-21 NV SLI Technology 2-22 PCI (Peripheral Component Interconnect) Slots 2-24 PCI Interrupt Request Routing 2-24 Chapter 3 BIOS Setup 3-1 Entering Setup ...3-2 Control Keys 3-3 Getting Help 3-3 General Help
D-Bracket™ 2 Connector: JDB1 2-19 Button ...2-20 Clear CMOS Button: SW2 2-20 Slots ...2-20 PCI (Peripheral Component Interconnect) Express Slots 2-21 NV SLI Technology 2-22 PCI (Peripheral Component Interconnect) Slots 2-24 PCI Interrupt Request Routing 2-24 Chapter 3 BIOS Setup 3-1 Entering Setup ...3-2 Control Keys 3-3 Getting Help 3-3 General Help

User Guide
Page 10
Summary of RAID Configurations B-2 RAID Configuration B-3 Basic Configuration Instructions B-3 Setting Up the NVRAID BIOS B-3 Installing the RAID Driver (for bootable RAID Array B-7 NVIDIA IDE Driver/ RAID Utility Installation B-9 Installing the NVIDIA RAID Software Under W indows (for Non-bootable RAID Array B-9 Initializing and Using the ... Plug Array B-18 Initializing a RAID Array B-19 Rebuilding a RAID Array B-22 Synchronizing a RAID Array B-25 Appendix C nVidia System Driver C-1 nVidia System Driver Installation C-2 NVIDIA System Driver C-2 nVidia Utility Installation C-5 x
Summary of RAID Configurations B-2 RAID Configuration B-3 Basic Configuration Instructions B-3 Setting Up the NVRAID BIOS B-3 Installing the RAID Driver (for bootable RAID Array B-7 NVIDIA IDE Driver/ RAID Utility Installation B-9 Installing the NVIDIA RAID Software Under W indows (for Non-bootable RAID Array B-9 Initializing and Using the ... Plug Array B-18 Initializing a RAID Array B-19 Rebuilding a RAID Array B-22 Synchronizing a RAID Array B-25 Appendix C nVidia System Driver C-1 nVidia System Driver Installation C-2 NVIDIA System Driver C-2 nVidia Utility Installation C-5 x
User Guide
Page 16
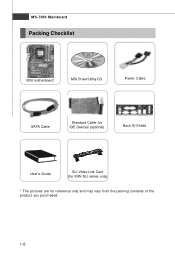
MS-7250 Mainboard Packing Checklist MSI motherboard MSI Driver/Utility CD Power Cable SATA Cable Standard Cable for IDE Devices (optional) Back IO Shield User's Guide SLI Video Link Card (for K9N SLI series only) * The pictures are for reference only and may vary from the packing contents of the product you purchased. 1-6
MS-7250 Mainboard Packing Checklist MSI motherboard MSI Driver/Utility CD Power Cable SATA Cable Standard Cable for IDE Devices (optional) Back IO Shield User's Guide SLI Video Link Card (for K9N SLI series only) * The pictures are for reference only and may vary from the packing contents of the product you purchased. 1-6
User Guide
Page 29
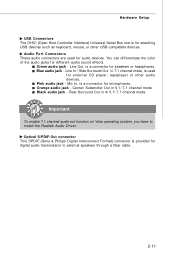
... Controller Interface) Universal Serial Bus root is a connector for speakers or headphones. Mic In, is provided for digital audio transmission to install the Realtek Audio Driver. Rear-Surround Out in 4/ 5.1/ 7.1 channel mode. Optical S/PDIF-Out connector This SPDIF (Sony & Philips Digital Interconnect Format) connector is a connector for different audio sound effects...
... Controller Interface) Universal Serial Bus root is a connector for speakers or headphones. Mic In, is provided for digital audio transmission to install the Realtek Audio Driver. Rear-Surround Out in 4/ 5.1/ 7.1 channel mode. Optical S/PDIF-Out connector This SPDIF (Sony & Philips Digital Interconnect Format) connector is a connector for different audio sound effects...
User Guide
Page 41
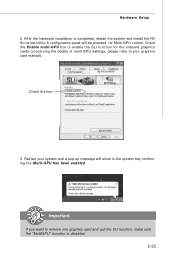
... cards (concerning the details of multi-GPU settings, please refer to remove one graphics card and quit the SLI function, make sure the "MultiGPU" function is completed, restart the system and install the NV SLI driver/utility. Important If you want to your system and a pop-up message will show in the system...
... cards (concerning the details of multi-GPU settings, please refer to remove one graphics card and quit the SLI function, make sure the "MultiGPU" function is completed, restart the system and install the NV SLI driver/utility. Important If you want to your system and a pop-up message will show in the system...
User Guide
Page 72
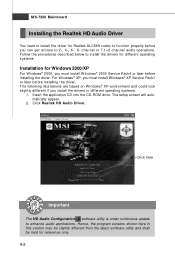
.... Installation for Windows 2000/XP For W indows® 2000, you must install W indows® XP Service Pack1 or later before installing the driver. The setup screen will automatically appear. 2. a A-2 The following illustrations are based on W indows® XP environment and could look slightly different... if you install the drivers in this section may be slightly different from the latest software utility and shall be held for reference only. Click here Important The ...
.... Installation for Windows 2000/XP For W indows® 2000, you must install W indows® XP Service Pack1 or later before installing the driver. The setup screen will automatically appear. 2. a A-2 The following illustrations are based on W indows® XP environment and could look slightly different... if you install the drivers in this section may be slightly different from the latest software utility and shall be held for reference only. Click here Important The ...
User Guide
Page 73
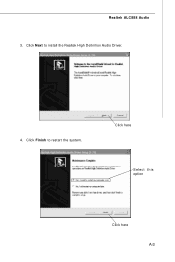
Click here Select this option Click here A-3 Click Finish to install the Realtek High Definition Audio Driver. 4. Realtek ALC888 Audio 3. Click Next to restart the system.
Click here Select this option Click here A-3 Click Finish to install the Realtek High Definition Audio Driver. 4. Realtek ALC888 Audio 3. Click Next to restart the system.
User Guide
Page 74
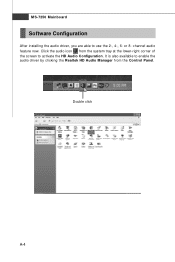
MS-7250 Mainboard Software Configuration After installing the audio driver, you are able to enable the audio driver by clicking the Realtek HD Audio M anager from the system tray at the lower-right corner of the screen to activate the HD Audio Configuration. It is also available to use the 2-, 4-, 6- Double click a A-4 Click the audio icon from the Control Panel. or 8- channel audio feature now.
MS-7250 Mainboard Software Configuration After installing the audio driver, you are able to enable the audio driver by clicking the Realtek HD Audio M anager from the system tray at the lower-right corner of the screen to activate the HD Audio Configuration. It is also available to use the 2-, 4-, 6- Double click a A-4 Click the audio icon from the Control Panel. or 8- channel audio feature now.
User Guide
Page 88
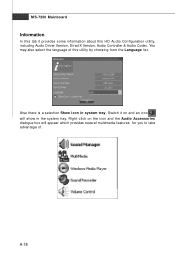
Also there is a selection Show icon in the system tray. Switch it provides some information about this HD Audio Configuration utility, including Audio Driver Version, DirectX Version, Audio Controller & Audio Codec. You may also select the language of . a A-18 MS-7250 Mainboard Information In this tab it on the icon and the Audio Accessories dialogue box will show in system tray. Right-click on and an icon will appear which provides several multimedia features for you to take advantage of this utility by choosing from the Language list.
Also there is a selection Show icon in the system tray. Switch it provides some information about this HD Audio Configuration utility, including Audio Driver Version, DirectX Version, Audio Controller & Audio Codec. You may also select the language of . a A-18 MS-7250 Mainboard Information In this tab it on the icon and the Audio Accessories dialogue box will show in system tray. Right-click on and an icon will appear which provides several multimedia features for you to take advantage of this utility by choosing from the Language list.
User Guide
Page 92
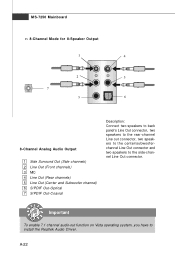
... speakers to the rear-channel Line out connector, two speakers to the center/subwooferchannel Line Out connector and two speakers to install the Realtek Audio Driver. Important To enable 7.1 channel audio-out function on Vista operating system, you have to the side-channel Line Out connector. a A-22
... speakers to the rear-channel Line out connector, two speakers to the center/subwooferchannel Line Out connector and two speakers to install the Realtek Audio Driver. Important To enable 7.1 channel audio-out function on Vista operating system, you have to the side-channel Line Out connector. a A-22

User Guide
Page 95
... 0/ 1/ 2 Primary/ Secondary Channel in SATA Device Configuration of Integrated Peripherals in BIOS.) 2. Entering the RAID BIOS Setup 1. Choose the hard disks that has the RAID driver to make part of Integrated Peripherals in BIOS before configuring the NVRAID BIOS. Boot from the W indows CD, use the floppy disk that are to...
... 0/ 1/ 2 Primary/ Secondary Channel in SATA Device Configuration of Integrated Peripherals in BIOS.) 2. Entering the RAID BIOS Setup 1. Choose the hard disks that has the RAID driver to make part of Integrated Peripherals in BIOS before configuring the NVRAID BIOS. Boot from the W indows CD, use the floppy disk that are to...

User Guide
Page 98
... step is to set up , then press Enter. MS-7250 Mainboard Completing the RAID BIOS Setup 1. Press Y if you want to configure and load NVRAID drivers under W indows, as explained in "Installing the NVIDIA RAID Software Under W indows" on B-9. You must choose Yes if the drives were previously used as empty...
... step is to set up , then press Enter. MS-7250 Mainboard Completing the RAID BIOS Setup 1. Press Y if you want to configure and load NVRAID drivers under W indows, as explained in "Installing the NVIDIA RAID Software Under W indows" on B-9. You must choose Yes if the drives were previously used as empty...
User Guide
Page 99
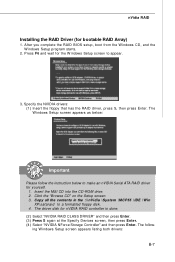
...ing W indows Setup screen appears listing both drivers: B-7 Specify the NVIDIA drivers: (1) Insert the floppy that has the RAID driver, press S, then press Enter. Click the "Browse CD" on the Setup screen. 3. The driver disk for the W indows Setup screen to appear. 3. Insert the MSI CD into the CD-ROM drive. 2.... Press F6 and wait for nVIDIA RAID controller is done. (2) Select "NVIDIA RAID CLASS DRIVER" and then press Enter. (3) Press S again at...
...ing W indows Setup screen appears listing both drivers: B-7 Specify the NVIDIA drivers: (1) Insert the floppy that has the RAID driver, press S, then press Enter. Click the "Browse CD" on the Setup screen. 3. The driver disk for the W indows Setup screen to appear. 3. Insert the MSI CD into the CD-ROM drive. 2.... Press F6 and wait for nVIDIA RAID controller is done. (2) Select "NVIDIA RAID CLASS DRIVER" and then press Enter. (3) Press S again at...
User Guide
Page 100
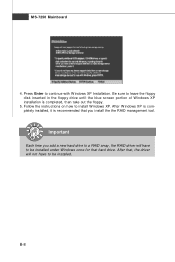
...the floppy disk inserted in the floppy drive until the blue screen portion of W indows XP installation is recommended that hard drive. After that, the driver will have to be installed. After W indows XP is completely installed, it is completed, then take out the floppy. 5. Important Each time ...you add a new hard drive to a RAID array, the RAID driver will not have to be installed under Windows once for that you install the the RAID management tool. MS-7250 Mainboard 4. B-8 Follow the instructions on...
...the floppy disk inserted in the floppy drive until the blue screen portion of W indows XP installation is recommended that hard drive. After that, the driver will have to be installed. After W indows XP is completely installed, it is completed, then take out the floppy. 5. Important Each time ...you add a new hard drive to a RAID array, the RAID driver will not have to be installed under Windows once for that you install the the RAID management tool. MS-7250 Mainboard 4. B-8 Follow the instructions on...
User Guide
Page 101
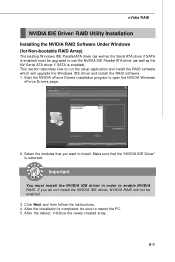
... enable NVIDIA RAID. B-9 Important You must be upgraded to use the NVIDIA IDE Parallel ATA driver (as well as the Serial ATA driver if SATA is enabled) must install the NVIDIA IDE driver in order to install. This section describes how to run the setup application and install the ...RAID software which will not be sure to open the NVIDIA W indows nForce Drivers page. 2. Start the NVIDIA nForce Drivers installation program to reboot the PC. 5. Select the modules that the "NVIDIA IDE Driver" is enabled). Make sure that you do not install the NVIDIA IDE...
... enable NVIDIA RAID. B-9 Important You must be upgraded to use the NVIDIA IDE Parallel ATA driver (as well as the Serial ATA driver if SATA is enabled) must install the NVIDIA IDE driver in order to install. This section describes how to run the setup application and install the ...RAID software which will not be sure to open the NVIDIA W indows nForce Drivers page. 2. Start the NVIDIA nForce Drivers installation program to reboot the PC. 5. Select the modules that the "NVIDIA IDE Driver" is enabled). Make sure that you do not install the NVIDIA IDE...
User Guide
Page 118
Installation of nVidia System Driver Appendix C nVidia System Driver MSI provides a setup CD along with your mainboard, which contains the required drivers for your system, and many other useful and powerful utility to bring you the best experience for your office professional working and for your home leisure entertainment. C-1
Installation of nVidia System Driver Appendix C nVidia System Driver MSI provides a setup CD along with your mainboard, which contains the required drivers for your system, and many other useful and powerful utility to bring you the best experience for your office professional working and for your home leisure entertainment. C-1
User Guide
Page 119
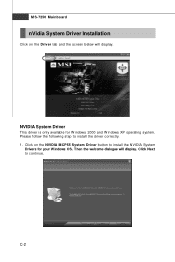
Click on the Driver tab and the screen below will display. Then the welcome dialogue will display. C-2 MS-7250 Mainboard nVidia System Driver Installation Click on the NVIDIA MCP55 System Driver button to continue. NVIDIA System Driver This driver is only available for your Windows OS. Click Next to install the NVIDIA System Drivers for W indows 2000 and W indows XP operating system. Please follow the following step to install the driver correctly. 1.
Click on the Driver tab and the screen below will display. Then the welcome dialogue will display. C-2 MS-7250 Mainboard nVidia System Driver Installation Click on the NVIDIA MCP55 System Driver button to continue. NVIDIA System Driver This driver is only available for your Windows OS. Click Next to install the NVIDIA System Drivers for W indows 2000 and W indows XP operating system. Please follow the following step to install the driver correctly. 1.
User Guide
Page 120
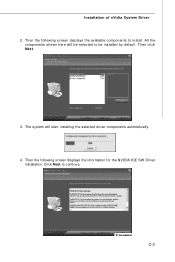
Click Next to be selected to continue. All the components shown here will start installing the selected driver components automatically. 4. Then the following screen displays the information for the NVIDIA IDE SW Driver installation. Then click Next. 3. C-3 Then the following screen displays the available components to install. The system will be installed by default. Installation of nVidia System Driver 2.
Click Next to be selected to continue. All the components shown here will start installing the selected driver components automatically. 4. Then the following screen displays the information for the NVIDIA IDE SW Driver installation. Then click Next. 3. C-3 Then the following screen displays the available components to install. The system will be installed by default. Installation of nVidia System Driver 2.
User Guide
Page 121
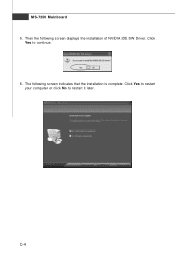
Click Yes to restart it later. The following screen displays the installation of NVIDIA IDE SW Driver. Then the following screen indicates that the installation is complete. C-4 MS-7250 Mainboard 5. Click Yes to restart your computer or click No to continue. 6.
Click Yes to restart it later. The following screen displays the installation of NVIDIA IDE SW Driver. Then the following screen indicates that the installation is complete. C-4 MS-7250 Mainboard 5. Click Yes to restart your computer or click No to continue. 6.


