
User Guide
Page 9
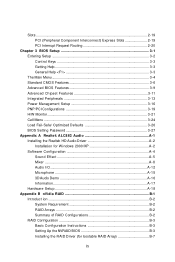
Slots ...2-19 PCI (Peripheral Component Interconnect) Express Slots 2-19 PCI Interrupt Request Routing 2-20 Chapter 3 BIOS Setup 3-1 Entering Setup ...3-2 Control Keys 3-3 Getting Help 3-3 General Help
Slots ...2-19 PCI (Peripheral Component Interconnect) Express Slots 2-19 PCI Interrupt Request Routing 2-20 Chapter 3 BIOS Setup 3-1 Entering Setup ...3-2 Control Keys 3-3 Getting Help 3-3 General Help

User Guide
Page 16
...will be risen automatically. W hen you can detect, view and adjust the PC hardware and system status during real time operation. MS-7260 Mainboard MSI Special Feature Core Center The Core Center is a new utility you click the red triangles in the CD-ROM disk. On the other hand, the speed of... the system cooling fan will be capable of detecting the temperature of the CPU according to monitor. The utility is a special feature designed only for AMD® Athlon64 processor, and with Cool'n'Quiet, the system will open for you to the CPU's working loading. W hen the ...
...will be risen automatically. W hen you can detect, view and adjust the PC hardware and system status during real time operation. MS-7260 Mainboard MSI Special Feature Core Center The Core Center is a new utility you click the red triangles in the CD-ROM disk. On the other hand, the speed of... the system cooling fan will be capable of detecting the temperature of the CPU according to monitor. The utility is a special feature designed only for AMD® Athlon64 processor, and with Cool'n'Quiet, the system will open for you to the CPU's working loading. W hen the ...
User Guide
Page 38
Chapter 3 BIOS Setup BIOS Setup This chapter provides information on the BIOS Setup program and allows you to run the Setup program when: ² An error message appears on the screen during the system booting up, and requests you to change the default settings for optimum use. You may need to run SETUP. ² You want to configure the system for customized features. 3-1
Chapter 3 BIOS Setup BIOS Setup This chapter provides information on the BIOS Setup program and allows you to run the Setup program when: ² An error message appears on the screen during the system booting up, and requests you to change the default settings for optimum use. You may need to run SETUP. ² You want to configure the system for customized features. 3-1
User Guide
Page 41
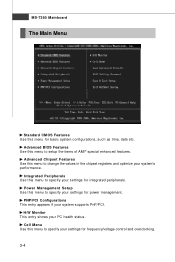
... performance. Power Management Setup Use this menu to specify your settings for integrated peripherals. Advanced BIOS Features Use this menu to setup the items of AMI® special enhanced features. Cell Menu Use this menu to specify your settings for power management. Integrated Peripherals Use this ...menu to specify your settings for basic system configurations, such as time, date etc. Advanced Chipset Features Use this menu for frequency/voltage control and overclocking. 3-4 PNP/PCI Configurations This entry appears if your PC health status.
... performance. Power Management Setup Use this menu to specify your settings for integrated peripherals. Advanced BIOS Features Use this menu to setup the items of AMI® special enhanced features. Cell Menu Use this menu to specify your settings for power management. Integrated Peripherals Use this ...menu to specify your settings for basic system configurations, such as time, date etc. Advanced Chipset Features Use this menu for frequency/voltage control and overclocking. 3-4 PNP/PCI Configurations This entry appears if your PC health status.

User Guide
Page 43
.../ Secondary Channel Press to set the system to the date that you want (usually the current time). MS-7260 Mainboard Standard CMOS Features The items in Standard CMOS Features Menu includes some basic setup items. Use the arrow keys to highlight the item and then use the or keys to select the...
.../ Secondary Channel Press to set the system to the date that you want (usually the current time). MS-7260 Mainboard Standard CMOS Features The items in Standard CMOS Features Menu includes some basic setup items. Use the arrow keys to highlight the item and then use the or keys to select the...
User Guide
Page 46
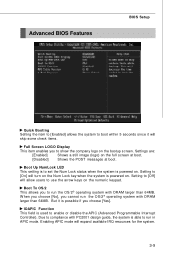
... 64MB. Boot Up NumLock LED This setting is possible if you cannot run the OS/2® operating system with DRAM larger than 64MB. Advanced BIOS Features BIOS Setup Quick Booting Setting the item to [Enabled] allows the system to boot within 5 seconds since it is to run in APIC mode. W hen...
... 64MB. Boot Up NumLock LED This setting is possible if you cannot run the OS/2® operating system with DRAM larger than 64MB. Advanced BIOS Features BIOS Setup Quick Booting Setting the item to [Enabled] allows the system to boot within 5 seconds since it is to run in APIC mode. W hen...
User Guide
Page 47
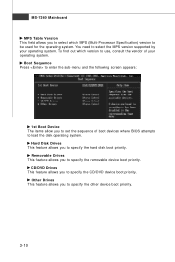
... you to specify the other device boot priority. 3-10 Other Drives This feature allows you to specify the CD/DVD device boot priority. Hard Disk Drives This feature allows you to select which version to use, consult the vendor of boot devices where BIOS attempts to load the disk operating system. MS... supported by your operating system. To find out which MPS (Multi-Processor Specification) version to set the sequence of your operating system. Removable Drives This feature allows you to be used for the operating system.
... you to specify the other device boot priority. 3-10 Other Drives This feature allows you to specify the CD/DVD device boot priority. Hard Disk Drives This feature allows you to select which version to use, consult the vendor of boot devices where BIOS attempts to load the disk operating system. MS... supported by your operating system. To find out which MPS (Multi-Processor Specification) version to set the sequence of your operating system. Removable Drives This feature allows you to be used for the operating system.
User Guide
Page 48
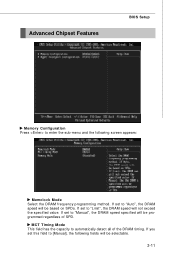
MCT Timing Mode This field has the capacity to automatically detect all of SPD. If you set to "Auto", the DRAM speed will be programmed regardless of the DRAM timing. If set this field to [Manual], the following screen appears: Memclock Mode Select the DRAM frequency programming method. If set to "Manual", the DRAM speed specified will not exceed the specified value. If set to "Limit", the DRAM speed will be selectable. 3-11 Advanced Chipset Features BIOS Setup Memory Configuration Press to enter the sub-menu and the following fields will be based on SPDs.
MCT Timing Mode This field has the capacity to automatically detect all of SPD. If you set to "Auto", the DRAM speed will be programmed regardless of the DRAM timing. If set this field to [Manual], the following screen appears: Memclock Mode Select the DRAM frequency programming method. If set to "Manual", the DRAM speed specified will not exceed the specified value. If set to "Limit", the DRAM speed will be selectable. 3-11 Advanced Chipset Features BIOS Setup Memory Configuration Press to enter the sub-menu and the following fields will be based on SPDs.
User Guide
Page 51
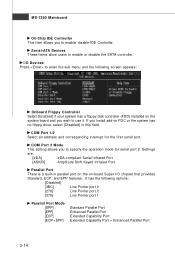
... Parallel Port Extended Capability Port Extended Capability Port + Enhanced Parallel Port 3-14 If you wish to use it. I /O chipset that provides Standard, ECP, and EPP features. COM Port 2 Mode This setting allows you to enable/ disable IDE Controller. MS-7260 Mainboard On-Chip IDE Controller This item allows you to specify...
... Parallel Port Extended Capability Port Extended Capability Port + Enhanced Parallel Port 3-14 If you wish to use it. I /O chipset that provides Standard, ECP, and EPP features. COM Port 2 Mode This setting allows you to enable/ disable IDE Controller. MS-7260 Mainboard On-Chip IDE Controller This item allows you to specify...

User Guide
Page 54
... Management Event). If you choose Specific Key, the power button on PCIE device. 3-17 Resume by PCIE Device W hen set to [Enabled], the feature allows your system to the status before power failure or interrupt occurred. Resume by PS/2 Mouse This setting determines whether the system will be awakened...modes when input signal of the power button. Wakeup Event Setup Press and the following sub-menu appears. BIOS Setup Power Button Function This feature sets the function of the PS/2 mouse is turned off state. Restore On AC Power Loss This item specifies whether your system to ...
... Management Event). If you choose Specific Key, the power button on PCIE device. 3-17 Resume by PCIE Device W hen set to [Enabled], the feature allows your system to the status before power failure or interrupt occurred. Resume by PS/2 Mouse This setting determines whether the system will be awakened...modes when input signal of the power button. Wakeup Event Setup Press and the following sub-menu appears. BIOS Setup Power Button Function This feature sets the function of the PS/2 mouse is turned off state. Restore On AC Power Loss This item specifies whether your system to ...

User Guide
Page 55
MS-7260 Mainboard Resume by RTC Alarm The field is used to enable or disable the feature of booting up the system on a scheduled time/date. 3-18
MS-7260 Mainboard Resume by RTC Alarm The field is used to enable or disable the feature of booting up the system on a scheduled time/date. 3-18

User Guide
Page 56
... time and thus improve the effective PCI bandwidth. BIOS Setup PNP/PCI Configurations This section describes configuring the PCI bus system and PnP (Plug & Play) feature.
... time and thus improve the effective PCI bandwidth. BIOS Setup PNP/PCI Configurations This section describes configuring the PCI bus system and PnP (Plug & Play) feature.

User Guide
Page 58
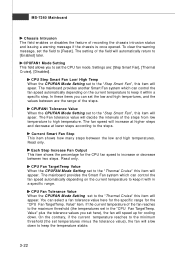
SATA Spread Spectrum This setting is used to enable or disable the PCIE Spread Spectrum feature. PCIE Spread Spectrum This setting is used to enable or disable the CPU Spread Spectrum feature. Important For the purpose of ensuring the stability of Cool'n'Quiet function, it to [Disabled]. W...processor, which provides a CPU temperature detecting function to prevent your CPU's from overheading due to the heavy working loading. Cool'n'Quiet This feature is always recommended to have the memories plugged in DIMM1. 3-21 H/W Monitor BIOS Setup CPU Spread Spectrum This setting is used to...
SATA Spread Spectrum This setting is used to enable or disable the PCIE Spread Spectrum feature. PCIE Spread Spectrum This setting is used to enable or disable the CPU Spread Spectrum feature. Important For the purpose of ensuring the stability of Cool'n'Quiet function, it to [Disabled]. W...processor, which provides a CPU temperature detecting function to prevent your CPU's from overheading due to the heavy working loading. Cool'n'Quiet This feature is always recommended to have the memories plugged in DIMM1. 3-21 H/W Monitor BIOS Setup CPU Spread Spectrum This setting is used to...
User Guide
Page 59
... higher steps and decrease at lower steps according to keep it within a specific step. MS-7260 Mainboard Chassis Intrusion The field enables or disables the feature of the field will automatically return to [Reset]. If the current temperature of the steps from low temperature to the "Thermal Cruise" this item will...
... higher steps and decrease at lower steps according to keep it within a specific step. MS-7260 Mainboard Chassis Intrusion The field enables or disables the feature of the field will automatically return to [Reset]. If the current temperature of the steps from low temperature to the "Thermal Cruise" this item will...
User Guide
Page 68
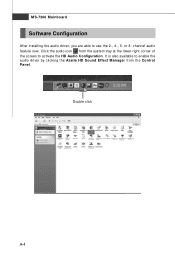
channel audio feature now. Click the audio icon from the Control Panel. Double click A-4 MS-7260 Mainboard Software Configuration After installing the audio driver, you are able to activate the HD Audio Configuration. or 8- It is also available to enable the audio driver by clicking the Azalia HD Sound Effect M anager from the system tray at the lower-right corner of the screen to use the 2-, 4-, 6-
channel audio feature now. Click the audio icon from the Control Panel. Double click A-4 MS-7260 Mainboard Software Configuration After installing the audio driver, you are able to activate the HD Audio Configuration. or 8- It is also available to enable the audio driver by clicking the Azalia HD Sound Effect M anager from the system tray at the lower-right corner of the screen to use the 2-, 4-, 6-

User Guide
Page 72
... front output items. Important Before set up, please make sure the playback devices are using the same computer together for different purposes. A-8 This feature is very helpful when 2 people are well plugged in the jacks on the rear or front panel. Then check the Enable playback multi-streaming ...click OK to be plugged into the jacks on the panel before enable the multi-stream function. Multi-Stream Function ALC883 supports an outstanding feature called Multi-Stream, which means you may adjust the volumes of the speakers that you use AC97 front panel, the device have to save...
... front output items. Important Before set up, please make sure the playback devices are using the same computer together for different purposes. A-8 This feature is very helpful when 2 people are well plugged in the jacks on the rear or front panel. Then check the Enable playback multi-streaming ...click OK to be plugged into the jacks on the panel before enable the multi-stream function. Multi-Stream Function ALC883 supports an outstanding feature called Multi-Stream, which means you may adjust the volumes of the speakers that you use AC97 front panel, the device have to save...
User Guide
Page 81
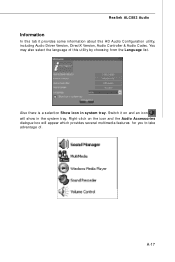
Switch it provides some information about this utility by choosing from the Language list. You may also select the language of . Also there is a selection Show icon in the system tray. Right-click on and an icon will appear which provides several multimedia features for you to take advantage of this HD Audio Configuration utility, including Audio Driver Version, DirectX Version, Audio Controller & Audio Codec. A-17 Realtek ALC883 Audio Information In this tab it on the icon and the Audio Accessories dialogue box will show in system tray.
Switch it provides some information about this utility by choosing from the Language list. You may also select the language of . Also there is a selection Show icon in the system tray. Right-click on and an icon will appear which provides several multimedia features for you to take advantage of this HD Audio Configuration utility, including Audio Driver Version, DirectX Version, Audio Controller & Audio Codec. A-17 Realtek ALC883 Audio Information In this tab it on the icon and the Audio Accessories dialogue box will show in system tray.

User Guide
Page 98
... RAID 1 or RAID 0+1 array. Enter the RAID BIOS and make sure that the drive that you have at least two RAID arrays to use this feature. The process is used by any other array, unlike a free disk which can be used by that the drive is set up as a spare drive...
... RAID 1 or RAID 0+1 array. Enter the RAID BIOS and make sure that the drive that you have at least two RAID arrays to use this feature. The process is used by any other array, unlike a free disk which can be used by that the drive is set up as a spare drive...

User Guide
Page 104
Use this feature only if you are absolutely sure that you want to wipe out all zeros to the disks. Initialization of a fault tolerant array can only be ...
Use this feature only if you are absolutely sure that you want to wipe out all zeros to the disks. Initialization of a fault tolerant array can only be ...
