
User Manual
Page 4
Preface 1-4 Installing the Express card ...3-29 Safely Remove Hardware ...3-31 BIOS Setup About BIOS Setup...4-2 When to Use BIOS Setup...4-2 How to Run BIOS Setup...4-2 Control Keys ...4-3 BIOS Setup Menu...4-4 Main menu...4-5 Advanced menu...4-7 Boot menu ...4-9 Security menu...4-10 Exit menu...4-12
Preface 1-4 Installing the Express card ...3-29 Safely Remove Hardware ...3-31 BIOS Setup About BIOS Setup...4-2 When to Use BIOS Setup...4-2 How to Run BIOS Setup...4-2 Control Keys ...4-3 BIOS Setup Menu...4-4 Main menu...4-5 Advanced menu...4-7 Boot menu ...4-9 Security menu...4-10 Exit menu...4-12

User Manual
Page 27
... MDC AM2 1.5 LAN 10/100/1000 Ethernet Bluetooth Supported (Optional) Wireless LAN Supported Audio Internal Speaker Sound Volume 4 speakers + 1 Subwoofer Adjust by volume button, K/B hot-key & SW Video Controller LCD Dual View Function CRT Output ATI WSXGA+ (1680x1050) / glare WXGA+ (1440 x 900) / glare. WUXGA (1920x1200) / non glare LCD or CRT will...
... MDC AM2 1.5 LAN 10/100/1000 Ethernet Bluetooth Supported (Optional) Wireless LAN Supported Audio Internal Speaker Sound Volume 4 speakers + 1 Subwoofer Adjust by volume button, K/B hot-key & SW Video Controller LCD Dual View Function CRT Output ATI WSXGA+ (1680x1050) / glare WXGA+ (1440 x 900) / glare. WUXGA (1920x1200) / non glare LCD or CRT will...

User Manual
Page 28
Yes x 1 WHQL Introductions 2-7 HDMI Output Display LCD Type Brightness WebCam CMOS Software & BIOS USB Flash Boot BIOS Others Kensington Lock Hole Compliance HDMI Output 1.3 supported The best resolution may vary depending on the television connected. 17" LCD display (Optional) WSXGA+ (1680x1050) / glare WXGA+ (1440 x 900) / glare. WUXGA (1920x1200) / non glare Brightness controlled by K/B hot-keys 2.0 Mega Pixel (optional) Yes, USB floppy boot up DOS only Fast Boot Support ---
Yes x 1 WHQL Introductions 2-7 HDMI Output Display LCD Type Brightness WebCam CMOS Software & BIOS USB Flash Boot BIOS Others Kensington Lock Hole Compliance HDMI Output 1.3 supported The best resolution may vary depending on the television connected. 17" LCD display (Optional) WSXGA+ (1680x1050) / glare WXGA+ (1440 x 900) / glare. WUXGA (1920x1200) / non glare Brightness controlled by K/B hot-keys 2.0 Mega Pixel (optional) Yes, USB floppy boot up DOS only Fast Boot Support ---
User Manual
Page 39
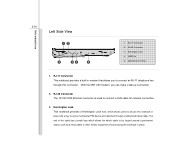
... 2. RJ-45 Connector 3. RJ-11 Connector This notebook provides a built-in place. With the 56K V.90 modem, you to secure the notebook in place with a key or some mechanical PIN device and attached through this connector. Kensington Lock 4. Optical Device Drive 1. Kensington Lock This notebook provides a Kensington Lock hole, which allows...
... 2. RJ-45 Connector 3. RJ-11 Connector This notebook provides a built-in place. With the 56K V.90 modem, you to secure the notebook in place with a key or some mechanical PIN device and attached through this connector. Kensington Lock 4. Optical Device Drive 1. Kensington Lock This notebook provides a Kensington Lock hole, which allows...

User Manual
Page 56
Typewriter keys Numeric keys The keyboard shown here may vary from the actual one, depending on which county users purchase the notebook. Getting Started 3-13 Knowing the Keyboard This notebook provides a full-functioned keyboard. This keyboard can be divided into four categories: Typewriter keys, Cursor keys, Numeric keys and Function keys. Cursor keys / Function keys
Typewriter keys Numeric keys The keyboard shown here may vary from the actual one, depending on which county users purchase the notebook. Getting Started 3-13 Knowing the Keyboard This notebook provides a full-functioned keyboard. This keyboard can be divided into four categories: Typewriter keys, Cursor keys, Numeric keys and Function keys. Cursor keys / Function keys

User Manual
Page 57
...Lock function to use the numeric keys that are embedded in uppercase. „ Scroll Lock: Press this key to toggle the Scroll Lock on and off. When this key to toggle the Num Lock on and off . When the lock keys are kept in the typewriter keys. „ Caps Lock: ...indicate their status: „ Num Lock: Press this function is activated, the letters you can use these typewrite keys also provide several keys for special purposes, such as [Ctrl,] [Alt,] and [Esc] key. Getting Started 3-14 Typewriter Keys In addition to providing the major function of the keyboard, these numeric...
...Lock function to use the numeric keys that are embedded in uppercase. „ Scroll Lock: Press this key to toggle the Scroll Lock on and off. When this key to toggle the Num Lock on and off . When the lock keys are kept in the typewriter keys. „ Caps Lock: ...indicate their status: „ Num Lock: Press this function is activated, the letters you can use these typewrite keys also provide several keys for special purposes, such as [Ctrl,] [Alt,] and [Esc] key. Getting Started 3-14 Typewriter Keys In addition to providing the major function of the keyboard, these numeric...

User Manual
Page 58
...the right of the line (or document). Move to the previous page. Press this key to delete one space. Move to control the cursor movement. Move to the next page. The Backspace key, [Ins] and [Del] keys at upper right corner are used to the left for one space. Move the ... to the beginning of the cursor and move the following text left for one space. Getting Started 3-15 Cursor Keys The four cursor (arrow) keys and [Home], [PgUp], [PgDn], [End] keys are use for editing purpose. Move the cursor right for one space. Move the cursor left for one character...
...the right of the line (or document). Move to the previous page. Press this key to delete one space. Move to control the cursor movement. Move to the next page. The Backspace key, [Ins] and [Del] keys at upper right corner are used to the left for one space. Move the ... to the beginning of the cursor and move the following text left for one space. Getting Started 3-15 Cursor Keys The four cursor (arrow) keys and [Home], [PgUp], [PgDn], [End] keys are use for editing purpose. Move the cursor right for one space. Move the cursor left for one character...
User Manual
Page 59
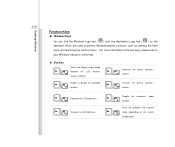
... between the LCD, external monitor and both. Enable or disable the touchpad function. Getting Started 3-16 Function Keys „ Windows Keys You can find the Windows Logo key ( ) and one Application Logo key ( ) on the system + configuration). Increase the built-in speaker's + volume. Decrease the built-in... speaker's + volume. For more information of the two keys, please refer to perform Windows-specific functions, such as opening the Start menu and launching the shortcut menu. Decrease the LCD ...
... between the LCD, external monitor and both. Enable or disable the touchpad function. Getting Started 3-16 Function Keys „ Windows Keys You can find the Windows Logo key ( ) and one Application Logo key ( ) on the system + configuration). Increase the built-in speaker's + volume. Decrease the built-in... speaker's + volume. For more information of the two keys, please refer to perform Windows-specific functions, such as opening the Start menu and launching the shortcut menu. Decrease the LCD ...
User Manual
Page 76
... default settings for your Notebook may need to run the BIOS Setup when: Š An error message appears on the notebook and press the [Del] key during the POST procedure. If the message disappears before you respond and you still wish to enter Setup, either restart the system by turning it... OFF and ON, or simultaneously pressing [Ctrl]+[Alt]+[Delete] keys to Use BIOS Setup? Be noted that the screen snaps and setting options in this chapter are for customized features. Š You want to Run...
... default settings for your Notebook may need to run the BIOS Setup when: Š An error message appears on the notebook and press the [Del] key during the POST procedure. If the message disappears before you respond and you still wish to enter Setup, either restart the system by turning it... OFF and ON, or simultaneously pressing [Ctrl]+[Alt]+[Delete] keys to Use BIOS Setup? Be noted that the screen snaps and setting options in this chapter are for customized features. Š You want to Run...

User Manual
Page 77
...the selected item to change setting field. Bring up help screen providing the information of control keys. 1) Exit the BIOS Setup Utility. 2) Return to the previous screen in the BIOS Setup Utility. BIOS Setup 4-3 Control Keys You can use only the keyboard to control the cursor in a sub-menu. In some... items, press this key to select one item under the menu title. Press right arrow to select one item under...
...the selected item to change setting field. Bring up help screen providing the information of control keys. 1) Exit the BIOS Setup Utility. 2) Return to the previous screen in the BIOS Setup Utility. BIOS Setup 4-3 Control Keys You can use only the keyboard to control the cursor in a sub-menu. In some... items, press this key to select one item under the menu title. Press right arrow to select one item under...


