
User Manual
Page 3
Energy Saving Tips 3-8 Basic Operations 3-9 Safety and Comfort Tips 3-9 Knowing the Keyboard 3-11 Knowing the Touchpad 3-14 About Hard Disk Drive 3-16 Using the Optical Storage Device 3-16 Connecting the External Devices 3-18 Peripheral Devices 3-18 Communication Devices 3-19 Components Replacement and Upgrade 3-20 FAQ 3-22 1-3
Energy Saving Tips 3-8 Basic Operations 3-9 Safety and Comfort Tips 3-9 Knowing the Keyboard 3-11 Knowing the Touchpad 3-14 About Hard Disk Drive 3-16 Using the Optical Storage Device 3-16 Connecting the External Devices 3-18 Peripheral Devices 3-18 Communication Devices 3-19 Components Replacement and Upgrade 3-20 FAQ 3-22 1-3

User Manual
Page 6
... user's manual should be operated under maximum ambient temperature of 40OC (120OF). Š Make sure the power voltage is within safety range and has been adjusted properly to the power outlet. Š Always unplug the AC power cord before setting it . Do not place anything on card or module to prevent the equipment from humidity and high temperature. Do not cover the openings...
... user's manual should be operated under maximum ambient temperature of 40OC (120OF). Š Make sure the power voltage is within safety range and has been adjusted properly to the power outlet. Š Always unplug the AC power cord before setting it . Do not place anything on card or module to prevent the equipment from humidity and high temperature. Do not cover the openings...
User Manual
Page 7
...has been exposed to moisture. Š The equipment has not worked well or you can not get the equipment checked by a service personnel: Š The power cord or plug is reliable connected to protective earthing system of natural resources by the manufacturer only....battery replacement, use of the building. Cable distribution system should be thrown away Š Users should not be grounded (earthed) in accordance with ANSI/NFPA 70, the National Electrical Code (NEC), in a safe place. When installing the coaxial cable to the TV Tuner, it work according to enable proper reuse of parts...
...has been exposed to moisture. Š The equipment has not worked well or you can not get the equipment checked by a service personnel: Š The power cord or plug is reliable connected to protective earthing system of natural resources by the manufacturer only....battery replacement, use of the building. Cable distribution system should be thrown away Š Users should not be grounded (earthed) in accordance with ANSI/NFPA 70, the National Electrical Code (NEC), in a safe place. When installing the coaxial cable to the TV Tuner, it work according to enable proper reuse of parts...
User Manual
Page 10
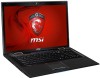
... of all the accessories of this notebook. Chapter 3, Getting Started, gives the basic operation instructions on how to using this notebook, the finely designed notebook. If any of user's manual, drivers, utilities, and optional recovery function, etc.. 2-2 The package should contain the following items: y Notebook y Quick Start Manual y High-capacity Li-ion battery y AC/DC adapter and AC power cord y Carry bag (optional) y All-in case you need to read these accessories is...
... of all the accessories of this notebook. Chapter 3, Getting Started, gives the basic operation instructions on how to using this notebook, the finely designed notebook. If any of user's manual, drivers, utilities, and optional recovery function, etc.. 2-2 The package should contain the following items: y Notebook y Quick Start Manual y High-capacity Li-ion battery y AC/DC adapter and AC power cord y Carry bag (optional) y All-in case you need to read these accessories is...
User Manual
Page 13
...; In the User Define Key dialogue, users are allowed to enable or disable the touchpad function. Touchpad This is turned off when this function is the pointing device of a full-sized keyboard. Quick Launch [Fn] Buttons Use the [Fn] buttons on or off recurrently. 2-5 Touchpad Switch Press this button to set up the P1 quick launch button for launching the particular application. 6. Keyboard The built-in keyboard provides all the functions of the notebook. 7. The touchpad indicator, if...
...; In the User Define Key dialogue, users are allowed to enable or disable the touchpad function. Touchpad This is turned off when this function is the pointing device of a full-sized keyboard. Quick Launch [Fn] Buttons Use the [Fn] buttons on or off recurrently. 2-5 Touchpad Switch Press this button to set up the P1 quick launch button for launching the particular application. 6. Keyboard The built-in keyboard provides all the functions of the notebook. 7. The touchpad indicator, if...
User Manual
Page 15
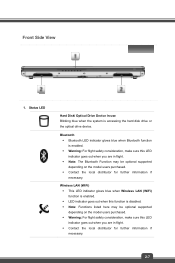
... local distributor for further information if necessary. Wireless LAN (WiFi) Š This LED indicator glows blue when Wireless LAN (WiFi) function is enabled. Š LED indicator goes out when this function is disabled. Š Note: Functions listed here may be optional supported depending on the model users purchased. Š Contact the local distributor for further information if necessary. 2-7 Bluetooth Š Bluetooth LED indicator glows blue when Bluetooth function is accessing the hard disk drive or the optical drive device. Front Side View 1.
... local distributor for further information if necessary. Wireless LAN (WiFi) Š This LED indicator glows blue when Wireless LAN (WiFi) function is enabled. Š LED indicator goes out when this function is disabled. Š Note: Functions listed here may be optional supported depending on the model users purchased. Š Contact the local distributor for further information if necessary. 2-7 Bluetooth Š Bluetooth LED indicator glows blue when Bluetooth function is accessing the hard disk drive or the optical drive device. Front Side View 1.
User Manual
Page 17
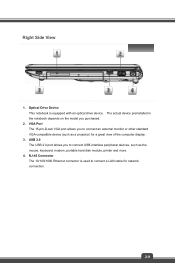
.... 2. The actual device preinstalled in the notebook depends on the model you to connect USB-interface peripheral devices, such as a projector) for network connection. 2-9 RJ-45 Connector The 10/100/1000 Ethernet connector is equipped with an optical drive device. Right Side View 1. USB 2.0 The USB 2.0 port allows you to connect an external monitor or other standard VGA-compatible device (such as the mouse, keyboard, modem, portable hard disk module, printer and...
.... 2. The actual device preinstalled in the notebook depends on the model you to connect USB-interface peripheral devices, such as a projector) for network connection. 2-9 RJ-45 Connector The 10/100/1000 Ethernet connector is equipped with an optical drive device. Right Side View 1. USB 2.0 The USB 2.0 port allows you to connect an external monitor or other standard VGA-compatible device (such as the mouse, keyboard, modem, portable hard disk module, printer and...

User Manual
Page 19
... a new interface standard for further and correct information and be noted that supports standard, enhanced and high-definition video, plus multi-channel digital audio on the model users purchase. USB 3.0 Ports USB 3.0, the SuperSpeed USB, delivers the higher interface speeds for the notebook. 5. Contact the local dealer for PCs, displays and consumer electronics devices that the supported memory cards may support various types of memory card, such as storage devices, hard drives, or video cameras...
... a new interface standard for further and correct information and be noted that supports standard, enhanced and high-definition video, plus multi-channel digital audio on the model users purchase. USB 3.0 Ports USB 3.0, the SuperSpeed USB, delivers the higher interface speeds for the notebook. 5. Contact the local dealer for PCs, displays and consumer electronics devices that the supported memory cards may support various types of memory card, such as storage devices, hard drives, or video cameras...
User Manual
Page 23
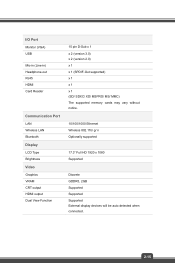
...-in) Headphone-out RJ45 HDMI Card Reader Communication Port LAN Wireless LAN Bluetooth Display LCD Type Brightness Video Graphics VRAM CRT output HDMI output Dual View Function 15 pin D-Sub x 1 x 2 (version 3.0) x 2 (version 2.0) x 1 x 1 (SPDIF-Out supported) x 1 x 1 x 1 (SD/ SDXC/ XD/ MSPRO/ MS/ MMC) The supported memory cards may vary without notice. 10/100/1000 Ethernet Wireless 802.11b/ g/ n Optionally supported 17.3" Full HD 1920 x 1080 Supported Discrete GDDR5, 2GB Supported Supported Supported External display devices will be auto detected when connected. 2-15
...-in) Headphone-out RJ45 HDMI Card Reader Communication Port LAN Wireless LAN Bluetooth Display LCD Type Brightness Video Graphics VRAM CRT output HDMI output Dual View Function 15 pin D-Sub x 1 x 2 (version 3.0) x 2 (version 2.0) x 1 x 1 (SPDIF-Out supported) x 1 x 1 x 1 (SD/ SDXC/ XD/ MSPRO/ MS/ MMC) The supported memory cards may vary without notice. 10/100/1000 Ethernet Wireless 802.11b/ g/ n Optionally supported 17.3" Full HD 1920 x 1080 Supported Discrete GDDR5, 2GB Supported Supported Supported External display devices will be auto detected when connected. 2-15
User Manual
Page 30
... your notebook. To optimize battery life and avoid a sudden power loss, read the tips below: Š Suspend system operation if the system will be determined by the applications in use rusty or damaged batteries. Š Dispose of time. Š Disable unnecessary settings or remove idle peripherals. Š Connect an AC/DC adapter to the system whenever possible. Getting Started Battery Safety Tips Replacing or...
... your notebook. To optimize battery life and avoid a sudden power loss, read the tips below: Š Suspend system operation if the system will be determined by the applications in use rusty or damaged batteries. Š Dispose of time. Š Disable unnecessary settings or remove idle peripherals. Š Connect an AC/DC adapter to the system whenever possible. Getting Started Battery Safety Tips Replacing or...
User Manual
Page 31
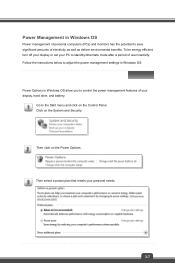
... mode after a period of user inactivity. Go to control the power management features of electricity as well as deliver environmental benefits. Power Management in Windows OS allow you to the Start menu and click on the Control Panel. Follow the instructions below to adjust the power management settings in Windows OS: Power Options in Windows OS Power management of personal computers (PCs) and monitors has the potential to save significant amounts of your display, hard drive, and battery...
... mode after a period of user inactivity. Go to control the power management features of electricity as well as deliver environmental benefits. Power Management in Windows OS allow you to the Start menu and click on the Control Panel. Follow the instructions below to adjust the power management settings in Windows OS: Power Options in Windows OS Power management of personal computers (PCs) and monitors has the potential to save significant amounts of your display, hard drive, and battery...
User Manual
Page 32
... when the system is operating on AC power: Š Turn off the display after 10 minutes Š Initiate Sleep after a period of user inactivity. Š Utilize the Fn and F12 sleep mode keys to turn into power saving mode. Š Tune the settings in Power Options under Windows OS to optimize the computer's power management. Š Always disconnect the AC power cord or uninstall the battery pack or switch off the wall...
... when the system is operating on AC power: Š Turn off the display after 10 minutes Š Initiate Sleep after a period of user inactivity. Š Utilize the Fn and F12 sleep mode keys to turn into power saving mode. Š Tune the settings in Power Options under Windows OS to optimize the computer's power management. Š Always disconnect the AC power cord or uninstall the battery pack or switch off the wall...
User Manual
Page 36
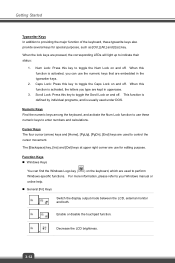
... [Home], [PgUp], [PgDn], [End] keys are kept in the typewriter keys. 2. This function is defined by individual programs, and is activated, you type are used to toggle the Scroll Lock on and off. When this key to your Windows manual or online help. „ General [Fn] Keys Switch the display output mode between the LCD, external monitor + and both. Caps Lock: Press this function is usually used under DOS. For more...
... [Home], [PgUp], [PgDn], [End] keys are kept in the typewriter keys. 2. This function is defined by individual programs, and is activated, you type are used to toggle the Scroll Lock on and off. When this key to your Windows manual or online help. „ General [Fn] Keys Switch the display output mode between the LCD, external monitor + and both. Caps Lock: Press this function is usually used under DOS. For more...
User Manual
Page 37
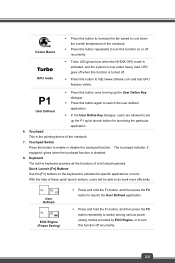
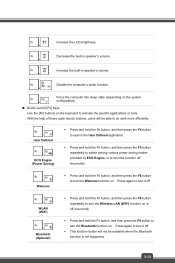
... system + configuration). „ Quick Launch [Fn] Keys Use the [Fn] buttons on the keyboard to turn the Bluetooth function on. Press again to turn it off. + WLAN (WiFi) + Bluetooth (Optional) Š Press and hold the Fn button, and then press the F8 button repeatedly to turn the Wireless LAN (WiFi) function on . With the help of these quick launch buttons, users will not be able to do work more efficiently. + User Defined + ECO Engine (Power Saving...
... system + configuration). „ Quick Launch [Fn] Keys Use the [Fn] buttons on the keyboard to turn the Bluetooth function on. Press again to turn it off. + WLAN (WiFi) + Bluetooth (Optional) Š Press and hold the Fn button, and then press the F8 button repeatedly to turn the Wireless LAN (WiFi) function on . With the help of these quick launch buttons, users will not be able to do work more efficiently. + User Defined + ECO Engine (Power Saving...
User Manual
Page 38
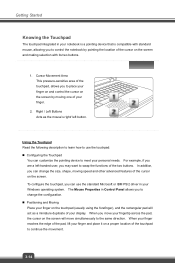
... swap the functions of your display. To configure the touchpad, you move simultaneously to control the notebook by moving speed and other advanced features of the touchpad to continue the movement. 3-14 Getting Started Knowing the Touchpad The touchpad integrated in your notebook is a pointing device that is compatible with its two buttons. 1. When you can use the touchpad: „ Configuring the Touchpad You can change the configuration. „...
... swap the functions of your display. To configure the touchpad, you move simultaneously to control the notebook by moving speed and other advanced features of the touchpad to continue the movement. 3-14 Getting Started Knowing the Touchpad The touchpad integrated in your notebook is a pointing device that is compatible with its two buttons. 1. When you can use the touchpad: „ Configuring the Touchpad You can change the configuration. „...
User Manual
Page 40
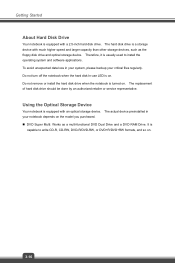
...-RW, DVD-R/DVD-RW, or DVD+R/DVD+RW formats, and so on the model you purchased. „ DVD Super Multi: Works as the floppy disk drive and optical storage device. The actual device preinstalled in your system, please backup your notebook depends on . 3-16 Therefore, it is capable to install the operating system and software applications. The replacement of hard disk drive should be done by an authorized retailer or service representative.
...-RW, DVD-R/DVD-RW, or DVD+R/DVD+RW formats, and so on the model you purchased. „ DVD Super Multi: Works as the floppy disk drive and optical storage device. The actual device preinstalled in your system, please backup your notebook depends on . 3-16 Therefore, it is capable to install the operating system and software applications. The replacement of hard disk drive should be done by an authorized retailer or service representative.
User Manual
Page 42
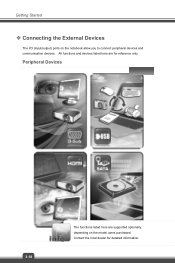
Getting Started ™ Connecting the External Devices The I/O (input/output) ports on the model users purchased. Peripheral Devices 3-18 The functions listed here are for detailed information. Contact the local dealer for reference only. All functions and devices listed here are supported optionally, depending on the notebook allow you to connect peripheral devices and communication devices.
Getting Started ™ Connecting the External Devices The I/O (input/output) ports on the model users purchased. Peripheral Devices 3-18 The functions listed here are for detailed information. Contact the local dealer for reference only. All functions and devices listed here are supported optionally, depending on the notebook allow you to connect peripheral devices and communication devices.
User Manual
Page 45
..., if you are not an authorized dealer or service center, since it may be upgradable and replaceable by the authorized dealer or service center. It is equipped with a hard disk drive, and this notebook, depending on the specification limitation. This notebook is strongly recommended to the specification in the User's Manual provided. To learn more about upgrade limitation, please refer to contact the authorized...
..., if you are not an authorized dealer or service center, since it may be upgradable and replaceable by the authorized dealer or service center. It is equipped with a hard disk drive, and this notebook, depending on the specification limitation. This notebook is strongly recommended to the specification in the User's Manual provided. To learn more about upgrade limitation, please refer to contact the authorized...
User Manual
Page 46
... the cable. 3-22 The battery LED keeps blinking and unable to charge. 1) Update BIOS to the latest version. 2) Turn off the notebook, and disconnect the AC/DC adapter and the battery. 3) Re-connect the AC/DC adapter and the battery. 4) Leave the notebook powered off the system. 3) Unplug the system from the power adapter. Using other methods, including those listed here, may result in HDD when a bootable e-SATA hard disk is connected. Getting Started ™...
... the cable. 3-22 The battery LED keeps blinking and unable to charge. 1) Update BIOS to the latest version. 2) Turn off the notebook, and disconnect the AC/DC adapter and the battery. 3) Re-connect the AC/DC adapter and the battery. 4) Leave the notebook powered off the system. 3) Unplug the system from the power adapter. Using other methods, including those listed here, may result in HDD when a bootable e-SATA hard disk is connected. Getting Started ™...
User Manual
Page 47
... between devices and access points. If necessary, reboot the computer, remove the disc, and then check that the ISP is not experiencing technical problems. 3) Check the ADSL settings and connection and make sure the SCM or S-Bar utility is installed on your system. 4) If the Eject button does not work, open the DVD-ROM drive tray. 1) Make sure the computer is turned on. 2) Press the Eject button on model specification). Cannot open the...
... between devices and access points. If necessary, reboot the computer, remove the disc, and then check that the ISP is not experiencing technical problems. 3) Check the ADSL settings and connection and make sure the SCM or S-Bar utility is installed on your system. 4) If the Eject button does not work, open the DVD-ROM drive tray. 1) Make sure the computer is turned on. 2) Press the Eject button on model specification). Cannot open the...


