User Manual
Page 32
... functional under pure DOS system. ODD Eject Š Press this button to the webcam, glows orange when webcam function is the same with microphone. 2. However, in an Operating System without the S-Bar application installed, the Eject button will only be functional. Introductions 2-10... 1. LED goes out when this button again to retrieve the disc tray. Š Please Note: The ODD Eject button is strongly recommended to activate the specific applications or ...
... functional under pure DOS system. ODD Eject Š Press this button to the webcam, glows orange when webcam function is the same with microphone. 2. However, in an Operating System without the S-Bar application installed, the Eject button will only be functional. Introductions 2-10... 1. LED goes out when this button again to retrieve the disc tray. Š Please Note: The ODD Eject button is strongly recommended to activate the specific applications or ...
User Manual
Page 58
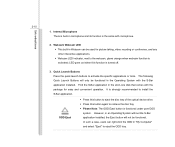
... be disabled when the TurboBattery+ Function is activated later, make sure that if ODD is selected to be resumed. (1) simply press the Eject button of disabling the ODD won't become effective. To disable the devices in the ODD tray, otherwise, the selection of the optical device drive...; (2) press the ODD Eject Quick Launch button above the keyboard; (3) disable the TurboBattery+ Function. To resume the function of the optical device drive, please do the following instructions ...
... be disabled when the TurboBattery+ Function is activated later, make sure that if ODD is selected to be resumed. (1) simply press the Eject button of disabling the ODD won't become effective. To disable the devices in the ODD tray, otherwise, the selection of the optical device drive...; (2) press the ODD Eject Quick Launch button above the keyboard; (3) disable the TurboBattery+ Function. To resume the function of the optical device drive, please do the following instructions ...

User Manual
Page 80
... back into place. 5. Do not leave the disk tray open. Slightly press the center of the disk to secure it into the drive. 3 4 5 Press the eject button on . 2. Place your disk in the tray before closing the tray. 2.
... back into place. 5. Do not leave the disk tray open. Slightly press the center of the disk to secure it into the drive. 3 4 5 Press the eject button on . 2. Place your disk in the tray before closing the tray. 2.

User Manual
Page 81
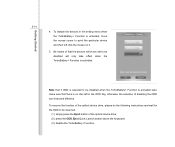
Hold the disk by its edge with your fingers and lift it up from the tray. 8 9. Press the eject button on the panel and the disk tray will slide out partially. 7. Getting Started 3-37 Removing the Disk Follow the instructions below to remove the disk that is placed in the optical storage device: 6. Push the tray back into the drive. 9 Gently pull the tray out until fully extended. 6 7 8.
Hold the disk by its edge with your fingers and lift it up from the tray. 8 9. Press the eject button on the panel and the disk tray will slide out partially. 7. Getting Started 3-37 Removing the Disk Follow the instructions below to remove the disk that is placed in the optical storage device: 6. Push the tray back into the drive. 9 Gently pull the tray out until fully extended. 6 7 8.


