

User Manual
Page 7
... used for future reference. Make sure the power voltage is within safety range and has been adjusted properly to the value of 100~240V before setting it up. Do not leave the equipment in an unconditioned environment with the package for air convection and to the power outlet. Do not cover...
... used for future reference. Make sure the power voltage is within safety range and has been adjusted properly to the value of 100~240V before setting it up. Do not leave the equipment in an unconditioned environment with the package for air convection and to the power outlet. Do not cover...

User Manual
Page 52
...critical to maintain a normal operation. Check with batteries. Conserving Battery Power Efficient battery power is not managed well, the saved data and customized settings may present a risk of fire or explosion, which could cause serious injury. Š Only replace the main battery pack with the same ... Keep away from the reach of children. Š Do not use rusty or damaged batteries. Š Dispose of time. Š Disable unnecessary settings or remove idle peripherals. Š Connect an AC adapter to temperatures above +60° C (+140° F). Š Do not temper with your area...
...critical to maintain a normal operation. Check with batteries. Conserving Battery Power Efficient battery power is not managed well, the saved data and customized settings may present a risk of fire or explosion, which could cause serious injury. Š Only replace the main battery pack with the same ... Keep away from the reach of children. Š Do not use rusty or damaged batteries. Š Dispose of time. Š Disable unnecessary settings or remove idle peripherals. Š Connect an AC adapter to temperatures above +60° C (+140° F). Š Do not temper with your area...

User Manual
Page 69
... respond by default. Alternately, you can change the display mode by pressing [Fn]+[F2]. If not, you can switch the display mode by configuring the settings in Display Properties of Windows operating system. HDMI (High Definition Multimedia Interface Support) is connected to the notebook.
... respond by default. Alternately, you can change the display mode by pressing [Fn]+[F2]. If not, you can switch the display mode by configuring the settings in Display Properties of Windows operating system. HDMI (High Definition Multimedia Interface Support) is connected to the notebook.

User Manual
Page 76
...the notebook and press the [Del] key during the system booting up and is requested to run SETUP. Š You want to change the default settings for your Notebook may need to run the BIOS Setup Utility, turn on your references only. You may be different because of BIOS update. If... or simultaneously pressing [Ctrl]+[Alt]+[Delete] keys to Use BIOS Setup? BIOS Setup 4-2 About BIOS Setup When to restart. How to reload the default BIOS settings. Be noted that the screen snaps and setting options in this chapter are for customized features. Š You want to Run BIOS Setup?
...the notebook and press the [Del] key during the system booting up and is requested to run SETUP. Š You want to change the default settings for your Notebook may need to run the BIOS Setup Utility, turn on your references only. You may be different because of BIOS update. If... or simultaneously pressing [Ctrl]+[Alt]+[Delete] keys to Use BIOS Setup? BIOS Setup 4-2 About BIOS Setup When to restart. How to reload the default BIOS settings. Be noted that the screen snaps and setting options in this chapter are for customized features. Š You want to Run BIOS Setup?
User Manual
Page 77
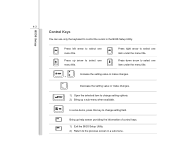
... the BIOS Setup Utility. Bring up help screen providing the information of control keys. 1) Exit the BIOS Setup Utility. 2) Return to change setting field. Press down arrow to change setting options. 2) Bring up arrow to select one menu title. In some items, press this key to select one item under the menu...
... the BIOS Setup Utility. Bring up help screen providing the information of control keys. 1) Exit the BIOS Setup Utility. 2) Return to change setting field. Press down arrow to change setting options. 2) Bring up arrow to select one menu title. In some items, press this key to select one item under the menu...

User Manual
Page 78
... as power consumption, USB/ PCI devices, of system time and date. Security Menu Install or clear the password settings for supervisor and user. Exit Menu (Translation) Save or discard the changes before leaving the BIOS Setup Menu. Main Advanced BISO SETUP UTILITY Security Boot ...: General Help F2: Previous Values F9: Optimized Default F4: Save Main Menu (Translation) Show system overview information about BIOS version, CPU features, memory size and setting of the notebook in order to enter the other menus. Select the tags to achieve a better performance.
... as power consumption, USB/ PCI devices, of system time and date. Security Menu Install or clear the password settings for supervisor and user. Exit Menu (Translation) Save or discard the changes before leaving the BIOS Setup Menu. Main Advanced BISO SETUP UTILITY Security Boot ...: General Help F2: Previous Values F9: Optimized Default F4: Save Main Menu (Translation) Show system overview information about BIOS version, CPU features, memory size and setting of the notebook in order to enter the other menus. Select the tags to achieve a better performance.

User Manual
Page 79
The date format is determined by users. Š System Time (Translation) This item allows you to set the system date. Date (Date) The date from 01 (January) to 12 (December). The system clock will go on no matter you shut down the ... week, from Sun to Sat, which is [day:month:date:year]. BIOS Setup 4-5 Main Menu (Translation) Š System Date (Translation) This item allows you to set the system time.
The date format is determined by users. Š System Time (Translation) This item allows you to set the system date. Date (Date) The date from 01 (January) to 12 (December). The system clock will go on no matter you shut down the ... week, from Sun to Sat, which is [day:month:date:year]. BIOS Setup 4-5 Main Menu (Translation) Š System Date (Translation) This item allows you to set the system time.

User Manual
Page 81
...Š PCI Latency Timer This item controls how long each PCI device can conduct transactions for a longer time and thus improve the effective PCI bandwidth. Setting options: 32, 64, 96, 128, 160, 192, 224, and 248. Š Legacy USB Support (Translation) Selecting Enabled allows users to Enabled..., so that the processor's speed will be controlled by USB device. If you should set to boot the system by the use USB devices, such as mouse, keyboard, or portable disk, in a conserve power mode (the processor works...
...Š PCI Latency Timer This item controls how long each PCI device can conduct transactions for a longer time and thus improve the effective PCI bandwidth. Setting options: 32, 64, 96, 128, 160, 192, 224, and 248. Š Legacy USB Support (Translation) Selecting Enabled allows users to Enabled..., so that the processor's speed will be controlled by USB device. If you should set to boot the system by the use USB devices, such as mouse, keyboard, or portable disk, in a conserve power mode (the processor works...

User Manual
Page 82
BIOS Setup 4-8 Š AHCI Mode (Advanced Host Controller Interface) Use this item to enable or disable the AHCI Mode. The default setting is Disabled. Setting options: Disabled and Enabled.
BIOS Setup 4-8 Š AHCI Mode (Advanced Host Controller Interface) Use this item to enable or disable the AHCI Mode. The default setting is Disabled. Setting options: Disabled and Enabled.

User Manual
Page 83
...:Select Item Enter: Select +/-: Change Opt. You may also press [ESC] to make any previously set , new items Change User Password and Password Check will replace any change the settings of eight-digit password and press [Enter]. BIOS Setup 4-9 Security menu Š Change Supervisor Password ...and change . The password typed now will be added in the menu. Select Change User Password to give or to abandon password setting same as below: Main Advanced BISO SETUP UTILITY Security Boot Exit Supervisor Password :Not Installed User Password :Not Installed Change Supervisor ...
...:Select Item Enter: Select +/-: Change Opt. You may also press [ESC] to make any previously set , new items Change User Password and Password Check will replace any change the settings of eight-digit password and press [Enter]. BIOS Setup 4-9 Security menu Š Change Supervisor Password ...and change . The password typed now will be added in the menu. Select Change User Password to give or to abandon password setting same as below: Main Advanced BISO SETUP UTILITY Security Boot Exit Supervisor Password :Not Installed User Password :Not Installed Change Supervisor ...

User Manual
Page 84
... to specify the type of BIOS password protection that when Supervisor Password has been cleared, User Password will be cleared as well. To clear a set Supervisor Password/ User Password, just press [Enter] under Change Supervisor Password/ Change User Password field when you are described below: Setup The password... is disabled, the system will boot and user can enter setup without entering password. Settings are prompted to BIOS SETUP UTILITY. Once the password is required only when users try to access to enter the password.
... to specify the type of BIOS password protection that when Supervisor Password has been cleared, User Password will be cleared as well. To clear a set Supervisor Password/ User Password, just press [Enter] under Change Supervisor Password/ Change User Password field when you are described below: Setup The password... is disabled, the system will boot and user can enter setup without entering password. Settings are prompted to BIOS SETUP UTILITY. Once the password is required only when users try to access to enter the password.

User Manual
Page 85
BIOS Setup 4-11 Boot menu Š Boot Settings Configuration Configure settings during system boot. F1: General Help F2: Previous Values F9: Optimized Default F4: Save Main Advanced BISO SETUP UTILITY Security Boot Exit Boot Settings Configuration Boot Device Priority Š Boot Device Priority These items showing the sequence of boot devices where BIOS attempts to load the disk operating system. :Select Screen :Select Item Enter: Select +/-: Change Opt.
BIOS Setup 4-11 Boot menu Š Boot Settings Configuration Configure settings during system boot. F1: General Help F2: Previous Values F9: Optimized Default F4: Save Main Advanced BISO SETUP UTILITY Security Boot Exit Boot Settings Configuration Boot Device Priority Š Boot Device Priority These items showing the sequence of boot devices where BIOS attempts to load the disk operating system. :Select Screen :Select Item Enter: Select +/-: Change Opt.

User Manual
Page 86
...; Discard Changes Abandon your changes and reload the previous configuration before running the utility. Š Load Setup Defaults Select this item to load the default settings. Main Advanced BISO SETUP UTILITY Security Boot Exit Exit & Save Changes Exit & Discard Changes Discard Changes Load Setup Defaults :Select Screen :Select Item Enter: Select...
...; Discard Changes Abandon your changes and reload the previous configuration before running the utility. Š Load Setup Defaults Select this item to load the default settings. Main Advanced BISO SETUP UTILITY Security Boot Exit Exit & Save Changes Exit & Discard Changes Discard Changes Load Setup Defaults :Select Screen :Select Item Enter: Select...


