
User Manual
Page 6
... other intellectual property rights. Keep this equipment on a stable surface before connecting the equipment to prevent the equipment from humidity and high temperature. 4. Do not cover the openings. 6. Place the power cord in a way that the power voltage is within its safety range and has been adjusted properly to the value...
... other intellectual property rights. Keep this equipment on a stable surface before connecting the equipment to prevent the equipment from humidity and high temperature. 4. Do not cover the openings. 6. Place the power cord in a way that the power voltage is within its safety range and has been adjusted properly to the value...
User Manual
Page 8
.../96/EC, which takes effect on August 13, 2005, products of "electrical and electronic equipment" cannot be discarded as municipal waste anymore and manufacturers of covered electronic equipment will be obligated to take back such products at the end of their useful life. (Deutsch) Gemäß der Richtlinie 2002/96...
.../96/EC, which takes effect on August 13, 2005, products of "electrical and electronic equipment" cannot be discarded as municipal waste anymore and manufacturers of covered electronic equipment will be obligated to take back such products at the end of their useful life. (Deutsch) Gemäß der Richtlinie 2002/96...
User Manual
Page 24
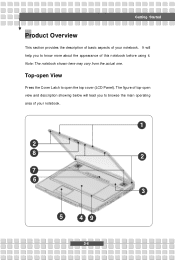
Top-open View Press the Cover Latch to open view and description showing below will help you to know more about the appearance of this notebook before using it. The figure of top-open the top cover (LCD Panel). Getting Started Product Overview This section provides the description of basic aspects of your notebook. 1 2 8 2 7 6 3 5 4 9 2-6 It will lead you to browse the main operating area of your notebook. Note: The notebook shown here may vary from the actual one.
Top-open View Press the Cover Latch to open view and description showing below will help you to know more about the appearance of this notebook before using it. The figure of top-open the top cover (LCD Panel). Getting Started Product Overview This section provides the description of basic aspects of your notebook. 1 2 8 2 7 6 3 5 4 9 2-6 It will lead you to browse the main operating area of your notebook. Note: The notebook shown here may vary from the actual one.
User Manual
Page 25
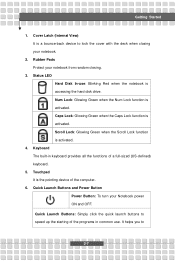
... Launch Buttons: Simply click the quick launch buttons to speed up the starting of the programs in keyboard provides all the functions of the computer.. 6. Cover Latch (Internal View) It is activated. Num Lock: Glowing Green when the Num Lock function is a bounce-back device to 2-7 It helps you... to lock the cover with the deck when closing . 3. Rubber Pads Protect your notebook from random closing your Notebook power ON and OFF. Caps Lock: Glowing Green when ...
... Launch Buttons: Simply click the quick launch buttons to speed up the starting of the programs in keyboard provides all the functions of the computer.. 6. Cover Latch (Internal View) It is activated. Num Lock: Glowing Green when the Num Lock function is a bounce-back device to 2-7 It helps you... to lock the cover with the deck when closing . 3. Rubber Pads Protect your notebook from random closing your Notebook power ON and OFF. Caps Lock: Glowing Green when ...
User Manual
Page 27
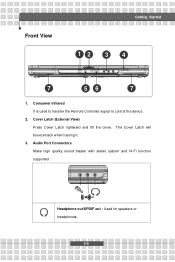
Cover Latch (External View) Press Cover Latch rightward and lift the cover. The Cover Latch will bounce back when loosing it. 3. Headphone out/SPDIF out : Used for speakers or headphones. 2-9 Audio Port Connectors Make high quality sound blaster with stereo system and Hi-Fi function supported. Consumer Infrared It is used to transfer the Remote Controller signal to control the device. 2. Front View Getting Started 12 3 4 7 5 6 7 1.
Cover Latch (External View) Press Cover Latch rightward and lift the cover. The Cover Latch will bounce back when loosing it. 3. Headphone out/SPDIF out : Used for speakers or headphones. 2-9 Audio Port Connectors Make high quality sound blaster with stereo system and Hi-Fi function supported. Consumer Infrared It is used to transfer the Remote Controller signal to control the device. 2. Front View Getting Started 12 3 4 7 5 6 7 1.

