
User Manual
Page 2
Preface 1-2 Table of Content Preface Table of Content ...1-2 Regulations Information...1-5 FCC-B Radio Frequency Interference Statement 1-5 FCC Conditions ...1-6 CE Conformity ...1-6 Safety Instructions...1-7 Safety Guideline for Using Lithium Battery 1-11 WEEE Statement ...1-15 Optical Device Drive Notice ...1-22 Trademarks ...1-22 Reversion History ...1-22 Introductions Manual Map ...2-2 Unpacking...2-3 Specification...2-4 Product Overview ...2-8 Top-Open View ...2-8 Front Side View ...2-13
Preface 1-2 Table of Content Preface Table of Content ...1-2 Regulations Information...1-5 FCC-B Radio Frequency Interference Statement 1-5 FCC Conditions ...1-6 CE Conformity ...1-6 Safety Instructions...1-7 Safety Guideline for Using Lithium Battery 1-11 WEEE Statement ...1-15 Optical Device Drive Notice ...1-22 Trademarks ...1-22 Reversion History ...1-22 Introductions Manual Map ...2-2 Unpacking...2-3 Specification...2-4 Product Overview ...2-8 Top-Open View ...2-8 Front Side View ...2-13
User Manual
Page 3
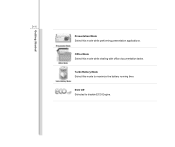
... Side View ...2-14 Left Side View...2-15 Rear Side View...2-17 Bottom Side View ...2-19 Getting Started Power Management ...3-2 Connecting the AC Power ...3-2 Using the Battery Power...3-4 ECO Engine --
... Side View ...2-14 Left Side View...2-15 Rear Side View...2-17 Bottom Side View ...2-19 Getting Started Power Management ...3-2 Connecting the AC Power ...3-2 Using the Battery Power...3-4 ECO Engine --
User Manual
Page 8
... the AC power cord before installing any add-on card or module to the equipment. Š Always disconnect the AC power cord or uninstall the battery pack or switch off the wall socket if the equipment would be left unused for a certain time to step on top of the power cord.
... the AC power cord before installing any add-on card or module to the equipment. Š Always disconnect the AC power cord or uninstall the battery pack or switch off the wall socket if the equipment would be left unused for a certain time to step on top of the power cord.
User Manual
Page 9
... particular Section 820.93, Grounding of Outer Conductive Shield of a Coaxial Cable. Š To prevent explosion caused by improper battery replacement, use the same or equivalent type of the building. Cable distribution system should be grounded (earthed) in accordance with ANSI/NFPA 70, the National ...
... particular Section 820.93, Grounding of Outer Conductive Shield of a Coaxial Cable. Š To prevent explosion caused by improper battery replacement, use the same or equivalent type of the building. Cable distribution system should be grounded (earthed) in accordance with ANSI/NFPA 70, the National ...
User Manual
Page 24
..., this chapter provides the specification of this notebook, and introduces the function buttons, quick launch buttons, connectors, LEDs and externals of installing and uninstalling the battery; It is thoroughly tested and certified by our reputation for the first time. If any of all the accessories included when you purchased this notebook...
..., this chapter provides the specification of this notebook, and introduces the function buttons, quick launch buttons, connectors, LEDs and externals of installing and uninstalling the battery; It is thoroughly tested and certified by our reputation for the first time. If any of all the accessories included when you purchased this notebook...
User Manual
Page 25
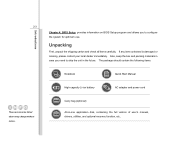
... allows you need to configure the system for optimum use. The package should contain the following items: Notebook Quick Start Manual High-capacity Li-ion battery AC adapter and power cord Carry bag (optional) All-in the future. Unpacking First, unpack the shipping carton and check all items carefully. If any...
... allows you need to configure the system for optimum use. The package should contain the following items: Notebook Quick Start Manual High-capacity Li-ion battery AC adapter and power cord Carry bag (optional) All-in the future. Unpacking First, unpack the shipping carton and check all items carefully. If any...
User Manual
Page 27
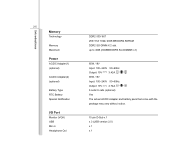
Introductions 2-5 Memory Technology Memory Maximum Power AC/DC Adapter(1) (optional) AC/DC Adapter(2) (optional) Battery Type RTC Battery Special Notification I/O Port Monitor (VGA) USB Mic-in Headphone Out DDR2 533/ 667 256/ 512/ 1024/ 2048 MB DDR2 SDRAM DDR2 SO-DIMM X 2 slot up ... 50~60Hz Output: 19V 3.42A 90W, 19V Input: 100~240V 50~60Hz Output: 19V 4.74A 6 cells/ 9 cells (optional) Yes The actual AC/DC Adapter and battery pack that come with the package may vary without notice. 15 pin D-Sub x 1 x 3 (USB version 2.0) x 1 x 1
Introductions 2-5 Memory Technology Memory Maximum Power AC/DC Adapter(1) (optional) AC/DC Adapter(2) (optional) Battery Type RTC Battery Special Notification I/O Port Monitor (VGA) USB Mic-in Headphone Out DDR2 533/ 667 256/ 512/ 1024/ 2048 MB DDR2 SDRAM DDR2 SO-DIMM X 2 slot up ... 50~60Hz Output: 19V 3.42A 90W, 19V Input: 100~240V 50~60Hz Output: 19V 4.74A 6 cells/ 9 cells (optional) Yes The actual AC/DC Adapter and battery pack that come with the package may vary without notice. 15 pin D-Sub x 1 x 3 (USB version 2.0) x 1 x 1
User Manual
Page 32
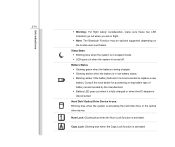
... Caps Lock: Glowing blue when the Caps Lock function is disconnected. Battery Status Š Glowing green when the battery is being charged. Š Glowing amber when the battery is in low battery status. Š Blinking amber if the battery fails and it is fully charged or when the AC adapter is activated.... Num Lock: Glowing blue when the Num Lock function is recommended to replace a new battery. Hard Disk/ Optical Drive Device In-use: Blinking blue when the system is in flight. Š Note: The Bluetooth Function may be ...
... Caps Lock: Glowing blue when the Caps Lock function is disconnected. Battery Status Š Glowing green when the battery is being charged. Š Glowing amber when the battery is in low battery status. Š Blinking amber if the battery fails and it is fully charged or when the AC adapter is activated.... Num Lock: Glowing blue when the Num Lock function is recommended to replace a new battery. Hard Disk/ Optical Drive Device In-use: Blinking blue when the system is in flight. Š Note: The Bluetooth Function may be ...
User Manual
Page 41
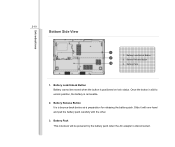
Battery Pack 1. Once the button is slid to unlock position, the battery is a bounce-back device as a preparation for releasing the battery pack. Battery Release Button It is removable. 2. Battery Pack This notebook will be moved when the button is disconnected. Slide it with one hand and pull the battery pack carefully with the other. 3. Introductions 2-19 Bottom Side View 1 1. Battery Lock/Unlock Button 2 2. Battery Lock/Unlock Button Battery cannot be powered by the battery pack when the AC adapter is positioned on lock status. Battery Release Button 3 3.
Battery Pack 1. Once the button is slid to unlock position, the battery is a bounce-back device as a preparation for releasing the battery pack. Battery Release Button It is removable. 2. Battery Pack This notebook will be moved when the button is disconnected. Slide it with one hand and pull the battery pack carefully with the other. 3. Introductions 2-19 Bottom Side View 1 1. Battery Lock/Unlock Button 2 2. Battery Lock/Unlock Button Battery cannot be powered by the battery pack when the AC adapter is positioned on lock status. Battery Release Button 3 3.
User Manual
Page 43
... damage either the notebook or other devices attached to it may produce a certain heat while in use. When the AC power is connected, recharging the battery will start immediately.
... damage either the notebook or other devices attached to it may produce a certain heat while in use. When the AC power is connected, recharging the battery will start immediately.
User Manual
Page 45
... the same or equivalent type of battery recommended by the manufacturer only. Always keep the battery which is an internal power source of that the limited warranty to the battery pack may be damaged if users try to recycle the unused battery pack. To prevent explosion caused by... an authorized machinist. Getting Started 3-4 Using the Battery Power This notebook is disassembled not by improper battery replacement, use in a safe place. ...
... the same or equivalent type of battery recommended by the manufacturer only. Always keep the battery which is an internal power source of that the limited warranty to the battery pack may be damaged if users try to recycle the unused battery pack. To prevent explosion caused by... an authorized machinist. Getting Started 3-4 Using the Battery Power This notebook is disassembled not by improper battery replacement, use in a safe place. ...
User Manual
Page 46
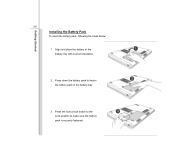
Getting Started 3-5 Installing the Battery Pack To insert the battery pack, following the steps below: 1. Align and place the battery to make sure the battery pack is securely fastened. Press the lock/unlock button to the 3 Lock position to the battery tray with correct orientation. 2. Press down the battery pack to fasten the battery pack in the battery tray. 1 2 3.
Getting Started 3-5 Installing the Battery Pack To insert the battery pack, following the steps below: 1. Align and place the battery to make sure the battery pack is securely fastened. Press the lock/unlock button to the 3 Lock position to the battery tray with correct orientation. 2. Press down the battery pack to fasten the battery pack in the battery tray. 1 2 3.
User Manual
Page 47
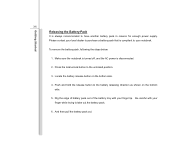
...for enough power supply. Locate the battery release button on the bottom side. 5. And then pull the battery pack out. Dig the edge of battery pack out of the battery tray with your finger tip. Be careful with your finger while trying to purchase a battery pack that is disconnected. 2. ... below: 1. Make sure the notebook is turned off, and the AC power is compliant to the battery releasing direction as shown on the bottom side. 4. Getting Started 3-6 Releasing the Battery Pack It is always recommended to the unlocked position. 3. Push and hold the release button to your...
...for enough power supply. Locate the battery release button on the bottom side. 5. And then pull the battery pack out. Dig the edge of battery pack out of the battery tray with your finger tip. Be careful with your finger while trying to purchase a battery pack that is disconnected. 2. ... below: 1. Make sure the notebook is turned off, and the AC power is compliant to the battery releasing direction as shown on the bottom side. 4. Getting Started 3-6 Releasing the Battery Pack It is always recommended to the unlocked position. 3. Push and hold the release button to your...
User Manual
Page 49
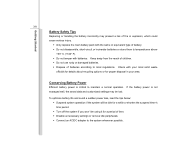
... shorten the suspend timer's time period. Š Turn off the system if you won't be lost. Getting Started 3-8 Battery Safety Tips Replacing or handling the battery incorrectly may be using it for a period of time. Š Disable unnecessary settings or remove idle peripherals. Š ... possible. Keep away from the reach of children. Š Do not use rusty or damaged batteries. Š Dispose of batteries according to maintain a normal operation. Conserving Battery Power Efficient battery power is not managed well, the saved data and customized settings may present a risk of fire...
... shorten the suspend timer's time period. Š Turn off the system if you won't be lost. Getting Started 3-8 Battery Safety Tips Replacing or handling the battery incorrectly may be using it for a period of time. Š Disable unnecessary settings or remove idle peripherals. Š ... possible. Keep away from the reach of children. Š Do not use rusty or damaged batteries. Š Dispose of batteries according to maintain a normal operation. Conserving Battery Power Efficient battery power is not managed well, the saved data and customized settings may present a risk of fire...
User Manual
Page 50
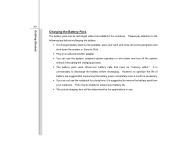
...and close all running programs and shut down and turn off the system without interrupting the charging process. Š The battery pack uses Lithium-ion battery cells that consuming the battery power completely once a month is necessary. Š If you do not use the notebook for a long time, ...; You can be determined by the applications in the notebook. However, to optimize the life of battery, we suggest that have no "memory effect." Getting Started 3-9 Charging the Battery Pack The battery pack can use the system, suspend system operation or shut down the system or Save-to extend...
...and close all running programs and shut down and turn off the system without interrupting the charging process. Š The battery pack uses Lithium-ion battery cells that consuming the battery power completely once a month is necessary. Š If you do not use the notebook for a long time, ...; You can be determined by the applications in the notebook. However, to optimize the life of battery, we suggest that have no "memory effect." Getting Started 3-9 Charging the Battery Pack The battery pack can use the system, suspend system operation or shut down the system or Save-to extend...
User Manual
Page 51
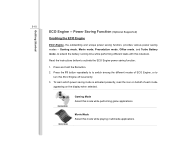
... the instructions bellow to switch among the different modes of each mode appearing on behalf of ECO Engine, or to extend the battery running time while performing different tasks with this mode while performing game applications. To learn which power saving mode is activated presently,...provides various power saving modes - Press and hold the Fn button. 2. Gaming mode, Movie mode, Presentation mode, Office mode, and Turbo Battery mode, to turn this mode while playing multimedia applications Press the F5 button repeatedly to to activate the ECO Engine power saving function: 1. ...
... the instructions bellow to switch among the different modes of each mode appearing on behalf of ECO Engine, or to extend the battery running time while performing different tasks with this mode while performing game applications. To learn which power saving mode is activated presently,...provides various power saving modes - Press and hold the Fn button. 2. Gaming mode, Movie mode, Presentation mode, Office mode, and Turbo Battery mode, to turn this mode while playing multimedia applications Press the F5 button repeatedly to to activate the ECO Engine power saving function: 1. ...
User Manual
Page 52
Turbo Battery Mode Select this mode to disable ECO Engine. Office Mode Select this mode while performing presentation applications. Getting Started 3-11 Presentation Mode Select this mode while dealing with office documentation tasks. ECO Off Selected to maximize the battery running time.
Turbo Battery Mode Select this mode to disable ECO Engine. Office Mode Select this mode while performing presentation applications. Getting Started 3-11 Presentation Mode Select this mode while dealing with office documentation tasks. ECO Off Selected to maximize the battery running time.
User Manual
Page 53
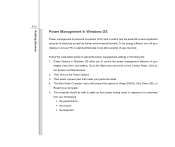
... Management in Windows OS Power management of personal computers (PCs) and monitors has the potential to save significant amounts of your display, hard drive, and battery. To be able to wake up from power saving mode in Windows OS: 1. The computer should be energy efficient, turn off your display or set...
... Management in Windows OS Power management of personal computers (PCs) and monitors has the potential to save significant amounts of your display, hard drive, and battery. To be able to wake up from power saving mode in Windows OS: 1. The computer should be energy efficient, turn off your display or set...
User Manual
Page 55
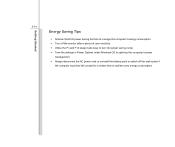
Getting Started 3-14 Energy Saving Tips Š Activate the ECO power saving function to manage the computer's energy consumption. Š Turn off the monitor after a period of user inactivity. Š Utilize the Fn and F12 sleep mode keys to turn into power saving mode. Š Tune the settings in Power Options under Windows OS to optimize the computer's power management. Š Always disconnect the AC power cord or uninstall the battery pack or switch off the wall socket if the computer would be left unused for a certain time to achieve zero energy consumption.
Getting Started 3-14 Energy Saving Tips Š Activate the ECO power saving function to manage the computer's energy consumption. Š Turn off the monitor after a period of user inactivity. Š Utilize the Fn and F12 sleep mode keys to turn into power saving mode. Š Tune the settings in Power Options under Windows OS to optimize the computer's power management. Š Always disconnect the AC power cord or uninstall the battery pack or switch off the wall socket if the computer would be left unused for a certain time to achieve zero energy consumption.
User Manual
Page 80
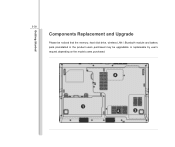
Getting Started 3-39 Components Replacement and Upgrade Please be noticed that the memory, hard disk drive, wireless LAN / Bluetooth module and battery pack preinstalled in the product users purchased may be upgradable or replaceable by user's request depending on the models users purchased. 2 1 4 3
Getting Started 3-39 Components Replacement and Upgrade Please be noticed that the memory, hard disk drive, wireless LAN / Bluetooth module and battery pack preinstalled in the product users purchased may be upgradable or replaceable by user's request depending on the models users purchased. 2 1 4 3


