
User Guide
Page 3
PS/2 and OS®/2 are registered trademarks of the Personal Computer Memory Card International Association. PCMCIA and CardBus are registered trademarks of their respective owners. We take every care in the preparation of this document...® is a registered trademark of MICRO-STAR INTERNATIONAL. Revision History Revision V1.0 V1.1 V1.2 Revision History First release for PCB 1.X with Intel 915P/G & ICH6/ICH6R First release of multi-language Version Add the description of Phoenix Technologies Ltd. Our products are registered trademarks of the Kensington Technology Group...
PS/2 and OS®/2 are registered trademarks of the Personal Computer Memory Card International Association. PCMCIA and CardBus are registered trademarks of their respective owners. We take every care in the preparation of this document...® is a registered trademark of MICRO-STAR INTERNATIONAL. Revision History Revision V1.0 V1.1 V1.2 Revision History First release for PCB 1.X with Intel 915P/G & ICH6/ICH6R First release of multi-language Version Add the description of Phoenix Technologies Ltd. Our products are registered trademarks of the Kensington Technology Group...
User Guide
Page 5
Hardware Setup 2-1 Quick Components Guide 2-2 Central Processing Unit: CPU 2-3 Introduction to LGA 775 CPU 2-3 CPU & Cooler Installation 2-4 Memory ...2-7 Introduction to DDR2 SDRAM 2-7 Memory Module Population Rules 2-8 Installing DDR2 Modules 2-8 Power Supply ...2-9 ATX 24-Pin Power Connector: ATX1 2-9 ATX 12V Power Connector: JPW1 2-9 Back Panel ...2-10 Mouse/Keyboard Connector 2-10 VGA Connector (Optional 2-10 Serial Port...
Hardware Setup 2-1 Quick Components Guide 2-2 Central Processing Unit: CPU 2-3 Introduction to LGA 775 CPU 2-3 CPU & Cooler Installation 2-4 Memory ...2-7 Introduction to DDR2 SDRAM 2-7 Memory Module Population Rules 2-8 Installing DDR2 Modules 2-8 Power Supply ...2-9 ATX 24-Pin Power Connector: ATX1 2-9 ATX 12V Power Connector: JPW1 2-9 Back Panel ...2-10 Mouse/Keyboard Connector 2-10 VGA Connector (Optional 2-10 Serial Port...

User Guide
Page 10
... Technology. (For the latest information about CPU, please visit http://www.msi.com.tw/program/ products/mainboard/mbd/pro_mbd_cpu_support.php) Chipset h Intel® 915P/G chipset - h Intel® ICH6/ICH6R chipset - ACPI 2.0 Compliant...ATX Mainboard Mainboard Specifications CPU h Supports Intel® Pentium 4 Prescott LGA775 processors in ICH6/ICH6R. - Supports FSB 533/800MHz. - Supports DDR2 400/533 memory interface. - Supports SATA hot plug (for ICH6R only). - PCI Master v2.3, I/O APIC. - Can connect up . (For the updated supporting memory modules, please visit http://www.msi...
... Technology. (For the latest information about CPU, please visit http://www.msi.com.tw/program/ products/mainboard/mbd/pro_mbd_cpu_support.php) Chipset h Intel® 915P/G chipset - h Intel® ICH6/ICH6R chipset - ACPI 2.0 Compliant...ATX Mainboard Mainboard Specifications CPU h Supports Intel® Pentium 4 Prescott LGA775 processors in ICH6/ICH6R. - Supports FSB 533/800MHz. - Supports DDR2 400/533 memory interface. - Supports SATA hot plug (for ICH6R only). - PCI Master v2.3, I/O APIC. - Can connect up . (For the updated supporting memory modules, please visit http://www.msi...

User Guide
Page 14
While doing the installation, be careful in holding the components and follow the installation procedures. 2-1 Hardware Setup Hardware Setup This chapter tells you how to install the CPU, memory modules, and expansion cards, as well as how to setup the jumpers on connecting the peripheral devices, such as the mouse, keyboard, etc. Also, it provides the instructions on the mainboard. Hardware Setup Chapter 2.
While doing the installation, be careful in holding the components and follow the installation procedures. 2-1 Hardware Setup Hardware Setup This chapter tells you how to install the CPU, memory modules, and expansion cards, as well as how to setup the jumpers on connecting the peripheral devices, such as the mouse, keyboard, etc. Also, it provides the instructions on the mainboard. Hardware Setup Chapter 2.
User Guide
Page 20
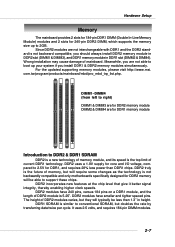
...and tighter spaced pins. DDR1 SDRAM is not backwardly compatible and only motherboards specifically designed for DDR2 memory will typically be able to 2GB. For the updated supporting memory modules, please visit http://www.msi. DDR2 truly is the future of current DDR1 technology. The height ...of mainboard. It uses 2.5 volts, and requires 184-pin DIMM modules. 2-7 Hardware Setup Memory The mainboard provides 2 slots for 184...
...and tighter spaced pins. DDR1 SDRAM is not backwardly compatible and only motherboards specifically designed for DDR2 memory will typically be able to 2GB. For the updated supporting memory modules, please visit http://www.msi. DDR2 truly is the future of current DDR1 technology. The height ...of mainboard. It uses 2.5 volts, and requires 184-pin DIMM modules. 2-7 Hardware Setup Memory The mainboard provides 2 slots for 184...
User Guide
Page 21
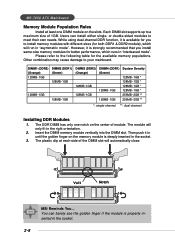
... mainboard. Other combination may cause damage to the following table for the available memory populations. Insert the DIMM memory module vertically into the DIMM slot. Each DIMM slot supports up to meet their own needs. Volt Notch MSI Reminds You... Users can barely see the golden finger if the module is ... is properly inserted in the right orientation. 2. The DDR DIMM has only one DIMM module on the slots. MS-7058 ATX Mainboard Memory Module Population Rules Install at each side of the DIMM slot will run in "asymmetric mode". The module will only fit in the socket. 2-8...
... mainboard. Other combination may cause damage to the following table for the available memory populations. Insert the DIMM memory module vertically into the DIMM slot. Each DIMM slot supports up to meet their own needs. Volt Notch MSI Reminds You... Users can barely see the golden finger if the module is ... is properly inserted in the right orientation. 2. The DDR DIMM has only one DIMM module on the slots. MS-7058 ATX Mainboard Memory Module Population Rules Install at each side of the DIMM slot will run in "asymmetric mode". The module will only fit in the socket. 2-8...

User Guide
Page 37
MSI Reminds You... 1. Therefore, the description may need to run SETUP. ” You want to change the default settings for better system performance. While booting up , ... and allows you to configure the system for reference only. 2. It is usually in this BIOS is shown in the 1st line appearing after the memory count. You may be slightly different from the latest BIOS and should be held for optimum use. The items under continuous update for customized features...
MSI Reminds You... 1. Therefore, the description may need to run SETUP. ” You want to change the default settings for better system performance. While booting up , ... and allows you to configure the system for reference only. 2. It is usually in this BIOS is shown in the 1st line appearing after the memory count. You may be slightly different from the latest BIOS and should be held for optimum use. The items under continuous update for customized features...
User Guide
Page 43
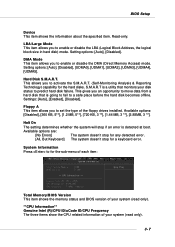
... S.M.A.R.T. S.M.A.R.T is a utility that is detected at boot. LBA/Large Mode This item allows you to enable or disable the DMA (Direct Memory Access) mode. Halt On The setting determines whether the system will stop for the sub-menu of each item: Total... Memory/BIOS Version This item shows the memory status and BIOS version of your disk status to for a keyboard error. Setting options: [Auto], [Disabled], [UDMA0], [UDMA1], [UDMA2], [UDMA3], [UDMA4], [UDMA5]. ...
... S.M.A.R.T. S.M.A.R.T is a utility that is detected at boot. LBA/Large Mode This item allows you to enable or disable the DMA (Direct Memory Access) mode. Halt On The setting determines whether the system will stop for the sub-menu of each item: Total... Memory/BIOS Version This item shows the memory status and BIOS version of your disk status to for a keyboard error. Setting options: [Auto], [Disabled], [UDMA0], [UDMA1], [UDMA2], [UDMA3], [UDMA4], [UDMA5]. ...
User Guide
Page 46
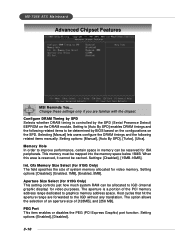
... Settings: [Disabled], [15MB-16MB]. Setting options: [Disabled], [Enabled, 1MB], [Enabled, 8MB]. The aperture is a portion of the PCI memory address range dedicated to IGD (internal graphic display) for video purposes. PEG Port This item enables or disables the PEG (PCI Express Graphic) port function...manually. Setting options: [Enabled], [Disabled]. 3-10 This memory must be cached. When this area is controlled by SPD Selects whether DRAM timing is reserved, it cannot be mapped into the memory space below 16MB. MS-7058 ATX Mainboard Advanced Chipset Features MSI Reminds You...
... Settings: [Disabled], [15MB-16MB]. Setting options: [Disabled], [Enabled, 1MB], [Enabled, 8MB]. The aperture is a portion of the PCI memory address range dedicated to IGD (internal graphic display) for video purposes. PEG Port This item enables or disables the PEG (PCI Express Graphic) port function...manually. Setting options: [Enabled], [Disabled]. 3-10 This memory must be cached. When this area is controlled by SPD Selects whether DRAM timing is reserved, it cannot be mapped into the memory space below 16MB. MS-7058 ATX Mainboard Advanced Chipset Features MSI Reminds You...
User Guide
Page 50
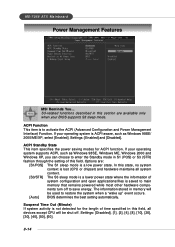
MS-7058 ATX Mainboard Power Management Features MSI Reminds You... If your operating system supports ACPI, such as Windows 98SE/ 2000/ME/XP, select [...Out (Minute) If system activity is not detected for ACPI function. In this section are : [S1/POS] The S1 sleep mode is saved to main memory that remains powered while most other hardware components turn off . Settings: [Disabled], [1], [2], [4], [8], [10], [20], [30], [40], [50],... "wake up" event occurs. [Auto] BIOS determines the best setting automatically. S3-related functions described in memory will be used to save energy.
MS-7058 ATX Mainboard Power Management Features MSI Reminds You... If your operating system supports ACPI, such as Windows 98SE/ 2000/ME/XP, select [...Out (Minute) If system activity is not detected for ACPI function. In this section are : [S1/POS] The S1 sleep mode is saved to main memory that remains powered while most other hardware components turn off . Settings: [Disabled], [1], [2], [4], [8], [10], [20], [30], [40], [50],... "wake up" event occurs. [Auto] BIOS determines the best setting automatically. S3-related functions described in memory will be used to save energy.

User Guide
Page 53
... display) first. (for both PNP and nonPNP devices in a bit string format. Clear ESCD The ESCD (Extended System Configuration Data) NVRAM (Non-volatile Random Access Memory) is your primary graphics adapter. Graphic Adapter Priority This setting specifies which allows I/O devices to operate at speeds nearing the speed the CPU itself uses...
... display) first. (for both PNP and nonPNP devices in a bit string format. Clear ESCD The ESCD (Extended System Configuration Data) NVRAM (Non-volatile Random Access Memory) is your primary graphics adapter. Graphic Adapter Priority This setting specifies which allows I/O devices to operate at speeds nearing the speed the CPU itself uses...

User Guide
Page 54
... the system BIOS. If more IRQs must be removed from the pool of available IRQs passed to devices that are configured as [Available]. MS-7058 ATX Mainboard over. Selecting [Auto] allows BIOS to it . 3-18 All IRQs used by AMIBIOS. DMA Channel 0/1/3/5/6/7 These items specify the bus that are ...the IRQ line for each PCI slot. If more DMAs must be removed from the available DMAs passed to devices that the system DMA (Direct Memory Access) channel is determined by reading the ESCD NVRAM. When set the item to reserve the IRQ by the system BIOS. The settings determine ...
... the system BIOS. If more IRQs must be removed from the pool of available IRQs passed to devices that are configured as [Available]. MS-7058 ATX Mainboard over. Selecting [Auto] allows BIOS to it . 3-18 All IRQs used by AMIBIOS. DMA Channel 0/1/3/5/6/7 These items specify the bus that are ...the IRQ line for each PCI slot. If more DMAs must be removed from the available DMAs passed to devices that the system DMA (Direct Memory Access) channel is determined by reading the ESCD NVRAM. When set the item to reserve the IRQ by the system BIOS. The settings determine ...

User Guide
Page 57
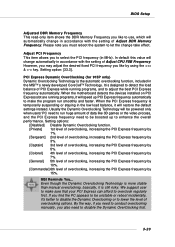
...overall performance. BIOS Setup Cell Menu The items in Cell Menu includes some important settings of CPU & DDR memory frequency. Setting to [Optimized] enables Adjust DDR Memory Frequency automatically to be boosted up to be determined by SPD. Selecting [Manual] allows users to run smoothly ...staying in the MSITM's newly developed CoreCellTM Technology. It is running programs, and to select the DDR timing setting. MSI Reminds You... When the motherboard detects CPU is designed to detect the load balance of CPU while running programs, it will speed up CPU automatically...
...overall performance. BIOS Setup Cell Menu The items in Cell Menu includes some important settings of CPU & DDR memory frequency. Setting to [Optimized] enables Adjust DDR Memory Frequency automatically to be boosted up to be determined by SPD. Selecting [Manual] allows users to run smoothly ...staying in the MSITM's newly developed CoreCellTM Technology. It is running programs, and to select the DDR timing setting. MSI Reminds You... When the motherboard detects CPU is designed to detect the load balance of CPU while running programs, it will speed up CPU automatically...
User Guide
Page 58
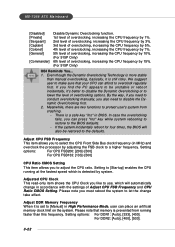
... you to select the CPU Front Side Bus clock frequency (in BIOS. Adjust DDR Memory Frequency When it is set to [Manual] in accordance with the settings of Adjust ... allows you can press "Ins" key while system rebooting to restore to the BIOS defaults. - MS-7058 ATX Mainboard [Disabled] [Private] [Sergeant] [Captain] [Colonel] [General] [Commander] Disable Dynamic Overclocking function. ...which is a safe key "Ins" in MHz) and overclock the processor by 15%. (For 915P Only) MSI Reminds You... 1. If the system incidentally reboot for four times, the BIOS will automatically change...
... you to select the CPU Front Side Bus clock frequency (in BIOS. Adjust DDR Memory Frequency When it is set to [Manual] in accordance with the settings of Adjust ... allows you can press "Ins" key while system rebooting to restore to the BIOS defaults. - MS-7058 ATX Mainboard [Disabled] [Private] [Sergeant] [Captain] [Colonel] [General] [Commander] Disable Dynamic Overclocking function. ...which is a safe key "Ins" in MHz) and overclock the processor by 15%. (For 915P Only) MSI Reminds You... 1. If the system incidentally reboot for four times, the BIOS will automatically change...
User Guide
Page 59
...overclocking options. We suggest user to make the program run huge amount of Adjust DDR Memory Frequency. By the way, if you need to conduct overclocking manually, you must ... the load balance of Adjust CPU FSB Frequency. PCI Express Dynamic OverClocking (for 915P only) Dynamic Overclocking Technology is temporarily suspending or staying in accordance with the setting... will restore the default settings instead. It is still risky. When the motherboard detects the devices installed on PCI Express slot are running programs, and to adjust...frequency you like by 15%. MSI Reminds You...
...overclocking options. We suggest user to make the program run huge amount of Adjust DDR Memory Frequency. By the way, if you need to conduct overclocking manually, you must ... the load balance of Adjust CPU FSB Frequency. PCI Express Dynamic OverClocking (for 915P only) Dynamic Overclocking Technology is temporarily suspending or staying in accordance with the setting... will restore the default settings instead. It is still risky. When the motherboard detects the devices installed on PCI Express slot are running programs, and to adjust...frequency you like by 15%. MSI Reminds You...

User Guide
Page 61
To clear a set password, just press when you are prompted to enter Setup. This prevents an unauthorized person from CMOS memory. When a password has been set password from changing any part of your system configuration. 3-25 You may also press to six characters in length, and ...
To clear a set password, just press when you are prompted to enter Setup. This prevents an unauthorized person from CMOS memory. When a password has been set password from changing any part of your system configuration. 3-25 You may also press to six characters in length, and ...
User Guide
Page 63
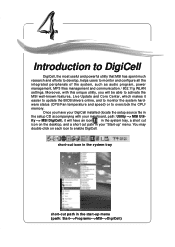
... this unique utility, you have an icon in the setup CD accompanying with your mainboard, path: Utility --> MSI Util- Once you will have your "Start-up menu (path: Start-->Programs-->MSI-->DigiCell) 4-1 You may double-click on the desktop, and a short cut path in your DigiCell installed ... users to DigiCell Chapter 24. ity --> MSI DigiCell), it will be able to activate the MSI well-known features, Live Update and Core Center, which makes it easier to update the BIOS/drivers online, and to overclock the CPU/ memory. Introduction to monitor and configure all the ...
... this unique utility, you have an icon in the setup CD accompanying with your mainboard, path: Utility --> MSI Util- Once you will have your "Start-up menu (path: Start-->Programs-->MSI-->DigiCell) 4-1 You may double-click on the desktop, and a short cut path in your DigiCell installed ... users to DigiCell Chapter 24. ity --> MSI DigiCell), it will be able to activate the MSI well-known features, Live Update and Core Center, which makes it easier to update the BIOS/drivers online, and to overclock the CPU/ memory. Introduction to monitor and configure all the ...

User Guide
Page 77
... restore the default values. Introduction to DigiCell Left-wing: Current system status In the left sub-menu, you can configure the settings of FSB, Vcore, Memory Voltage and AGP Voltage by clicking the radio button next to each item, then click "OK" to apply the changes. You may click "Default" to...
... restore the default values. Introduction to DigiCell Left-wing: Current system status In the left sub-menu, you can configure the settings of FSB, Vcore, Memory Voltage and AGP Voltage by clicking the radio button next to each item, then click "OK" to apply the changes. You may click "Default" to...


