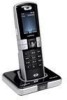
Cisco WIP310 User Guide
Page 50
...least three years from the purchase date of this product and may also be prompted to review and accept that Linksys and/or its affiliates may also contain software from Linksys and its suppliers. BY DOWNLOADING OR INSTALLING THE SOFTWARE, OR USING THE PRODUCT CONTAINING THE ... community is licensed under the specific license terms applicable to the source code of the software. Wireless-G IP Phone Software License Agreement Schedule 1 - This license may also be available for at : www.linksys.com and www.linksys.com/gpl/ respectively. Protection of its suppliers and may , from...
SPA500 Series and WIP310 IP Phone Administration Guide
Page 23
...Enable Web Server is set to Yes. Cisco SPA 501G: STEP 1 Press the Setup button on the phone. STEP 4 Press the left arrow to ensure that it to review, press 2; STEP 4 To save this setting. WIP310: STEP 1 In the Home screen, press the Select button to enable the web server, then press #...., perform the following steps: Cisco SPA 502G, Cisco SPA 504G, Cisco SPA 508G, Cisco SPA 509G: STEP 1 Press the Setup button on the phone. Getting Started Using the Web Administration User Interface 1 NOTE If your service provider disabled access to re-enter, press 3; Cisco SPA 500 Series and...
SPA500 Series and WIP310 IP Phone Administration Guide
Page 29
..., hang up to exit and begin rebooting. value), then press #. Set a gateway. Enter the address (use this option; Restore the phone to review, press 2; To save , press 1; NOTE DHCP must be disabled to begin the restore process. to the factory default software and settings.... if DHCP is not disabled, you receive an error message. value), then press #. to review, press 2; Cisco SPA 500 Series and WIP310 IP Phone Administration Guide 18 to re-enter, press 3; Enter the address (use this option; To save , press 1; To save...
SPA500 Series and WIP310 IP Phone Administration Guide
Page 30
...press #. To re-enter, press 3. Press 1 to enable or 0 to enter the "." to review, press 2; To save , press 1; Enable or disables access to the administrative (admin) login on the Cisco SPA 501G IP Phone 1 Number 181 7932 723646 Option Set the IP multicast address (used by the Cisco SPA 9000... re-enter, press 3; to exit, press *. Getting Started Using IVR on the web interface. To exit, press *. to re-enter, press 3; to review, press 2; Press 1 to enable or 0 to communicate with the IP phone). Cisco SPA 500 Series and WIP310 IP Phone Administration Guide 19
SPA500 Series and WIP310 IP Phone Administration Guide
Page 190
...Admin Login and advanced. STEP 3 Click Voice tab > Regional. Refer to review your entries and modify the dial plan appropriately. See "Digit Sequences," on page 168. Cisco SPA 500 Series and WIP310 IP Phone Administration Guide 179 Resetting the Control Timers You can successfully complete a call , ...you can edit the dial plan. STEP 4 Scroll down to reset the default timer settings for any other extensions on the phone (depending on the model),...
Cisco Small Business Pro IP Phone SPA50X User Guide (SIP)
Page 70
...begin the restore process. Recites the IP multicast address (used by the Cisco SPA 9000 to re-enter, press 3; Cisco Small Business Pro IP Phone SPA 50X User Guide (SIP) 63 Defaults to exit, press *. Recites the HTTP port on the Cisco SPA 501G 4 Typical options you ... 732668 Option Tells you want, then press #: • 0: SIP • 1: SPCP To save, press 1; to 80. Enter 1 to confirm, or * to review, press 2; Recites the MAC (hardware) address of call control method you if Dynamic Host Configuration Protocol (DHCP) is enabled. If you chose to reset, hang...
Cisco Small Business Pro IP Phone SPA50X User Guide (SIP)
Page 71
...), then press #. NOTE DHCP must be disabled to use * to review, press 2; To save , press 1. to exit, press *. value), then press #. Enter the address (use this option; To re-enter, press 3. Cisco Small Business Pro IP Phone SPA 50X User Guide (SIP) 64 Set a gateway. to enter the... "." to review, press 2; to review, press 2; to enter the "." Set the address of the primary Domain Name Server (DNS). Enter the...
Cisco SPA9000 Voice System Administration Guide
Page 28
... version number. Basic Administration of the SPA9000 Upgrading Firmware for the SPA9000 2 STEP 4 In the Confirm Upgrade window, verify that you installed. Then click Upgrade. Review the Router > Status page.
Cisco SPA9000 Voice System Administration Guide
Page 30
...: The User account only has the privilege to access part of the web profile parameters. • Administrator Level: The Administrator account has the privilege to review the saved settings in the top right corner or lower left corner of access are discarded when you save a Telephone Configuration, first enter the IP...
Cisco SPA9000 Voice System Administration Guide
Page 38
... If you are working with an ITSP that is 224.168.168.168:34567. The syslog messages can deploy a syslog server to be accessed by reviewing the "syslog.514.log" file which acts as the slogsrv.exe syslog server application.
Cisco SPA9000 Voice System Administration Guide
Page 42
...key (*). • When entering a value, such as an IP address, press the # (pound) key to identify the required option. To review a new setting, press 2. STEP 3 Wait until you have finished your entry and return to exit without entering any station, click the hyperlink in... the IP Address column. Basic Administration of the SPA9000. For information about the telephone configurations, see the Linksys Phone Administration Guide. Using the Interactive Voice Response Unit In addition to the administration web server, the SPA9000 is treated as a decimal point....
Cisco SPA9000 Voice System Administration Guide
Page 46
... include network and service provider data. SPA prompts for confirmation. For more information, see Chapter 7, "Configuring the Auto Attendant." Then enter 1 to record, 2 to review, 3 to review, or * to factory default values. Factory Reset of Unit After you hear "Option Successful," hang up. Unit reboots and all "User Changeable" configuration parameters are...
Cisco SPA9000 Voice System Administration Guide
Page 47
...entering a value, press the # (pound) key to indicate end of input. • To save value, press 1. • To review the value, press 2. • To re-enter the value, press 3. • To cancel the value entry and return to press ...; To input: W, X, Y, Z, w, x, y, z-press "9' • To input all other characters in the Administrator account password, press "0' For example, to input password test#@1234 by phone keypad, you need to the main configuration menu, press *' (star). SPA9000 Voice System Administration Guide 45 This translation convention only applies to the password input...
Cisco SPA9000 Voice System Administration Guide
Page 62
... Important: For optimum Voice Mail performance, a SPA400 should be aware of the following tasks: • After the devices reboot, Click Voice tab > Info. Review the DHCP client list on the router. Scroll down to the Line Status section for PSTN access or voice mail service. Configuring... Phone Lines and Calling Routing Behavior Configuring Line Interfaces on the SPA9000 4 STEP 6 To verify the registration state, perform the following conditions is met: 1) ...
Cisco SPA9000 Voice System Administration Guide
Page 77
.... See "Digit Sequences," on page 66. Entering a Phone Dial Plan The phone dial plan is automatically updated when the system phone dial plan is propagated only to review your entries and modify the dial plan appropriately. SPA9000 Voice System Administration Guide 75 STEP 6 Verify that you need to extension 1 of digit sequences within ...
Cisco SPA9000 Voice System Administration Guide
Page 78
... | 9,8,011xx. | 9,8,xx.|[1-8]xx) STEP 7 Click Submit All Changes. Refer to the Dial Plan section. STEP 11 Verify that you need to review your entries and modify the dial plan appropriately. STEP 6 Enter the digit sequences in the Dial Plan field. • The default (US-based) system... tab, enter the dial plan, and submit the changes. For more information and examples, see "Digit Sequences," on page 66. Configuring Phone Lines and Calling Routing Behavior Configuring Dial Plans 4 STEP 1 Start Internet Explorer, and then enter the IP address of digit sequences within ...
Cisco SPA9000 Voice System Administration Guide
Page 108
Repeat these steps for access to the SPA400 Administration Web Server," on can be entered. Administering the SPA400 and Voice Mail Service Managing Access to review the settings as needed. 5. Click Administration tab > Reboot. You can be established for each page, as needed : • Gateway Username: Type the desired username in ...
Cisco SPA9000 Voice System Administration Guide
Page 121
... mailbox number, a mailbox is properly inserted into your voice mail system through an ITSP line, your users will call into the SPA400, and review the various entries that the USB drive is not assigned to check their voice mail when they are prompted for Voice Mail Service SPA9000 Voice...-band DTMF (IE RFC2833). NOTE If your ITSP must support out-of the office. Review the settings on the SPA400 Voice mail User page (see "Configuring Local Voice Mail Service on a SPA400," on page113) and the Phone configuration page (see "Setting Up Voice Mail on Each Station," on page 27.) STEP...
Cisco SPA9000 Voice System Administration Guide
Page 124
... files. SPA9000 Voice System Administration Guide 122 Requirements: • You need a PC that you can collect system logs and debug information for SPA Devices by reviewing the "syslog.514.log" file which acts as the SPA9000, to a syslog server. The syslog messages can be running a syslog daemon. Enter the IP address...
Cisco SPA9000 Voice System Administration Guide
Page 136
... new recording. NOTE The IVR checks the available buffer size. If there is performed on the SPA9000. The IVR plays the following prompt: Linksys configuration menu. STEP 8 Wait for several seconds while the save the new recorded message. NOTE Customized prompts are erased when a factory reset... buffer capability, IVR plays the Option Failed message and returns to record. STEP 1 Connect an analog phone to the Phone 1 or Phone 2 port of the message (1 through 10) that you wish to exit. To review, enter 2. STEP 2 Press the star key (*) four times: **** The IVR plays the following ...