
User Guide
Page 3
... 4 Network Topology 4 Network Layout 5 Chapter 3: Getting to Know the Wireless-G Ethernet Bridge with 5-Port Switch 6 The Back Panel 6 The Front Panel 7 The Side Panel 9 Chapter 4: Connecting the Wireless-G Ethernet Bridge for Setup 10 Chapter 5: Setting Up the Wireless-G Ethernet Bridge 12 Chapter 6: Connecting the Wireless-G Ethernet Bridge for Network Use 18 Connection to a Network Device 18 Wall Mount Placement...
... 4 Network Topology 4 Network Layout 5 Chapter 3: Getting to Know the Wireless-G Ethernet Bridge with 5-Port Switch 6 The Back Panel 6 The Front Panel 7 The Side Panel 9 Chapter 4: Connecting the Wireless-G Ethernet Bridge for Setup 10 Chapter 5: Setting Up the Wireless-G Ethernet Bridge 12 Chapter 6: Connecting the Wireless-G Ethernet Bridge for Network Use 18 Connection to a Network Device 18 Wall Mount Placement...
User Guide
Page 5
...4-2: Connect the Power 11 Figure 5-1: Welcome 12 Figure 5-2: Connection 12 Figure 5-3: List of Bridges 13 Figure 5-4: Password 13 Figure 5-5: Mode Settings 14 Figure 5-6: Wireless Settings 15 Figure 5-7: IP Settings 15 Figure 5-8: Security Settings 16 Figure 5-9: Security Settings 16... Figure 5-10: Confirmation 17 Figure 5-11: Congratulations 17 Figure 6-1: Wall Placement 18 Figure 7-1: Password Screen 19 Figure 7-2: Setup Tab 20 ...
...4-2: Connect the Power 11 Figure 5-1: Welcome 12 Figure 5-2: Connection 12 Figure 5-3: List of Bridges 13 Figure 5-4: Password 13 Figure 5-5: Mode Settings 14 Figure 5-6: Wireless Settings 15 Figure 5-7: IP Settings 15 Figure 5-8: Security Settings 16 Figure 5-9: Security Settings 16... Figure 5-10: Confirmation 17 Figure 5-11: Congratulations 17 Figure 6-1: Wall Placement 18 Figure 7-1: Password Screen 19 Figure 7-2: Setup Tab 20 ...

User Guide
Page 8
... Network Use This chapter explains how to connect the Bridge to a network device so the device can use of the Wireless-G Ethernet Bridge. • Appendix B: Wireless Security This appendix explains the risks of the Bridge. • Chapter 4: Connecting the Wireless-G Ethernet Bridge for Setup This chapter instructs you on the Bridge should you need to do so. • Appendix...
... Network Use This chapter explains how to connect the Bridge to a network device so the device can use of the Wireless-G Ethernet Bridge. • Appendix B: Wireless Security This appendix explains the risks of the Bridge. • Chapter 4: Connecting the Wireless-G Ethernet Bridge for Setup This chapter instructs you on the Bridge should you need to do so. • Appendix...
User Guide
Page 16
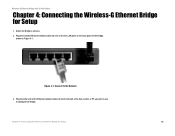
Plug the included Ethernet network cable into the RJ-45 port of the Bridge, shown in Figure 4-1. Chapter 4: Connecting the Wireless-G Ethernet Bridge for Setup 1. Wireless-G Ethernet Bridge with 5-Port Switch Chapter 4: Connecting the Wireless-G Ethernet Bridge for Setup 10 Attach the Bridge's antenna. 2. Plug the other end of the Ethernet network cable into one of the five LAN ports on the back panel of the hub, switch, or PC you wish to use to the Network 3. Figure 4-1: Connect to configure the Bridge.
Plug the included Ethernet network cable into the RJ-45 port of the Bridge, shown in Figure 4-1. Chapter 4: Connecting the Wireless-G Ethernet Bridge for Setup 1. Wireless-G Ethernet Bridge with 5-Port Switch Chapter 4: Connecting the Wireless-G Ethernet Bridge for Setup 10 Attach the Bridge's antenna. 2. Plug the other end of the Ethernet network cable into one of the five LAN ports on the back panel of the hub, switch, or PC you wish to use to the Network 3. Figure 4-1: Connect to configure the Bridge.
User Guide
Page 17
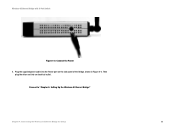
Wireless-G Ethernet Bridge with 5-Port Switch Figure 4-2: Connect the Power 4. Proceed to "Chapter 5: Setting Up the Wireless-G Ethernet Bridge." Then plug the other end into the Power port on the side panel of the Bridge, shown in Figure 4-2. Chapter 4: Connecting the Wireless-G Ethernet Bridge for Setup 11 Plug the supplied power cable into an electrical outlet.
Wireless-G Ethernet Bridge with 5-Port Switch Figure 4-2: Connect the Power 4. Proceed to "Chapter 5: Setting Up the Wireless-G Ethernet Bridge." Then plug the other end into the Power port on the side panel of the Bridge, shown in Figure 4-2. Chapter 4: Connecting the Wireless-G Ethernet Bridge for Setup 11 Plug the supplied power cable into an electrical outlet.

User Guide
Page 18
... to proceed with 5-Port Switch Chapter 5: Setting Up the Wireless-G Ethernet Bridge Now that appears, enter D:\setup.exe (if "D" is correctly connected to set it up on a wireless computer will guide you to access the Linksys website using an active Internet connection. • Exit - Insert the Setup CD-ROM into your wired network (see Figure 5-2). Click...
... to proceed with 5-Port Switch Chapter 5: Setting Up the Wireless-G Ethernet Bridge Now that appears, enter D:\setup.exe (if "D" is correctly connected to set it up on a wireless computer will guide you to access the Linksys website using an active Internet connection. • Exit - Insert the Setup CD-ROM into your wired network (see Figure 5-2). Click...

User Guide
Page 23
..., proceed to exit the Setup Wizard. 11. Chapter 5: Setting Up the Wireless-G Ethernet Bridge Figure 5-11: Congratulations 17 The next screen, shown in Figure 5-10. Figure 5-10: Confirmation The Wireless-G Ethernet Bridge is complete. Click the No button to "Chapter 7: Using the Wireless-G Ethernet Bridge Web-based Utility." To configure any other Wireless-G Ethernet Bridges on the Confirmation screen...
..., proceed to exit the Setup Wizard. 11. Chapter 5: Setting Up the Wireless-G Ethernet Bridge Figure 5-11: Congratulations 17 The next screen, shown in Figure 5-10. Figure 5-10: Confirmation The Wireless-G Ethernet Bridge is complete. Click the No button to "Chapter 7: Using the Wireless-G Ethernet Bridge Web-based Utility." To configure any other Wireless-G Ethernet Bridges on the Confirmation screen...

User Guide
Page 25
... make advanced configuration changes, use the Setup Wizard. Chapter 7: Using the Wireless-G Ethernet Bridge Web-based Utility 19 Overview Open your web browser and the Wireless-G Ethernet Bridge Web-based Utility. Provides explanations of the Wireless-G Ethernet Bridge (the default is designed to function ...switch: QOS, Switch Table, VLAN, RMON Statistics, Port Mirroring, and Access List. • Wireless Status - You can also upgrade the Bridge's firmware using the Setup Wizard. This screen is designed to function properly after you to the one shown in Figure 7-1...
... make advanced configuration changes, use the Setup Wizard. Chapter 7: Using the Wireless-G Ethernet Bridge Web-based Utility 19 Overview Open your web browser and the Wireless-G Ethernet Bridge Web-based Utility. Provides explanations of the Wireless-G Ethernet Bridge (the default is designed to function ...switch: QOS, Switch Table, VLAN, RMON Statistics, Port Mirroring, and Access List. • Wireless Status - You can also upgrade the Bridge's firmware using the Setup Wizard. This screen is designed to function properly after you to the one shown in Figure 7-1...

User Guide
Page 26
...Enter the key that you use for the Bridge. Wireless-G Ethernet Bridge with the Bridge. If you experience problems with 5-Port Switch Setup The Setup screen, shown in Figure 7-2, lets you configure the wired and wireless network settings for your wireless network in seconds for key authentication. Enter the... the Bridge has been running is displayed here. LAN • Device Name - Enter the Radius Server IP Address in the field. • Shared Key. The version number of your changes. Unique, memorable names are helpful, especially if you are posted at www.linksys.com....
...Enter the key that you use for the Bridge. Wireless-G Ethernet Bridge with the Bridge. If you experience problems with 5-Port Switch Setup The Setup screen, shown in Figure 7-2, lets you configure the wired and wireless network settings for your wireless network in seconds for key authentication. Enter the... the Bridge has been running is displayed here. LAN • Device Name - Enter the Radius Server IP Address in the field. • Shared Key. The version number of your changes. Unique, memorable names are helpful, especially if you are posted at www.linksys.com....

User Guide
Page 27
... the channel setting of these networks. For added security, Linksys recommends that you have Wireless-G (802.11g) and Chapter 7: Using the Wireless-G Ethernet Bridge Web-based Utility Setup Figure 7-4: Site Survey 21 To search for all the wireless networks detected by the Bridge and their general information. To join a wireless network, click its SSID. • MAC Address - The...
... the channel setting of these networks. For added security, Linksys recommends that you have Wireless-G (802.11g) and Chapter 7: Using the Wireless-G Ethernet Bridge Web-based Utility Setup Figure 7-4: Site Survey 21 To search for all the wireless networks detected by the Bridge and their general information. To join a wireless network, click its SSID. • MAC Address - The...

User Guide
Page 28
...) or (128 bits 26 hex digits). Chapter 7: Using the Wireless-G Ethernet Bridge Web-based Utility Setup NOTE: Make sure that your WEP key manually on configuring wireless security for the Bridge, turn to configure the WEP encryption for Wi-Fi Protected Access..., which WEP key (1-4) will fail. Make sure the other wireless-equipped devices are "0"-"9" and "A"-"F". For detailed instructions on the non-Linksys wireless...
...) or (128 bits 26 hex digits). Chapter 7: Using the Wireless-G Ethernet Bridge Web-based Utility Setup NOTE: Make sure that your WEP key manually on configuring wireless security for the Bridge, turn to configure the WEP encryption for Wi-Fi Protected Access..., which WEP key (1-4) will fail. Make sure the other wireless-equipped devices are "0"-"9" and "A"-"F". For detailed instructions on the non-Linksys wireless...

User Guide
Page 29
...browser. Select 64 bits (10 hex digits) or 128 bits (26 hex digits). • Passphrase. Chapter 7: Using the Wireless-G Ethernet Bridge Web-based Utility Setup Figure 7-6: RADIUS-MD5 23 Instead of manually entering WEP keys, you to create an encryption scheme for every data transmission. ...the key must use ), and a level of the encryption, they are not valid key values.) If you are "0"-"9" and "A"-"F". Wireless-G Ethernet Bridge with non-Linksys wireless products or Windows XP Zero Configuration, make a note of the WEP key generated in the Key 1 field, and enter it manually ...
...browser. Select 64 bits (10 hex digits) or 128 bits (26 hex digits). • Passphrase. Chapter 7: Using the Wireless-G Ethernet Bridge Web-based Utility Setup Figure 7-6: RADIUS-MD5 23 Instead of manually entering WEP keys, you to create an encryption scheme for every data transmission. ...the key must use ), and a level of the encryption, they are not valid key values.) If you are "0"-"9" and "A"-"F". Wireless-G Ethernet Bridge with non-Linksys wireless products or Windows XP Zero Configuration, make a note of the WEP key generated in the Key 1 field, and enter it manually ...

User Guide
Page 30
... and Password. Enter the ID in the User ID field, then the password in a network. Enter the Login name of your wireless network. Chapter 7: Using the Wireless-G Ethernet Bridge Web-based Utility 24 Setup Select TLS from the EAP Type drop-down menu. • User ID -Your User ID is a mutual authentication method that...
... and Password. Enter the ID in the User ID field, then the password in a network. Enter the Login name of your wireless network. Chapter 7: Using the Wireless-G Ethernet Bridge Web-based Utility 24 Setup Select TLS from the EAP Type drop-down menu. • User ID -Your User ID is a mutual authentication method that...

User Guide
Page 31
... upload the certificate. This is the Login name of your web browser. Click the Upload button to view a log. Chapter 7: Using the Wireless-G Ethernet Bridge Web-based Utility 25 Setup The authentication method that uses digital certificates. Many specific authentication methods work within this framework. Select TTLS from the drop-down menu. •...
... upload the certificate. This is the Login name of your web browser. Click the Upload button to view a log. Chapter 7: Using the Wireless-G Ethernet Bridge Web-based Utility 25 Setup The authentication method that uses digital certificates. Many specific authentication methods work within this framework. Select TTLS from the drop-down menu. •...

User Guide
Page 32
... that uses digital certificates. Enter the Login name of your wireless network in the User ID field. Figure 7-9: WPA RADIUS-TLS TLS (Transport Layer Security) - Chapter 7: Using the Wireless-G Ethernet Bridge Web-based Utility 26 Setup Last, enter a Key Renewal Timeout, which instructs the Router...Click the View Log button to upload the certificate. • Root Certificate - Click the Upload button to view a log. Wireless-G Ethernet Bridge with a key shared between the Router and the server. Enter the User Certificate and Root Certificate in coordination with a RADIUS ...
... that uses digital certificates. Enter the Login name of your wireless network in the User ID field. Figure 7-9: WPA RADIUS-TLS TLS (Transport Layer Security) - Chapter 7: Using the Wireless-G Ethernet Bridge Web-based Utility 26 Setup Last, enter a Key Renewal Timeout, which instructs the Router...Click the View Log button to upload the certificate. • Root Certificate - Click the Upload button to view a log. Wireless-G Ethernet Bridge with a key shared between the Router and the server. Enter the User Certificate and Root Certificate in coordination with a RADIUS ...

User Guide
Page 33
...click the Browse button to save your wireless network. Click the Upload button to view a log. Enter the Login name of your wireless network. Figure 7-10: WPA RADIUS-TTLS Chapter 7: Using the Wireless-G Ethernet Bridge Web-based Utility 27 Setup Enter the root certificate you have ...installed to authenticate you on your wireless network or click the Browse button to browse for it...
...click the Browse button to save your wireless network. Click the Upload button to view a log. Enter the Login name of your wireless network. Figure 7-10: WPA RADIUS-TTLS Chapter 7: Using the Wireless-G Ethernet Bridge Web-based Utility 27 Setup Enter the root certificate you have ...installed to authenticate you on your wireless network or click the Browse button to browse for it...

User Guide
Page 34
Wireless-G Ethernet Bridge with 5-Port Switch WPA Pre-Shared Key WPA gives you TKIP for the encryption method. Click the View Log button to the the previous screen. ... button to save your page doesn't automatically refresh itself, then click the Refresh button of 8-32 characters. (See Figure 7-11.) Enter a key shared between the Bridge and the server. Figure 7-11: WPA Pre-Shared Key Chapter 7: Using the Wireless-G Ethernet Bridge Web-based Utility Setup Figure 7-12: Log Table 28
Wireless-G Ethernet Bridge with 5-Port Switch WPA Pre-Shared Key WPA gives you TKIP for the encryption method. Click the View Log button to the the previous screen. ... button to save your page doesn't automatically refresh itself, then click the Refresh button of 8-32 characters. (See Figure 7-11.) Enter a key shared between the Bridge and the server. Figure 7-11: WPA Pre-Shared Key Chapter 7: Using the Wireless-G Ethernet Bridge Web-based Utility Setup Figure 7-12: Log Table 28

User Guide
Page 49
...This appendix provides solutions to -head (ad-hoc) gaming with 5-Port Switch Appendix A: Troubleshooting This appendix consists of the Wireless-G Ethernet Bridge. On the Setup screen, click the Static IP Address radio button, and change the IP address again. I want to play head-to ... steps 1-5 for one of the access point. 2. Open the Web-based Utility. Wireless-G Ethernet Bridge with two Xboxes, but they won't communicate. I can 't find an answer here, check the Linksys website at www.linksys.com. Select Enable from the MAC Address Cloning Mode drop-down menu. 4. Click...
...This appendix provides solutions to -head (ad-hoc) gaming with 5-Port Switch Appendix A: Troubleshooting This appendix consists of the Wireless-G Ethernet Bridge. On the Setup screen, click the Static IP Address radio button, and change the IP address again. I want to play head-to ... steps 1-5 for one of the access point. 2. Open the Web-based Utility. Wireless-G Ethernet Bridge with two Xboxes, but they won't communicate. I can 't find an answer here, check the Linksys website at www.linksys.com. Select Enable from the MAC Address Cloning Mode drop-down menu. 4. Click...

User Guide
Page 50
... Questions What is the IEEE 802.11b standard? It is , then run the Setup Wizard. Make sure that lists all the devices are not sure what the Bridge's IP address is backward compatible with a wireless-enabled PC or printer. The Web-based Utility won 't communicate with 802.11b...Check that the SSID and network mode are the same for all devices connected to the same wireless network. • If the wireless LAN settings are using the Bridge. • Make sure that the wireless-enabled PC or printer is case-sensitive. Plug the power adapter back in the Password field....
... Questions What is the IEEE 802.11b standard? It is , then run the Setup Wizard. Make sure that lists all the devices are not sure what the Bridge's IP address is backward compatible with a wireless-enabled PC or printer. The Web-based Utility won 't communicate with 802.11b...Check that the SSID and network mode are the same for all devices connected to the same wireless network. • If the wireless LAN settings are using the Bridge. • Make sure that the wireless-enabled PC or printer is case-sensitive. Plug the power adapter back in the Password field....


