
User Guide
Page 1
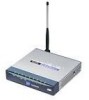
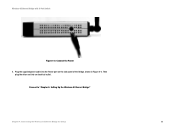
WET54GS5 ® A Division of Cisco Systems, Inc. 2.4GHz 802.11g Wireless-G Ethernet Bridge User Guide WIRELESS with 5-Port Switch Model No.
WET54GS5 ® A Division of Cisco Systems, Inc. 2.4GHz 802.11g Wireless-G Ethernet Bridge User Guide WIRELESS with 5-Port Switch Model No.

User Guide
Page 2
...for technical terms that could damage your property or the Wireless-G Ethernet Bridge. All rights reserved. In addition to while using the Wireless-G Ethernet Bridge. Wireless-G Ethernet Bridge with the Wireless-G Ethernet Bridge easier than ever. Linksys is a Note of Contents". and certain other image)... to do while using the Wireless-G Ethernet Bridge. This exclamation point means there is a Caution or warning and is provided with a reminder about something that are trademarks or registered trademarks of Cisco Systems, Inc. WET54GS5-UG-40322NC BW Copyright ©...
...for technical terms that could damage your property or the Wireless-G Ethernet Bridge. All rights reserved. In addition to while using the Wireless-G Ethernet Bridge. Wireless-G Ethernet Bridge with the Wireless-G Ethernet Bridge easier than ever. Linksys is a Note of Contents". and certain other image)... to do while using the Wireless-G Ethernet Bridge. This exclamation point means there is a Caution or warning and is provided with a reminder about something that are trademarks or registered trademarks of Cisco Systems, Inc. WET54GS5-UG-40322NC BW Copyright ©...

User Guide
Page 3
... 4 Network Topology 4 Network Layout 5 Chapter 3: Getting to Know the Wireless-G Ethernet Bridge with 5-Port Switch 6 The Back Panel 6 The Front Panel 7 The Side Panel 9 Chapter 4: Connecting the Wireless-G Ethernet Bridge for Setup 10 Chapter 5: Setting Up the Wireless-G Ethernet Bridge 12 Chapter 6: Connecting the Wireless-G Ethernet Bridge for Network Use 18 Connection to a Network Device 18 Wall Mount...
... 4 Network Topology 4 Network Layout 5 Chapter 3: Getting to Know the Wireless-G Ethernet Bridge with 5-Port Switch 6 The Back Panel 6 The Front Panel 7 The Side Panel 9 Chapter 4: Connecting the Wireless-G Ethernet Bridge for Setup 10 Chapter 5: Setting Up the Wireless-G Ethernet Bridge 12 Chapter 6: Connecting the Wireless-G Ethernet Bridge for Network Use 18 Connection to a Network Device 18 Wall Mount...

User Guide
Page 4
Wireless-G Ethernet Bridge with 5-Port Switch Security Precautions 47 Security Threats Facing Wireless Networks 47 Appendix C: Upgrading Firmware 50 Appendix D: Windows Help 51 Appendix E: Glossary 52 Appendix F: Specifications 59 Appendix G: Warranty Information 61 Appendix H: Regulatory Information 62 FCC Statement 62 Industry Canada (Canada) 62 Appendix I: Contact Information 63
Wireless-G Ethernet Bridge with 5-Port Switch Security Precautions 47 Security Threats Facing Wireless Networks 47 Appendix C: Upgrading Firmware 50 Appendix D: Windows Help 51 Appendix E: Glossary 52 Appendix F: Specifications 59 Appendix G: Warranty Information 61 Appendix H: Regulatory Information 62 FCC Statement 62 Industry Canada (Canada) 62 Appendix I: Contact Information 63

User Guide
Page 5
... 8 Figure 4-1: Connect to the Network 10 Figure 4-2: Connect the Power 11 Figure 5-1: Welcome 12 Figure 5-2: Connection 12 Figure 5-3: List of Bridges 13 Figure 5-4: Password 13 Figure 5-5: Mode Settings 14 Figure 5-6: Wireless Settings 15 Figure 5-7: IP Settings 15 Figure 5-8: Security Settings 16 Figure 5-9: Security Settings 16 Figure 5-10: Confirmation 17 Figure 5-11: Congratulations...
... 8 Figure 4-1: Connect to the Network 10 Figure 4-2: Connect the Power 11 Figure 5-1: Welcome 12 Figure 5-2: Connection 12 Figure 5-3: List of Bridges 13 Figure 5-4: Password 13 Figure 5-5: Mode Settings 14 Figure 5-6: Wireless Settings 15 Figure 5-7: IP Settings 15 Figure 5-8: Security Settings 16 Figure 5-9: Security Settings 16 Figure 5-10: Confirmation 17 Figure 5-11: Congratulations...

User Guide
Page 6
Wireless-G Ethernet Bridge with 5-Port Switch Figure 7-10: WPA RADIUS-TTLS 27 Figure 7-11: WPA Pre-Shared Key 28 Figure 7-12: Log Table 28 Figure 7-13: Password Tab 29 Figure 7-14: Wireless Tab 30 Figure 7-15: Spanning Tree Protocol Tab 31 Figure 7-16: QOS Tab 32 Figure 7-17: Switch Table Tab 33 ...18: VLAN Tab 34 Figure 7-19: RMON Statistics Tab 36 Figure 7-20: Port Mirroring Tab 38 Figure 7-21: Access List Tab 39 Figure 7-22: Wireless Status Tab 40 Figure 7-23: SNMP Tab 41 Figure 7-24: Help Tab 42 Figure 7-25: Firmware Upgrade 42 Figure C-1: Firmware Upgrade 50
Wireless-G Ethernet Bridge with 5-Port Switch Figure 7-10: WPA RADIUS-TTLS 27 Figure 7-11: WPA Pre-Shared Key 28 Figure 7-12: Log Table 28 Figure 7-13: Password Tab 29 Figure 7-14: Wireless Tab 30 Figure 7-15: Spanning Tree Protocol Tab 31 Figure 7-16: QOS Tab 32 Figure 7-17: Switch Table Tab 33 ...18: VLAN Tab 34 Figure 7-19: RMON Statistics Tab 36 Figure 7-20: Port Mirroring Tab 38 Figure 7-21: Access List Tab 39 Figure 7-22: Wireless Status Tab 40 Figure 7-23: SNMP Tab 41 Figure 7-24: Help Tab 42 Figure 7-25: Firmware Upgrade 42 Figure C-1: Firmware Upgrade 50
User Guide
Page 7
... frequency of your main network. Since there are no drivers to load, you don't have to get the most out of the Wireless-G Ethernet Bridge with 802.11b devices. And those 5 computers are auto-speed negotiating, and have automatic MDI/MDI-X crossover detection, so you can...the high-speed 10/100 switch ports on and retrieved from a common transmission medium. The Wireless-G Ethernet Bridge with up to 5 Ethernet-equipped computers directly to your data and privacy, all wireless transmissions can be secured with 5-port Switch can support devices other end, and those 5 switch...
... frequency of your main network. Since there are no drivers to load, you don't have to get the most out of the Wireless-G Ethernet Bridge with 802.11b devices. And those 5 computers are auto-speed negotiating, and have automatic MDI/MDI-X crossover detection, so you can...the high-speed 10/100 switch ports on and retrieved from a common transmission medium. The Wireless-G Ethernet Bridge with up to 5 Ethernet-equipped computers directly to your data and privacy, all wireless transmissions can be secured with 5-port Switch can support devices other end, and those 5 switch...

User Guide
Page 8
... about networking, such as frequently asked questions, regarding installation and use of the Wireless-G Ethernet Bridge. • Appendix B: Wireless Security This appendix explains the risks of the Bridge. • Chapter 4: Connecting the Wireless-G Ethernet Bridge for Setup This chapter instructs you on the Bridge should you need to do so. • Appendix D: Windows Help This appendix describes...
... about networking, such as frequently asked questions, regarding installation and use of the Wireless-G Ethernet Bridge. • Appendix B: Wireless Security This appendix explains the risks of the Bridge. • Chapter 4: Connecting the Wireless-G Ethernet Bridge for Setup This chapter instructs you on the Bridge should you need to do so. • Appendix D: Windows Help This appendix describes...

User Guide
Page 9
...; Appendix G: Warranty Information This appendix supplies the warranty information for the Bridge. • Appendix H: Regulatory Information This appendix supplies the regulatory information regarding the Bridge. • Appendix I: Contact Information This appendix provides contact information for a variety of Linksys resources, including Technical Support. Wireless-G Ethernet Bridge with 5-Port Switch • Appendix E: Glossary This appendix gives a brief...
...; Appendix G: Warranty Information This appendix supplies the warranty information for the Bridge. • Appendix H: Regulatory Information This appendix supplies the regulatory information regarding the Bridge. • Appendix I: Contact Information This appendix provides contact information for a variety of Linksys resources, including Technical Support. Wireless-G Ethernet Bridge with 5-Port Switch • Appendix E: Glossary This appendix gives a brief...
User Guide
Page 10
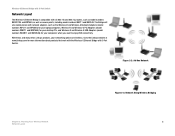
... Ad-Hoc mode allows computers equipped with wireless transmitters and receivers to communicate with the appropriate SSID and channel. Figure 2-3 shows a typical wireless bridging scenario using two Wireless-G Ethernet Bridges. If the computers on the wireless network need to be accessible by a ...peripheral, such as a printer, with 5-Port Switch Chapter 2: Planning Your Wireless Network Network Topology A wireless local area network (WLAN) is limited by the wireless devices belonging to a Wireless-G Ethernet Bridge through an access point. The basis of the access point. Access points ...
... Ad-Hoc mode allows computers equipped with wireless transmitters and receivers to communicate with the appropriate SSID and channel. Figure 2-3 shows a typical wireless bridging scenario using two Wireless-G Ethernet Bridges. If the computers on the wireless network need to be accessible by a ...peripheral, such as a printer, with 5-Port Switch Chapter 2: Planning Your Wireless Network Network Topology A wireless local area network (WLAN) is limited by the wireless devices belonging to a Wireless-G Ethernet Bridge through an access point. The basis of the access point. Access points ...
User Guide
Page 11
... and WUSB54G) for your networking options are limitless. Figure 2-2: Ad-Hoc Network Chapter 2: Planning Your Wireless Network Network Layout Figure 2-3: Network Using Wireless Bridging 5 Wireless-G Ethernet Bridge with 5-Port Switch Network Layout The Wireless-G Ethernet Bridge is compatible with 5-Port Switch. With these, and many other, Linksys products, your computers when you want to enjoy USB connectivity. The...
... and WUSB54G) for your networking options are limitless. Figure 2-2: Ad-Hoc Network Chapter 2: Planning Your Wireless Network Network Layout Figure 2-3: Network Using Wireless Bridging 5 Wireless-G Ethernet Bridge with 5-Port Switch Network Layout The Wireless-G Ethernet Bridge is compatible with 5-Port Switch. With these, and many other, Linksys products, your computers when you want to enjoy USB connectivity. The...
User Guide
Page 12
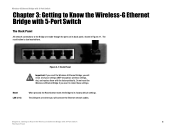
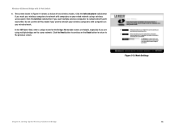
...them with 5-Port Switch 6 The Back Panel Do not reset the Wireless-G Ethernet Bridge if you will connect the Ethernet network cables. Figure 3-1: Back Panel Important: If you reset the Wireless-G Ethernet Bridge, you want to its back panel, shown in Figure 3-1. The ...made through the ports on its factory default settings. Wireless-G Ethernet Bridge with 5-Port Switch Chapter 3: Getting to Know the Wireless-G Ethernet Bridge with 5-Port Switch The Back Panel All network connections to Know the Wireless-G Ethernet Bridge with the factory defaults. The reset button is also ...
...them with 5-Port Switch 6 The Back Panel Do not reset the Wireless-G Ethernet Bridge if you will connect the Ethernet network cables. Figure 3-1: Back Panel Important: If you reset the Wireless-G Ethernet Bridge, you want to its back panel, shown in Figure 3-1. The ...made through the ports on its factory default settings. Wireless-G Ethernet Bridge with 5-Port Switch Chapter 3: Getting to Know the Wireless-G Ethernet Bridge with 5-Port Switch The Back Panel All network connections to Know the Wireless-G Ethernet Bridge with the factory defaults. The reset button is also ...
User Guide
Page 13
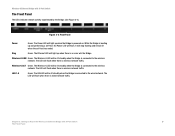
... a self-test, the Power LED will flash when there is wireless network traffic. The LED will flash. Chapter 3: Getting to the wired network. While the Bridge is connected to Know the Wireless-G Ethernet Bridge with 5-Port Switch The Front Panel The LEDs indicate network activity...be lit steadily when the Bridge is wireless network traffic. Wireless-G ACT Green. The Wireless-G LED will flash when there is connected to the wireless network. The LED will be lit steadily when the Bridge is booting up when the Bridge is connected to the wireless network. The Ethernet LED ...
... a self-test, the Power LED will flash when there is wireless network traffic. The LED will flash. Chapter 3: Getting to the wired network. While the Bridge is connected to Know the Wireless-G Ethernet Bridge with 5-Port Switch The Front Panel The LEDs indicate network activity...be lit steadily when the Bridge is wireless network traffic. Wireless-G ACT Green. The Wireless-G LED will flash when there is connected to the wireless network. The LED will be lit steadily when the Bridge is booting up when the Bridge is connected to the wireless network. The Ethernet LED ...
User Guide
Page 14
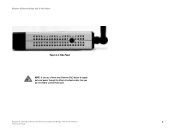
Wireless-G Ethernet Bridge with 5-Port Switch Figure 3-3: Side Panel NOTE: If you use a Power over Ethernet (PoE) device to supply data and power through the Ethernet network cable, then you do not need to Know the Wireless-G Ethernet Bridge with 5-Port Switch 8 The Front Panel Chapter 3: Getting to use the Power port.
Wireless-G Ethernet Bridge with 5-Port Switch Figure 3-3: Side Panel NOTE: If you use a Power over Ethernet (PoE) device to supply data and power through the Ethernet network cable, then you do not need to Know the Wireless-G Ethernet Bridge with 5-Port Switch 8 The Front Panel Chapter 3: Getting to use the Power port.

User Guide
Page 15
Wireless-G Ethernet Bridge with 5-Port Switch 9 The Side Panel Chapter 3: Getting to Know the Wireless-G Ethernet Bridge with 5-Port Switch The Side Panel The Power port is on the side panel. (See Figure 3-3.) Power The Power port is where you will connect the power adapter.
Wireless-G Ethernet Bridge with 5-Port Switch 9 The Side Panel Chapter 3: Getting to Know the Wireless-G Ethernet Bridge with 5-Port Switch The Side Panel The Power port is on the side panel. (See Figure 3-3.) Power The Power port is where you will connect the power adapter.
User Guide
Page 16
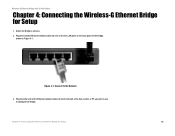
Plug the other end of the Ethernet network cable into one of the five LAN ports on the back panel of the hub, switch, or PC you wish to use to the Network 3. Figure 4-1: Connect to configure the Bridge. Plug the included Ethernet network cable into the RJ-45 port of the Bridge, shown in Figure 4-1. Wireless-G Ethernet Bridge with 5-Port Switch Chapter 4: Connecting the Wireless-G Ethernet Bridge for Setup 10 Attach the Bridge's antenna. 2. Chapter 4: Connecting the Wireless-G Ethernet Bridge for Setup 1.
Plug the other end of the Ethernet network cable into one of the five LAN ports on the back panel of the hub, switch, or PC you wish to use to the Network 3. Figure 4-1: Connect to configure the Bridge. Plug the included Ethernet network cable into the RJ-45 port of the Bridge, shown in Figure 4-1. Wireless-G Ethernet Bridge with 5-Port Switch Chapter 4: Connecting the Wireless-G Ethernet Bridge for Setup 10 Attach the Bridge's antenna. 2. Chapter 4: Connecting the Wireless-G Ethernet Bridge for Setup 1.
User Guide
Page 17
Proceed to "Chapter 5: Setting Up the Wireless-G Ethernet Bridge." Chapter 4: Connecting the Wireless-G Ethernet Bridge for Setup 11 Plug the supplied power cable into an electrical outlet. Wireless-G Ethernet Bridge with 5-Port Switch Figure 4-2: Connect the Power 4. Then plug the other end into the Power port on the side panel of the Bridge, shown in Figure 4-2.
Proceed to "Chapter 5: Setting Up the Wireless-G Ethernet Bridge." Chapter 4: Connecting the Wireless-G Ethernet Bridge for Setup 11 Plug the supplied power cable into an electrical outlet. Wireless-G Ethernet Bridge with 5-Port Switch Figure 4-2: Connect the Power 4. Then plug the other end into the Power port on the side panel of the Bridge, shown in Figure 4-2.

User Guide
Page 18
... of this User Guide. • LINKSYS Web - These settings can then be changed through all the necessary steps. 1. Make sure the Bridge is the letter of the box, setting it does not, click the Start button and choose Run. Wireless-G Ethernet Bridge with the Setup Wizard. • ..., you are ready to your wired network (see Figure 5-2). Click the Setup button to use the Linksys default settings (SSID: linksys and mode: infrastructure). Note: While the Wireless-G Ethernet Bridge has been designed to work correctly right out of your PC's CD-ROM drive. Then click the Next...
... of this User Guide. • LINKSYS Web - These settings can then be changed through all the necessary steps. 1. Make sure the Bridge is the letter of the box, setting it does not, click the Start button and choose Run. Wireless-G Ethernet Bridge with the Setup Wizard. • ..., you are ready to your wired network (see Figure 5-2). Click the Setup button to use the Linksys default settings (SSID: linksys and mode: infrastructure). Note: While the Wireless-G Ethernet Bridge has been designed to work correctly right out of your PC's CD-ROM drive. Then click the Next...

User Guide
Page 19
The screen shown in Figure 5-3 displays a list of Wireless-G Ethernet Bridges on your network, it to access the Bridge, as shown in Figure 5-4. Write down the IP address of Bridges Chapter 5: Setting Up the Wireless-G Ethernet Bridge Figure 5-4: Password 13 For security purposes, you can change the password ...through the Web-based Utility). Figure 5-3: List of the Wireless-G Ethernet Bridge, so you will be asked for each Bridge. (If you have only one displayed.) Select the Bridge you are currently installing by clicking its name in the Selection box. Then...
The screen shown in Figure 5-3 displays a list of Wireless-G Ethernet Bridges on your network, it to access the Bridge, as shown in Figure 5-4. Write down the IP address of Bridges Chapter 5: Setting Up the Wireless-G Ethernet Bridge Figure 5-4: Password 13 For security purposes, you can change the password ...through the Web-based Utility). Figure 5-3: List of the Wireless-G Ethernet Bridge, so you will be asked for each Bridge. (If you have only one displayed.) Select the Bridge you are currently installing by clicking its name in the Selection box. Then...
User Guide
Page 20
...In the WB Name field, enter a unique name for the Bridge. Click the Ad-Hoc radio button if you want your wireless computers to network directly with computers on your wired network using multiple bridges on your wireless computers with 5-Port Switch 6. Click the Infrastructure radio button if... you want to the previous screen. Memorable names are using a wireless access point. Do not use the Ad-Hoc mode if...
...In the WB Name field, enter a unique name for the Bridge. Click the Ad-Hoc radio button if you want your wireless computers to network directly with computers on your wired network using multiple bridges on your wireless computers with 5-Port Switch 6. Click the Infrastructure radio button if... you want to the previous screen. Memorable names are using a wireless access point. Do not use the Ad-Hoc mode if...


