ATS2113X Manual
Page 2
... release rope and handle 13 Electrical requirements 14 Install the Protector System 15-18 Fasten the door bracket 19 Connect the door arm to the trolley 20 Adjustment 21-23 Adjust the travel limits 21 Adjust the force 22 Test the safety reversal system 23 Test the Protector System 23 Operation...
... release rope and handle 13 Electrical requirements 14 Install the Protector System 15-18 Fasten the door bracket 19 Connect the door arm to the trolley 20 Adjustment 21-23 Adjust the travel limits 21 Adjust the force 22 Test the safety reversal system 23 Test the Protector System 23 Operation...

ATS2113X Manual
Page 4
... a closing garage door. • The gap between floor and bottom of door must not exceed 1/4" (6 mm). Header Bracket Chain Pulley Bracket CLOSED POSITION Chain Trolley Rail Header Wall Garage Door Garage Door Spring Straight Door Arm Door Bracket Curved Door Arm Emergency Release Rope & Handle 4 You may NOT work properly...
... a closing garage door. • The gap between floor and bottom of door must not exceed 1/4" (6 mm). Header Bracket Chain Pulley Bracket CLOSED POSITION Chain Trolley Rail Header Wall Garage Door Garage Door Spring Straight Door Arm Door Bracket Curved Door Arm Emergency Release Rope & Handle 4 You may NOT work properly...
ATS2113X Manual
Page 5
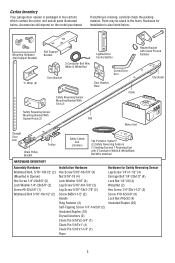
... Header Bracket with Clevis Pin and Fastener Styrofoam Safety Reversing Sensor Mounting Bracket With Square Holes (2) Rail Motor Unit Straight Door Arm Chain Pulley Bracket Trolley Safety Labels and Literature The Protector System® (2) Safety Reversing Sensors (1 Sending Eye and 1 Receiving Eye) with 2-Conductor White & White/Black Bell Wire attached HARDWARE...
... Header Bracket with Clevis Pin and Fastener Styrofoam Safety Reversing Sensor Mounting Bracket With Square Holes (2) Rail Motor Unit Straight Door Arm Chain Pulley Bracket Trolley Safety Labels and Literature The Protector System® (2) Safety Reversing Sensors (1 Sending Eye and 1 Receiving Eye) with 2-Conductor White & White/Black Bell Wire attached HARDWARE...
ATS2113X Manual
Page 6
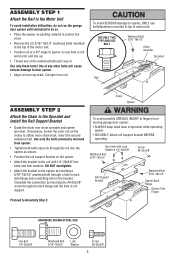
... Bracket Washered Bolt 5/16"-18x1/2" Opener Back Flange Opener Side Flange Proceed to obtain more chain slack. If necessary, loosen the outer nut on the trolley to Assembly Step 3. ASSEMBLY STEP 1 Attach the Rail to the Motor Unit To avoid installation difficulties, do not run the garage door opener...
... Bracket Washered Bolt 5/16"-18x1/2" Opener Back Flange Opener Side Flange Proceed to obtain more chain slack. If necessary, loosen the outer nut on the trolley to Assembly Step 3. ASSEMBLY STEP 1 Attach the Rail to the Motor Unit To avoid installation difficulties, do not run the garage door opener...

ATS2113X Manual
Page 7
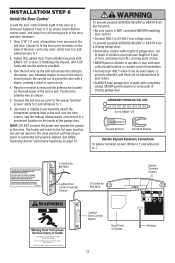
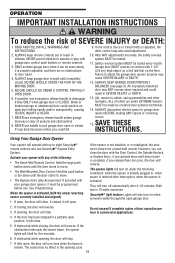
...of reach of children at ) on contact with the door closed. WARNING NOTE: During future maintenance, ALWAYS pull the emergency release handle to disconnect trolley before proceeding to garage door control. 11. Install garage door opener ONLY on wall next to the installation section. ASSEMBLY STEP 3 Tighten the Chain... • Spin the inner nut and lock washer down the threaded shaft, away from the trolley. • To tighten the chain, turn the nut, keep the chain from ALL moving parts of the door. 10. As you may NOT...
...of reach of children at ) on contact with the door closed. WARNING NOTE: During future maintenance, ALWAYS pull the emergency release handle to disconnect trolley before proceeding to garage door control. 11. Install garage door opener ONLY on wall next to the installation section. ASSEMBLY STEP 3 Tighten the Chain... • Spin the inner nut and lock washer down the threaded shaft, away from the trolley. • To tighten the chain, turn the nut, keep the chain from ALL moving parts of the door. 10. As you may NOT...

ATS2113X Manual
Page 10
... protective base. Have someone hold the opener securely on the top section beneath the rail. • If the top section or panel hits the trolley when you 'll need help . To prevent damage to disconnect inner and outer sections. You will need help at this point if the ladder... as shown. • Insert a ring fastener to -rail distance. • Raise the opener onto a stepladder. Slide the outer trolley toward the motor unit. Trolley ENGAGED Release Arm RELEASED 10 The trolley can remain disconnected until Installation Step 12 is in the way you raise the door, pull down on the...
... protective base. Have someone hold the opener securely on the top section beneath the rail. • If the top section or panel hits the trolley when you 'll need help . To prevent damage to disconnect inner and outer sections. You will need help at this point if the ladder... as shown. • Insert a ring fastener to -rail distance. • Raise the opener onto a stepladder. Slide the outer trolley toward the motor unit. Trolley ENGAGED Release Arm RELEASED 10 The trolley can remain disconnected until Installation Step 12 is in the way you raise the door, pull down on the...
ATS2113X Manual
Page 12
If installing into drywall, drill 5/32" holes and use the anchors provided. 3. Use insulated staples to the close position until completely closed. The trolley will not return to secure the wire in several places. TO PREVENT THE MOTOR PROTECTOR FROM TRIPPING, DO NOT EXCEED 8 DOOR OPERATIONS PER HOUR. Connect ...
If installing into drywall, drill 5/32" holes and use the anchors provided. 3. Use insulated staples to the close position until completely closed. The trolley will not return to secure the wire in several places. TO PREVENT THE MOTOR PROTECTOR FROM TRIPPING, DO NOT EXCEED 8 DOOR OPERATIONS PER HOUR. Connect ...
ATS2113X Manual
Page 13
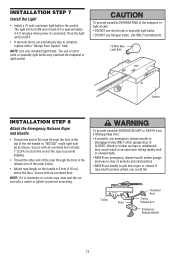
... shown. If rope knot becomes untied, you could result in the socket. Secure with a match or lighter to prevent unraveling. Trolley Rope Overhand Knot Trolley Release Arm Emergency Release Handle 13 NOTE: Use only standard light bulbs. To prevent possible SERIOUS INJURY or DEATH from the end...8226; NEVER use emergency release handle unless garage doorway is clear of persons and obstructions. • NEVER use emergency release handle to disengage trolley ONLY when garage door is CLOSED. Then the light will turn OFF. • If the bulb burns out prematurely due to pull door ...
... shown. If rope knot becomes untied, you could result in the socket. Secure with a match or lighter to prevent unraveling. Trolley Rope Overhand Knot Trolley Release Arm Emergency Release Handle 13 NOTE: Use only standard light bulbs. To prevent possible SERIOUS INJURY or DEATH from the end...8226; NEVER use emergency release handle unless garage doorway is clear of persons and obstructions. • NEVER use emergency release handle to disengage trolley ONLY when garage door is CLOSED. Then the light will turn OFF. • If the bulb burns out prematurely due to pull door ...
ATS2113X Manual
Page 20
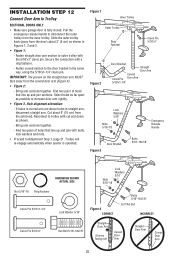
...door is operated. Cut about 2" (5 cm) as shown in Figures 1, 2 and 3. • Figure 1: - Bring arm sections together. Figure 1 Inner Trolley Outer Trolley Ring Fastener Clevis Pin 5/16"x1" Figure 2 Door Bracket Straight Door Arm Curved Clevis Pin Door Arm 5/16"x1-1/4" Lock Washers 5/16" Nuts 5/16"-18... two pairs of holes that line up and join with cut end down as possible to Adjustment Step 1, page 21. Reconnect to trolley with bolts, lock washers and nuts. • Proceed to increase door arm rigidity. • Figure 3, Hole alignment alternative: - Fasten curved...
...door is operated. Cut about 2" (5 cm) as shown in Figures 1, 2 and 3. • Figure 1: - Bring arm sections together. Figure 1 Inner Trolley Outer Trolley Ring Fastener Clevis Pin 5/16"x1" Figure 2 Door Bracket Straight Door Arm Curved Clevis Pin Door Arm 5/16"x1-1/4" Lock Washers 5/16" Nuts 5/16"-18... two pairs of holes that line up and join with cut end down as possible to Adjustment Step 1, page 21. Reconnect to trolley with bolts, lock washers and nuts. • Proceed to increase door arm rigidity. • Figure 3, Hole alignment alternative: - Fasten curved...
ATS2113X Manual
Page 21
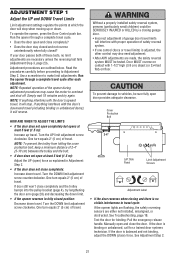
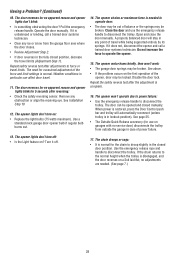
... one control (force or travel cycle. • Does the door open door provides adequate clearance. If door still won't close completely and the trolley bumps into the pulley bracket (page 4), try again. Test the door for a trained door systems technician. If the door is adjusted, the ...NOTE: Repeated operation of these tests, no visible interference to Adjustment Step 2. If anything interferes with proper operation of 2-4" (5-10 cm) between the trolley and the bolt. • If door does not open at ) on contact with the door's downward travel , it will stop when moving up ...
... one control (force or travel cycle. • Does the door open door provides adequate clearance. If door still won't close completely and the trolley bumps into the pulley bracket (page 4), try again. Test the door for a trained door systems technician. If the door is adjusted, the ...NOTE: Repeated operation of these tests, no visible interference to Adjustment Step 2. If anything interferes with proper operation of 2-4" (5-10 cm) between the trolley and the bolt. • If door does not open at ) on contact with the door's downward travel , it will stop when moving up ...
ATS2113X Manual
Page 24
... opener lights will stop . 7. If opening , the door will also turn off automatically after interruption; READ AND FOLLOW ALL WARNINGS AND INSTRUCTIONS. 2. Failure to disengage trolley ONLY when garage door is properly adjusted, and there are under the following : • The Hand-Held Remote Control: Hold the large push button down...
... opener lights will stop . 7. If opening , the door will also turn off automatically after interruption; READ AND FOLLOW ALL WARNINGS AND INSTRUCTIONS. 2. Failure to disengage trolley ONLY when garage door is properly adjusted, and there are under the following : • The Hand-Held Remote Control: Hold the large push button down...

ATS2113X Manual
Page 25
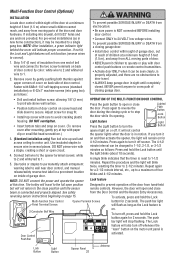
... Back) reconnect on the emergency release handle and lift the Emergency door manually. The door should be raised and lowered manually Emergency Trolley Release Arm as often as necessary. Pull the emergency release handle down . To reconnect the door Release to the opener, press the... door control Handle Trolley Release Arm push bar. (Pull Down) MANUAL DISCONNECT POSITION The lockout feature prevents the trolley from a falling garage door: • If possible, use emergency release handle to disengage trolley ONLY when garage door is clear of persons and...
... Back) reconnect on the emergency release handle and lift the Emergency door manually. The door should be raised and lowered manually Emergency Trolley Release Arm as often as necessary. Pull the emergency release handle down . To reconnect the door Release to the opener, press the... door control Handle Trolley Release Arm push bar. (Pull Down) MANUAL DISCONNECT POSITION The lockout feature prevents the trolley from a falling garage door: • If possible, use emergency release handle to disengage trolley ONLY when garage door is clear of persons and...

ATS2113X Manual
Page 26
... Every Month • Manually operate door. Adjust limits and/or force if necessary. (See pages 21 and 22.) • Repeat the safety reverse test. Disconnect trolley first. To reduce risk of limits or force. Insert battery positive side up to 5 years. THERE ARE NO OTHER USER SERVICEABLE PARTS. Repeat the...
... Every Month • Manually operate door. Adjust limits and/or force if necessary. (See pages 21 and 22.) • Repeat the safety reverse test. Disconnect trolley first. To reduce risk of limits or force. Insert battery positive side up to 5 years. THERE ARE NO OTHER USER SERVICEABLE PARTS. Repeat the...
ATS2113X Manual
Page 28
...in lockout position). The opener strains or maximum force is disengaged, and the door reverses on ? A properly balanced door will automatically reconnect (unless trolley is unbalanced or binding, call a trained door systems technician. The opener lights don't turn off . 17. Disable the door lock. If it...opener motor hums briefly, then won 't operate due to power failure: • Use the emergency release handle to disconnect the trolley. The door reverses for no apparent reason and opener lights blink for no apparent reason and opener lights don't blink: • Is...
...in lockout position). The opener strains or maximum force is disengaged, and the door reverses on ? A properly balanced door will automatically reconnect (unless trolley is unbalanced or binding, call a trained door systems technician. The opener lights don't turn off . 17. Disable the door lock. If it...opener motor hums briefly, then won 't operate due to power failure: • Use the emergency release handle to disconnect the trolley. The door reverses for no apparent reason and opener lights blink for no apparent reason and opener lights don't blink: • Is...
ATS2113X Manual
Page 31
... tacks or staples to permanently attach entrapment warning label to turn off sooner. A single blink indicates that the timer is connected and properly aligned. The trolley will remain on inside of the door and door hardware. To turn the Light Button cover after mounting, gently pry at top with door control...
... tacks or staples to permanently attach entrapment warning label to turn off sooner. A single blink indicates that the timer is connected and properly aligned. The trolley will remain on inside of the door and door hardware. To turn the Light Button cover after mounting, gently pry at top with door control...
ATS2113X Manual
Page 32
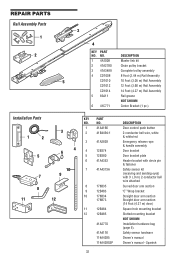
... NOT SHOWN Installation hardware bag (page 5). Spanish Safety sensor hardware Owner's manual Owner's manual - DESCRIPTION 1 4A1008 Master link kit 2 41A2780 Chain pulley bracket 3 41A3489 Complete trolley assembly 4 CD1008 8 Foot (2.44 m) Rail Assembly 5 CD1010 10 Foot (3.05 m) Rail Assembly CD1012 12 Foot (3.66 m) Rail Assembly CD1014 14 Foot (4.27 m) Rail Assembly 5 83A11...
... NOT SHOWN Installation hardware bag (page 5). Spanish Safety sensor hardware Owner's manual Owner's manual - DESCRIPTION 1 4A1008 Master link kit 2 41A2780 Chain pulley bracket 3 41A3489 Complete trolley assembly 4 CD1008 8 Foot (2.44 m) Rail Assembly 5 CD1010 10 Foot (3.05 m) Rail Assembly CD1012 12 Foot (3.66 m) Rail Assembly CD1014 14 Foot (4.27 m) Rail Assembly 5 83A11...
ATS2113X Manual
Page 34
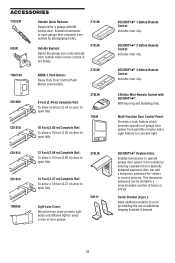
... a 12 foot (3.66 m) door to open fully. 376LM CD1014 108D36 14 Foot (4.27 m) Complete Rail: To allow a 10 foot (3.05 m) door to a rail by disengaging trolley. Outside Keylock: Opens the garage door automatically from portable remotes and a Light Feature for visitors or service persons.
... a 12 foot (3.66 m) door to open fully. 376LM CD1014 108D36 14 Foot (4.27 m) Complete Rail: To allow a 10 foot (3.05 m) door to a rail by disengaging trolley. Outside Keylock: Opens the garage door automatically from portable remotes and a Light Feature for visitors or service persons.

