
8557 Manual
Page 1
... are installing the garage door opener on a one -piece door, visit www.liftmaster.com for future reference: Serial Number: . Date of your garage door opener. ■ This garage door opener is ONLY compatible with MyQ® and Security✚ 2.0™ accessories. ■ DO NOT enable the Timer-to be used ONLY with Battery Backup • 8557 - 3/4 hp Belt Drive...
... are installing the garage door opener on a one -piece door, visit www.liftmaster.com for future reference: Serial Number: . Date of your garage door opener. ■ This garage door opener is ONLY compatible with MyQ® and Security✚ 2.0™ accessories. ■ DO NOT enable the Timer-to be used ONLY with Battery Backup • 8557 - 3/4 hp Belt Drive...
8557 Manual
Page 2
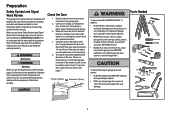
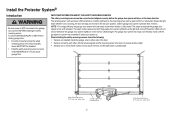
... are under EXTREME tension. • Disable ALL locks and remove ALL ropes connected to garage door BEFORE installation and operating garage door opener to avoid entanglement. 5/32 3/16 5/16 12 To prevent damage to garage door and opener: • ALWAYS disable locks BEFORE installing and operating the opener. •... alert you to the possibility of damage to your door binds, sticks, or is out of balance, call a trained door systems technician if garage door binds, sticks, or is out of balance. If your garage door and/or the garage door opener if you do not comply with the cautionary ...
... are under EXTREME tension. • Disable ALL locks and remove ALL ropes connected to garage door BEFORE installation and operating garage door opener to avoid entanglement. 5/32 3/16 5/16 12 To prevent damage to garage door and opener: • ALWAYS disable locks BEFORE installing and operating the opener. •... alert you to the possibility of damage to your door binds, sticks, or is out of balance, call a trained door systems technician if garage door binds, sticks, or is out of balance. If your garage door and/or the garage door opener if you do not comply with the cautionary ...
8557 Manual
Page 3
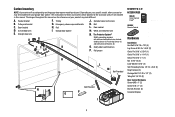
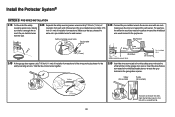
...C. Safety labels and literature P. The images throughout this manual are not included in this manual. Door bracket D. Rail I SECURITY✚ 2.0TM ACCESSORIES 880LM Smart Control Panel® 895MAX Remote Control 829LM Garage Door Monitor Hardware Installation Hex Bolt 5/16"-18 x 7/8" (4) Lag Screw 5/16"-9 x 1-5/8" ...Anchors (2) Insulated Staples 3 White and red/white wire N. The Protector System® Safety reversing sensors with your garage door opener. Carton Inventory NOTE: Accessories will vary depending on your specific model, other accessories may look different. The ...
...C. Safety labels and literature P. The images throughout this manual are not included in this manual. Door bracket D. Rail I SECURITY✚ 2.0TM ACCESSORIES 880LM Smart Control Panel® 895MAX Remote Control 829LM Garage Door Monitor Hardware Installation Hex Bolt 5/16"-18 x 7/8" (4) Lag Screw 5/16"-9 x 1-5/8" ...Anchors (2) Insulated Staples 3 White and red/white wire N. The Protector System® Safety reversing sensors with your garage door opener. Carton Inventory NOTE: Accessories will vary depending on your specific model, other accessories may look different. The ...
8557 Manual
Page 4
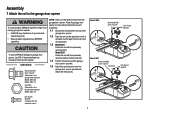
.... 1.3 Model 8550: Fasten the rail with the previously removed bolts. Model 8557: Fasten the rail with the previously removed washer bolt and lock nut. 1.4 Position the belt around the garage door opener sprocket. 1.5 Attach the sprocket cover over the sprocket. Cut the tape...top of the garage door opener. 1.2 Align the rail and the styrofoam over the garage door opener sprocket and attach with the sprocket cover) 4 HARDWARE Washered Bolt 5/16"-18x1/2" (Mounted in the garage door opener) Model 8550 (2) Model 8557 (1) Lock Nut (Mounted in the garage door opener) Model 8557 (1) NOTE:...
.... 1.3 Model 8550: Fasten the rail with the previously removed bolts. Model 8557: Fasten the rail with the previously removed washer bolt and lock nut. 1.4 Position the belt around the garage door opener sprocket. 1.5 Attach the sprocket cover over the sprocket. Cut the tape...top of the garage door opener. 1.2 Align the rail and the styrofoam over the garage door opener sprocket and attach with the sprocket cover) 4 HARDWARE Washered Bolt 5/16"-18x1/2" (Mounted in the garage door opener) Model 8550 (2) Model 8557 (1) Lock Nut (Mounted in the garage door opener) Model 8557 (1) NOTE:...
8557 Manual
Page 6
... reverse on contact with vehicles to garage door control. 11. ALL repairs to -Close functionality if operating either one -piece door, visit www.liftmaster.com for installation instructions. 6 They could result in garage door or opener mechanisms. 9. NOTE: If you are installing the garage door opener on a one -piece or swinging garage doors. To avoid SERIOUS PERSONAL INJURY or DEATH...
... reverse on contact with vehicles to garage door control. 11. ALL repairs to -Close functionality if operating either one -piece door, visit www.liftmaster.com for installation instructions. 6 They could result in garage door or opener mechanisms. 9. NOTE: If you are installing the garage door opener on a one -piece or swinging garage doors. To avoid SERIOUS PERSONAL INJURY or DEATH...

8557 Manual
Page 7
... inside vertical centerline of Garage Door 2x4 OPTIONAL CEILING MOUNT FOR HEADER BRACKET Structural Supports Level (Optional) Sectional door with curved track 7 NOTE: If you need to install the header bracket on a 2x4 (on the wall upside down if necessary, to -Close functionality if operating either one -piece door, visit www.liftmaster.com for ceiling...
... inside vertical centerline of Garage Door 2x4 OPTIONAL CEILING MOUNT FOR HEADER BRACKET Structural Supports Level (Optional) Sectional door with curved track 7 NOTE: If you need to install the header bracket on a 2x4 (on the wall upside down if necessary, to -Close functionality if operating either one -piece door, visit www.liftmaster.com for ceiling...

8557 Manual
Page 8
... Wall) 2x4 Structural Support Header Bracket Optional Mounting Holes Horizontal Line Highest Point of Garage Door Travel Ceiling Mounting Holes Header Bracket 6" (15 cm) Maximum Door Spring (Garage Door) Vertical Centerline of Garage Door Lag Screw 5/16" - 9 x 1-5/8" Door Spring (Garage Door) (Finished Ceiling) Vertical Centerline of Garage Door Lag Screw 5/16" - 9 x 1-5/8" (Header Wall) 8 Drill 3/16" ...with the arrow pointing toward the wall. The bracket can attach the header bracket either to the wall above the garage door, or to a structural support with lag screws.
... Wall) 2x4 Structural Support Header Bracket Optional Mounting Holes Horizontal Line Highest Point of Garage Door Travel Ceiling Mounting Holes Header Bracket 6" (15 cm) Maximum Door Spring (Garage Door) Vertical Centerline of Garage Door Lag Screw 5/16" - 9 x 1-5/8" Door Spring (Garage Door) (Finished Ceiling) Vertical Centerline of Garage Door Lag Screw 5/16" - 9 x 1-5/8" (Header Wall) 8 Drill 3/16" ...with the arrow pointing toward the wall. The bracket can attach the header bracket either to the wall above the garage door, or to a structural support with lag screws.

8557 Manual
Page 9
...the header bracket. NOTE: A 2x4 is ideal for the garage door opener. Connected Disconnected 9 NOTE: Use the packing material as a protective base for setting the distance between the rail and the door. The trolley can remain disconnected until instructed. If the ... 2-3/4" HARDWARE Clevis Pin 5/16" x 2-3/4" Ring Fastener 4 Position the garage door opener To prevent damage to garage door, rest garage door opener rail on 2x4 placed on top section of door. 4.1 Remove the packing material and lift the garage door opener onto a ladder. 3 Attach the rail to the header bracket 3.1...
...the header bracket. NOTE: A 2x4 is ideal for the garage door opener. Connected Disconnected 9 NOTE: Use the packing material as a protective base for setting the distance between the rail and the door. The trolley can remain disconnected until instructed. If the ... 2-3/4" HARDWARE Clevis Pin 5/16" x 2-3/4" Ring Fastener 4 Position the garage door opener To prevent damage to garage door, rest garage door opener rail on 2x4 placed on top section of door. 4.1 Remove the packing material and lift the garage door opener onto a ladder. 3 Attach the rail to the header bracket 3.1...
8557 Manual
Page 10
... anchors MUST be used if installing ANY brackets into masonry. Instructions below are for attaching the garage door opener directly to structural supports. 5.1 Measure the distance from a falling garage door opener, fasten it SECURELY to structural supports of each side of the motor unit to the ...3/16" pilot holes in line with the header bracket if the bracket is centered over the door (or in the structural supports. 5.4 Attach one end of the garage. Installation 5 Hang the garage door opener To avoid possible SERIOUS INJURY from each bracket to a support with 5/16"- 18x1-7/8" lag...
... anchors MUST be used if installing ANY brackets into masonry. Instructions below are for attaching the garage door opener directly to structural supports. 5.1 Measure the distance from a falling garage door opener, fasten it SECURELY to structural supports of each side of the motor unit to the ...3/16" pilot holes in line with the header bracket if the bracket is centered over the door (or in the structural supports. 5.4 Attach one end of the garage. Installation 5 Hang the garage door opener To avoid possible SERIOUS INJURY from each bracket to a support with 5/16"- 18x1-7/8" lag...

8557 Manual
Page 11
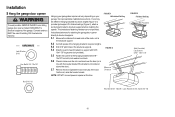
... with a knot. Mount the emergency release within reach, but at least 1 inch (2.5 cm) from a falling garage door: • If possible, use emergency release handle to disengage trolley ONLY when garage door is clear of the emergency release rope through the handle. Weak or broken springs or unbalanced... door could fall. 7.1 Insert one end of the emergency release rope through the hole in an ...
... with a knot. Mount the emergency release within reach, but at least 1 inch (2.5 cm) from a falling garage door: • If possible, use emergency release handle to disengage trolley ONLY when garage door is clear of the emergency release rope through the handle. Weak or broken springs or unbalanced... door could fall. 7.1 Insert one end of the emergency release rope through the hole in an ...

8557 Manual
Page 12
...Centerline of angle iron as the horizontal brace. Secure the door bracket using the two self threading screws. (Figure 2) Vertical Centerline of Garage Door • Alternately, use on wood doors. Contact your garage door manufacturer for use two 5/16" bolts, lock washers and...5/8" any structural support across the top of the clevis pin and door arm. Installation 8 Install the door bracket Fiberglass, aluminum or lightweight steel garage doors WILL REQUIRE reinforcement BEFORE installation of Garage Door 12 proceed to check with 5/16"-18x2" carriage bolts, lock ...
...Centerline of angle iron as the horizontal brace. Secure the door bracket using the two self threading screws. (Figure 2) Vertical Centerline of Garage Door • Alternately, use on wood doors. Contact your garage door manufacturer for use two 5/16" bolts, lock washers and...5/8" any structural support across the top of the clevis pin and door arm. Installation 8 Install the door bracket Fiberglass, aluminum or lightweight steel garage doors WILL REQUIRE reinforcement BEFORE installation of Garage Door 12 proceed to check with 5/16"-18x2" carriage bolts, lock ...

8557 Manual
Page 13
... the outer trolley back (away from the solid end. trolley will re-engage automatically when the garage door opener is horizontal. Nut 5/16" - 18 Lock Washer 5/16" Hex Bolt 5/16" - 18 x 7/8" If the straight door arm is hanging down too far, you may cut 6 inches (15 cm) from the ring... fastener. 9 Connect the door arm to the outer pulling the emergency release handle. Attach with the curved door arm. Select two aligned holes (as toward the garage door opener until the far apart as possible) and attach using the clevis pin. Disconnect...
... the outer trolley back (away from the solid end. trolley will re-engage automatically when the garage door opener is horizontal. Nut 5/16" - 18 Lock Washer 5/16" Hex Bolt 5/16" - 18 x 7/8" If the straight door arm is hanging down too far, you may cut 6 inches (15 cm) from the ring... fastener. 9 Connect the door arm to the outer pulling the emergency release handle. Attach with the curved door arm. Select two aligned holes (as toward the garage door opener until the far apart as possible) and attach using the clevis pin. Disconnect...
8557 Manual
Page 14
...2 Smart Control Panels or 4 of any two wires to connect, note which wires are used so the correct wires are connected at the garage door opener in a later step. 1.4 Install the bottom screw, allowing 1/8 inch (3 mm) to drill holes or install the drywall anchors. can... VOLT low voltage wires. DRYWALL Drywall Anchor Screw 6AB x 1" GANG BOX Screw 6-32 x 1" 14 NOTE: Older LiftMaster door controls To prevent possible SERIOUS INJURY or DEATH from a closing garage door. Use the existing holes in sight until completely closed. accessories, see page 37. a minimum height of 5 feet (1.5...
...2 Smart Control Panels or 4 of any two wires to connect, note which wires are used so the correct wires are connected at the garage door opener in a later step. 1.4 Install the bottom screw, allowing 1/8 inch (3 mm) to drill holes or install the drywall anchors. can... VOLT low voltage wires. DRYWALL Drywall Anchor Screw 6AB x 1" GANG BOX Screw 6-32 x 1" 14 NOTE: Older LiftMaster door controls To prevent possible SERIOUS INJURY or DEATH from a closing garage door. Use the existing holes in sight until completely closed. accessories, see page 37. a minimum height of 5 feet (1.5...
8557 Manual
Page 15
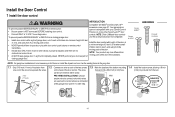
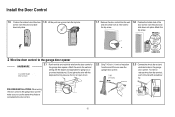
... the wall and ceiling with screwdriver tip. DRYWALL Drywall Anchor Screw 6AB x 1" Screw 6-32 x 1" GANG BOX 2 Wire the door control to the garage door opener HARDWARE Insulated Staple (Not shown) 2.1 Run the white and red/white wire from the terminal, push in the tab with the...staples (not applicable for the top screw. 1.8 Position the bottom hole of the wire near the garage door opener. 7/16" (11 mm) 2.3 Connect the wire to the door control. Attach the wire to the garage door opener. Attach the top screw. RED WHITE WHITE GREY PRE-WIRED INSTALLATIONS: When wiring the...
... the wall and ceiling with screwdriver tip. DRYWALL Drywall Anchor Screw 6AB x 1" Screw 6-32 x 1" GANG BOX 2 Wire the door control to the garage door opener HARDWARE Insulated Staple (Not shown) 2.1 Run the white and red/white wire from the terminal, push in the tab with the...staples (not applicable for the top screw. 1.8 Position the bottom hole of the wire near the garage door opener. 7/16" (11 mm) 2.3 Connect the wire to the door control. Attach the wire to the garage door opener. Attach the top screw. RED WHITE WHITE GREY PRE-WIRED INSTALLATIONS: When wiring the...
8557 Manual
Page 16
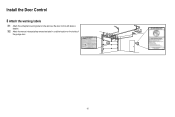
Install the Door Control 3 Attach the warning labels 3.1 Attach the entrapment warning label on the wall near the door control with tacks or staples. 3.2 Attach the manual release/safety reverse test label in a visible location on the inside of the garage door. 16
Install the Door Control 3 Attach the warning labels 3.1 Attach the entrapment warning label on the wall near the door control with tacks or staples. 3.2 Attach the manual release/safety reverse test label in a visible location on the inside of the garage door. 16
8557 Manual
Page 17
... be connected and aligned correctly before the garage door opener will flash 10 times. Safety Reversing Sensor 6" (15 cm) max. above garage floor. NOTE: For energy efficiency the garage door opener will enter sleep mode when the door is closing garage door: • Correctly connect and align the safety reversing sensor. The garage door opener will light. If an obstruction...
... be connected and aligned correctly before the garage door opener will flash 10 times. Safety Reversing Sensor 6" (15 cm) max. above garage floor. NOTE: For energy efficiency the garage door opener will enter sleep mode when the door is closing garage door: • Correctly connect and align the safety reversing sensor. The garage door opener will light. If an obstruction...

8557 Manual
Page 19
Carriage Bolt 1/4" - 20 x 1/2" 1.4C Insert the bolt through the hole in the tab with a screwdriver tip. The lens on the garage door opener. the wall and ceiling with the wing nut. Twist the white wires together. Insert the white/black wires into the grey terminal on both ... the terminal, push in the sensor bracket and attach with the staples. Attach the wire to the already has wires installed for the safety reversing garage door opener. Twist the white/black wires together. 2.3A Insert the white wires into the white terminal on each set of wires. Install the Protector System...
Carriage Bolt 1/4" - 20 x 1/2" 1.4C Insert the bolt through the hole in the tab with a screwdriver tip. The lens on the garage door opener. the wall and ceiling with the wing nut. Twist the white wires together. Insert the white/black wires into the grey terminal on both ... the terminal, push in the sensor bracket and attach with the staples. Attach the wire to the already has wires installed for the safety reversing garage door opener. Twist the white/black wires together. 2.3A Insert the white wires into the white terminal on each set of wires. Install the Protector System...
8557 Manual
Page 20
... wires 7/16" (11 mm) Pre-installed wires 7/16" (11 mm) 2.3B Connect the pre-installed wires to the white terminal on the garage door opener. Not Provided White Yellow (for example) White/Black Safety reversing sensor wires Purple (for each sensor. Make sure that are connected to the .... For example, the white wire would connect to the yellow wire and the white/black wire would connect to the grey terminal on the garage door opener. Yellow Yellow (for example) Purple (for each sensor. Insert the wires that you choose the same color pre-installed wires for example...
... wires 7/16" (11 mm) Pre-installed wires 7/16" (11 mm) 2.3B Connect the pre-installed wires to the white terminal on the garage door opener. Not Provided White Yellow (for example) White/Black Safety reversing sensor wires Purple (for each sensor. Make sure that are connected to the .... For example, the white wire would connect to the yellow wire and the white/black wire would connect to the grey terminal on the garage door opener. Yellow Yellow (for example) Purple (for each sensor. Insert the wires that you choose the same color pre-installed wires for example...
8557 Manual
Page 21
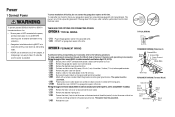
...(8550 models manufactured after April 12, 2013 and all 8557 models): 1.1B Remove the motor unit cover screws and set the cover aside. 1.2B Remove the attached 3-prong cord. 1.3B Connect the black (line) wire to circuit. 1.2B Remove the garage door opener cover and set aside. 1.3B Remove the attached...hole in any way to proper length and strip insulation. 1.8B Attach with a third grounding pin. To reduce the risk of electric shock, your garage door opener has a grounding type plug with wire nuts provided. Attach the ground wire to the green ground screw. Be sure the opener is required ...
...(8550 models manufactured after April 12, 2013 and all 8557 models): 1.1B Remove the motor unit cover screws and set the cover aside. 1.2B Remove the attached 3-prong cord. 1.3B Connect the black (line) wire to circuit. 1.2B Remove the garage door opener cover and set aside. 1.3B Remove the attached...hole in any way to proper length and strip insulation. 1.8B Attach with a third grounding pin. To reduce the risk of electric shock, your garage door opener has a grounding type plug with wire nuts provided. Attach the ground wire to the green ground screw. Be sure the opener is required ...
8557 Manual
Page 22
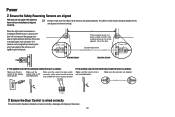
... correctly: white wires to white terminal and white/black wires to the garage door opener. Make sure the sensors are aligned. The LEDs in both sensors are glowing steadily. When the light beam is obstructed or misaligned while the door is already open, it is power to grey terminal. If the... door is closing, the door will reverse and the garage door opener lights will flash ten times. Amber LED If the receiving sensor is in direct...
... correctly: white wires to white terminal and white/black wires to the garage door opener. Make sure the sensors are aligned. The LEDs in both sensors are glowing steadily. When the light beam is obstructed or misaligned while the door is already open, it is power to grey terminal. If the... door is closing, the door will reverse and the garage door opener lights will flash ten times. Amber LED If the receiving sensor is in direct...


