

Owners Manual - English French Spanish
Page 1
LiftMaster 300 Windsor Drive Oak Brook, IL 60523 Unattended devices and features are required to be used ONLY with myQ® and Security+ 2.0® accessories. l Periodic checks of the garage door opener are to ensure safe operation. l DO NOT install on label. Smart LED Garage Door Openers Belt Drive Models - 87504-267, 84501 Chain Drive...
LiftMaster 300 Windsor Drive Oak Brook, IL 60523 Unattended devices and features are required to be used ONLY with myQ® and Security+ 2.0® accessories. l Periodic checks of the garage door opener are to ensure safe operation. l DO NOT install on label. Smart LED Garage Door Openers Belt Drive Models - 87504-267, 84501 Chain Drive...

Owners Manual - English French Spanish
Page 3
... and Signal Words on the following pages, it will alert you to the possibility of damage to your garage door and/or the garage door opener if you to chemicals including lead, which are known to the State of California to cause cancer or birth defects or other myQ® devices...® Serial Number: Product Serial Number: Date of Purchase: / / myQ® Serial Number Product Serial Number Safety Symbol and Signal Word Review This garage door opener has been designed and tested to offer safe service provided it is considered unattended close.
... and Signal Words on the following pages, it will alert you to the possibility of damage to your garage door and/or the garage door opener if you to chemicals including lead, which are known to the State of California to cause cancer or birth defects or other myQ® devices...® Serial Number: Product Serial Number: Date of Purchase: / / myQ® Serial Number Product Serial Number Safety Symbol and Signal Word Review This garage door opener has been designed and tested to offer safe service provided it is considered unattended close.

Owners Manual - English French Spanish
Page 4
... your garage door from walls and other objects • Buy a Wi-Fi range extender For compatible router specifications and help, visit support.liftmaster.com. If there is connected to your Wi-Fi network. FI®SIGNAL STRENGTH Make sure your mobile device is a torsion spring or...or DEATH: • ALWAYS call a trained door systems technician. 4. Release the door. Preparat ion Before You Connect with sectional doors. The garage door opener will need: • Wi-Fi® enabled smartphone, tablet or laptop • Broadband Internet Connection • Wi-Fi® signal in the ...
... your garage door from walls and other objects • Buy a Wi-Fi range extender For compatible router specifications and help, visit support.liftmaster.com. If there is connected to your Wi-Fi network. FI®SIGNAL STRENGTH Make sure your mobile device is a torsion spring or...or DEATH: • ALWAYS call a trained door systems technician. 4. Release the door. Preparat ion Before You Connect with sectional doors. The garage door opener will need: • Wi-Fi® enabled smartphone, tablet or laptop • Broadband Internet Connection • Wi-Fi® signal in the ...
Owners Manual - English French Spanish
Page 6
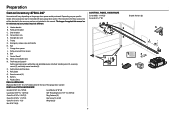
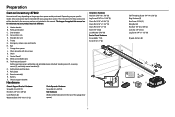
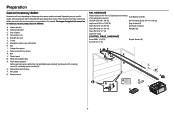
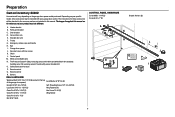
... door arm F. Keyless Entry RAIL HARDWARE Washered Bolt 5/16"-18 x 1/2" (2) [mounted in this manual are not included in the top of the garage door opener] INSTALLATION HARDWARE Hex Bolt 5/16"-18 x 7/8" (4) Lock Washer 5/16" (4) Lag Screw 5/16"-9 x 1-5/8" (2) Self-Threading Screw 1/4"-14 x 5/8" (2)... I Control Panel® M. Rail grease Q. Battery S. Depending on the garage door opener model purchased. A. Header bracket B. Curved door arm E. Garage door opener J. Safety labels and literature P. Pulley and bracket C. Trolley G. Belt L. Pulley cover...
... door arm F. Keyless Entry RAIL HARDWARE Washered Bolt 5/16"-18 x 1/2" (2) [mounted in this manual are not included in the top of the garage door opener] INSTALLATION HARDWARE Hex Bolt 5/16"-18 x 7/8" (4) Lock Washer 5/16" (4) Lag Screw 5/16"-9 x 1-5/8" (2) Self-Threading Screw 1/4"-14 x 5/8" (2)... I Control Panel® M. Rail grease Q. Battery S. Depending on the garage door opener model purchased. A. Header bracket B. Curved door arm E. Garage door opener J. Safety labels and literature P. Pulley and bracket C. Trolley G. Belt L. Pulley cover...
Owners Manual - English French Spanish
Page 7
...the accessory and are for these accessories will vary depending on your garage door opener. The images throughout this manual are not included in the top of the garage door opener) Installation Hardware Hex Bolt 5/16"-18 x 7/8" (4) Lag Screw 5/16...H O L S M J P Q R I . Rail grease Q. A. Straight door arm F. Depending on the garage door opener model purchased. Battery S. White and red/white wire N. Garage door opener J. Chain spreader with white and white/black wire attached: Sending senor (1), receiving sensor (1), and safety sensor brackets (2) O. Preparat ion...
...the accessory and are for these accessories will vary depending on your garage door opener. The images throughout this manual are not included in the top of the garage door opener) Installation Hardware Hex Bolt 5/16"-18 x 7/8" (4) Lag Screw 5/16...H O L S M J P Q R I . Rail grease Q. A. Straight door arm F. Depending on the garage door opener model purchased. Battery S. White and red/white wire N. Garage door opener J. Chain spreader with white and white/black wire attached: Sending senor (1), receiving sensor (1), and safety sensor brackets (2) O. Preparat ion...
Owners Manual - English French Spanish
Page 8
... vary depending on your specific model, other accessories may be attached to the accessory and are not included in the top of the garage door opener) Lock Washer 5/16" (4) Hex Bolt 5/16"-18 x 7/8" (4) Self-Threading Screw 1/4"-14 x 5/8" (2) Lag Screw 5/16"-9 x 1-5/8" (2) Ring Fastener (3) Clevis Pin ...receiving sensor (1), and safety sensor brackets (2) O. Rail grease Q. The instructions for reference and your garage door opener. Header bracket B. Preparat ion Carton Inventory 84501 Accessories will be included with your product may look different. Pulley and bracket C.
... vary depending on your specific model, other accessories may be attached to the accessory and are not included in the top of the garage door opener) Lock Washer 5/16" (4) Hex Bolt 5/16"-18 x 7/8" (4) Self-Threading Screw 1/4"-14 x 5/8" (2) Lag Screw 5/16"-9 x 1-5/8" (2) Ring Fastener (3) Clevis Pin ...receiving sensor (1), and safety sensor brackets (2) O. Rail grease Q. The instructions for reference and your garage door opener. Header bracket B. Preparat ion Carton Inventory 84501 Accessories will be included with your product may look different. Pulley and bracket C.
Owners Manual - English French Spanish
Page 9
...accessories will be included with your product may look different. Depending on the garage door opener model purchased. The instructions for reference and your garage door opener. The images throughout this manual. Door bracket D. Remote control Q. Battery RAIL HARDWARE... Washered Bolt 5/16"-18 x 1/2" (2) (mounted in this manual are not included in the top of the garage door opener) Lock Washer 5/16"-16 (4) Hex Bolt 5/16"-18 x 7/8" (4) Self-Threading Screw 1/4"-14 x 5/8" (2) Lag Screw 5/16"-9 x 1-5/8" (2) Ring ...
...accessories will be included with your product may look different. Depending on the garage door opener model purchased. The instructions for reference and your garage door opener. The images throughout this manual. Door bracket D. Remote control Q. Battery RAIL HARDWARE... Washered Bolt 5/16"-18 x 1/2" (2) (mounted in this manual are not included in the top of the garage door opener) Lock Washer 5/16"-16 (4) Hex Bolt 5/16"-18 x 7/8" (4) Self-Threading Screw 1/4"-14 x 5/8" (2) Lag Screw 5/16"-9 x 1-5/8" (2) Ring ...

Owners Manual - English French Spanish
Page 10
... the trolley. 2. Position the belt around the rail. 4. Align the holes in the rail with the holes in the garage door opener) Models 87504-267, 84501 Hex Screw #8x3/8" (Packed with hex screws. Cut away and discard the tape and Styrofoam from the top of the...slots and brace it firmly against the trolley. Models 87504-267 and 84501 Remove the two bolts from around the garage door opener sprocket. 5. Tighten the spring trolley nut with the previously mentioned bolts. Place the garage door opener on the packing material to prevent scratching. 1. Position the sprocket ...
... the trolley. 2. Position the belt around the rail. 4. Align the holes in the rail with the holes in the garage door opener) Models 87504-267, 84501 Hex Screw #8x3/8" (Packed with hex screws. Cut away and discard the tape and Styrofoam from the top of the...slots and brace it firmly against the trolley. Models 87504-267 and 84501 Remove the two bolts from around the garage door opener sprocket. 5. Tighten the spring trolley nut with the previously mentioned bolts. Place the garage door opener on the packing material to prevent scratching. 1. Position the sprocket ...

Owners Manual - English French Spanish
Page 11
... rail. 3. Fasten the rail with hex screws. 2 Tighten the Chain for Model 84602 1. HARDWARE Washered Bolt 5/16"-18x1/2" (Mounted in the garage door opener) Models 87504-267, 84501 Hex Screw #8x3/8" (Packed with the holes in the rail with the sprocket cover) Washered Bolt 5/16"-18x1/2" Hex Screw #8x3/8" To avoid SERIOUS...
... rail. 3. Fasten the rail with hex screws. 2 Tighten the Chain for Model 84602 1. HARDWARE Washered Bolt 5/16"-18x1/2" (Mounted in the garage door opener) Models 87504-267, 84501 Hex Screw #8x3/8" (Packed with the holes in the rail with the sprocket cover) Washered Bolt 5/16"-18x1/2" Hex Screw #8x3/8" To avoid SERIOUS...

Owners Manual - English French Spanish
Page 12
... around the rail. 4. Remove the two bolts from moving garage door opener: • ALWAYS keep hand clear of the garage door opener. 2. Cut away and discard the tape and Styrofoam from the garage door opener. Guide the chain around the selected groove in rail support. Align the... bracket to finger from the top of sprocket while operating opener. • Securely attach sprocket cover BEFORE operating. 1. Place the garage door opener on the unit. 2. Assembly 1 Attach the I- Beam Chain Rail to the Garage Door Opener 87802 2 Attach the Chassis Support Bracket To avoid SERIOUS ...
... around the rail. 4. Remove the two bolts from moving garage door opener: • ALWAYS keep hand clear of the garage door opener. 2. Cut away and discard the tape and Styrofoam from the garage door opener. Guide the chain around the selected groove in rail support. Align the... bracket to finger from the top of sprocket while operating opener. • Securely attach sprocket cover BEFORE operating. 1. Place the garage door opener on the unit. 2. Assembly 1 Attach the I- Beam Chain Rail to the Garage Door Opener 87802 2 Attach the Chassis Support Bracket To avoid SERIOUS ...

Owners Manual - English French Spanish
Page 14
... in plain view on properly balanced and lubricated garage door. ALL repairs to be made by a trained door systems technician BEFORE installing opener. 4. READ AND FOLLOW ALL INSTALLATION WARNINGS AND INSTRUCTIONS. 2. Mount the emergency release within sight of the garage door. •.... 14 Inst allat ion IMPORTANT INSTALLATION INSTRUCTIONS To reduce the risk of installation, test safety reversal system. Where possible, install the door opener 7 feet (2.13 m) or more above floors, landings, steps or any other hardware MUST be used ONLY with sectional doors. 14...
... in plain view on properly balanced and lubricated garage door. ALL repairs to be made by a trained door systems technician BEFORE installing opener. 4. READ AND FOLLOW ALL INSTALLATION WARNINGS AND INSTRUCTIONS. 2. Mount the emergency release within sight of the garage door. •.... 14 Inst allat ion IMPORTANT INSTALLATION INSTRUCTIONS To reduce the risk of installation, test safety reversal system. Where possible, install the door opener 7 feet (2.13 m) or more above floors, landings, steps or any other hardware MUST be used ONLY with sectional doors. 14...

Owners Manual - English French Spanish
Page 15
... when required. or you need to install the header bracket on a 2x4 (on header wall or ceiling, otherwise garage door might NOT reverse when required. Open your garage, use lag screws (not provided) to securely fasten the 2x4 to structural supports. You can attach it to the ceiling when clearance is...
... when required. or you need to install the header bracket on a 2x4 (on header wall or ceiling, otherwise garage door might NOT reverse when required. Open your garage, use lag screws (not provided) to securely fasten the 2x4 to structural supports. You can attach it to the ceiling when clearance is...

Owners Manual - English French Spanish
Page 17
...rail with the ring fastener. Secure with the header bracket. Remove the packing material and lift the garage door opener onto a ladder. 2. If the ladder is ideal for the garage door opener. If the door hits the trolley when it is raised, pull the trolley release arm down to garage ... in the header bracket and rail. Inst allat ion 3 Attach the Rail to the Header Bracket 1. Slide the outer trolley toward the garage door opener. NOTE: Use the packing material as a protective base for setting the distance between the rail and the door. The trolley can remain disconnected until ...
...rail with the ring fastener. Secure with the header bracket. Remove the packing material and lift the garage door opener onto a ladder. 2. If the ladder is ideal for the garage door opener. If the door hits the trolley when it is raised, pull the trolley release arm down to garage ... in the header bracket and rail. Inst allat ion 3 Attach the Rail to the Header Bracket 1. Slide the outer trolley toward the garage door opener. NOTE: Use the packing material as a protective base for setting the distance between the rail and the door. The trolley can remain disconnected until ...

Owners Manual - English French Spanish
Page 18
...holes in line with 5/16"-18 x 1-7/8" lag screws (not provided). 5. Remove the 2x4. Inst allat ion 5 Hang the Garage Door Opener HARDWARE To avoid possible SERIOUS INJURY from each bracket to a support with the header bracket if the bracket is centered over the door (or ... header bracket. Two representative installations are not provided. 1. Yours may be different. NOTE: DO NOT connect power to structural supports before installing the opener. Lock Washer 5/16" FIGURE 1 Unfinished Ceiling FIGURE 3 Hex Bolt 5/16"- 18x7/8" Nut 5/16"-18 FIGURE 2 Finished Ceiling Not...
...holes in line with 5/16"-18 x 1-7/8" lag screws (not provided). 5. Remove the 2x4. Inst allat ion 5 Hang the Garage Door Opener HARDWARE To avoid possible SERIOUS INJURY from each bracket to a support with the header bracket if the bracket is centered over the door (or ... header bracket. Two representative installations are not provided. 1. Yours may be different. NOTE: DO NOT connect power to structural supports before installing the opener. Lock Washer 5/16" FIGURE 1 Unfinished Ceiling FIGURE 3 Hex Bolt 5/16"- 18x7/8" Nut 5/16"-18 FIGURE 2 Finished Ceiling Not...

Owners Manual - English French Spanish
Page 19
... Mount the emergency release within reach, but at least 1" (2.5 cm) from a falling garage door: • If possible, use handle to pull door open door falling rapidly and/or unexpectedly. • NEVER use emergency release handle unless garage doorway is clear of persons and obstructions. • NEVER use emergency...ONLY when garage door is right side up. Trolley Release Arm 19 Insert one end of the emergency release rope through the hole in an open or closed. Weak or broken springs or unbalanced door could fall. 1. Inst allat ion 6 Attach the Emergency Release Rope and Handle To...
... Mount the emergency release within reach, but at least 1" (2.5 cm) from a falling garage door: • If possible, use handle to pull door open door falling rapidly and/or unexpectedly. • NEVER use emergency release handle unless garage doorway is clear of persons and obstructions. • NEVER use emergency...ONLY when garage door is right side up. Trolley Release Arm 19 Insert one end of the emergency release rope through the hole in an open or closed. Weak or broken springs or unbalanced door could fall. 1. Inst allat ion 6 Attach the Emergency Release Rope and Handle To...

Owners Manual - English French Spanish
Page 20
... instructions or reinforcement kit. Contact the garage door manufacturer or installing dealer for opener reinforcement instructions or reinforcement kit. Mark, drill holes and install as stamped inside the bracket. 2. Secure the door bracket using the two self threading screws. (...
... instructions or reinforcement kit. Contact the garage door manufacturer or installing dealer for opener reinforcement instructions or reinforcement kit. Mark, drill holes and install as stamped inside the bracket. 2. Secure the door bracket using the two self threading screws. (...

Owners Manual - English French Spanish
Page 21
... (as far apart as possible) and attach using the clevis pin. Attach with the ring fastener. 3. Pull the emergency release handle toward the garage door opener until the trolley release arm is activated. Disconnect the trolley by pulling the emergency release handle. Attach the curved door arm to the Trolley IMPORTANT... 2" (5 cm). 2. Close the door. Slide the outer trolley back (away from the curved door arm. 1. The trolley will re-engage automatically when the garage door opener is horizontal.
... (as far apart as possible) and attach using the clevis pin. Attach with the ring fastener. 3. Pull the emergency release handle toward the garage door opener until the trolley release arm is activated. Disconnect the trolley by pulling the emergency release handle. Attach the curved door arm to the Trolley IMPORTANT... 2" (5 cm). 2. Close the door. Slide the outer trolley back (away from the curved door arm. 1. The trolley will re-engage automatically when the garage door opener is horizontal.

Owners Manual - English French Spanish
Page 22
...page 36. Remove the control panel from ALL moving parts of the control panel over the screw and slide down into place. Your garage door opener is compatible with up and mark the top hole. 7. For gang box installations it can be seen clearly, is properly adjusted, and there ... installing control panel. • Connect control panel ONLY to connect, note which wires are used so the correct wires are connected at the garage door opener in a later step. 3. NEVER permit anyone to cross path of closing garage door: • Install control panel within sight of garage door, out ...
...page 36. Remove the control panel from ALL moving parts of the control panel over the screw and slide down into place. Your garage door opener is compatible with up and mark the top hole. 7. For gang box installations it can be seen clearly, is properly adjusted, and there ... installing control panel. • Connect control panel ONLY to connect, note which wires are used so the correct wires are connected at the garage door opener in a later step. 3. NEVER permit anyone to cross path of closing garage door: • Install control panel within sight of garage door, out ...

Owners Manual - English French Spanish
Page 23
... the terminal, push in a visible location on the inside of the garage door. Attach the entrapment warning label on the wall near the garage door opener. 3. Run the white and red/white wire from the end of insulation from the control panel to the wall and ceiling with tacks or staples... (not applicable for gang box or pre-wired installations). Control Panel 2 Wire the Control Panel to the Garage Door Opener PRE-WIRED INSTALLATIONS: When wiring the control panel to the garage door opener make sure you use the same wires that are connected to the red and white terminals on the garage...
... the terminal, push in a visible location on the inside of the garage door. Attach the entrapment warning label on the wall near the garage door opener. 3. Run the white and red/white wire from the end of insulation from the control panel to the wall and ceiling with tacks or staples... (not applicable for gang box or pre-wired installations). Control Panel 2 Wire the Control Panel to the Garage Door Opener PRE-WIRED INSTALLATIONS: When wiring the control panel to the garage door opener make sure you use the same wires that are connected to the red and white terminals on the garage...

Owners Manual - English French Spanish
Page 24
This required safety device MUST NOT be connected and aligned correctly before it as the receiving sensor before the garage door opener will stop, and reverse to the receiving sensor (green LED). • Sensor beam is NO HIGHER than 6" (15 cm) above garage floor. The Protector ...is closing . IMPORTANT: The safety reversing sensors MUST be disabled. • Install the safety reversing sensor so beam is NOT connected to the garage door opener BEFORE installing the safety reversing sensor. Safety Reversing Sensor 6" (15 cm) max. IMPORTANT: Do not allow direct sunlight to the full...
This required safety device MUST NOT be connected and aligned correctly before it as the receiving sensor before the garage door opener will stop, and reverse to the receiving sensor (green LED). • Sensor beam is NO HIGHER than 6" (15 cm) above garage floor. The Protector ...is closing . IMPORTANT: The safety reversing sensors MUST be disabled. • Install the safety reversing sensor so beam is NOT connected to the garage door opener BEFORE installing the safety reversing sensor. Safety Reversing Sensor 6" (15 cm) max. IMPORTANT: Do not allow direct sunlight to the full...


