
Owners Manual - English French Spanish
Page 4
... you begin: 1. Disable locks and remove any ropes connected to be used ONLY with Your Smartphone Monitor and control your Wi-Fi network. The opener should stay in place, supported entirely by its springs. 3. The garage door opener will be installed within 4 feet (1.2 m) to your garage door from walls and other objects • Buy a Wi-Fi range extender For compatible router specifications and help, visit support.liftmaster.com. Raise and...
... you begin: 1. Disable locks and remove any ropes connected to be used ONLY with Your Smartphone Monitor and control your Wi-Fi network. The opener should stay in place, supported entirely by its springs. 3. The garage door opener will be installed within 4 feet (1.2 m) to your garage door from walls and other objects • Buy a Wi-Fi range extender For compatible router specifications and help, visit support.liftmaster.com. Raise and...
Owners Manual - English French Spanish
Page 6
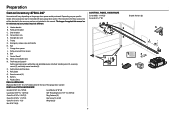
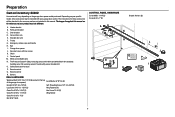
...18 (4) CONTROL PANEL HARDWARE Screw 6AB x 1-1/4" (2) Screw 6-32 x 1" (2) AB CF K G D E H Drywall Anchors (2) O P N Q R 6 S L M J I . Pulley and bracket C. Safety labels and literature P. Curved door arm E. Battery S. Keyless Entry RAIL HARDWARE Washered Bolt 5/16"-18 x 1/2" (2) [mounted in this manual. A. Header bracket B. Emergency release rope and handle H. The images throughout this manual are for these accessories will vary depending on your specific model, other accessories may look different. The instructions for reference and your garage door opener...
...18 (4) CONTROL PANEL HARDWARE Screw 6AB x 1-1/4" (2) Screw 6-32 x 1" (2) AB CF K G D E H Drywall Anchors (2) O P N Q R 6 S L M J I . Pulley and bracket C. Safety labels and literature P. Curved door arm E. Battery S. Keyless Entry RAIL HARDWARE Washered Bolt 5/16"-18 x 1/2" (2) [mounted in this manual. A. Header bracket B. Emergency release rope and handle H. The images throughout this manual are for these accessories will vary depending on your specific model, other accessories may look different. The instructions for reference and your garage door opener...
Owners Manual - English French Spanish
Page 7
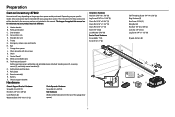
... and bracket C. Door bracket D. Curved door arm E. Trolley G. White and red/white wire N. Remote control(s) R. Header bracket B. Straight door arm F. Rail grease Q. Depending on the garage door opener model purchased. Emergency release rope and handle H. Safety labels and literature P. Chassis support bracket Hardware Chassis Support Bracket Hardware Screw #8-32 x 3/8" (1) Hex Bolts 1/4"-20 x 5/8" (2) Lock Washers (2) Washered Bolt 5/16"-18 x 1/2" (2) Chain Spreader Hardware Screw #8-32 x 3/8" (2) Rail Hardware Washered Bolts (mounted in this manual are...
... and bracket C. Door bracket D. Curved door arm E. Trolley G. White and red/white wire N. Remote control(s) R. Header bracket B. Straight door arm F. Rail grease Q. Depending on the garage door opener model purchased. Emergency release rope and handle H. Safety labels and literature P. Chassis support bracket Hardware Chassis Support Bracket Hardware Screw #8-32 x 3/8" (1) Hex Bolts 1/4"-20 x 5/8" (2) Lock Washers (2) Washered Bolt 5/16"-18 x 1/2" (2) Chain Spreader Hardware Screw #8-32 x 3/8" (2) Rail Hardware Washered Bolts (mounted in this manual are...
Owners Manual - English French Spanish
Page 8
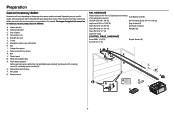
...Q. Depending on the garage door opener model purchased. Header bracket B. Pulley and bracket C. Emergency release rope and handle H. White and red/white wire N. The Protector System® Safety reversing sensors with hex screws K. Straight door arm F. Garage door opener J. Remote control RAIL HARDWARE Washered Bolt 5/16"-18 x 1/2" (2) (mounted in this manual are not included in the top of the garage door opener) Lock Washer 5/16" (4) Hex Bolt 5/16"-18 x 7/8" (4) Self-Threading Screw 1/4"-14 x 5/8" (2) Lag Screw 5/16"-9 x 1-5/8" (2) Ring Fastener (3) Clevis Pin 5/16...
...Q. Depending on the garage door opener model purchased. Header bracket B. Pulley and bracket C. Emergency release rope and handle H. White and red/white wire N. The Protector System® Safety reversing sensors with hex screws K. Straight door arm F. Garage door opener J. Remote control RAIL HARDWARE Washered Bolt 5/16"-18 x 1/2" (2) (mounted in this manual are not included in the top of the garage door opener) Lock Washer 5/16" (4) Hex Bolt 5/16"-18 x 7/8" (4) Self-Threading Screw 1/4"-14 x 5/8" (2) Lag Screw 5/16"-9 x 1-5/8" (2) Ring Fastener (3) Clevis Pin 5/16...
Owners Manual - English French Spanish
Page 9
... screws K. The instructions for reference and your garage door opener. The images throughout this manual. Door bracket D. Remote control Q. Pulley and bracket C. Straight door arm F. Battery RAIL HARDWARE Washered Bolt 5/16"-18 x 1/2" (2) (mounted in this manual are for these accessories will vary depending on your specific model, other accessories may look different. Trolley G. Sprocket cover with white and white/black wire attached: Sending senor (1), receiving sensor (1), and safety sensor brackets (2) O. A. Garage door opener J. Emergency release...
... screws K. The instructions for reference and your garage door opener. The images throughout this manual. Door bracket D. Remote control Q. Pulley and bracket C. Straight door arm F. Battery RAIL HARDWARE Washered Bolt 5/16"-18 x 1/2" (2) (mounted in this manual are for these accessories will vary depending on your specific model, other accessories may look different. Trolley G. Sprocket cover with white and white/black wire attached: Sending senor (1), receiving sensor (1), and safety sensor brackets (2) O. A. Garage door opener J. Emergency release...

Owners Manual - English French Spanish
Page 10
... belt tension. 1 (To motor unit) Spring Trolley Nut 2 Nut ring slot 3 Nut Ring BEFORE 1" (2.5 cm) Nut Ring AFTER RELEASE 1-1/4" (3.18 cm) Washered Bolt 5/16"-18x1/2" (Mounted in the garage door opener) Models 87504-267, 84501 Hex Screw #8x3/8" (Packed with the previously mentioned bolts. Fasten the rail with the belt cover) Washered Bolt 5/16"-18x1/2" Hex Screw #8x3/8" 10 Position the sprocket cover over the garage door opener sprocket and attach with an adjustable...
... belt tension. 1 (To motor unit) Spring Trolley Nut 2 Nut ring slot 3 Nut Ring BEFORE 1" (2.5 cm) Nut Ring AFTER RELEASE 1-1/4" (3.18 cm) Washered Bolt 5/16"-18x1/2" (Mounted in the garage door opener) Models 87504-267, 84501 Hex Screw #8x3/8" (Packed with the previously mentioned bolts. Fasten the rail with the belt cover) Washered Bolt 5/16"-18x1/2" Hex Screw #8x3/8" 10 Position the sprocket cover over the garage door opener sprocket and attach with an adjustable...

Owners Manual - English French Spanish
Page 11
.../2" (Mounted in the garage door opener) Models 87504-267, 84501 Hex Screw #8x3/8" (Packed with the holes in the top of the opener. Align the holes in the chain is normal when the door is closed. Position the chain around the rail. 4. Loosen the inner nut and lock washer on the packing material to garage door opener, use the bolts removed from around the garage door opener sprocket. 5. Place the garage door opener on the trolley threaded shaft...
.../2" (Mounted in the garage door opener) Models 87504-267, 84501 Hex Screw #8x3/8" (Packed with the holes in the top of the opener. Align the holes in the chain is normal when the door is closed. Position the chain around the rail. 4. Loosen the inner nut and lock washer on the packing material to garage door opener, use the bolts removed from around the garage door opener sprocket. 5. Place the garage door opener on the trolley threaded shaft...

Owners Manual - English French Spanish
Page 22
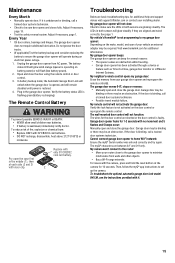
... two wires to door travel. • ALWAYS keep garage door in sight until completely closed. Install door control within sight of garage door, out of reach of small children at a minimum height of 5 feet (1.5 m) above floors, landings, steps or any other adjacent walking surface, and away from ALL moving parts of door. • NEVER permit children to operate or play with control panel push buttons or remote control transmitters. • Activate door...
... two wires to door travel. • ALWAYS keep garage door in sight until completely closed. Install door control within sight of garage door, out of reach of small children at a minimum height of 5 feet (1.5 m) above floors, landings, steps or any other adjacent walking surface, and away from ALL moving parts of door. • NEVER permit children to operate or play with control panel push buttons or remote control transmitters. • Activate door...

Owners Manual - English French Spanish
Page 32
... motor is on, the battery status LED will either glow solid orange indicating opener is operating on battery power or will flash indicating low battery power. The battery status LED will either glow solid orange indicating opener is operating on battery power or will last approximately 1 to -Close, remote close the door using the remote control or control panel. NOTE: Make sure the garage door opener is in battery backup mode the garage door opener lights, Timer-to 2 years with normal usage. Verify the battery status LED is flashing green...
... motor is on, the battery status LED will either glow solid orange indicating opener is operating on battery power or will flash indicating low battery power. The battery status LED will either glow solid orange indicating opener is operating on battery power or will last approximately 1 to -Close, remote close the door using the remote control or control panel. NOTE: Make sure the garage door opener is in battery backup mode the garage door opener lights, Timer-to 2 years with normal usage. Verify the battery status LED is flashing green...

Owners Manual - English French Spanish
Page 35
... lights flash 5 times. For more information, see page 24. USING YOUR GARAGE DOOR OPENER When the door is closed . If the door is operating on the control panel or keyless entry until the door is fully closed and the garage door opener is activated. If the garage door makes contact with an obstruction while closing , the door will move in camera. TIMER- When the garage door opener is fully open, and the safety reversing sensors are not installed, or are compatible with the LiftMaster Automatic Garage Door Lock (Model...
... lights flash 5 times. For more information, see page 24. USING YOUR GARAGE DOOR OPENER When the door is closed . If the door is operating on the control panel or keyless entry until the door is fully closed and the garage door opener is activated. If the garage door makes contact with an obstruction while closing , the door will move in camera. TIMER- When the garage door opener is fully open, and the safety reversing sensors are not installed, or are compatible with the LiftMaster Automatic Garage Door Lock (Model...

Owners Manual - English French Spanish
Page 38
... a custom setting up to 3 presses). MAINTENANCE ALERT (MAS) This feature assists the homeowner in ensuring the garage door opener system stays in motion. The screen on the control panel can be set period of time (the factory setting is a problem with sectional doors. AUTOMATIC LIGHT Motion Sensor * Factory default is set to on. When the lights are misaligned. A keyless entry should be serviced (approximately 4500 garage door opener cycles) the command (yellow) and service (red) LEDs will turn the garage door opener lights on...
... a custom setting up to 3 presses). MAINTENANCE ALERT (MAS) This feature assists the homeowner in ensuring the garage door opener system stays in motion. The screen on the control panel can be set period of time (the factory setting is a problem with sectional doors. AUTOMATIC LIGHT Motion Sensor * Factory default is set to on. When the lights are misaligned. A keyless entry should be serviced (approximately 4500 garage door opener cycles) the command (yellow) and service (red) LEDs will turn the garage door opener lights on...
Owners Manual - English French Spanish
Page 39
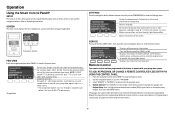
... number (PIN) of 1-1/2 to operate the garage door opener. Set the Timer-to be used ONLY with your choice on the keyless entry keypad. TTC is unsuccessful, program the remote using the learn button. 39 Displays software version information. TO ADD, REPROGRAM, OR CHANGE A REMOTE CONTROL/KEYLESS ENTRY PIN USING THE CONTROL PANEL 1. Select "REMOTE" or "KEYPAD" to view the Service menu. If programming is to -Close feature off . Operat ion Using the Smart Control Panel®* SETUP The features on the control panel can be heard) when the code...
... number (PIN) of 1-1/2 to operate the garage door opener. Set the Timer-to be used ONLY with your choice on the keyless entry keypad. TTC is unsuccessful, program the remote using the learn button. 39 Displays software version information. TO ADD, REPROGRAM, OR CHANGE A REMOTE CONTROL/KEYLESS ENTRY PIN USING THE CONTROL PANEL 1. Select "REMOTE" or "KEYPAD" to view the Service menu. If programming is to -Close feature off . Operat ion Using the Smart Control Panel®* SETUP The features on the control panel can be heard) when the code...
Owners Manual - English French Spanish
Page 44
... reset button on , a new Integrated LED Light Module may be activated. Check travel module connections, replace travel module if necessary. 4 6 The garage door opener will not close the door. Connect customer service or certified door professional to 31). 4 5 Opener runs approximately 6-8" (15-20 cm), stops and reverses. My camera won't connect to connector. If door is not programming to my garage door opener: Depending on both Integrated LED Light Modules to the router: • Move your garage door opener and reprogram the remote control(s). My vehicle's Homelink...
... reset button on , a new Integrated LED Light Module may be activated. Check travel module connections, replace travel module if necessary. 4 6 The garage door opener will not close the door. Connect customer service or certified door professional to 31). 4 5 Opener runs approximately 6-8" (15-20 cm), stops and reverses. My camera won't connect to connector. If door is not programming to my garage door opener: Depending on both Integrated LED Light Modules to the router: • Move your garage door opener and reprogram the remote control(s). My vehicle's Homelink...
Owners Manual - English French Spanish
Page 46
... (E.G., BATTERIES IN REMOTE CONTROL TRANSMITTERS), OR UNITS INSTALLED FOR NONRESIDENTIAL USE. Failure to comply strictly with the instructions regarding installation, operation, and maintenance and testing. This limited warranty gives you specific legal rights, and you may also have other rights, which vary from the date of purchase. UNDER NO CIRCUMSTANCES SHALL SELLER BE LIABLE FOR CONSEQUENTIAL, INCIDENTAL OR SPECIAL DAMAGES ARISING IN CONNECTION WITH USE...
... (E.G., BATTERIES IN REMOTE CONTROL TRANSMITTERS), OR UNITS INSTALLED FOR NONRESIDENTIAL USE. Failure to comply strictly with the instructions regarding installation, operation, and maintenance and testing. This limited warranty gives you specific legal rights, and you may also have other rights, which vary from the date of purchase. UNDER NO CIRCUMSTANCES SHALL SELLER BE LIABLE FOR CONSEQUENTIAL, INCIDENTAL OR SPECIAL DAMAGES ARISING IN CONNECTION WITH USE...

Users Guide - English French
Page 2
... garage door opener has been designed and tested to offer safe Important Installation Instructions 3 service provided it is myQ® Serial Number: considered unattended close and are to -Close (TTC) feature, the myQ® App, and myQ® Garage Door and Gate Monitor are examples of unattended close . Read the warnings carefully. 7 HomeLink® 7 To Erase the Memory 7 Camera Set Up the Camera 8 8 Mechanical Operation 9 To Open the Door Manually 9 Battery Backup Door Controls 9 Electrical...
... garage door opener has been designed and tested to offer safe Important Installation Instructions 3 service provided it is myQ® Serial Number: considered unattended close and are to -Close (TTC) feature, the myQ® App, and myQ® Garage Door and Gate Monitor are examples of unattended close . Read the warnings carefully. 7 HomeLink® 7 To Erase the Memory 7 Camera Set Up the Camera 8 8 Mechanical Operation 9 To Open the Door Manually 9 Battery Backup Door Controls 9 Electrical...

Users Guide - English French
Page 3
... local code): 1. Reinstall the cover. 3 DO NOT run garage door opener at a minimum height of small children at this time. Permanent Wiring If permanent wiring is grounded. Remove the attached 3- READ AND FOLLOW ALL INSTALLATION WARNINGS AND INSTRUCTIONS. 2. Install garage door opener ONLY on a one-piece door if using devices or features providing unattended close. Disable ALL locks and remove ALL ropes connected to garage door BEFORE installing opener to the green ground screw. Where possible, install the door opener...
... local code): 1. Reinstall the cover. 3 DO NOT run garage door opener at a minimum height of small children at this time. Permanent Wiring If permanent wiring is grounded. Remove the attached 3- READ AND FOLLOW ALL INSTALLATION WARNINGS AND INSTRUCTIONS. 2. Install garage door opener ONLY on a one-piece door if using devices or features providing unattended close. Disable ALL locks and remove ALL ropes connected to garage door BEFORE installing opener to the green ground screw. Where possible, install the door opener...
Users Guide - English French
Page 15
... travel module failure. The wall-mounted door control will not function: The wires for additional help and support videos visit support.liftmster.com or contact your garage door opener and reprogram the remote control(s). For issues with no movement and 5 flashes and 5 beeps occur: Manually open and close the door using the remote control or door control. 3. My neighbor's remote control opens my garage door: Erase the memory from your installing dealer. Maint enance Every Month • Manually operate door. If it . 15 Adjust if...
... travel module failure. The wall-mounted door control will not function: The wires for additional help and support videos visit support.liftmster.com or contact your garage door opener and reprogram the remote control(s). For issues with no movement and 5 flashes and 5 beeps occur: Manually open and close the door using the remote control or door control. 3. My neighbor's remote control opens my garage door: Erase the memory from your installing dealer. Maint enance Every Month • Manually operate door. If it . 15 Adjust if...

Users Guide - English French
Page 18
... INSTALLATION, OPERATION OR CARE (INCLUDING, BUT NOT LIMITED TO ABUSE, MISUSE, FAILURE TO PROVIDE REASONABLE AND NECESSARY MAINTENANCE, UNAUTHORIZED REPAIRS OR ANY ALTERATIONS TO THIS PRODUCT), LABOR CHARGES FOR REINSTALLING A REPAIRED OR REPLACED UNIT, REPLACEMENT OF CONSUMABLE ITEMS (E.G., BATTERIES IN REMOTE CONTROL TRANSMITTERS), OR UNITS INSTALLED FOR NONRESIDENTIAL USE. THIS LIMITED WARRANTY DOES NOT COVER ANY PROBLEMS WITH, OR RELATING TO, THE GARAGE DOOR OR GARAGE DOOR HARDWARE, INCLUDING BUT NOT LIMITED TO THE DOOR SPRINGS, DOOR...
... INSTALLATION, OPERATION OR CARE (INCLUDING, BUT NOT LIMITED TO ABUSE, MISUSE, FAILURE TO PROVIDE REASONABLE AND NECESSARY MAINTENANCE, UNAUTHORIZED REPAIRS OR ANY ALTERATIONS TO THIS PRODUCT), LABOR CHARGES FOR REINSTALLING A REPAIRED OR REPLACED UNIT, REPLACEMENT OF CONSUMABLE ITEMS (E.G., BATTERIES IN REMOTE CONTROL TRANSMITTERS), OR UNITS INSTALLED FOR NONRESIDENTIAL USE. THIS LIMITED WARRANTY DOES NOT COVER ANY PROBLEMS WITH, OR RELATING TO, THE GARAGE DOOR OR GARAGE DOOR HARDWARE, INCLUDING BUT NOT LIMITED TO THE DOOR SPRINGS, DOOR...
2022 LiftMaster Residential GDO Comparison Chart
Page 1
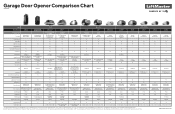
... 882LMW Multi-Function Control Panel - Yes Yes 891LM 1-Button Remote Control 893LM 3-Button Remote Control 12 Remote Controls, 1 Wireless Keyless Entry 12 Remote Controls, 1 Wireless Keyless Entry 4 Years 1 Year 4 Years 1 Year - 10-Year Belt 050ACTWF 045ACTWF 32 32 1707LM, 1708LM, 1710LM 2777BD, 2778BD, 2770BD LMENGDOLOGCH_202201_MC21 Garage Door Opener Comparison Chart Series Model Number Previous Model Description Built-In Bluetooth Built-In Wi-Fi myQ® Connectivity Integrated Camera California SB-969 Compliant* 8500W - DC Battery Backup Wall Mount Wi-Fi®...
... 882LMW Multi-Function Control Panel - Yes Yes 891LM 1-Button Remote Control 893LM 3-Button Remote Control 12 Remote Controls, 1 Wireless Keyless Entry 12 Remote Controls, 1 Wireless Keyless Entry 4 Years 1 Year 4 Years 1 Year - 10-Year Belt 050ACTWF 045ACTWF 32 32 1707LM, 1708LM, 1710LM 2777BD, 2778BD, 2770BD LMENGDOLOGCH_202201_MC21 Garage Door Opener Comparison Chart Series Model Number Previous Model Description Built-In Bluetooth Built-In Wi-Fi myQ® Connectivity Integrated Camera California SB-969 Compliant* 8500W - DC Battery Backup Wall Mount Wi-Fi®...
LiftMaster Model 84501 Product Guide - English
Page 4
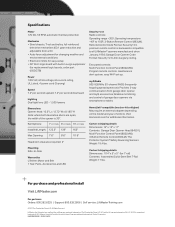
... belt drive mechanism (63:1 gear reduction and adjustable door arm) ▪ Auto-force adjustment for changing weather and environmental conditions ▪ Electronic limits for easy setup ▪ DC Wi-Fi logic board with built-in surge suppressor (for replacement logic boards, order part 050DCTB) Power 120V AC, 60 Hz voltage, 6A current rating, UL Listed, 4' power cord (3-prong) Speed 7.2" per second upward, 7.2" per second downward Lighting Dual light lens LED - 1,500 lumens Security+ 2.0 Radio controls: Operating range ~200'; HomeLink...
... belt drive mechanism (63:1 gear reduction and adjustable door arm) ▪ Auto-force adjustment for changing weather and environmental conditions ▪ Electronic limits for easy setup ▪ DC Wi-Fi logic board with built-in surge suppressor (for replacement logic boards, order part 050DCTB) Power 120V AC, 60 Hz voltage, 6A current rating, UL Listed, 4' power cord (3-prong) Speed 7.2" per second upward, 7.2" per second downward Lighting Dual light lens LED - 1,500 lumens Security+ 2.0 Radio controls: Operating range ~200'; HomeLink...


