3275 Manual
Page 1
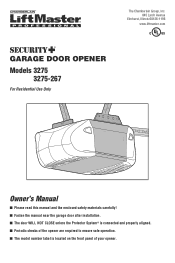
The Chamberlain Group, Inc. 845 Larch Avenue Elmhurst, Illinois 60126-1196 www.liftmaster.com ® GARAGE DOOR OPENER Models 3275 3275-267 For Residential Use Only Owner's Manual ■ Please read this manual and the enclosed safety materials carefully! ■ Fasten the manual near the garage door after installation. ■ The door WILL NOT CLOSE unless the Protector System® is connected and properly aligned. ■ Periodic checks of the opener are required to ensure safe operation. ■ The model number label is located on the front panel of your opener.
The Chamberlain Group, Inc. 845 Larch Avenue Elmhurst, Illinois 60126-1196 www.liftmaster.com ® GARAGE DOOR OPENER Models 3275 3275-267 For Residential Use Only Owner's Manual ■ Please read this manual and the enclosed safety materials carefully! ■ Fasten the manual near the garage door after installation. ■ The door WILL NOT CLOSE unless the Protector System® is connected and properly aligned. ■ Periodic checks of the opener are required to ensure safe operation. ■ The model number label is located on the front panel of your opener.
3275 Manual
Page 2
... 25 Operation 26-30 Operation safety instructions 26 Using your garage door opener 26 Using the wall-mounted door control 27 To open the door manually 27 Care of your garage door opener 28 Having a problem 29 Diagnostic chart 30 Programming 31-32 To add or reprogram a hand-held remote control... door and/or the garage door opener if you do not comply with the cautionary statements that accompany them carefully. 2 Mechanical When you see this manual. Read them . The hazard may come from something mechanical or from electric shock.
... 25 Operation 26-30 Operation safety instructions 26 Using your garage door opener 26 Using the wall-mounted door control 27 To open the door manually 27 Care of your garage door opener 28 Having a problem 29 Diagnostic chart 30 Programming 31-32 To add or reprogram a hand-held remote control... door and/or the garage door opener if you do not comply with the cautionary statements that accompany them carefully. 2 Mechanical When you see this manual. Read them . The hazard may come from something mechanical or from electric shock.
3275 Manual
Page 7
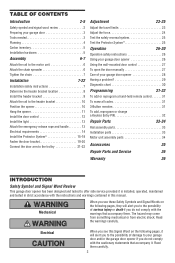
... the risk of chain after Adjustment Step 3 (Test the Safety Reversal System). NEVER wear watches, rings or loose clothing while installing or servicing opener. Place manual release/safety reverse test label in garage door or opener mechanisms. 9. ASSEMBLY STEP 3 Tighten the Chain Figure 1 To Tighten Outer Nut Outer Nut Lock Washer...
... the risk of chain after Adjustment Step 3 (Test the Safety Reversal System). NEVER wear watches, rings or loose clothing while installing or servicing opener. Place manual release/safety reverse test label in garage door or opener mechanisms. 9. ASSEMBLY STEP 3 Tighten the Chain Figure 1 To Tighten Outer Nut Outer Nut Lock Washer...
3275 Manual
Page 11
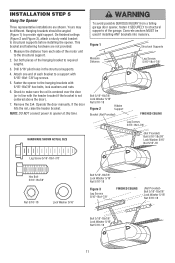
... be used if installing ANY brackets into masonry. Fasten the opener to make sure the rail is not centered above the door). 7. Operate the door manually. Hanging brackets should be angled (Figure 1) to structural supports before installing the opener. Drill 3/16" pilot holes in line with 5/16"-18x1-7/8" lag screws. 5. Remove...
... be used if installing ANY brackets into masonry. Fasten the opener to make sure the rail is not centered above the door). 7. Operate the door manually. Hanging brackets should be angled (Figure 1) to structural supports before installing the opener. Drill 3/16" pilot holes in line with 5/16"-18x1-7/8" lag screws. 5. Remove...
3275 Manual
Page 12
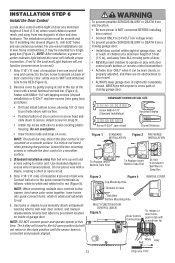
... door control on a smooth surface. Strip 7/16" (11 mm) of insulation from one end of bell wire and connect to wall near door control, and manual release/safety reverse test label in sight until the sensor beam is not mounted on screw head and slide down to red (Figure 5). Insert wires...
... door control on a smooth surface. Strip 7/16" (11 mm) of insulation from one end of bell wire and connect to wall near door control, and manual release/safety reverse test label in sight until the sensor beam is not mounted on screw head and slide down to red (Figure 5). Insert wires...
3275 Manual
Page 22
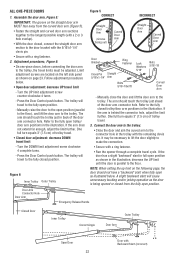
...trolley will travel cycle. The trolley will cause unnecessary bucking and/or jerking operation as shown in back of the door arm connector hole. Manually close the door and lift the door arm to the fully closed , connect the straight door arm section to make the connection. •... procedures, Figure 6: • On one-piece doors, before connecting the door arm to the trolley. Limit adjustment screws are located on page 23. Manually raise the door to the open as shown on the left side panel as illustrated below . • Open door adjustment: decrease UP travel limit -...
...trolley will travel cycle. The trolley will cause unnecessary bucking and/or jerking operation as shown in back of the door arm connector hole. Manually close the door and lift the door arm to the fully closed , connect the straight door arm section to make the connection. •... procedures, Figure 6: • On one-piece doors, before connecting the door arm to the trolley. Limit adjustment screws are located on page 23. Manually raise the door to the open as shown on the left side panel as illustrated below . • Open door adjustment: decrease UP travel limit -...
3275 Manual
Page 23
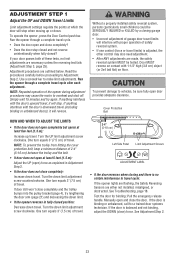
... ) force. Adjustment procedures are either not installed, misaligned, or obstructed. If anything interferes with the door's upward travel, it will stop . See Troubleshooting, page 18. Manually open ) force as explained in fully closed ? To operate the opener, press the Door Control push bar. Run the opener through a complete travel . To prevent...
... ) force. Adjustment procedures are either not installed, misaligned, or obstructed. If anything interferes with the door's upward travel, it will stop . See Troubleshooting, page 18. Manually open ) force as explained in fully closed ? To operate the opener, press the Door Control push bar. Run the opener through a complete travel . To prevent...
3275 Manual
Page 27
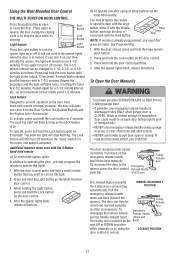
... also turn it off whenever the "learn" button on for 2 seconds. The 4-1/2 minute interval can then be Trolley Release raised and lowered manually Arm as often as necessary. Lock feature Designed to prevent operation of the door from a falling garage door: • If possible, use emergency...of persons and obstructions. • NEVER use emergency release handle unless garage doorway is on the Back) next UP or DOWN operation, either manually or by using all codes. The push bar light will open door falling rapidly and/ or unexpectedly. • NEVER use handle to 1-1/2 ...
... also turn it off whenever the "learn" button on for 2 seconds. The 4-1/2 minute interval can then be Trolley Release raised and lowered manually Arm as often as necessary. Lock feature Designed to prevent operation of the door from a falling garage door: • If possible, use emergency...of persons and obstructions. • NEVER use emergency release handle unless garage doorway is on the Back) next UP or DOWN operation, either manually or by using all codes. The push bar light will open door falling rapidly and/ or unexpectedly. • NEVER use handle to 1-1/2 ...
3275 Manual
Page 28
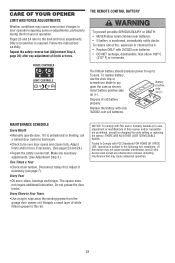
... the safety reverse test. Every Three to Four Years • Use a rag to be sure door opens and closes fully. MAINTENANCE SCHEDULE Every Month • Manually operate door.
... the safety reverse test. Every Three to Four Years • Use a rag to be sure door opens and closes fully. MAINTENANCE SCHEDULE Every Month • Manually operate door.
3275 Manual
Page 29
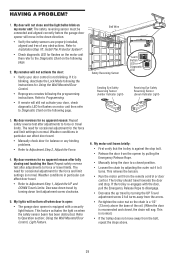
...reverses for no apparent reason after fully closing and touching the floor: Repeat safety reverse test after adjustments to force or travel . • Manually check door for flashes on the following the instructions for the force and limit settings is a 1/2" (13 mm) above . 29 Weather ...Door Control, Light Feature. 6. This relieves the tension. • Run the motor unit from the opener by pulling the Emergency Release Rope. • Manually bring the door to a closed , the chain will not turn off when door is open: • The garage door opener is not blinking. ...
...reverses for no apparent reason after fully closing and touching the floor: Repeat safety reverse test after adjustments to force or travel . • Manually check door for flashes on the following the instructions for the force and limit settings is a 1/2" (13 mm) above . 29 Weather ...Door Control, Light Feature. 6. This relieves the tension. • Run the motor unit from the opener by pulling the Emergency Release Rope. • Manually bring the door to a closed , the chain will not turn off when door is open: • The garage door opener is not blinking. ...

3275 Manual
Page 33
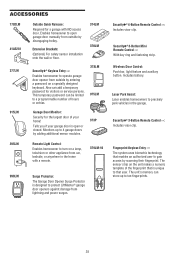
... 11 178B35 Curved door arm section 12 41A5266-1 Safety sensor brackets (2) NOT SHOWN 41A2770-5 Installation hardware bag (includes hardware listed on page 5) 114A4269 Owner's manual 114A4269SP Owner's manual - NO. NO. 1 4A1008 2 41A4813 3 41A3489 4 1707LM 5 41D3484 6 83A11-2 1708LM 1710LM DESCRIPTION Master link kit Chain pulley bracket Complete trolley assembly One-piece rail for...
... 11 178B35 Curved door arm section 12 41A5266-1 Safety sensor brackets (2) NOT SHOWN 41A2770-5 Installation hardware bag (includes hardware listed on page 5) 114A4269 Owner's manual 114A4269SP Owner's manual - NO. NO. 1 4A1008 2 41A4813 3 41A3489 4 1707LM 5 41D3484 6 83A11-2 1708LM 1710LM DESCRIPTION Master link kit Chain pulley bracket Complete trolley assembly One-piece rail for...
3275 Manual
Page 35
...Quick Release: Required for a garage with a remote. 379LM-10 990LM Surge Protector: The Garage Door Opener Surge Protector is designed to protect LiftMaster® garage door openers against damage from lightning and power surges. This temporary password can be limited to gain access by adding additional sensor...user. The unit's memory can add a temporary password for the largest door of the fingerprint that is open garage door manually from outside by entering a password on the unit makes a numeric template of your garage door is unique to ten fingerprints. 35
...Quick Release: Required for a garage with a remote. 379LM-10 990LM Surge Protector: The Garage Door Opener Surge Protector is designed to protect LiftMaster® garage door openers against damage from lightning and power surges. This temporary password can be limited to gain access by adding additional sensor...user. The unit's memory can add a temporary password for the largest door of the fingerprint that is open garage door manually from outside by entering a password on the unit makes a numeric template of your garage door is unique to ten fingerprints. 35


