Owners Manual
Page 1
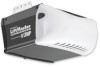
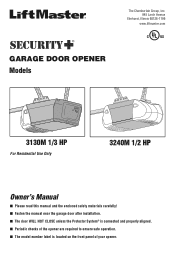
® GARAGE DOOR OPENER Models The Chamberlain Group, Inc. 845 Larch Avenue Elmhurst, Illinois 60126-1196 www.liftmaster.com 3130M 1/3 HP For Residential Use Only 3240M 1/2 HP Owner's Manual ■ Please read this manual and the enclosed safety materials carefully! ■ Fasten the manual near the garage door after installation. ■ The door WILL NOT CLOSE unless the Protector System® is connected and properly aligned. ■ Periodic checks of the opener are required to ensure safe operation. ■ The model number label is located on the front panel of your opener.
® GARAGE DOOR OPENER Models The Chamberlain Group, Inc. 845 Larch Avenue Elmhurst, Illinois 60126-1196 www.liftmaster.com 3130M 1/3 HP For Residential Use Only 3240M 1/2 HP Owner's Manual ■ Please read this manual and the enclosed safety materials carefully! ■ Fasten the manual near the garage door after installation. ■ The door WILL NOT CLOSE unless the Protector System® is connected and properly aligned. ■ Periodic checks of the opener are required to ensure safe operation. ■ The model number label is located on the front panel of your opener.
Owners Manual
Page 2
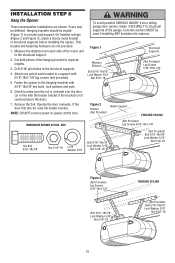
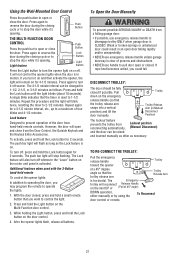
... door and/or the garage door opener if you do not comply with the cautionary statements that accompany them carefully. 2 Mechanical When you see this manual. Read the warnings carefully. Read them . TABLE OF CONTENTS Introduction 2-5 Safety symbol and signal word review 2 Preparing your garage door 3 Tools needed 3... 26-30 Operation safety instructions 26 Using your garage door opener 26 Using the wall-mounted door control 27 To open the door manually 27 Care of serious injury or death if you do not comply with the warnings that accompany it will alert you to your...
... door and/or the garage door opener if you do not comply with the cautionary statements that accompany them carefully. 2 Mechanical When you see this manual. Read the warnings carefully. Read them . TABLE OF CONTENTS Introduction 2-5 Safety symbol and signal word review 2 Preparing your garage door 3 Tools needed 3... 26-30 Operation safety instructions 26 Using your garage door opener 26 Using the wall-mounted door control 27 To open the door manually 27 Care of serious injury or death if you do not comply with the warnings that accompany it will alert you to your...
Owners Manual
Page 7
...;oor. 6. Place entrapment warning label on inside of the door. 10. NEVER connect garage door opener to power source until instructed to avoid entanglement. 5. Place manual release/safety reverse test label in plain view on wall next to garage door control. 11. ALL repairs to avoid accidental release. 7. An improperly balanced...
...;oor. 6. Place entrapment warning label on inside of the door. 10. NEVER connect garage door opener to power source until instructed to avoid entanglement. 5. Place manual release/safety reverse test label in plain view on wall next to garage door control. 11. ALL repairs to avoid accidental release. 7. An improperly balanced...
Owners Manual
Page 15
... SERIOUS INJURY from each side of each bracket to the structural support. 2. Yours may be used if installing ANY brackets into masonry. Operate the door manually. NOTE: DO NOT connect power to provide rigid support. Cut both pieces of the garage. Check to structural supports before installing the opener. Drill 3/16...
... SERIOUS INJURY from each side of each bracket to the structural support. 2. Yours may be used if installing ANY brackets into masonry. Operate the door manually. NOTE: DO NOT connect power to provide rigid support. Cut both pieces of the garage. Check to structural supports before installing the opener. Drill 3/16...
Owners Manual
Page 16
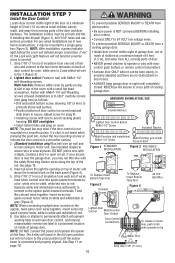
... Volt Bell Wire 9 1 7 3 5 KG 9 1 7 3 5 KG NOTE: When connecting multiple door controls to secure wire in sight until the sensor beam is near door control, and manual release/safety reverse test label in top of the cover with door control push buttons or remote control transmitters. • Activate door ONLY when it...
... Volt Bell Wire 9 1 7 3 5 KG 9 1 7 3 5 KG NOTE: When connecting multiple door controls to secure wire in sight until the sensor beam is near door control, and manual release/safety reverse test label in top of the cover with door control push buttons or remote control transmitters. • Activate door ONLY when it...
Owners Manual
Page 22
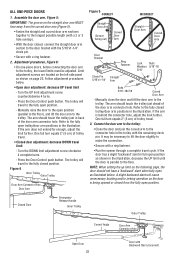
...Closed Door Emergency Release Handle Inner Trolley Outer Trolley Correct Angle Door Arm Connector Hole Open Door 22 Door with the remaining clevis pin. Manually raise the door to the fully open position. - Press the Door Control push button. The arm should not have a "backward" ...side panel as the door is behind the connector hole, adjust the limit further. One full turn equals 2" (5 cm) of trolley travel limit - Manually close the door and lift the door arm to make the connection. • Secure with a ring fastener. 2. Adjustment procedures, Figure 6: •...
...Closed Door Emergency Release Handle Inner Trolley Outer Trolley Correct Angle Door Arm Connector Hole Open Door 22 Door with the remaining clevis pin. Manually raise the door to the fully open position. - Press the Door Control push button. The arm should not have a "backward" ...side panel as the door is behind the connector hole, adjust the limit further. One full turn equals 2" (5 cm) of trolley travel limit - Manually close the door and lift the door arm to make the connection. • Secure with a ring fastener. 2. Adjustment procedures, Figure 6: •...
Owners Manual
Page 23
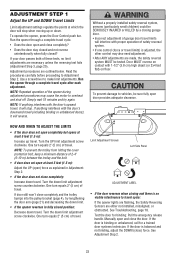
... the cover protection bolt, keep a minimum distance of these tests, no visible interference to overheat and shut off. Turn the down limit adjustment screw counterclockwise. Manually open and close the door. If door still won't close ) force. See Troubleshooting, page 18. ADJUSTMENT STEP 1 Adjust the UP and DOWN Travel Limits Limit...
... the cover protection bolt, keep a minimum distance of these tests, no visible interference to overheat and shut off. Turn the down limit adjustment screw counterclockwise. Manually open and close the door. If door still won't close ) force. See Troubleshooting, page 18. ADJUSTMENT STEP 1 Adjust the UP and DOWN Travel Limits Limit...
Owners Manual
Page 27
... the emergency release handle (so that the timer is reset to open or close from reconnecting automatically, Disconnect Position) NOTICE Lockout position (Manual Disconnect) and the door can be fully closed , press and hold the Lock button again for 4-1/2 minutes. To activate, press and...Press again to reverse the door during the closing cycle or to stop flashing. The 4-1/2 minute interval can be raised and lowered manually as often as necessary. Repeat again for 2 seconds. The push bar light will remain on . Additional features when used with the 3-Button...
... the emergency release handle (so that the timer is reset to open or close from reconnecting automatically, Disconnect Position) NOTICE Lockout position (Manual Disconnect) and the door can be fully closed , press and hold the Lock button again for 4-1/2 minutes. To activate, press and...Press again to reverse the door during the closing cycle or to stop flashing. The 4-1/2 minute interval can be raised and lowered manually as often as necessary. Repeat again for 2 seconds. The push bar light will remain on . Additional features when used with the 3-Button...
Owners Manual
Page 28
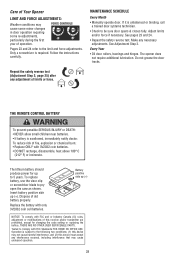
... some re-adjustments, particularly during the first year of limits or force. The opener does not require additional lubrication. MAINTENANCE SCHEDULE Every Month • Manually operate door. Battery positive side up (+) NOTICE: To comply with 3V2032 coin batteries. • DO NOT recharge, disassemble, heat above 100° C (212° F) or...
... some re-adjustments, particularly during the first year of limits or force. The opener does not require additional lubrication. MAINTENANCE SCHEDULE Every Month • Manually operate door. Battery positive side up (+) NOTICE: To comply with 3V2032 coin batteries. • DO NOT recharge, disassemble, heat above 100° C (212° F) or...
Owners Manual
Page 29
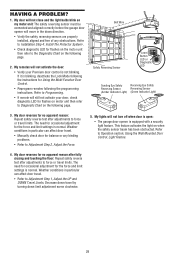
... reversing sensors are properly installed, aligned and free of any binding problems. • Refer to force or travel limits. Refer to force or travel . • Manually check door for no apparent reason after fully closing and touching the floor: Repeat safety reverse test after adjustments to Adjustment Step 2, Adjust the...
... reversing sensors are properly installed, aligned and free of any binding problems. • Refer to force or travel limits. Refer to force or travel . • Manually check door for no apparent reason after fully closing and touching the floor: Repeat safety reverse test after adjustments to Adjustment Step 2, Adjust the...

Owners Manual
Page 33
... bell wire attached Safety reversing sensor bracket 2-conductor bell wire: white & white/red Curved door arm section NOT SHOWN Installation hardware bag (see page 3) Owner's manual Owner's manual-Spanish 33 REPAIR PARTS Rail Assembly Parts 5 3 6 1 7 2 4 KEY PART NO. NO. DESCRIPTION 1 41A6353 Hardware bag (includes sprocket coupling) 2 81C275 Rack 3 41A6262 Complete trolley assembly...
... bell wire attached Safety reversing sensor bracket 2-conductor bell wire: white & white/red Curved door arm section NOT SHOWN Installation hardware bag (see page 3) Owner's manual Owner's manual-Spanish 33 REPAIR PARTS Rail Assembly Parts 5 3 6 1 7 2 4 KEY PART NO. NO. DESCRIPTION 1 41A6353 Hardware bag (includes sprocket coupling) 2 81C275 Rack 3 41A6262 Complete trolley assembly...
Owners Manual
Page 35
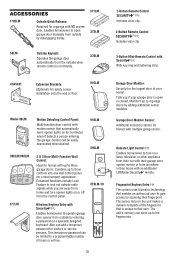
... the garage. Monitors up to turn opener lights on or off from the control panel. 379LM-10 Wireless Keyless Entry with an additional LiftMaster Security✚® remote. CLOSED OPEN Remote Light Control : Enables homeowner to three garage doors. OPEN CLOSED GarageOPEN Door Monitor Sensor: .... 916LM 395LM 2 & 3 Door Multi-Function Wall Control: Ideal for the largest door of your garage door is open garage door manually from outside when remote control is unique to 4 garage doors by scanning their car with up to that automatically turns opener lights on ...
... the garage. Monitors up to turn opener lights on or off from the control panel. 379LM-10 Wireless Keyless Entry with an additional LiftMaster Security✚® remote. CLOSED OPEN Remote Light Control : Enables homeowner to three garage doors. OPEN CLOSED GarageOPEN Door Monitor Sensor: .... 916LM 395LM 2 & 3 Door Multi-Function Wall Control: Ideal for the largest door of your garage door is open garage door manually from outside when remote control is unique to 4 garage doors by scanning their car with up to that automatically turns opener lights on ...


