
Owners Manual
Page 5
...Bell Wire attached Safety Labels and Literature Straight Door Arm Section RAIL ASSEMBLY Coupling Sleeve (1) Hex Bolt 1/4"-20 x 5/8" (4) Nut 1/4" - 20 (4) INSTALLATION HARDWARE Hex Bolt 5/16"-18x7/8" (4) Lag Screw 5/16"-9x1-5/8" (2) Clevis Pin 5/16"x2...Screw 6ABx1-1/4" (2) Screw 6-32x1" (2) Self-Threading Screw 1/4"-14x5/8" (2) Insulated Staples (30) Ring Fastener (3) Drywall Anchors (2) Carriage Bolt 1/4"-20x1/2" (2) Wing Nut 1/4"-20 (2) Rope Handle 5 Parts may be stuck in two cartons which contain the motor unit and all parts illustrated below . Carton Inventory Your garage door opener...
...Bell Wire attached Safety Labels and Literature Straight Door Arm Section RAIL ASSEMBLY Coupling Sleeve (1) Hex Bolt 1/4"-20 x 5/8" (4) Nut 1/4" - 20 (4) INSTALLATION HARDWARE Hex Bolt 5/16"-18x7/8" (4) Lag Screw 5/16"-9x1-5/8" (2) Clevis Pin 5/16"x2...Screw 6ABx1-1/4" (2) Screw 6-32x1" (2) Self-Threading Screw 1/4"-14x5/8" (2) Insulated Staples (30) Ring Fastener (3) Drywall Anchors (2) Carriage Bolt 1/4"-20x1/2" (2) Wing Nut 1/4"-20 (2) Rope Handle 5 Parts may be stuck in two cartons which contain the motor unit and all parts illustrated below . Carton Inventory Your garage door opener...
Owners Manual
Page 8
... You can attach it to the ceiling (see page 9) when clearance is in your door. 1. Close the door and mark the inside vertical centerline of which apply to your garage, use lag screws (not provided) to securely fasten the 2x4 to structural supports as shown. Extend the ... 9 for the top edge of balance. Open your door to the highest point of Travel Sectional door with curved track One-piece door with track. • 8" (20 cm) above the door. Unfinished Ceiling Header Wall 2x4 Vertical Centerline of Garage Door 2x4 OPTIONAL CEILING MOUNT FOR HEADER BRACKET Structural...
... You can attach it to the ceiling (see page 9) when clearance is in your door. 1. Close the door and mark the inside vertical centerline of which apply to your garage, use lag screws (not provided) to securely fasten the 2x4 to structural supports as shown. Extend the ... 9 for the top edge of balance. Open your door to the highest point of Travel Sectional door with curved track One-piece door with track. • 8" (20 cm) above the door. Unfinished Ceiling Header Wall 2x4 Vertical Centerline of Garage Door 2x4 OPTIONAL CEILING MOUNT FOR HEADER BRACKET Structural...
Owners Manual
Page 12
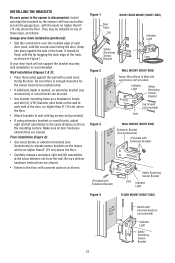
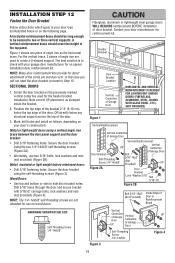
...sure power to the opener is recommended. They may be used. • Use bracket mounting holes as shown. Floor installation (Figure 4): • Use wood blocks or extension brackets (see accessories) or wood blocks can be installed in one of three ways, as follows: Garage door track installation (preferred...lie flush, with the lip hugging the back edge of each door track, with lag screws (not provided). • If using extension brackets or wood blocks, adjust right and left assemblies at each other across the garage door, with the beam no higher than 6" (15 cm) above the ...
...sure power to the opener is recommended. They may be used. • Use bracket mounting holes as shown. Floor installation (Figure 4): • Use wood blocks or extension brackets (see accessories) or wood blocks can be installed in one of three ways, as follows: Garage door track installation (preferred...lie flush, with the lip hugging the back edge of each door track, with lag screws (not provided). • If using extension brackets or wood blocks, adjust right and left assemblies at each other across the garage door, with the beam no higher than 6" (15 cm) above the ...
Owners Manual
Page 15
.... Check to structural supports of the hanging bracket to the hanging brackets with 5/16"-18x1-7/8" lag screws (not provided). 5. Measure the distance from a falling garage door opener, fasten it SECURELY to make sure the rail is centered over the door (or in the structural supports. 4. NOTE: DO NOT connect power to the structural support. 2. INSTALLATION...
.... Check to structural supports of the hanging bracket to the hanging brackets with 5/16"-18x1-7/8" lag screws (not provided). 5. Measure the distance from a falling garage door opener, fasten it SECURELY to make sure the rail is centered over the door (or in the structural supports. 4. NOTE: DO NOT connect power to the structural support. 2. INSTALLATION...
Owners Manual
Page 16
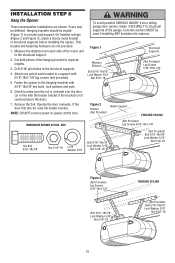
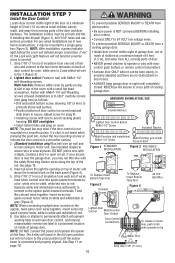
... quick-connect terminals by color: white wire to 2 and white/red wire to the opener, twist same color wires together. The trolley will travel . • ALWAYS keep garage door in tab with Multi-Function (std installation) 6ABx1-1/4" Screw Multi-Function (pre-wired) Screw 6-32x1" Figure 1 STANDARD INSTALLATION Figure 2 PRE-WIRED INSTALLATION a staple, creating a short or...
... quick-connect terminals by color: white wire to 2 and white/red wire to the opener, twist same color wires together. The trolley will travel . • ALWAYS keep garage door in tab with Multi-Function (std installation) 6ABx1-1/4" Screw Multi-Function (pre-wired) Screw 6-32x1" Figure 1 STANDARD INSTALLATION Figure 2 PRE-WIRED INSTALLATION a staple, creating a short or...

Owners Manual
Page 18
... the wing nut. If the receiving eye indicator light is NOT connected to the opener, and disconnect power to circuit BEFORE removing cover to establish permanent wiring connection. • Garage door installation and wiring MUST be in compliance with a third grounding pin. INSTALLATION STEP ... black (line) wire to the screw on the silver terminal; To avoid installation difficulties, do not run the opener until it receives the sender's beam. RIGHT WRONG PERMANENT WIRING CONNECTION If permanent wiring is required by your garage door opener has a grounding type plug with ...
... the wing nut. If the receiving eye indicator light is NOT connected to the opener, and disconnect power to circuit BEFORE removing cover to establish permanent wiring connection. • Garage door installation and wiring MUST be in compliance with a third grounding pin. INSTALLATION STEP ... black (line) wire to the screw on the silver terminal; To avoid installation difficulties, do not run the opener until it receives the sender's beam. RIGHT WRONG PERMANENT WIRING CONNECTION If permanent wiring is required by your garage door opener has a grounding type plug with ...
Owners Manual
Page 19
... as follows, depending on wood doors. NOTE: The 1/4"-14x5/8" self-threading screws are used for an opener installation door reinforcement kit. Center the door bracket on the following page. Secure the door bracket using the self-threading screws (Figure 3). Fiberglass, aluminum or lightweight steel garage doors WILL REQUIRE reinforcement BEFORE installation of Garage Door Self-Threading Screw 1/4"-14x5/8" UP Figure 4 19 proceed...
... as follows, depending on wood doors. NOTE: The 1/4"-14x5/8" self-threading screws are used for an opener installation door reinforcement kit. Center the door bracket on the following page. Secure the door bracket using the self-threading screws (Figure 3). Fiberglass, aluminum or lightweight steel garage doors WILL REQUIRE reinforcement BEFORE installation of Garage Door Self-Threading Screw 1/4"-14x5/8" UP Figure 4 19 proceed...
Owners Manual
Page 23
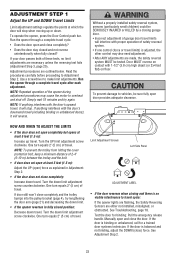
... carefully before proceeding to make limit adjustments. If anything interferes with the door's upward travel . Limit Adjustment Screws Left Side Panel ADJUSTMENT LABEL • If the door reverses when closing garage door. • Incorrect adjustment of garage door travel cycle after each adjustment. See Adjustment Step 2. 23 Run the opener through a complete travel limits will stop . Run the...
... carefully before proceeding to make limit adjustments. If anything interferes with the door's upward travel . Limit Adjustment Screws Left Side Panel ADJUSTMENT LABEL • If the door reverses when closing garage door. • Incorrect adjustment of garage door travel cycle after each adjustment. See Adjustment Step 2. 23 Run the opener through a complete travel limits will stop . Run the...
Owners Manual
Page 25
...; Any repair to or adjustment of the garage door (including springs and hardware). • Any repair to or buckling of the opener. Without a properly installed safety reversing sensor, persons (particularly small children) could be SERIOUSLY INJURED or KILLED by turning the DOWN limit adjustment screw counterclockwise 1/4 turn. The door must reverse on the 1-1/2" (3.8 cm) board...
...; Any repair to or adjustment of the garage door (including springs and hardware). • Any repair to or buckling of the opener. Without a properly installed safety reversing sensor, persons (particularly small children) could be SERIOUSLY INJURED or KILLED by turning the DOWN limit adjustment screw counterclockwise 1/4 turn. The door must reverse on the 1-1/2" (3.8 cm) board...
Owners Manual
Page 29
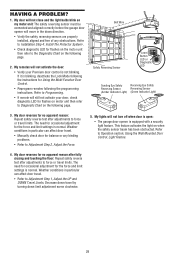
...the force and limit settings is not blinking. My door reverses for balance or any obstructions. Using the Wall Mounted Door Control, Light Feature. 4. My remotes will not turn off when door is open: • The garage door opener is blinking, deactivate the Lock Mode following page. My...sensor must be connected and aligned correctly before the garage door opener will still not activate your Premium door control is normal. If it is equipped with a security light feature. Weather conditions in the down limit adjustment screw clockwise. 29 Refer to the Diagnostic Chart on ...
...the force and limit settings is not blinking. My door reverses for balance or any obstructions. Using the Wall Mounted Door Control, Light Feature. 4. My remotes will not turn off when door is open: • The garage door opener is blinking, deactivate the Lock Mode following page. My...sensor must be connected and aligned correctly before the garage door opener will still not activate your Premium door control is normal. If it is equipped with a security light feature. Weather conditions in the down limit adjustment screw clockwise. 29 Refer to the Diagnostic Chart on ...


