1355 Manual
Page 8
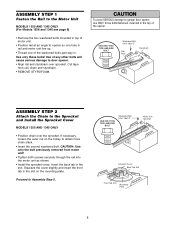
...Squeeze the cover slightly and insert the front tab in the slot. USE ONLY THIS TYPE AND SIZE BOLT Washered Bolt 5/16"-18x1/2" Motor Unit Sprocket Sprocket Cover Back Tab Slot Front Tab Slot ...and styrofoam. • REMOVE STYROFOAM. Use of any other bolts will cause serious damage to garage door opener, use ONLY those bolts/fasteners mounted in the top of the opener. Proceed to opener ...one of the washered bolts part way in. ASSEMBLY STEP 1 Fasten the Rail to the Motor Unit MODELS 1355 AND 1345 ONLY (For Models 1356 and 1346 see page 9) • Remove the two washered bolts ...
...Squeeze the cover slightly and insert the front tab in the slot. USE ONLY THIS TYPE AND SIZE BOLT Washered Bolt 5/16"-18x1/2" Motor Unit Sprocket Sprocket Cover Back Tab Slot Front Tab Slot ...and styrofoam. • REMOVE STYROFOAM. Use of any other bolts will cause serious damage to garage door opener, use ONLY those bolts/fasteners mounted in the top of the opener. Proceed to opener ...one of the washered bolts part way in. ASSEMBLY STEP 1 Fasten the Rail to the Motor Unit MODELS 1355 AND 1345 ONLY (For Models 1356 and 1346 see page 9) • Remove the two washered bolts ...
1355 Manual
Page 9
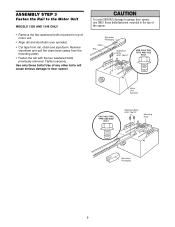
... removed. Tighten securely. WARNING CAUTION To avoid SERIOUS damage to door opener. Styrofoam Packaging Chain Rail Washered Bolts 5/16"-18x1/2" USE ONLY THIS TYPE AND SIZE BOLT Motor Unit Sprocket USE ONLY THIS TYPE AND SIZE BOLT Washered Bolts 5/16"-18x1/2" Mounting Plate Styrofoam Packaging 9 ...Use of any other bolts will cause serious damage to garage door opener, use ONLY those bolts/fasteners mounted ...
... removed. Tighten securely. WARNING CAUTION To avoid SERIOUS damage to door opener. Styrofoam Packaging Chain Rail Washered Bolts 5/16"-18x1/2" USE ONLY THIS TYPE AND SIZE BOLT Motor Unit Sprocket USE ONLY THIS TYPE AND SIZE BOLT Washered Bolts 5/16"-18x1/2" Mounting Plate Styrofoam Packaging 9 ...Use of any other bolts will cause serious damage to garage door opener, use ONLY those bolts/fasteners mounted ...
1355 Manual
Page 10
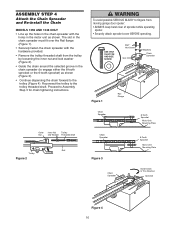
... To avoid possible SERIOUS INJURY to the trolley threaded shaft. Proceed to Assembly Step 3 for chain tightening instructions. USE ONLY THIS TYPE AND SIZE SCREW #8x1" Hex Screw Slot Washers Chain Spreader Figure 1 Rail Flange Chain Spreader Outer Nut Inner Nut Trolley and Washer Threaded Shaft Rail Trolley...Line up the holes in the chain spreader with the hardware provided. • Remove the trolley threaded shaft from CAUTION moving garage door opener: • ALWAYS keep hand clear of sprocket while operating opener. • Securely attach sprocket cover BEFORE operating.
... To avoid possible SERIOUS INJURY to the trolley threaded shaft. Proceed to Assembly Step 3 for chain tightening instructions. USE ONLY THIS TYPE AND SIZE SCREW #8x1" Hex Screw Slot Washers Chain Spreader Figure 1 Rail Flange Chain Spreader Outer Nut Inner Nut Trolley and Washer Threaded Shaft Rail Trolley...Line up the holes in the chain spreader with the hardware provided. • Remove the trolley threaded shaft from CAUTION moving garage door opener: • ALWAYS keep hand clear of sprocket while operating opener. • Securely attach sprocket cover BEFORE operating.
1355 Manual
Page 14
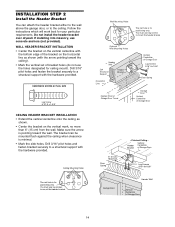
... 3/16" pilot holes and fasten the bracket securely to a structural support with the arrow pointing toward the wall. HARDWARE SHOWN ACTUAL SIZE Lag Screw 5/16"-9 x 1-5/8" CEILING HEADER BRACKET INSTALLATION • Extend the vertical centerline onto the ceiling as shown. • Center... 2x4 Structural Support Header Bracket CEILING MOUNT ONLY UP Horizontal Line Vertical Centerline of Garage Door Lag Screws 5/16"-9x1-5/8" Door Spring Highest Point of Garage Door Travel Garage Door Vertical Centerline of bracket holes (do not use lag screws to a structural support with...
... 3/16" pilot holes and fasten the bracket securely to a structural support with the arrow pointing toward the wall. HARDWARE SHOWN ACTUAL SIZE Lag Screw 5/16"-9 x 1-5/8" CEILING HEADER BRACKET INSTALLATION • Extend the vertical centerline onto the ceiling as shown. • Center... 2x4 Structural Support Header Bracket CEILING MOUNT ONLY UP Horizontal Line Vertical Centerline of Garage Door Lag Screws 5/16"-9x1-5/8" Door Spring Highest Point of Garage Door Travel Garage Door Vertical Centerline of bracket holes (do not use lag screws to a structural support with...

1355 Manual
Page 15
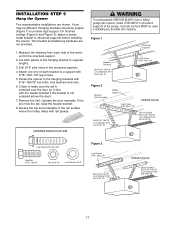
... to secure. Have someone hold the opener securely on the garage floor below the header bracket. Garage Door Ring Fastener Header Bracket Clevis Pin 5/16"x2-3/4" Chain Pulley Bracket Rail Temporary Support HARDWARE SHOWN ACTUAL SIZE Clevis Pin 5/16"x2-3/4" 15 Ring Fastener Use packing material as shown. • Insert a ring fastener.... • Position the rail bracket against the header bracket. • Align the bracket holes and join with a clevis pin as a protective base. NOTE: If the door spring is in the way you'll need help.
... to secure. Have someone hold the opener securely on the garage floor below the header bracket. Garage Door Ring Fastener Header Bracket Clevis Pin 5/16"x2-3/4" Chain Pulley Bracket Rail Temporary Support HARDWARE SHOWN ACTUAL SIZE Clevis Pin 5/16"x2-3/4" 15 Ring Fastener Use packing material as shown. • Insert a ring fastener.... • Position the rail bracket against the header bracket. • Align the bracket holes and join with a clevis pin as a protective base. NOTE: If the door spring is in the way you'll need help.
1355 Manual
Page 17
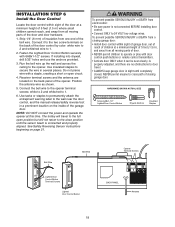
... side of the rail surface where the trolley slides with 5/16"-18x7/8" hex bolts, lock washers and nuts. 6. HARDWARE SHOWN ACTUAL SIZE WARNING To avoid possible SERIOUS INJURY from each bracket to the hanging brackets with rail grease. On finished ceilings (Figure 2 and Figure... fastening hardware are shown. Concrete anchors MUST be different. Cut both pieces of the garage. Operate the door manually. Measure the distance from a falling CAUTION garage door opener, fasten it SECURELY to structural supports before installing the opener. Hanging brackets should be angled (Figure ...
... side of the rail surface where the trolley slides with 5/16"-18x7/8" hex bolts, lock washers and nuts. 6. HARDWARE SHOWN ACTUAL SIZE WARNING To avoid possible SERIOUS INJURY from each bracket to the hanging brackets with rail grease. On finished ceilings (Figure 2 and Figure... fastening hardware are shown. Concrete anchors MUST be different. Cut both pieces of the garage. Operate the door manually. Measure the distance from a falling CAUTION garage door opener, fasten it SECURELY to structural supports before installing the opener. Hanging brackets should be angled (Figure ...
1355 Manual
Page 18
... with 6ABx1-1/2" screws. To prevent possible SERIOUS INJURY or DEATH from a closing garage door. HARDWARE SHOWN ACTUAL SIZE Screw 6ABx1-1/2" Lighted Door Control Button Drywall Anchors Insulated Staples Bell Wire Bell Wire W-H2T R-E1D Lighted Door Control Button Terminal Screws Lighted Door Control Button Opener Terminal Screws BACK PANEL 1 2 3 9 1 7 3 5 KG 9 1 7 3 5 KG Antenna 18 If installing...
... with 6ABx1-1/2" screws. To prevent possible SERIOUS INJURY or DEATH from a closing garage door. HARDWARE SHOWN ACTUAL SIZE Screw 6ABx1-1/2" Lighted Door Control Button Drywall Anchors Insulated Staples Bell Wire Bell Wire W-H2T R-E1D Lighted Door Control Button Terminal Screws Lighted Door Control Button Opener Terminal Screws BACK PANEL 1 2 3 9 1 7 3 5 KG 9 1 7 3 5 KG Antenna 18 If installing...
1355 Manual
Page 19
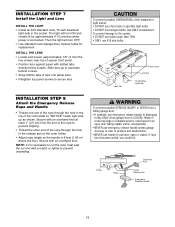
...Arm Emergency Release Handle 19 Secure with a match or lighter to the opener: • DO NOT use bulbs larger than 75W. • ONLY use A19 size bulbs. INSTALLATION STEP 7 Install the Light and Lens INSTALL THE LIGHT • Install an A19 standard neck, 75 watt maximum light bulb in an open... or closed. Slide lens up as shown. Use ONLY incandescent. To prevent damage to prevent unraveling. Weak or broken springs or unbalanced door could fall. Light Lens Lens Tab Panel Screw Lens Slot 75 Watt Max. NOTE: If it is clear of opener front panel. • Position ...
...Arm Emergency Release Handle 19 Secure with a match or lighter to the opener: • DO NOT use bulbs larger than 75W. • ONLY use A19 size bulbs. INSTALLATION STEP 7 Install the Light and Lens INSTALL THE LIGHT • Install an A19 standard neck, 75 watt maximum light bulb in an open... or closed. Slide lens up as shown. Use ONLY incandescent. To prevent damage to prevent unraveling. Weak or broken springs or unbalanced door could fall. Light Lens Lens Tab Panel Screw Lens Slot 75 Watt Max. NOTE: If it is clear of opener front panel. • Position ...

1355 Manual
Page 22
...Snap into place against the wall with Concrete Anchors (Not Provided) Indicator Light Sensor Bracket 22 Figure 1 DOOR TRACK MOUNT (RIGHT SIDE) Door Track Lip Indicator Light Sensor Bracket Lens Figure 2 IGWnasairldal ege WALL MOUNT (RIGHT SIDE) Fasten Wood Block...Bracket) Figure 4 Lens Sensor Bracket Indicator Light FLOOR MOUNT (RIGHT SIDE) HARDWARE SHOWN ACTUAL SIZE Carriage Bolt 1/4"-20x1/2" Wing Nut 1/4"-20 Staples IGWnsaairdlalege Lens Attach with curved arms facing the door. They may be used. • Use bracket mounting holes as follows. Wall installation (...
...Snap into place against the wall with Concrete Anchors (Not Provided) Indicator Light Sensor Bracket 22 Figure 1 DOOR TRACK MOUNT (RIGHT SIDE) Door Track Lip Indicator Light Sensor Bracket Lens Figure 2 IGWnasairldal ege WALL MOUNT (RIGHT SIDE) Fasten Wood Block...Bracket) Figure 4 Lens Sensor Bracket Indicator Light FLOOR MOUNT (RIGHT SIDE) HARDWARE SHOWN ACTUAL SIZE Carriage Bolt 1/4"-20x1/2" Wing Nut 1/4"-20 Staples IGWnsaairdlalege Lens Attach with curved arms facing the door. They may be used. • Use bracket mounting holes as follows. Wall installation (...
1355 Manual
Page 24
... bracket 2"-4" (5-10 cm) below the top edge of the door, OR directly below or on wood doors. HARDWARE SHOWN ACTUAL SIZE Self-Threading Screw 1/4"-14x5/8" CAUTION To prevent damage to garage door, reinforce inside the bracket. 2. Figure 1 shows one piece of the clevis pin and door arm. The best solution is to check with your...
... bracket 2"-4" (5-10 cm) below the top edge of the door, OR directly below or on wood doors. HARDWARE SHOWN ACTUAL SIZE Self-Threading Screw 1/4"-14x5/8" CAUTION To prevent damage to garage door, reinforce inside the bracket. 2. Figure 1 shows one piece of the clevis pin and door arm. The best solution is to check with your...

1355 Manual
Page 25
... GLASS PANEL, ETC.). (NOT PROVIDED) HARDWARE SHOWN ACTUAL SIZE Self-Threading Screw 1/4"-14x5/8" Door Bracket Nut 5/16"-18 Door Bracket Self-Threading Screw 1/4"-14x5/8" Top of Door (Inside Garage) Top Edge of Door Optional Placement METAL DOOR Lock Washer 5/16" Top of Door (Inside Garage) Top Edge of the door, in line with the header bracket as shown.
... GLASS PANEL, ETC.). (NOT PROVIDED) HARDWARE SHOWN ACTUAL SIZE Self-Threading Screw 1/4"-14x5/8" Door Bracket Nut 5/16"-18 Door Bracket Self-Threading Screw 1/4"-14x5/8" Top of Door (Inside Garage) Top Edge of Door Optional Placement METAL DOOR Lock Washer 5/16" Top of Door (Inside Garage) Top Edge of the door, in line with the header bracket as shown.

1355 Manual
Page 26
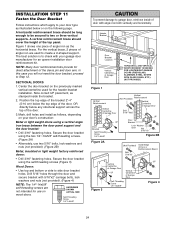
... 2" (5 cm) as possible to increase door arm rigidity. • Figure 3, Hole alignment alternative: - HARDWARE SHOWN ACTUAL SIZE Inner Trolley Outer Trolley Ring Fastener Clevis Pin 5/16"x1" Figure 1 Door Bracket Straight Door Arm Curved Door Arm Clevis Pin 5/16"x1-1/4" Lock Washers... 5/16" Nuts 5/16"-18 Figure 2 Door Bracket Emergency Release Handle Bolts 5/16"-18x7...
... 2" (5 cm) as possible to increase door arm rigidity. • Figure 3, Hole alignment alternative: - HARDWARE SHOWN ACTUAL SIZE Inner Trolley Outer Trolley Ring Fastener Clevis Pin 5/16"x1" Figure 1 Door Bracket Straight Door Arm Curved Door Arm Clevis Pin 5/16"x1-1/4" Lock Washers... 5/16" Nuts 5/16"-18 Figure 2 Door Bracket Emergency Release Handle Bolts 5/16"-18x7...

1355 Manual
Page 31
...-held remote. If you purchase a new remote, or if you wish to door travel. 4. If opening, the door will reverse. 3. The sensor has no obstructions to deactivate any remote, follow the instructions in SEVERE INJURY or DEATH. 13. Bulb size is clear of persons and obstructions. 8. ALWAYS keep remote controls out of reach...
...-held remote. If you purchase a new remote, or if you wish to door travel. 4. If opening, the door will reverse. 3. The sensor has no obstructions to deactivate any remote, follow the instructions in SEVERE INJURY or DEATH. 13. Bulb size is clear of persons and obstructions. 8. ALWAYS keep remote controls out of reach...


