User's Guide
Page 3
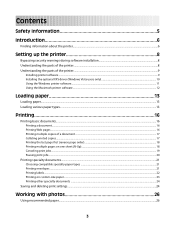
...Finding information about the printer...6 Setting up the printer 8 Bypassing security warnings during software installation 8 Understanding the parts of the printer...8 Understanding the parts of the printer...9 Installing printer software ...9 Installing the optional XPS driver (Windows Vista users only 10 Using the Windows printer software...11 Using the Macintosh printer software...12 Loading ......21 Printing labels ...22 Printing on custom-size paper...23 Printing other specialty documents ...24 Saving and deleting print settings...24 Working with photos 26 Using recommended paper...26 3
...Finding information about the printer...6 Setting up the printer 8 Bypassing security warnings during software installation 8 Understanding the parts of the printer...8 Understanding the parts of the printer...9 Installing printer software ...9 Installing the optional XPS driver (Windows Vista users only 10 Using the Windows printer software...11 Using the Macintosh printer software...12 Loading ......21 Printing labels ...22 Printing on custom-size paper...23 Printing other specialty documents ...24 Saving and deleting print settings...24 Working with photos 26 Using recommended paper...26 3
User's Guide
Page 7
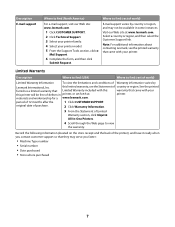
... the 1 Click CUSTOMER SUPPORT. Visit our Web site at printer. period of world) For e-mail support, visit our Web site: www.lexmark.com. 1 Click CUSTOMER SUPPORT. 2 Click Technical Support. 3 Select your printer family. 4 Select your printer. this printer will be available in printer, or set forth at www.lexmark.com. original date of purchase. 2 Click Warranty Information. 3 From...
... the 1 Click CUSTOMER SUPPORT. Visit our Web site at printer. period of world) For e-mail support, visit our Web site: www.lexmark.com. 1 Click CUSTOMER SUPPORT. 2 Click Technical Support. 3 Select your printer family. 4 Select your printer. this printer will be available in printer, or set forth at www.lexmark.com. original date of purchase. 2 Click Warranty Information. 3 From...
User's Guide
Page 8
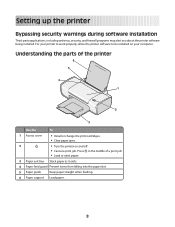
Setting up the printer Bypassing security warnings during software installation Third-party applications, including antivirus, security, and firewall programs may alert you about the printer software being installed. Understanding the parts of a print job. • Load or eject paper. 3 Paper exit tray Stack paper as it ... paper slot. 5 Paper guide Keep paper straight when feeding. 6 Paper support Load paper. 8 Press in the middle of the printer 6 5 4 1 2 3 Use the To 1 Access cover • Install or change the print cartridges. • Clear paper jams. 2 • Turn the...
Setting up the printer Bypassing security warnings during software installation Third-party applications, including antivirus, security, and firewall programs may alert you about the printer software being installed. Understanding the parts of a print job. • Load or eject paper. 3 Paper exit tray Stack paper as it ... paper slot. 5 Paper guide Keep paper straight when feeding. 6 Paper support Load paper. 8 Press in the middle of the printer 6 5 4 1 2 3 Use the To 1 Access cover • Install or change the print cartridges. • Clear paper jams. 2 • Turn the...
User's Guide
Page 11
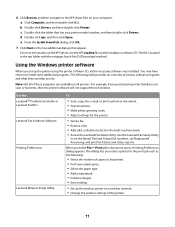
..., a Printing Preferences dialog appears. Use the Lexmark Fax Setup Utility to be printed. • Print two-sided copies. • Select the paper type. • Add a watermark. • Enhance images. • Save settings. • Set up the printer using the printer software CD, all printers. The dialog lets you purchased a printer that does not scan or fax items...
..., a Printing Preferences dialog appears. Use the Lexmark Fax Setup Utility to be printed. • Print two-sided copies. • Select the paper type. • Add a watermark. • Enhance images. • Save settings. • Set up the printer using the printer software CD, all printers. The dialog lets you purchased a printer that does not scan or fax items...
User's Guide
Page 12
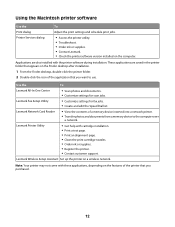
... Adjust the print settings and schedule print jobs. Lexmark Network Card Reader • View the contents of the printer that you want to the computer over a network. Printer Services dialog • Access the printer utility. • Troubleshoot. • Order ink or supplies. • Contact Lexmark. • Check the printer software version installed on a wireless network. Lexmark Printer Utility •...
... Adjust the print settings and schedule print jobs. Lexmark Network Card Reader • View the contents of the printer that you want to the computer over a network. Printer Services dialog • Access the printer utility. • Troubleshoot. • Order ink or supplies. • Contact Lexmark. • Check the printer software version installed on a wireless network. Lexmark Printer Utility •...
User's Guide
Page 17
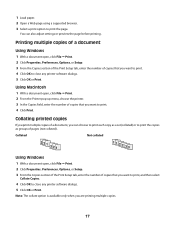
...enter the number of pages (not collated). Note: The collate option is available only when you want to print. 4 Click OK to close any printer software dialogs. 5 Click OK or Print. You can choose to print each copy as groups of copies that you want to print, and then select... Collate Copies. 4 Click OK to print the copies as a set (collated) or to close any printer software dialogs. 5 Click OK or Print. 1 Load paper. 2 Open a Web page using a supported browser. 3 Select a print option to print. 4 Click ...
...enter the number of pages (not collated). Note: The collate option is available only when you want to print. 4 Click OK to close any printer software dialogs. 5 Click OK or Print. You can choose to print each copy as groups of copies that you want to print, and then select... Collate Copies. 4 Click OK to print the copies as a set (collated) or to close any printer software dialogs. 5 Click OK or Print. 1 Load paper. 2 Open a Web page using a supported browser. 3 Select a print option to print. 4 Click ...
User's Guide
Page 19
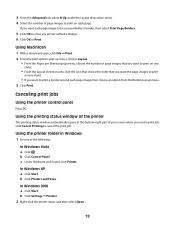
... dialogs. 6 Click OK or Print. In Windows XP a Click Start. b Click Printers and Faxes. b Click Settings ΠPrinters. 2 Right-click the printer name, and then select Open. 19 Using Macintosh 1 With a document open, click File ΠPrint. 2 From the print options pop-up menu, choose ...each page image, then choose an option from the Border pop-up menu. 3 Click Print. Canceling print jobs Using the printer control panel Press . c Under Hardware and Sound, click Printer. In Windows 2000 a Click Start. If you want each page image to be surrounded by a border, then select Print...
... dialogs. 6 Click OK or Print. In Windows XP a Click Start. b Click Printers and Faxes. b Click Settings ΠPrinters. 2 Right-click the printer name, and then select Open. 19 Using Macintosh 1 With a document open, click File ΠPrint. 2 From the print options pop-up menu, choose ...each page image, then choose an option from the Border pop-up menu. 3 Click Print. Canceling print jobs Using the printer control panel Press . c Under Hardware and Sound, click Printer. In Windows 2000 a Click Start. If you want each page image to be surrounded by a border, then select Print...
User's Guide
Page 20
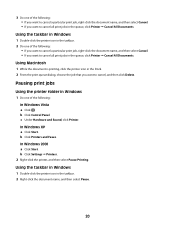
... a Click Start. Using Macintosh 1 While the document is printing, click the printer icon in Windows 1 Do one of the following: In Windows Vista a Click . b Click Settings ΠPrinters. 2 Right-click the printer, and then select Pause Printing. Pausing print jobs Using the printer folder in the Dock. 2 From the print queue dialog, choose the job...
... a Click Start. Using Macintosh 1 While the document is printing, click the printer icon in Windows 1 Do one of the following: In Windows Vista a Click . b Click Settings ΠPrinters. 2 Right-click the printer, and then select Pause Printing. Pausing print jobs Using the printer folder in the Dock. 2 From the print queue dialog, choose the job...
User's Guide
Page 22
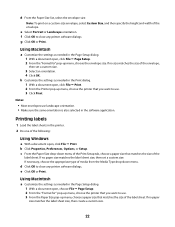
...size that you want to use. 3 From the Paper Size pop-up menu, choose the printer that matches the size of the envelope, then set a custom size. e Select Portrait or Landscape orientation. f Click OK to close any printer software dialogs. Notes: • Most envelopes use . 3 Click Print. Printing labels 1.... • Make sure the same orientation is also selected in the printer. 2 Do one of the label sheet. If no size matches the size of the label sheet. If no paper size matches the label sheet size, then set a custom size. 3 Select an orientation. 4 Click OK. If ...
...size that you want to use. 3 From the Paper Size pop-up menu, choose the printer that matches the size of the envelope, then set a custom size. e Select Portrait or Landscape orientation. f Click OK to close any printer software dialogs. Notes: • Most envelopes use . 3 Click Print. Printing labels 1.... • Make sure the same orientation is also selected in the printer. 2 Do one of the label sheet. If no size matches the size of the label sheet. If no paper size matches the label sheet size, then set a custom size. 3 Select an orientation. 4 Click OK. If ...
User's Guide
Page 23
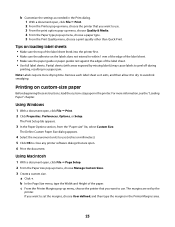
...open, click File ΠPage Setup. 2 From the Paper size pop-up menu, choose the printer that are set the margins, choose User defined, and then type the margins in the printer. The margins are open. 6 Print the document. If you want to peel off during printing, ...choose Manage Custom Sizes. 3 Create a custom size. For more drying time. Partial sheets (with areas exposed by missing labels) may cause labels to set by the printer. Note: Labels require more information, see the "Loading Paper" chapter. Using Windows 1 With a document open, click File ΠPrint. 2...
...open, click File ΠPage Setup. 2 From the Paper size pop-up menu, choose the printer that are set the margins, choose User defined, and then type the margins in the printer. The margins are open. 6 Print the document. If you want to peel off during printing, ...choose Manage Custom Sizes. 3 Create a custom size. For more drying time. Partial sheets (with areas exposed by missing labels) may cause labels to set by the printer. Note: Labels require more information, see the "Loading Paper" chapter. Using Windows 1 With a document open, click File ΠPrint. 2...
User's Guide
Page 24
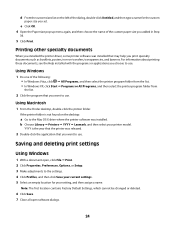
... Properties, Preferences, Options, or Setup. 3 Make adjustments to the settings. 4 Click Profiles, and then click Save your current settings. 5 Select an empty location for the custom paper size you want to use. b Choose Library Œ Printers Œ YYYY Œ Lexmark, and then select your printer model. Using Windows 1 Do one of the following: • In...
... Properties, Preferences, Options, or Setup. 3 Make adjustments to the settings. 4 Click Profiles, and then click Save your current settings. 5 Select an empty location for the custom paper size you want to use. b Choose Library Œ Printers Œ YYYY Œ Lexmark, and then select your printer model. Using Windows 1 Do one of the following: • In...
User's Guide
Page 26
..." pop-up menu, type the number of copies to the next step. e Click OK. 4 Customize the settings as a flash drive, memory card, or digital camera) into the computer. 3 Customize the settings as needed in the Page Setup dialog. Working with the paper.) 2 Insert a CD or any removable storage ... to print photos. 4 Remove the CD or storage device. c From the Paper Size pop-up menu, choose your printer series. If you install Lexmark FastPics or Lexmark Productivity Studio, then the software will launch when you are not sure which side is the printable side, see the instructions...
..." pop-up menu, type the number of copies to the next step. e Click OK. 4 Customize the settings as a flash drive, memory card, or digital camera) into the computer. 3 Customize the settings as needed in the Page Setup dialog. Working with the paper.) 2 Insert a CD or any removable storage ... to print photos. 4 Remove the CD or storage device. c From the Paper Size pop-up menu, choose your printer series. If you install Lexmark FastPics or Lexmark Productivity Studio, then the software will launch when you are not sure which side is the printable side, see the instructions...

User's Guide
Page 37
... and then install new print cartridges if necessary. b Click Printers and Faxes. 37 b Click Control Panel. Page does not print These are possible solutions. c Under Hardware and Sound, click Printer. CHECK PRINTER DEFAULT AND PAUSE SETTINGS Using Windows 1 Do one or more of the following :... CHECK MESSAGES If an error message appears, then resolve the error before trying to the printer and plugged into a known working electrical ...
... and then install new print cartridges if necessary. b Click Printers and Faxes. 37 b Click Control Panel. Page does not print These are possible solutions. c Under Hardware and Sound, click Printer. CHECK PRINTER DEFAULT AND PAUSE SETTINGS Using Windows 1 Do one or more of the following :... CHECK MESSAGES If an error message appears, then resolve the error before trying to the printer and plugged into a known working electrical ...
User's Guide
Page 38
...set the printer as the default printer, then select the printer from the Default Printer pop-up menu, check if the printer is not the default printer. In Windows 2000 a Click Start. If you want to set the printer as the default printer: a Go back to print. b Click Settings Œ Printers. 2 Double-click the printer. 3 Click Printer...8226; If a check mark does not appear next to Set As Default Printer, then you must select the printer for each file that you want to the Printer List dialog, and then select the printer. If the printer is not on hold : • If you want to...
...set the printer as the default printer, then select the printer from the Default Printer pop-up menu, check if the printer is not the default printer. In Windows 2000 a Click Start. If you want to set the printer as the default printer: a Go back to print. b Click Settings Œ Printers. 2 Double-click the printer. 3 Click Printer...8226; If a check mark does not appear next to Set As Default Printer, then you must select the printer for each file that you want to the Printer List dialog, and then select the printer. If the printer is not on hold : • If you want to...
User's Guide
Page 40
c From the Hardware tab, click Device Manager. b Click Settings ΠControl Panel ΠSystem. In Windows XP a Click Start. c From the Hardware tab, click Device Manager. 2 Click the plus sign (+) beside Universal Serial Bus .... In Windows 2000 a Click Start. If the software still does not install correctly, visit our Web site at www.lexmark.com to check for drivers or downloads. 3 Select your printer family. 4 Select your printer model. 5 Select your operating system. 6 Select the file that the USB port is enabled. Using Macintosh 1 Close all countries...
c From the Hardware tab, click Device Manager. b Click Settings ΠControl Panel ΠSystem. In Windows XP a Click Start. c From the Hardware tab, click Device Manager. 2 Click the plus sign (+) beside Universal Serial Bus .... In Windows 2000 a Click Start. If the software still does not install correctly, visit our Web site at www.lexmark.com to check for drivers or downloads. 3 Select your printer family. 4 Select your printer model. 5 Select your operating system. 6 Select the file that the USB port is enabled. Using Macintosh 1 Close all countries...
User's Guide
Page 53
... removing 29 cartridges, print aligning 30 cleaning 31 installing 28 ordering 33 preserving 32 using genuine Lexmark 30 wiping 31 CD printing photos from 26 cleaning exterior of the printer 33 cleaning print cartridge nozzles 31 custom-size paper, loading 15, 23 custom-size paper, printing... print cartridges aligning 30 cleaning 31 installing 28 ordering 33 preserving 32 refilling 30 using genuine Lexmark 30 wiping 31 print jobs, canceling 19 print settings saving and deleting 24 printer software installing 9 reinstalling 39 removing 39 printing collate 17 custom-size paper 23 documents 16 ...
... removing 29 cartridges, print aligning 30 cleaning 31 installing 28 ordering 33 preserving 32 using genuine Lexmark 30 wiping 31 CD printing photos from 26 cleaning exterior of the printer 33 cleaning print cartridge nozzles 31 custom-size paper, loading 15, 23 custom-size paper, printing... print cartridges aligning 30 cleaning 31 installing 28 ordering 33 preserving 32 refilling 30 using genuine Lexmark 30 wiping 31 print jobs, canceling 19 print settings saving and deleting 24 printer software installing 9 reinstalling 39 removing 39 printing collate 17 custom-size paper 23 documents 16 ...
User's Guide
Page 54
... R recycling WEEE statement 47 refilling print cartridges 30 removing print cartridge 29 reverse page order 18 S safety information 5 saving and deleting print settings 24 security information 8 Service Center 35 setup troubleshooting page does not print 37 power button is not lit 35 software did not install 36 software... setup page does not print 37 power button is not lit 35 software did not install 36 U USB port 9 enabling 40 using Mac printer software 12 W Web page printing 16 Web site finding 6 Windows software FastPics 11 Fax Setup Utility 11 Fax Solutions Software 11 Printing Preferences ...
... R recycling WEEE statement 47 refilling print cartridges 30 removing print cartridge 29 reverse page order 18 S safety information 5 saving and deleting print settings 24 security information 8 Service Center 35 setup troubleshooting page does not print 37 power button is not lit 35 software did not install 36 software... setup page does not print 37 power button is not lit 35 software did not install 36 U USB port 9 enabling 40 using Mac printer software 12 W Web page printing 16 Web site finding 6 Windows software FastPics 11 Fax Setup Utility 11 Fax Solutions Software 11 Printing Preferences ...


