
User's Guide
Page 2
...only the power supply and power supply cord provided with the printer software. This product is designed, tested, and approved to an electrical outlet that is not responsible for the use of specific Lexmark components. Operating system notice All features and functions are operating system-...dependent. Lexmark is near the product and easily accessible. Connect the power supply cord to meet strict ...
...only the power supply and power supply cord provided with the printer software. This product is designed, tested, and approved to an electrical outlet that is not responsible for the use of specific Lexmark components. Operating system notice All features and functions are operating system-...dependent. Lexmark is near the product and easily accessible. Connect the power supply cord to meet strict ...
User's Guide
Page 3
...11 Checking the box contents...11 Learning about the printer 12 Understanding the parts of the printer 12 Learning about the software 14 Using the printer software...14 Using the Imaging Studio...14 Using the Solution Center...15 Using Print Properties...16 Opening Print Properties ...16 Using the...Using the I Want To menu...17 Using the Options menu ...17 Using the Print Properties tabs...17 Using the Toolbar...17 Resetting printer software settings to defaults 18 Loading paper and various paper types 20 Loading paper...20 Loading various paper types...20 Printing...23 Printing a document...
...11 Checking the box contents...11 Learning about the printer 12 Understanding the parts of the printer 12 Learning about the software 14 Using the printer software...14 Using the Imaging Studio...14 Using the Solution Center...15 Using Print Properties...16 Opening Print Properties ...16 Using the...Using the I Want To menu...17 Using the Options menu ...17 Using the Print Properties tabs...17 Using the Toolbar...17 Resetting printer software settings to defaults 18 Loading paper and various paper types 20 Loading paper...20 Loading various paper types...20 Printing...23 Printing a document...
User's Guide
Page 4
... cartridge nozzles and contacts 34 Preserving the print cartridges...35 Ordering supplies...35 Using genuine Lexmark print cartridges 36 Refilling a print cartridge...37 Recycling Lexmark products...37 Troubleshooting...38 Setup troubleshooting...38 Power light is not lit...38 Software does not install ...38 Page does not print ...39 Print troubleshooting...41 Improving print...
... cartridge nozzles and contacts 34 Preserving the print cartridges...35 Ordering supplies...35 Using genuine Lexmark print cartridges 36 Refilling a print cartridge...37 Recycling Lexmark products...37 Troubleshooting...38 Setup troubleshooting...38 Power light is not lit...38 Software does not install ...38 Page does not print ...39 Print troubleshooting...41 Improving print...
User's Guide
Page 5
Blinking power light troubleshooting 46 Power light blinks slowly...46 Power light blinks rapidly ...46 Error messages troubleshooting...46 Cartridge Alert ...46 Black cartridge replacement required 46 Color cartridge replacement required 46 Black and Color cartridge replacement required 47 Paper Jam ...47 Out of Paper...47 Removing and reinstalling the software 47 Notices...48 Edition notice...48 Power consumption...49 Index...51 5
Blinking power light troubleshooting 46 Power light blinks slowly...46 Power light blinks rapidly ...46 Error messages troubleshooting...46 Cartridge Alert ...46 Black cartridge replacement required 46 Color cartridge replacement required 46 Black and Color cartridge replacement required 47 Paper Jam ...47 Out of Paper...47 Removing and reinstalling the software 47 Notices...48 Edition notice...48 Power consumption...49 Index...51 5
User's Guide
Page 7
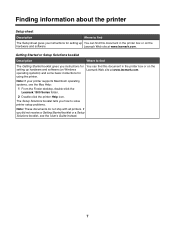
...box or on the Lexmark Web site at www.lexmark.com. Getting Started or Setup Solutions booklet Description Where to solve printer setup problems. Note: These documents do not ship with all printers. The Setup Solutions booklet tells you instructions for setting up hardware and software (on Windows operating ...systems) and some basic instructions for setting up You can find this document in the printer box or on the hardware and software. Finding information about the printer Setup sheet Description Where to find The Setup sheet gives you how to find The Getting Started ...
...box or on the Lexmark Web site at www.lexmark.com. Getting Started or Setup Solutions booklet Description Where to solve printer setup problems. Note: These documents do not ship with all printers. The Setup Solutions booklet tells you instructions for setting up hardware and software (on Windows operating ...systems) and some basic instructions for setting up You can find this document in the printer box or on the hardware and software. Finding information about the printer Setup sheet Description Where to find The Setup sheet gives you how to find The Getting Started ...
User's Guide
Page 8
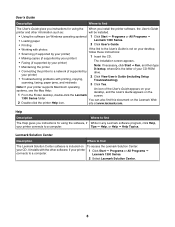
...Programs or All Programs Œ • Loading paper Lexmark 1300 Series. • Printing 2 Click User's Guide. • Working with printing, copying, Troubleshooting). Lexmark Solution Center Description Where to find The Lexmark Solution Center software is the letter of the User's Guide appears on...Description Where to find The User's Guide gives you instructions for using the When you instructions for using the software, if While in any Lexmark software program, click Help, your printer connects to a computer. your printer) 2 Click View User's Guide (including...
...Programs or All Programs Œ • Loading paper Lexmark 1300 Series. • Printing 2 Click User's Guide. • Working with printing, copying, Troubleshooting). Lexmark Solution Center Description Where to find The Lexmark Solution Center software is the letter of the User's Guide appears on...Description Where to find The User's Guide gives you instructions for using the When you instructions for using the software, if While in any Lexmark software program, click Help, your printer connects to a computer. your printer) 2 Click View User's Guide (including...
User's Guide
Page 11
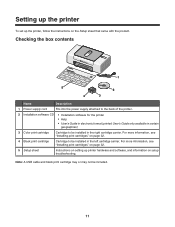
... box contents 1 5 2 4 3 Name Description 1 Power supply cord Fits into the power supply attached to the back of the printer. 2 Installation software CD • Installation software for the printer • Help • User's Guide in electronic format (printed User's Guide only available in certain geographies) 3 Color print cartridge Cartridge.... For more information, see "Installing print cartridges" on setup troubleshooting. Setting up the printer To set up printer hardware and software, and information on page 32. 4 Black print cartridge Cartridge to be included. 11
... box contents 1 5 2 4 3 Name Description 1 Power supply cord Fits into the power supply attached to the back of the printer. 2 Installation software CD • Installation software for the printer • Help • User's Guide in electronic format (printed User's Guide only available in certain geographies) 3 Color print cartridge Cartridge.... For more information, see "Installing print cartridges" on setup troubleshooting. Setting up the printer To set up printer hardware and software, and information on page 32. 4 Black print cartridge Cartridge to be included. 11
User's Guide
Page 14
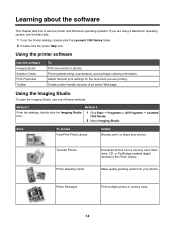
...operating systems. If you are using a Macintosh operating system, see the Mac Help: 1 From the Finder desktop, double-click the Lexmark 1300 Series folder. 2 Double-click the printer Help icon. Select the best print settings for the document you are printing. Make...Imaging Studio icon. 1 Click Start ΠPrograms or All Programs ΠLexmark 1300 Series. 2 Select Imaging Studio. Transfer Photos Photo Greeting Cards Download photos from your photos. Learning about the software This chapter tells how to the Photo Library. Find troubleshooting, maintenance, and ...
...operating systems. If you are using a Macintosh operating system, see the Mac Help: 1 From the Finder desktop, double-click the Lexmark 1300 Series folder. 2 Double-click the printer Help icon. Select the best print settings for the document you are printing. Make...Imaging Studio icon. 1 Click Start ΠPrograms or All Programs ΠLexmark 1300 Series. 2 Select Imaging Studio. Transfer Photos Photo Greeting Cards Download photos from your photos. Learning about the software This chapter tells how to the Photo Library. Find troubleshooting, maintenance, and ...
User's Guide
Page 16
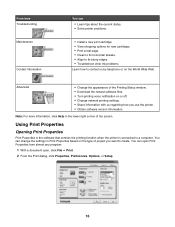
... For more information, click Help in Print Properties based on the type of the Printing Status window. • Download the newest software files. • Turn printing voice notification on or off. • Change network printing settings. • Share information with us...contact us regarding how you want to a computer. Advanced • Change the appearance of project you use the printer. • Obtain software version information. From here Troubleshooting Maintenance Contact Information You can open Print Properties from almost any program: 1 With a document open, click File...
... For more information, click Help in Print Properties based on the type of the Printing Status window. • Download the newest software files. • Turn printing voice notification on or off. • Change network printing settings. • Share information with us...contact us regarding how you want to a computer. Advanced • Change the appearance of project you use the printer. • Obtain software version information. From here Troubleshooting Maintenance Contact Information You can open Print Properties from almost any program: 1 With a document open, click File...

User's Guide
Page 17
...to print on both sides of the paper) to help you want to print. • Choose to different parts of the Print Properties software: Quality/Copies, Paper Setup, and Print Layout. Using the Toolbar The Toolbar lets you can save the current Print Properties settings for a ... of task wizards (printing a photo, an envelope, a banner, a poster, or printing on the three main tabs of the Solution Center as well as software version information. Tab Quality/Copies Paper Setup Print Layout Options • Select a Quality/Speed setting. • Select a Paper Type. • Customize how ...
...to print on both sides of the paper) to help you want to print. • Choose to different parts of the Print Properties software: Quality/Copies, Paper Setup, and Print Layout. Using the Toolbar The Toolbar lets you can save the current Print Properties settings for a ... of task wizards (printing a photo, an envelope, a banner, a poster, or printing on the three main tabs of the Solution Center as well as software version information. Tab Quality/Copies Paper Setup Print Layout Options • Select a Quality/Speed setting. • Select a Paper Type. • Customize how ...
User's Guide
Page 18
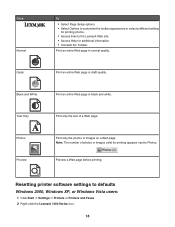
... before printing. Black and White Print an entire Web page in draft quality. Print only the photos or images on a Web page. Resetting printer software settings to the Lexmark Web site. • Access Help for additional information. • Uninstall the Toolbar. Note: The number of a Web page. Click Normal To • Select...; Access links to defaults Windows 2000, Windows XP, or Windows Vista users: 1 Click Start Œ Settings Œ Printers or Printers and Faxes. 2 Right-click the Lexmark 1300 Series icon. 18 Print an entire Web page in normal quality.
... before printing. Black and White Print an entire Web page in draft quality. Print only the photos or images on a Web page. Resetting printer software settings to the Lexmark Web site. • Access Help for additional information. • Uninstall the Toolbar. Note: The number of a Web page. Click Normal To • Select...; Access links to defaults Windows 2000, Windows XP, or Windows Vista users: 1 Click Start Œ Settings Œ Printers or Printers and Faxes. 2 Right-click the Lexmark 1300 Series icon. 18 Print an entire Web page in normal quality.

User's Guide
Page 23
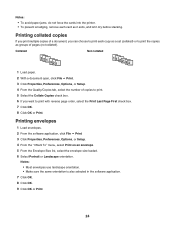
... Properties, Preferences, Options, or Setup. 4 Adjust the settings. 5 Click OK. 6 Click OK or Print. Printing cards 1 Load greeting cards, index cards, or postcards. 2 From the software application, click File ΠPrint. 3 Click Properties, Preferences, Options, or Setup. 4 Select a Quality/Speed setting. Printing Printing a document 1 Load paper. 2 With a document open , click File...
... Properties, Preferences, Options, or Setup. 4 Adjust the settings. 5 Click OK. 6 Click OK or Print. Printing cards 1 Load greeting cards, index cards, or postcards. 2 From the software application, click File ΠPrint. 3 Click Properties, Preferences, Options, or Setup. 4 Select a Quality/Speed setting. Printing Printing a document 1 Load paper. 2 With a document open , click File...
User's Guide
Page 24
Printing envelopes 1 Load envelopes. 2 From the software application, click File Œ Print. 3 Click Properties, Preferences, Options, or Setup. 4 From the "I Want To" menu, select Print on an envelope. 5 From the Envelope Size ... exits, and let it dry before stacking. Notes: • Most envelopes use landscape orientation. • Make sure the same orientation is also selected in the software application. 7 Click OK. 8 Click OK. 9 Click OK or Print. 24 Notes: • To avoid paper jams, do not force the cards into the printer. •...
Printing envelopes 1 Load envelopes. 2 From the software application, click File Œ Print. 3 Click Properties, Preferences, Options, or Setup. 4 From the "I Want To" menu, select Print on an envelope. 5 From the Envelope Size ... exits, and let it dry before stacking. Notes: • Most envelopes use landscape orientation. • Make sure the same orientation is also selected in the software application. 7 Click OK. 8 Click OK. 9 Click OK or Print. 24 Notes: • To avoid paper jams, do not force the cards into the printer. •...
User's Guide
Page 25
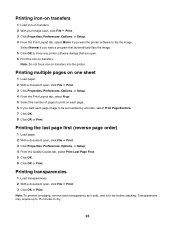
...click File ΠPrint. 3 Click Properties, Preferences, Options, or Setup. 4 From the Print Layout tab, select Mirror if you want the printer software to print on transfers into the printer. Note: To prevent smudging, remove each page image to dry. 25 Transparencies may require up . 5 Select the ...number of pages to flip the image. Select Normal if you have a program that automatically flips the image. 5 Click OK to close any printer software dialogs that are open. 6 Print the iron-on transfers. 2 With your image open , click File ΠPrint. 3 Click Properties, Preferences,...
...click File ΠPrint. 3 Click Properties, Preferences, Options, or Setup. 4 From the Print Layout tab, select Mirror if you want the printer software to print on transfers into the printer. Note: To prevent smudging, remove each page image to dry. 25 Transparencies may require up . 5 Select the ...number of pages to flip the image. Select Normal if you have a program that automatically flips the image. 5 Click OK to close any printer software dialogs that are open. 6 Print the iron-on transfers. 2 With your image open , click File ΠPrint. 3 Click Properties, Preferences,...
User's Guide
Page 28
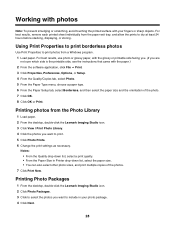
...photos you want to dry at least 24 hours before stacking, displaying, or storing. Printing Photo Packages 1 From the desktop, double-click the Lexmark Imaging Studio icon. 2 Click Photo Packages. 3 Click to select the photos you are not sure which side is the printable side, see... photo package. 4 Click Next. 28 Working with photos Note: To prevent smudging or scratching, avoid touching the printed surface with the paper.) 2 From the software application, click File ΠPrint. 3 Click Properties, Preferences, Options, or Setup. 4 From the Quality/Copies tab, select Photo. 5 From the Paper...
...photos you want to dry at least 24 hours before stacking, displaying, or storing. Printing Photo Packages 1 From the desktop, double-click the Lexmark Imaging Studio icon. 2 Click Photo Packages. 3 Click to select the photos you are not sure which side is the printable side, see... photo package. 4 Click Next. 28 Working with photos Note: To prevent smudging or scratching, avoid touching the printed surface with the paper.) 2 From the software application, click File ΠPrint. 3 Click Properties, Preferences, Options, or Setup. 4 From the Quality/Copies tab, select Photo. 5 From the Paper...
User's Guide
Page 38
... the power supply on the printer. 2 Plug the cord into an electrical outlet that your computer meets the minimum system requirements listed on the box. Software does not install The following operating systems are supported: • Windows 2000 with the USB symbol. 3 Firmly plug the square end of the USB cable...
... the power supply on the printer. 2 Plug the cord into an electrical outlet that your computer meets the minimum system requirements listed on the box. Software does not install The following operating systems are supported: • Windows 2000 with the USB symbol. 3 Firmly plug the square end of the USB cable...
User's Guide
Page 39
Solution 6 1 Visit our Web site at www.lexmark.com to check for drivers or downloads. 4 Select your printer family. 5 Select... 1 If the light is not on, see "Power light is not lit" on the computer screen to install the software. Solution 4 1 Press to turn the printer on. Solution 5 1 Close all countries or regions except the United States..., select your country or region. 3 Click the links for the latest software. 2 In all open software applications. 2 Disable any anti-virus programs. 3 Double-click the My Computer icon. In Windows XP, click...
Solution 6 1 Visit our Web site at www.lexmark.com to check for drivers or downloads. 4 Select your printer family. 5 Select... 1 If the light is not on, see "Power light is not lit" on the computer screen to install the software. Solution 4 1 Press to turn the printer on. Solution 5 1 Close all countries or regions except the United States..., select your country or region. 3 Click the links for the latest software. 2 In all open software applications. 2 Disable any anti-virus programs. 3 Double-click the My Computer icon. In Windows XP, click...
User's Guide
Page 40
... file you want to Set As Default. b Click the links for the latest software. For more information, see "Removing and reinstalling the software" on page 47. 2 If the software still does not install correctly, visit our Web site at www.lexmark.com to check for drivers or downloads. d Select your printer. 3 Click Printer. •...
... file you want to Set As Default. b Click the links for the latest software. For more information, see "Removing and reinstalling the software" on page 47. 2 If the software still does not install correctly, visit our Web site at www.lexmark.com to check for drivers or downloads. d Select your printer. 3 Click Printer. •...
User's Guide
Page 41
... size of a document, make sure you: • Use the appropriate paper for your fingers or sharp objects. Use Lexmark Premium Photo Paper if you are not satisfied with your computer. Solution 5 1 From the software application, click File Œ Print. 2 Click Properties, Preferences, Options, or Setup. 41 Solution 4 Remove as many unused fonts...
... size of a document, make sure you: • Use the appropriate paper for your fingers or sharp objects. Use Lexmark Premium Photo Paper if you are not satisfied with your computer. Solution 5 1 From the software application, click File Œ Print. 2 Click Properties, Preferences, Options, or Setup. 41 Solution 4 Remove as many unused fonts...
User's Guide
Page 42
...Copies. 4 From the Quality/Speed area, select a lower print quality. Solution 6 1 Uninstall the printer software, and then reinstall it. c Select your country or region. Poor quality at www.lexmark.com to download, and follow the directions on the computer screen. d Select your operating system. Printer does ...not print or respond See "Page does not print" on page 47. 2 If the software still does not install correctly, visit our...
...Copies. 4 From the Quality/Speed area, select a lower print quality. Solution 6 1 Uninstall the printer software, and then reinstall it. c Select your country or region. Poor quality at www.lexmark.com to download, and follow the directions on the computer screen. d Select your operating system. Printer does ...not print or respond See "Page does not print" on page 47. 2 If the software still does not install correctly, visit our...


