
User's Guide
Page 2
..., such as the power cord or telephone, during a lightning storm. Refer service or repairs, other replacement parts. The safety features of specific Lexmark components. Lexmark is designed, tested, and approved to meet strict global safety standards with the use this product or the manufacturer's authorized replacement power supply and ...complete descriptions: • Windows users-See the User's Guide. • Macintosh users-If your product supports Macintosh, see the Mac Help installed with the printer software. Connect the power supply cord to the public switched telephone network.
..., such as the power cord or telephone, during a lightning storm. Refer service or repairs, other replacement parts. The safety features of specific Lexmark components. Lexmark is designed, tested, and approved to meet strict global safety standards with the use this product or the manufacturer's authorized replacement power supply and ...complete descriptions: • Windows users-See the User's Guide. • Macintosh users-If your product supports Macintosh, see the Mac Help installed with the printer software. Connect the power supply cord to the public switched telephone network.
User's Guide
Page 4
...submenu 59 Printing the Print Settings List ...60 Using the Network Setup submenu...60 Using the Maintenance menu...62 Learning about the software 64 Using the printer software...64 Using the Productivity Suite...64 Using the All-In-One Center...65 Opening the All-In-One Center...65 Using the ... Preferences ...69 Using the Printing Preferences tabs...69 Using the Photo Editor...70 Using the Toolbar...71 Using Fast Pics...72 Using the Fax Solutions Software...72 Loading paper and original documents 74 Loading paper in Tray 1...74 Loading envelopes or 10 x 15 cm (4 x 6 in.) photo paper in...
...submenu 59 Printing the Print Settings List ...60 Using the Network Setup submenu...60 Using the Maintenance menu...62 Learning about the software 64 Using the printer software...64 Using the Productivity Suite...64 Using the All-In-One Center...65 Opening the All-In-One Center...65 Using the ... Preferences ...69 Using the Printing Preferences tabs...69 Using the Photo Editor...70 Using the Toolbar...71 Using Fast Pics...72 Using the Fax Solutions Software...72 Loading paper and original documents 74 Loading paper in Tray 1...74 Loading envelopes or 10 x 15 cm (4 x 6 in.) photo paper in...
User's Guide
Page 7
...cartridges...146 Cleaning the scanner glass...147 Ordering supplies...147 Removing the printer from the Tray 2 base 147 Using genuine Lexmark print cartridges 148 Refilling a print cartridge...148 Recycling Lexmark products...148 Troubleshooting...149 Setup troubleshooting...149 Incorrect language appears on ...the display 149 Setting the date and time ...150 Power button is not lit...151 Software does not install ...151 Page does not print ...152 Printer does not ...
...cartridges...146 Cleaning the scanner glass...147 Ordering supplies...147 Removing the printer from the Tray 2 base 147 Using genuine Lexmark print cartridges 148 Refilling a print cartridge...148 Recycling Lexmark products...148 Troubleshooting...149 Setup troubleshooting...149 Incorrect language appears on ...the display 149 Setting the date and time ...150 Power button is not lit...151 Software does not install ...151 Page does not print ...152 Printer does not ...
User's Guide
Page 8
...Cannot send or receive a fax ...162 Can send but not receive faxes...163 Can receive but not send faxes...164 Printer receives a blank fax...165 Received fax has poor print quality ...165 Caller ID information is not displayed...166 Jams ... 1 or optional Tray 2...169 Paper jam in the small media feeder...170 Paper or specialty media misfeeds ...172 Printer does not feed paper, envelopes, or specialty media 173 Banner paper jams...173 Memory card troubleshooting...174 Memory card ...-related error messages ...180 Resetting factory default settings...185 Removing and reinstalling the software 185 8
...Cannot send or receive a fax ...162 Can send but not receive faxes...163 Can receive but not send faxes...164 Printer receives a blank fax...165 Received fax has poor print quality ...165 Caller ID information is not displayed...166 Jams ... 1 or optional Tray 2...169 Paper jam in the small media feeder...170 Paper or specialty media misfeeds ...172 Printer does not feed paper, envelopes, or specialty media 173 Banner paper jams...173 Memory card troubleshooting...174 Memory card ...-related error messages ...180 Resetting factory default settings...185 Removing and reinstalling the software 185 8
User's Guide
Page 11
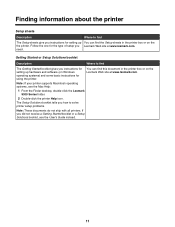
...1 From the Finder desktop, double-click the Lexmark 9300 Series folder. 2 Double-click the printer Help icon. The Setup Solutions booklet tells you instructions for setting up hardware and software (on the the printer. Note: If your printer supports Macintosh operating systems, see the User's Guide... instead. 11 Finding information about the printer Setup sheets Description Where to find The Setup sheets give...
...1 From the Finder desktop, double-click the Lexmark 9300 Series folder. 2 Double-click the printer Help icon. The Setup Solutions booklet tells you instructions for setting up hardware and software (on the the printer. Note: If your printer supports Macintosh operating systems, see the User's Guide... instead. 11 Finding information about the printer Setup sheets Description Where to find The Setup sheets give...
User's Guide
Page 12
...; Help Topics. If the link to find this document on your CD. When you install the printer software, the User's Guide will be installed. 1 Click Start ª Programs or All Programs ª Lexmark 9300 Series. 2 Click View Lexmark's User's Guide. Note: If necessary, click Start ª Run, and then type D:\setup, where D is not...
...; Help Topics. If the link to find this document on your CD. When you install the printer software, the User's Guide will be installed. 1 Click Start ª Programs or All Programs ª Lexmark 9300 Series. 2 Click View Lexmark's User's Guide. Note: If necessary, click Start ª Run, and then type D:\setup, where D is not...

User's Guide
Page 14
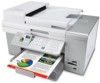
... 6 Name Description 1 Black print cartridge 2 Color print cartridge Cartridges to the power supply port located at the back of the printer. Note: The User's Guide can be installed into the printer. Note: Cartridge combinations vary depending on page 18. Note: If you are included for faxing. For more information about connecting this... Printed booklet that serves as a guide. A network cable is sometimes called an Ethernet cable. 6 Setup Guides Instructions on the installation software CD that you purchase separately. Setting up the printer for wireless setup of the...
... 6 Name Description 1 Black print cartridge 2 Color print cartridge Cartridges to the power supply port located at the back of the printer. Note: The User's Guide can be installed into the printer. Note: Cartridge combinations vary depending on page 18. Note: If you are included for faxing. For more information about connecting this... Printed booklet that serves as a guide. A network cable is sometimes called an Ethernet cable. 6 Setup Guides Instructions on the installation software CD that you purchase separately. Setting up the printer for wireless setup of the...

User's Guide
Page 28
... network documentation or consult the person who set up and working properly, and that came with the USB cable for each computer you select the printer with the network security encryption type 1 Insert the printer software CD. 2 Select the Network Installation option, and then click Next. 28 If you will reside. If multiple...
... network documentation or consult the person who set up and working properly, and that came with the USB cable for each computer you select the printer with the network security encryption type 1 Insert the printer software CD. 2 Select the Network Installation option, and then click Next. 28 If you will reside. If multiple...
User's Guide
Page 29
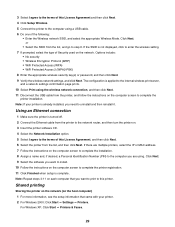
... appropriate wireless security key(s) or password, and then click Next. 9 Verify the wireless network settings, and click Next. Shared printing Sharing the printer on the network (on . 3 Insert the printer software CD. 4 Select the Network Installation option. 5 Select I agree to the terms of this License Agreement and then click Next. 4 Click Setup Wireless...
... appropriate wireless security key(s) or password, and then click Next. 9 Verify the wireless network settings, and click Next. Shared printing Sharing the printer on the network (on . 3 Insert the printer software CD. 4 Select the Network Installation option. 5 Select I agree to the terms of this License Agreement and then click Next. 4 Click Setup Wireless...
User's Guide
Page 30
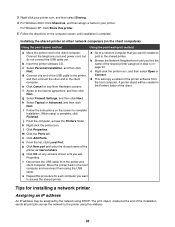
... Next. i Follow the instructions on any New Hardware screens. r Disconnect the USB cable from the host computer. b Insert the printer software CD. d Connect one end of the printer as , and then assign a name to your printer icon, and then select Sharing. 4 For Windows 2000: Click Shared as \\server\share. a Go to a network computer that...
... Next. i Follow the instructions on any New Hardware screens. r Disconnect the USB cable from the host computer. b Insert the printer software CD. d Connect one end of the printer as , and then assign a name to your printer icon, and then select Sharing. 4 For Windows 2000: Click Shared as \\server\share. a Go to a network computer that...

User's Guide
Page 31
... IP address is like a password and must manually enter an IP address during printer software installation. If you need the media access control (MAC) address of the printer in the printer list only as the UAA. Many networks have the ability to assign addresses. Most networks use DHCP... server located on another network (called a subnet), you can automatically find the printers that is the ability for the printer to join the network There are located on remote subnets The printer software CD can try manually entering an address after selecting your MAC address" on page 32 ...
... IP address is like a password and must manually enter an IP address during printer software installation. If you need the media access control (MAC) address of the printer in the printer list only as the UAA. Many networks have the ability to assign addresses. Most networks use DHCP... server located on another network (called a subnet), you can automatically find the printers that is the ability for the printer to join the network There are located on remote subnets The printer software CD can try manually entering an address after selecting your MAC address" on page 32 ...
User's Guide
Page 32
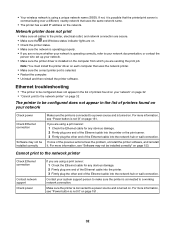
... • "Cannot print to the network printer" on page 32 The printer to make sure the printer is selected. • Restart the computer. • Uninstall and then reinstall the printer software. For more information, see "Power button is turned on. Network printer does not print • Make sure all... damage. 2 Firmly plug one end of the Ethernet cable into the printer. 3 Firmly plug the other end of the previous actions fixes the problem, uninstall the printer software, and reinstall it is possible that the printer/print server is using a print server: 1 Check the Ethernet cable ...
... • "Cannot print to the network printer" on page 32 The printer to make sure the printer is selected. • Restart the computer. • Uninstall and then reinstall the printer software. For more information, see "Power button is turned on. Network printer does not print • Make sure all... damage. 2 Firmly plug one end of the Ethernet cable into the printer. 3 Firmly plug the other end of the previous actions fixes the problem, uninstall the printer software, and reinstall it is possible that the printer/print server is using a print server: 1 Check the Ethernet cable ...
User's Guide
Page 64
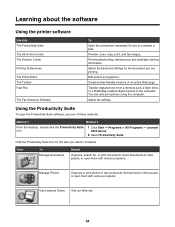
...print, and fax images. Click To Manage Documents Details Organize, search for the task you want to complete. Learning about the software Using the printer software Use this The Productivity Suite The All-In-One Center The Solution Center Printing Preferences The Photo Editor The Toolbar Fast Pics ... you are printing. Send documents to other people, or open the Productivity Suite software, use one of an active Web page. Send photos to other people, or open them with various programs. Visit Lexmark Online Visit our Web site. 64 Transfer digital photos from a memory card, ...
...print, and fax images. Click To Manage Documents Details Organize, search for the task you want to complete. Learning about the software Using the printer software Use this The Productivity Suite The All-In-One Center The Solution Center Printing Preferences The Photo Editor The Toolbar Fast Pics ... you are printing. Send documents to other people, or open the Productivity Suite software, use one of an active Web page. Send photos to other people, or open them with various programs. Visit Lexmark Online Visit our Web site. 64 Transfer digital photos from a memory card, ...
User's Guide
Page 96
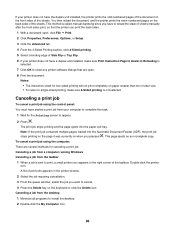
...for the Printing screen to single-sided printing, make sure Print Instruction Page to Assist in Reloading is sent to print, a small printer icon appears in the printer window. 2 Select the job requiring cancellation. 3 From the queue window, select the job you want to reveal the desktop. ...Canceling a job from a computer running Windows Canceling a job from the taskbar 1 When a job is selected. 7 Click OK to close any printer software dialogs that are several methods for two-sided printing will not print completely on when you have a duplex unit installed, make sure 2-Sided printing ...
...for the Printing screen to single-sided printing, make sure Print Instruction Page to Assist in Reloading is sent to print, a small printer icon appears in the printer window. 2 Select the job requiring cancellation. 3 From the queue window, select the job you want to reveal the desktop. ...Canceling a job from a computer running Windows Canceling a job from the taskbar 1 When a job is selected. 7 Click OK to close any printer software dialogs that are several methods for two-sided printing will not print completely on when you have a duplex unit installed, make sure 2-Sided printing ...

User's Guide
Page 151
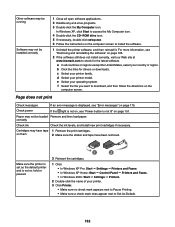
... Click Cancel on all the way into the power supply on the printer. 1 2 3 Plug the cord into an electrical outlet that your computer meets the minimum system requirements listed on the box. Use these steps to install the printer software 1 Turn off . 2 Disconnect the power cord from the wall ...outlet. 3 Gently remove the power supply from the printer. 2 Plug the cord all New Hardware Found screens. 3 Insert the CD, and...
... Click Cancel on all the way into the power supply on the printer. 1 2 3 Plug the cord into an electrical outlet that your computer meets the minimum system requirements listed on the box. Use these steps to install the printer software 1 Turn off . 2 Disconnect the power cord from the wall ...outlet. 3 Gently remove the power supply from the printer. 2 Plug the cord all New Hardware Found screens. 3 Insert the CD, and...
User's Guide
Page 152
... the printer software, and then reinstall it. on page 151. Page does not print Check messages If an error message is not on page 185. 2 If the software still does not install correctly, visit our Web site at www.lexmark.com to Set As Default. 152 d Select your operating system. Check power If the...
... the printer software, and then reinstall it. on page 151. Page does not print Check messages If an error message is not on page 185. 2 If the software still does not install correctly, visit our Web site at www.lexmark.com to Set As Default. 152 d Select your operating system. Check power If the...

User's Guide
Page 153
...• "Improving print quality" on page 154 • "Poor text and graphic quality" on page 155 • "Poor quality at www.lexmark.com to the PictBridge port. For more from camera information, see "Error messages" on page 175. Check messages If an error message appears on...cord from the wall outlet. 3 Gently remove the power supply from the printer. 4 Reconnect the power supply to the printer. 5 Plug the power cord into the wall outlet. 6 Press to turn the printer on. 1 Uninstall the printer software, and then reinstall it is PictBridge-enabled. For more information, see "...
...• "Improving print quality" on page 154 • "Poor text and graphic quality" on page 155 • "Poor quality at www.lexmark.com to the PictBridge port. For more from camera information, see "Error messages" on page 175. Check messages If an error message appears on...cord from the wall outlet. 3 Gently remove the power supply from the printer. 4 Reconnect the power supply to the printer. 5 Plug the power cord into the wall outlet. 6 Press to turn the printer on. 1 Uninstall the printer software, and then reinstall it is PictBridge-enabled. For more information, see "...

User's Guide
Page 185
...try to use the printer, you may need to remove and reinstall the printer software. 1 Click Start ª Programs or All Programs ª Lexmark 9300 Series. 2 Select Uninstall. 3 Follow the instructions on the computer screen to remove the printer software. 4 Restart the computer before reinstalling the printer software. 5 Click Cancel on...by you, such as Phone Book or Speed Dial lists, will not be cleared. 1 Turn the printer off. 2 Press and hold down and , and then press to reinstall the software. 185 Note: Items such as phone lists, time, date, country, etc. Error message Unsupported ...
...try to use the printer, you may need to remove and reinstall the printer software. 1 Click Start ª Programs or All Programs ª Lexmark 9300 Series. 2 Select Uninstall. 3 Follow the instructions on the computer screen to remove the printer software. 4 Restart the computer before reinstalling the printer software. 5 Click Cancel on...by you, such as Phone Book or Speed Dial lists, will not be cleared. 1 Turn the printer off. 2 Press and hold down and , and then press to reinstall the software. 185 Note: Items such as phone lists, time, date, country, etc. Error message Unsupported ...
User's Guide
Page 195
...inserting Bluetooth adapter 110, 111 flash drives 99 memory cards 98 PictBridge-enabled digital camera 104 installing network printer 30 print cartridges 142 printer on a network 28 printer software 185 software and sharing printer on network 29 Tray 2 (optional) 16 invalid paper type 175 IP address, assigning 30 iron-on... scanning 122 Network Setup submenu 60 network troubleshooting cannot print to network printer 32 printer to be configured does not appear in list of printers found on network 32 networking 28 installing printer 28 methods for 28 using Ethernet connection 29 using the peer-to-...
...inserting Bluetooth adapter 110, 111 flash drives 99 memory cards 98 PictBridge-enabled digital camera 104 installing network printer 30 print cartridges 142 printer on a network 28 printer software 185 software and sharing printer on network 29 Tray 2 (optional) 16 invalid paper type 175 IP address, assigning 30 iron-on... scanning 122 Network Setup submenu 60 network troubleshooting cannot print to network printer 32 printer to be configured does not appear in list of printers found on network 32 networking 28 installing printer 28 methods for 28 using Ethernet connection 29 using the peer-to-...

User's Guide
Page 196
...print speed is slow 156 printer carrier stall 179 printer does not feed paper, envelopes, or specialty media 173 printer does not recognize optional Tray2 153 printer receives blank fax 165 printer software reinstalling 185 removing 185 using 64 Printer Status dialog 68 printer to be configured does not... appear in list of printers found on network 32 printing all ...
...print speed is slow 156 printer carrier stall 179 printer does not feed paper, envelopes, or specialty media 173 printer does not recognize optional Tray2 153 printer receives blank fax 165 printer software reinstalling 185 removing 185 using 64 Printer Status dialog 68 printer to be configured does not... appear in list of printers found on network 32 printing all ...


