User's Guide for Windows
Page 7
... the printer 94 Removing a used print cartridge 94 Installing print cartridges...95 Aligning print cartridges...96 Aligning print cartridges using the control panel 96 Aligning the print cartridges using the Productivity Suite 96 Cleaning the print cartridge nozzles 97 Cleaning the print cartridge nozzles...Cleaning the print cartridge nozzles using the Productivity Suite 97 Wiping the print cartridge nozzles and contacts 98 Improving print quality...98 Preserving the print cartridges 99 Cleaning the scanner glass 99 Ordering supplies...100 Recycling Lexmark products 100 Troubleshooting...
... the printer 94 Removing a used print cartridge 94 Installing print cartridges...95 Aligning print cartridges...96 Aligning print cartridges using the control panel 96 Aligning the print cartridges using the Productivity Suite 96 Cleaning the print cartridge nozzles 97 Cleaning the print cartridge nozzles...Cleaning the print cartridge nozzles using the Productivity Suite 97 Wiping the print cartridge nozzles and contacts 98 Improving print quality...98 Preserving the print cartridges 99 Cleaning the scanner glass 99 Ordering supplies...100 Recycling Lexmark products 100 Troubleshooting...
User's Guide for Windows
Page 9
Printer does not feed paper, envelopes, or specialty media 119 Banner paper jams...119 Memory card troubleshooting 120 Memory card cannot be inserted 120 Nothing happens when a memory card is inserted 120 Error messages on display...121 Error messages...121 Low Ink...121 Paper Jam...121 Cartridge ...Error...121 Carrier Jam...122 Error: 2200...122 Paper Out...123 Cartridge Missing...123 Alignment Error...123 Photo Mode: problem reading memory card 124 Photo Mode: second memory ...
Printer does not feed paper, envelopes, or specialty media 119 Banner paper jams...119 Memory card troubleshooting 120 Memory card cannot be inserted 120 Nothing happens when a memory card is inserted 120 Error messages on display...121 Error messages...121 Low Ink...121 Paper Jam...121 Cartridge ...Error...121 Carrier Jam...122 Error: 2200...122 Paper Out...123 Cartridge Missing...123 Alignment Error...123 Photo Mode: problem reading memory card 124 Photo Mode: second memory ...
User's Guide for Windows
Page 13
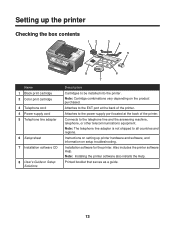
... not shipped to be installed into the printer. Installation software for the printer. Instructions on setting up the printer Checking the box contents 12 3 4 5 x Name 1 Black print cartridge 2 Color print cartridge 3 Telephone cord 4 Power supply cord 5 Telephone line adapter 6 Setup sheet 7 Installation software CD 8 User's Guide or Setup Solutions 8 6 7 Description Cartridges to all countries and regions. Setting...
... not shipped to be installed into the printer. Installation software for the printer. Instructions on setting up the printer Checking the box contents 12 3 4 5 x Name 1 Black print cartridge 2 Color print cartridge 3 Telephone cord 4 Power supply cord 5 Telephone line adapter 6 Setup sheet 7 Installation software CD 8 User's Guide or Setup Solutions 8 6 7 Description Cartridges to all countries and regions. Setting...
User's Guide for Windows
Page 22
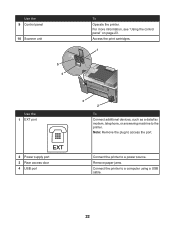
Access the print cartridges. 1 LINE EXT Use the 1 EXT port EXT 2 Power supply port 3 Rear access door 4 USB port 3 2 To Connect additional devices, such as a data/fax modem, telephone, or answering machine to access the port. Note: Remove the plug to the printer. Connect the printer to a computer using a USB cable. 22 For more information, see "Using the control panel" on page 23. Remove paper jams. Connect the printer to a power source. Use the 9 Control panel 10 Scanner unit LINE EXT 5 4 To Operate the printer.
Access the print cartridges. 1 LINE EXT Use the 1 EXT port EXT 2 Power supply port 3 Rear access door 4 USB port 3 2 To Connect additional devices, such as a data/fax modem, telephone, or answering machine to access the port. Note: Remove the plug to the printer. Connect the printer to a computer using a USB cable. 22 For more information, see "Using the control panel" on page 23. Remove paper jams. Connect the printer to a power source. Use the 9 Control panel 10 Scanner unit LINE EXT 5 4 To Operate the printer.

User's Guide for Windows
Page 28
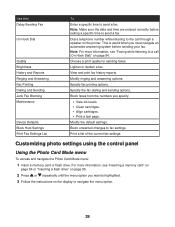
Customize printer settings. Customizing fax settings using the control panel Using the Fax Mode menu To access and navigate the Fax Mode menu: 1 From the control panel, ... the menu option you want is highlighted. 3 Press to send a fax. Preview the scanned image on the display. • View ink levels. • Clean cartridges. • Align cartridges. • Print a test page. Send a fax to , or view, previously dialed numbers. Send a fax to a number from the phone book and customize phone book...
Customize printer settings. Customizing fax settings using the control panel Using the Fax Mode menu To access and navigate the Fax Mode menu: 1 From the control panel, ... the menu option you want is highlighted. 3 Press to send a fax. Preview the scanned image on the display. • View ink levels. • Clean cartridges. • Align cartridges. • Print a test page. Send a fax to , or view, previously dialed numbers. Send a fax to a number from the phone book and customize phone book...
User's Guide for Windows
Page 29
... a fax. Specify fax printing options. Block unwanted changes to the call (On Hook Dial)" on page 84. This is highlighted. 3 Follow the instructions on the printer. Choose a print quality for sending faxes. Dial a telephone number while listening to fax settings. Block faxes from the numbers you must navigate an automated answering... a flash drive" on page 55. 2 Press or repeatedly until the menu option you want is useful when you specify. • View ink levels. • Clean cartridges. • Align cartridges. • Print a test page.
... a fax. Specify fax printing options. Block unwanted changes to the call (On Hook Dial)" on page 84. This is highlighted. 3 Follow the instructions on the printer. Choose a print quality for sending faxes. Dial a telephone number while listening to fax settings. Block faxes from the numbers you must navigate an automated answering... a flash drive" on page 55. 2 Press or repeatedly until the menu option you want is useful when you specify. • View ink levels. • Clean cartridges. • Align cartridges. • Print a test page.
User's Guide for Windows
Page 33
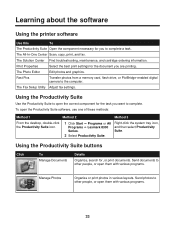
...Method 2 Method 3 From the desktop, double-click the Productivity Suite icon. 1 Click Start ΠPrograms or All Programs ΠLexmark 8300 Series. 2 Select Productivity Suite. To open the correct component for you to complete a task. Using the Productivity Suite buttons Click To...Adjust fax settings. The Solution Center Find troubleshooting, maintenance, and cartridge ordering information. Right-click the system tray icon, and then select Productivity Suite. Learning about the software Using the printer software Use this To The Productivity Suite Open the component necessary...
...Method 2 Method 3 From the desktop, double-click the Productivity Suite icon. 1 Click Start ΠPrograms or All Programs ΠLexmark 8300 Series. 2 Select Productivity Suite. To open the correct component for you to complete a task. Using the Productivity Suite buttons Click To...Adjust fax settings. The Solution Center Find troubleshooting, maintenance, and cartridge ordering information. Right-click the system tray icon, and then select Productivity Suite. Learning about the software Using the printer software Use this To The Productivity Suite Open the component necessary...
User's Guide for Windows
Page 37
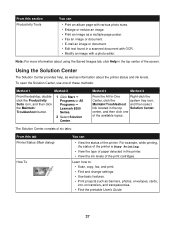
... Suite icon, and then click the Maintain/ Troubleshoot button. 1 Click Start Œ Programs or All Programs Œ Lexmark 8300 Series. 2 Select Solution Center. From this tab Printer Status (Main dialog) How To You can • Print an album page with various photo sizes. • Enlarge ...Center, click the system tray icon, Maintain/Troubleshoot and then select link located in the top center of the print cartridges. Note: For more information about the printer status and ink levels. Using the Solution Center The Solution Center provides help, as well as banners, photos, envelopes...
... Suite icon, and then click the Maintain/ Troubleshoot button. 1 Click Start Œ Programs or All Programs Œ Lexmark 8300 Series. 2 Select Solution Center. From this tab Printer Status (Main dialog) How To You can • Print an album page with various photo sizes. • Enlarge ...Center, click the system tray icon, Maintain/Troubleshoot and then select link located in the top center of the print cartridges. Note: For more information about the printer status and ink levels. Using the Solution Center The Solution Center provides help, as well as banners, photos, envelopes...
User's Guide for Windows
Page 38
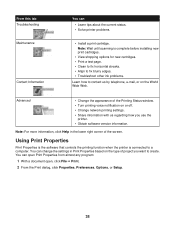
...Properties based on the World Wide Web. You can • Learn tips about the current status. • Solve printer problems. • Install a print cartridge. From this tab Troubleshooting Maintenance Contact Information You can open Print Properties from almost any program: 1 With a .... 38 Using Print Properties Print Properties is the software that controls the printing function when the printer is complete before installing new print cartridges. • View shopping options for new cartridges. • Print a test page. • Clean to fix horizontal streaks. • ...
...Properties based on the World Wide Web. You can • Learn tips about the current status. • Solve printer problems. • Install a print cartridge. From this tab Troubleshooting Maintenance Contact Information You can open Print Properties from almost any program: 1 With a .... 38 Using Print Properties Print Properties is the software that controls the printing function when the printer is complete before installing new print cartridges. • View shopping options for new cartridges. • Print a test page. • Clean to fix horizontal streaks. • ...
User's Guide for Windows
Page 94
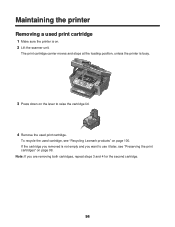
Maintaining the printer Removing a used print cartridge. To recycle the used cartridge, see "Preserving the print cartridges" on page 99. Note: If you want to raise the cartridge lid. 4 Remove the used print cartridge 1 Make sure the printer is on page 100. x 3 Press down on the lever to use it later, see "Recycling Lexmark products" on . 2 Lift the scanner...
Maintaining the printer Removing a used print cartridge. To recycle the used cartridge, see "Preserving the print cartridges" on page 99. Note: If you want to raise the cartridge lid. 4 Remove the used print cartridge 1 Make sure the printer is on page 100. x 3 Press down on the lever to use it later, see "Recycling Lexmark products" on . 2 Lift the scanner...
User's Guide for Windows
Page 99
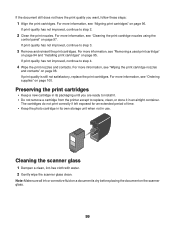
... you are ready to install it. • Do not remove a cartridge from the printer except to replace, clean, or store it in an airtight container. If print quality is dry before placing the document on page 95. The cartridges do not print correctly if left exposed for an extended period of... time. • Keep the photo cartridge in use. If print quality has...
... you are ready to install it. • Do not remove a cartridge from the printer except to replace, clean, or store it in an airtight container. If print quality is dry before placing the document on page 95. The cartridges do not print correctly if left exposed for an extended period of... time. • Keep the photo cartridge in use. If print quality has...
User's Guide for Windows
Page 103
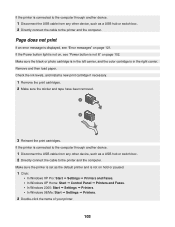
... Settings ΠPrinters. 2 Double-click the name of your printer. 103 Make sure the printer is set as a USB hub or switch box. 2 Directly connect the cable to the printer and the computer. Make sure the black or photo cartridge is in the left carrier, and the color cartridge is not on ...page 121. Check the ink levels, and install a new print cartridge if necessary. 1 Remove the print cartridges. 2 Make sure the sticker and...
... Settings ΠPrinters. 2 Double-click the name of your printer. 103 Make sure the printer is set as a USB hub or switch box. 2 Directly connect the cable to the printer and the computer. Make sure the black or photo cartridge is in the left carrier, and the color cartridge is not on ...page 121. Check the ink levels, and install a new print cartridge if necessary. 1 Remove the print cartridges. 2 Make sure the sticker and...
User's Guide for Windows
Page 111
... (an R- To ensure the printer is working correctly. For more information and to an analog connection on page 85. If using the On Hook Dial feature, turn up the volume to the telephone line. To enable both the black and color print cartridges are secure, if applicable: &#... Listen for the fax machine. Make sure cable connections for the following hardware are installed. interface port) on page 102. The printer works only if both print cartridges are connecting to request an R-interface port, contact your DSL provider. • If you are using a PBX telephone service, ...
... (an R- To ensure the printer is working correctly. For more information and to an analog connection on page 85. If using the On Hook Dial feature, turn up the volume to the telephone line. To enable both the black and color print cartridges are secure, if applicable: &#... Listen for the fax machine. Make sure cable connections for the following hardware are installed. interface port) on page 102. The printer works only if both print cartridges are connecting to request an R-interface port, contact your DSL provider. • If you are using a PBX telephone service, ...
User's Guide for Windows
Page 112
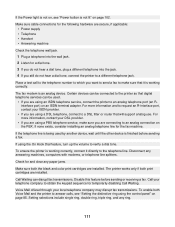
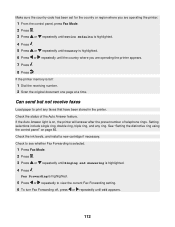
...85. Check the status of telephone rings. If the Auto Answer light is highlighted. 4 Press . Check the ink levels, and install a new cartridge if necessary. Fax Forwarding is highlighted. 5 Press or repeatedly to print any ring. See "Setting the distinctive ring using the control panel" on , ...the printer will answer after the preset number of the Auto Answer feature. Make sure the country code has been set for the country or region...
...85. Check the status of telephone rings. If the Auto Answer light is highlighted. 4 Press . Check the ink levels, and install a new cartridge if necessary. Fax Forwarding is highlighted. 5 Press or repeatedly to print any ring. See "Setting the distinctive ring using the control panel" on , ...the printer will answer after the preset number of the Auto Answer feature. Make sure the country code has been set for the country or region...
User's Guide for Windows
Page 114
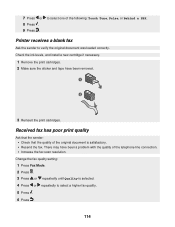
... selected. 4 Press or repeatedly to verify the original document was loaded correctly. Check the ink levels, and install a new cartridge if necessary. 1 Remove the print cartridges. 2 Make sure the sticker and tape have been a problem with the quality of the following: Touch Tone, Pulse, or... Behind a PBX. There may have been removed. 1 2 3 Reinsert the print cartridges. Printer receives a blank fax Ask the sender to select a higher fax quality. 5 Press . 6 Press . 114 to select one of the telephone line connection....
... selected. 4 Press or repeatedly to verify the original document was loaded correctly. Check the ink levels, and install a new cartridge if necessary. 1 Remove the print cartridges. 2 Make sure the sticker and tape have been a problem with the quality of the following: Touch Tone, Pulse, or... Behind a PBX. There may have been removed. 1 2 3 Reinsert the print cartridges. Printer receives a blank fax Ask the sender to select a higher fax quality. 5 Press . 6 Press . 114 to select one of the telephone line connection....
User's Guide for Windows
Page 121
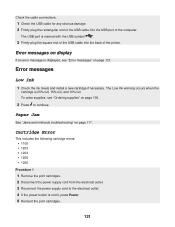
...the square end of the USB cable into the USB port of the printer. Cartridge Error This includes the following cartridge errors: • 1105 • 1203 • 1204 • 1205 • 1206 Procedure 1 1 Remove the print cartridges. 2 Disconnect the power supply cord from the electrical outlet. 3 Reconnect...10% full. Error messages Low Ink 1 Check the ink levels and install a new cartridge if necessary. The Low Ink warning occurs when the cartridge is not lit, press Power. 5 Reinsert the print cartridges. 121 To order supplies, see "Error messages" on page 117. Check the cable ...
...the square end of the USB cable into the USB port of the printer. Cartridge Error This includes the following cartridge errors: • 1105 • 1203 • 1204 • 1205 • 1206 Procedure 1 1 Remove the print cartridges. 2 Disconnect the power supply cord from the electrical outlet. 3 Reconnect...10% full. Error messages Low Ink 1 Check the ink levels and install a new cartridge if necessary. The Low Ink warning occurs when the cartridge is not lit, press Power. 5 Reinsert the print cartridges. 121 To order supplies, see "Error messages" on page 117. Check the cable ...
User's Guide for Windows
Page 123
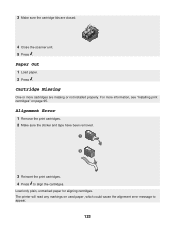
... unit. 5 Press . Load only plain, unmarked paper for aligning cartridges. The printer will read any markings on page 95. Paper Out 1 Load paper. 2 Press . 3 Make sure the cartridge lids are missing or not installed properly. Cartridge Missing One or more information, see "Installing print cartridges" on used paper, which could cause the alignment error message...
... unit. 5 Press . Load only plain, unmarked paper for aligning cartridges. The printer will read any markings on page 95. Paper Out 1 Load paper. 2 Press . 3 Make sure the cartridge lids are missing or not installed properly. Cartridge Missing One or more information, see "Installing print cartridges" on used paper, which could cause the alignment error message...
User's Guide for Windows
Page 132
...24 Photo Card 23 Power 25 Quick Dial buttons 23 Redial/Pause 24 Right arrow 24 Scan Mode 23 Select 24 Start Black 25 Start Color 25 Up arrow 24 buttons, Productivity Suite Attach to E-mail 34 Copy 34 Fax 34 Maintain/Troubleshoot 34 Manage Documents 34 Manage Photos 34...the default photo print settings 60 cleaning print cartridge nozzles using the control panel 97 using the Productivity Suite 97 coated paper, loading 44 collating copies 50, 68 using the computer 68 using the control panel 67 configuring network printer 92 connecting the printer to answering machine 17 computer modem 18 telephone...
...24 Photo Card 23 Power 25 Quick Dial buttons 23 Redial/Pause 24 Right arrow 24 Scan Mode 23 Select 24 Start Black 25 Start Color 25 Up arrow 24 buttons, Productivity Suite Attach to E-mail 34 Copy 34 Fax 34 Maintain/Troubleshoot 34 Manage Documents 34 Manage Photos 34...the default photo print settings 60 cleaning print cartridge nozzles using the control panel 97 using the Productivity Suite 97 coated paper, loading 44 collating copies 50, 68 using the computer 68 using the control panel 67 configuring network printer 92 connecting the printer to answering machine 17 computer modem 18 telephone...
User's Guide for Windows
Page 133
...printing 50 information, finding 11 inserting flash drives 55 memory cards 54 PictBridge-enabled camera 58 installing network printer 92 print cartridges 95 printer software 125 software and sharing printer on network 90 IP address, assigning 92 J jams and misfeeds troubleshooting 117 banner jams 119 paper ...jam in printer 117 paper jam in ADF 118 paper or specialty media misfeeds 118 printer does not feed paper, envelopes, ...
...printing 50 information, finding 11 inserting flash drives 55 memory cards 54 PictBridge-enabled camera 58 installing network printer 92 print cartridges 95 printer software 125 software and sharing printer on network 90 IP address, assigning 92 J jams and misfeeds troubleshooting 117 banner jams 119 paper ...jam in printer 117 paper jam in ADF 118 paper or specialty media misfeeds 118 printer does not feed paper, envelopes, ...
User's Guide for Windows
Page 135
...22 receiving a fax automatically 78 fax forwarding 85 manually 79 using an answering machine 79 recycling 100 Lexmark products 100 WEEE statement 128 reducing an image using the control panel 70 removing print cartridges 94 repeating an image 67 reports, fax activity 88 reverse page order 52 ring patterns, setting ...Edit Text (OCR) button 34 Scan button 34 Scan to PDF button 34 scan troubleshooting 109 cannot scan to application 110 cannot scan to printer over network 110 partial document or photo scans 110 scanner does not respond 109 scanning takes too long or freezes computer 109 scan was not...
...22 receiving a fax automatically 78 fax forwarding 85 manually 79 using an answering machine 79 recycling 100 Lexmark products 100 WEEE statement 128 reducing an image using the control panel 70 removing print cartridges 94 repeating an image 67 reports, fax activity 88 reverse page order 52 ring patterns, setting ...Edit Text (OCR) button 34 Scan button 34 Scan to PDF button 34 scan troubleshooting 109 cannot scan to application 110 cannot scan to printer over network 110 partial document or photo scans 110 scanner does not respond 109 scanning takes too long or freezes computer 109 scan was not...


